Note
Access to this page requires authorization. You can try signing in or changing directories.
Access to this page requires authorization. You can try changing directories.
The Microsoft 365 admin center provides governance and lifecycle management capabilities for agents through the Agent Registry. These capabilities enable administrators to manage agent visibility, access, distribution, and retirement across the tenant.
Agent actions
Note
Microsoft 365 for government Community Cloud High (GCCH) and Government Community Cloud Moderate (GCCM) environments support publishing agents to the organization.
| Agent actions | Description |
|---|---|
| Install and uninstall | Install an agent for users so it's ready to use without manual installation by end users. Admin can uninstall a previously installed agent. |
| Activate | Activate an agent and allow only selected users or groups to create instances of it. |
| Block and unblock | Restrict access to an agent across the organization, preventing any user from using it. |
| Delete, restore, and permanently delete | Delete an agent with a 30-day recovery window, restore a deleted agent, or permanently delete it before the recovery window ends. |
| Start and stop | Start or stop the underlying Azure infrastructure to govern Foundry agents. This action is unique to Microsoft Foundry agents. |
| Assign a new owner | Assign a new owner to agents that are ownerless or active. |
| Add an owner | Add an owner to an Agent Builder agent that already has an owner. |
| Remove an owner | Remove an owner from an Agent Builder agent that has multiple owners. |
| Publish to store | Make a requested agent available to members of your organization by publishing the agent to Agent Store. For more information, see Actions for requested agents. |
| Reject submission | Prevent a requested agent from becoming available to members of your organization. For more information, see Actions for requested agents. |
Note
For information about actions related to the agent registry list, such as Export to Excel, Upload custom agent, and Manage pinned agents, see Agent registry in the Microsoft 365 admin center.
Install agents
You can install agents across the whole organization or for specific users or groups by using the same controls that work for any other app in the Microsoft 365 admin center.
To install an agent through the Microsoft 365 admin center, follow these steps:
Sign in to the Microsoft 365 admin center.
Select Agents > All agents.
In the All agents page, make sure Registry is selected. Select the Status filter and then select Available.
From the list of agents, select an agent that isn't already installed.
In the agent details pane that opens, immediately under the agent's name, select Install.
In the Deploy agent to selected users pane, decide whether to install the agent to all users or to specific users or groups, and then select Next.
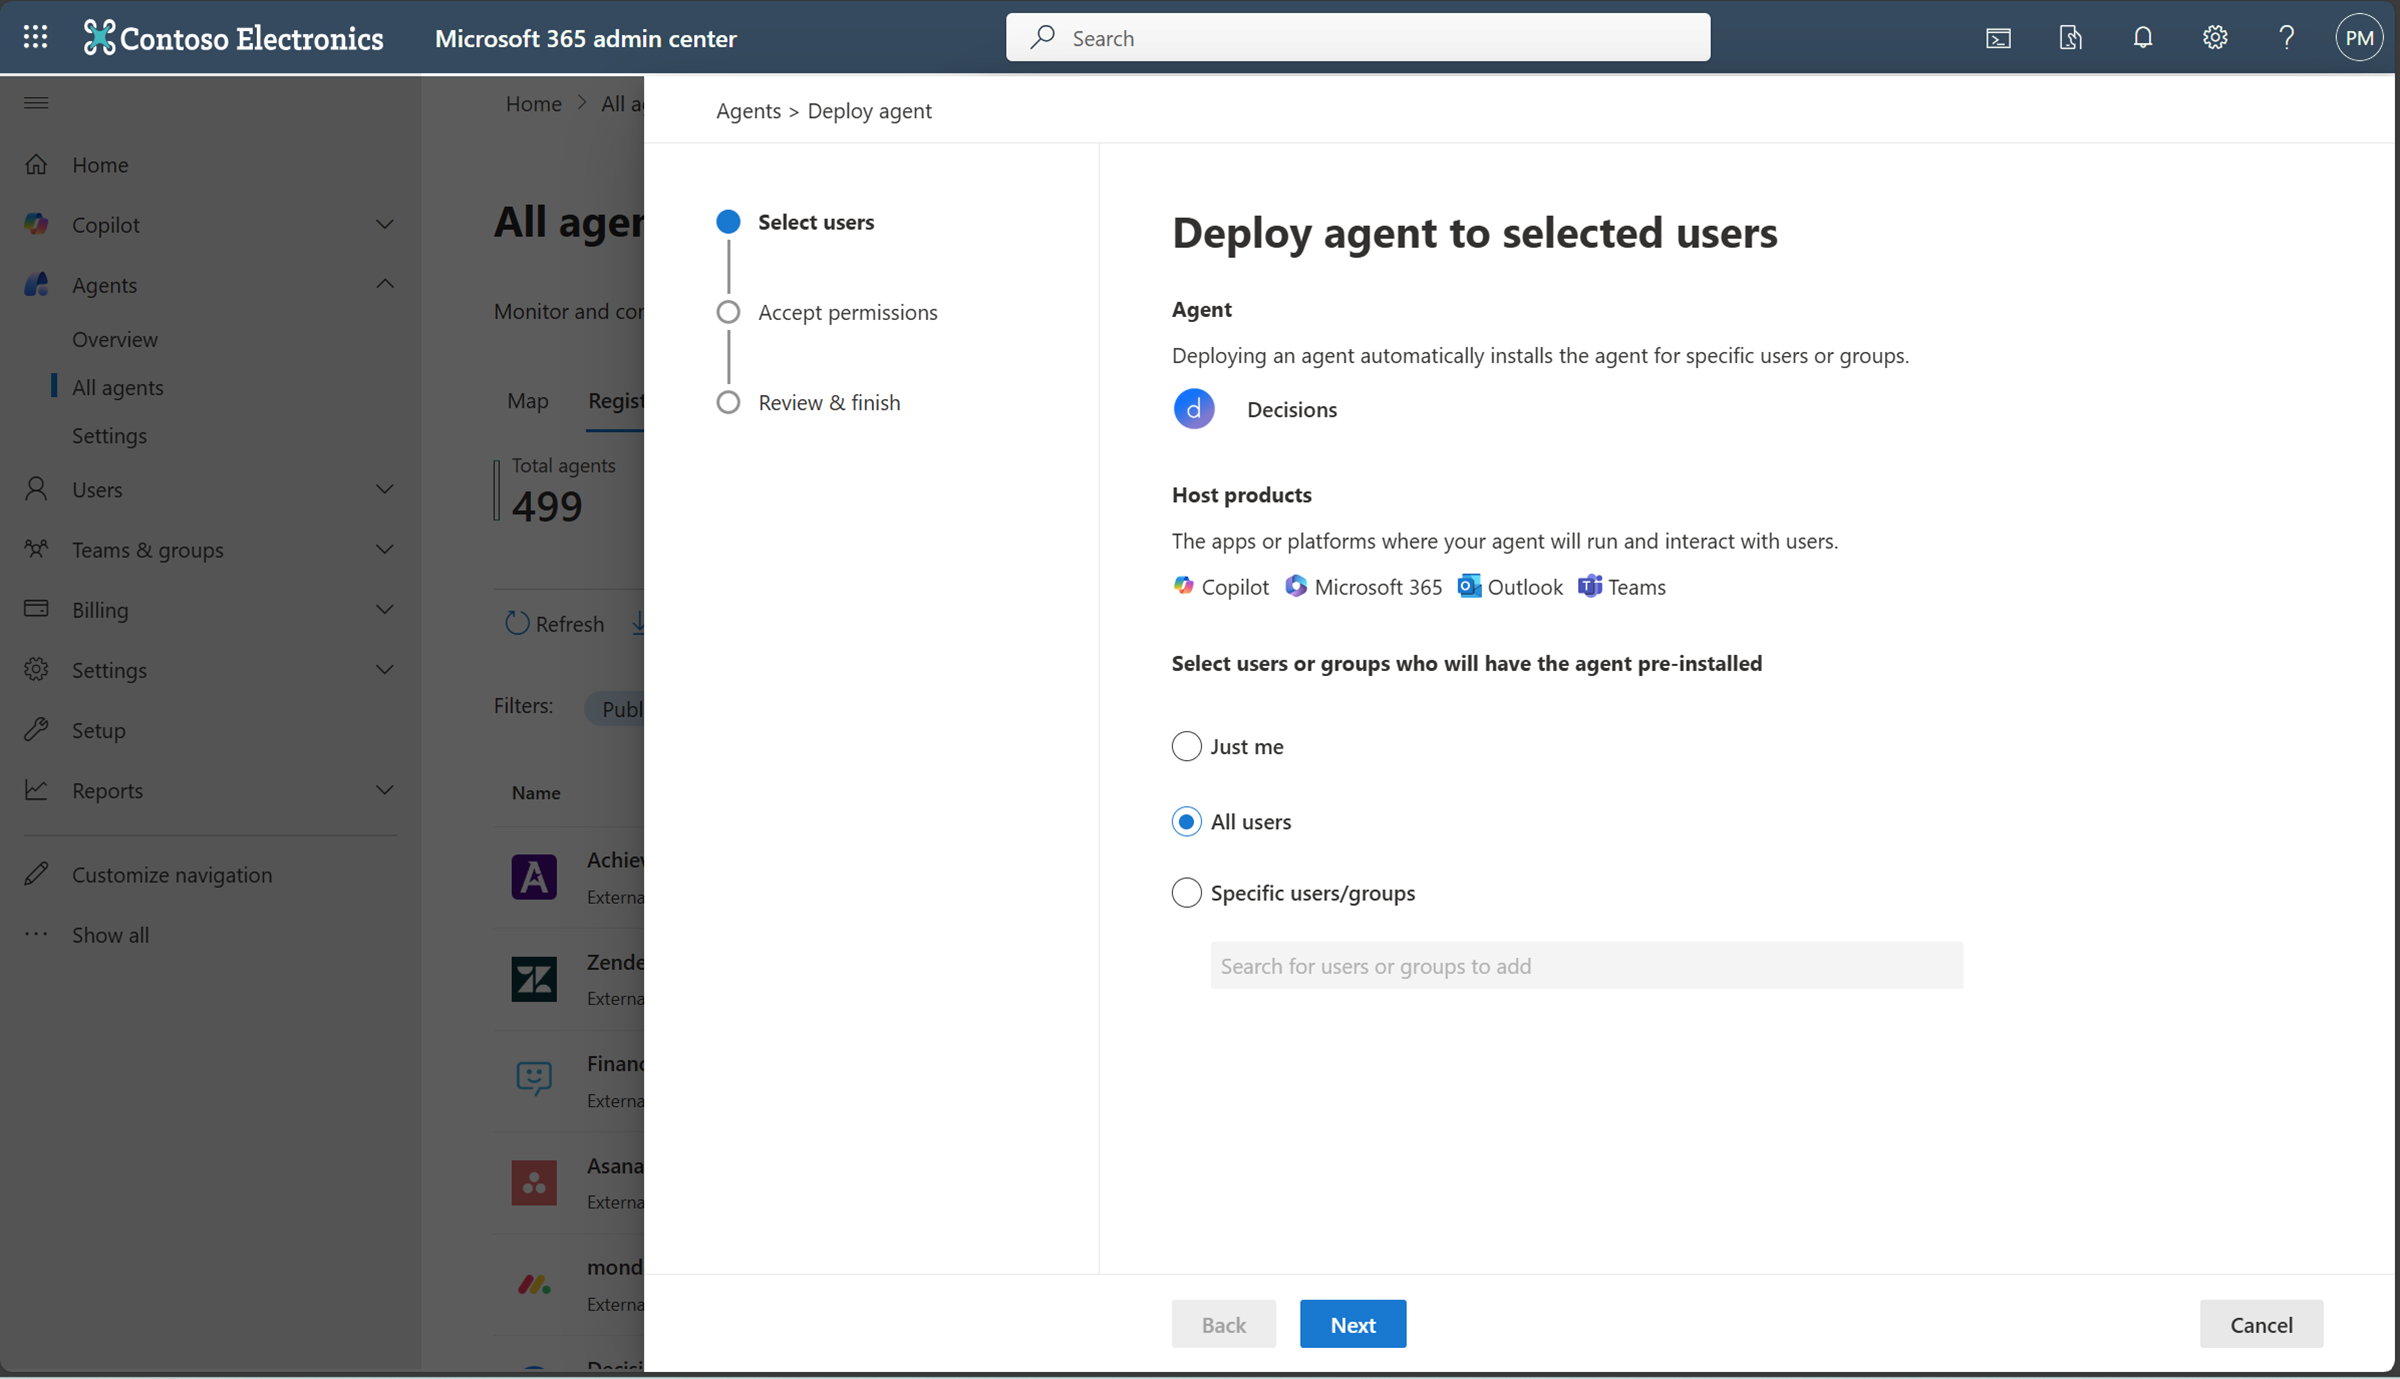
In the Review permissions pane, review the requested permissions for the agent. If the permissions are acceptable, select Grant admin consent. For more information, see Agent permissions.
In the Permissions requested window, select Accept to grant the permissions to the agent, and then select Next.
In the Review & finish pane, select Finish deployment.
Installing an agent affects its availability and functionality in Copilot and in the other host products, such as Outlook, Teams, or Microsoft 365.
Uninstall agents
You can uninstall first-party or external agents across the whole organization or for specific users or groups by using the same controls that work for any other agent in the Microsoft 365 admin center.
To uninstall an agent through the Microsoft 365 admin center, follow these steps:
Sign in to the Microsoft 365 admin center.
Select Agents > All agents.
Under Agents, select All agents.
In the All agents page, make sure Registry is selected. Select the Status filter and then select Available.
Select an installed agent from the list of agents.
In the agent details pane that opens, immediately under the agent's name, select Uninstall.
Note
If you don't see the Uninstall option, the selected agent might not be installed.
In the Remove agent pane, select the Remove agent option, and then select the Uninstall Agent button.
Uninstalling an agent affects its availability and functionality in Copilot and in the other host products, such as Microsoft Outlook, Microsoft Teams, or other Microsoft 365 applications.
Activate agents
Activation is a governance step for new agents. When a user requests activation so they can create instances of an agent, the request requires AI admin approval before the requester can create instances. Administrators review the agent's details, such as its description, owner, data, and tools, and then approve or reject the request. When an administrator activates an agent, they can also scope its audience to specific users, groups, or everyone in the organization to ensure a controlled rollout. The activation process in the Microsoft 365 admin center helps you maintain governance, security, and quality of custom applications.
Overview of the activation process
The activation process consists of the following steps:
View a pending activation request - On the Requests tab, view all submitted agents that have a pending activation request. The list shows the agent name, publisher name, status, and date requested. New submissions appear with a status of Allow activation.
Review submission details - Select a pending agent to view more details and metadata, including its description, capabilities, connected data sources, and tools. These details help you make an informed decision about activating or rejecting the agent.
Start the request - When you're ready, select the Request tab to open the request wizard.
Select users - Choose the users you want to approve for activating the agent. Activating an agent makes it available for the selected audience to install and create instances.
Use the activation wizard - After you accept the activation request, the activation wizard opens so you can select users. You can include the original requesters and add security groups that have access to create instances from the agent.
Apply a template - To strengthen governance and security for agents, apply a template that includes predefined policies:
- Default template - Microsoft provides an out-of-the-box template with essential security and compliance controls from Microsoft Entra, Microsoft Purview, and SharePoint. The default template automatically assigns the license to minimize manual license management. For more information, see Default template automatic license assignment.
- Custom template - If you need governance beyond the default template, create a custom template and apply extra policies, such as restricting external content sharing, to meet your organization's requirements.
Note
AI Administrators aren't authorized to configure Conditional Access policies or Microsoft Entra access package policies. These actions require a highly privileged administrator role with the appropriate Microsoft Graph permissions.
Review permissions and grant admin consent - Review the permissions requested by the agent, and grant admin consent if appropriate. Permissions allow the agent to access relevant data or perform actions on behalf of users.
Review and complete activation - Review all configurations, and then select Finish to activate the agent.
After you activate an agent, it becomes available for creating instances in the Teams app store, Microsoft 365 Copilot, and Copilot Studio, and the requester is notified. For future user additions, the process is simplified: the admin only needs to approve or reject requests, using the existing templates without repeating the full activation steps.
Admin-initiated activation
Administrators can proactively activate an agent through the Agent Registry without waiting for an activation request. During activation, administrators can make the agent available to all users, specific users, or specific security groups, depending on their organization's deployment requirements.
Policies predefined in the Microsoft prebuilt default template
| Service | Policy name | Description | Learn more |
|---|---|---|---|
| Microsoft Entra | Identity Protection | Detects agent identity threats by flagging anomalous activities involving agents. | ID Protection for Agents - Microsoft Entra ID Protection |
| Microsoft Entra | Network visibility | Enables network visibility into agent access to external resources. | Learn about Secure Web and AI Gateway for Microsoft Copilot Studio agents - Global Secure Access |
| Microsoft Entra | Lifecycle management for agents | Governs Microsoft Entra Agent IDs at scale with lifecycle policies. | Automate identity lifecycle management with Microsoft Entra ID Governance |
| SharePoint | Restrict external sharing of sites and content | Lets you allow or restrict specific agents from sharing content in SharePoint sites and OneDrive with external users and guests. | SharePoint Advanced Management overview |
| SharePoint | Access control for sites and OneDrive | Lets admins specify which agents and users can access a given site. | Restrict SharePoint site access with Microsoft 365 groups and Microsoft Entra security groups |
| SharePoint | Content permissions insights | Provides insights on the content and sites that users have permissions to. | Data access governance reports for SharePoint sites |
| SharePoint | Agent access insights | Provides insights on agents accessing SharePoint and OneDrive sites. | Monitor agent access to SharePoint and OneDrive |
| Microsoft Purview | Audit enabled | Logs audit trails for all activities and provides clear observability. | Use Microsoft Purview to manage data security & compliance for Microsoft Agent 365 |
| Microsoft Purview | Know your data policy | Applies data security controls to safeguard against sensitive data leaks and oversharing. | Use Microsoft Purview to manage data security & compliance for Microsoft Agent 365 |
| Microsoft Purview | AI compliance assessment | Continuously monitors and evaluates agents for compliance gaps and identifies areas that need attention. | Use Microsoft Purview to manage data security & compliance for Microsoft Agent 365 |
| Microsoft Defender | Investigation and advanced hunting | Alerts you to AI agent activity and lets you investigate suspicious events with advanced hunting capabilities. | Detect and investigate threats to AI agents using Microsoft Defender (Preview) |
| Microsoft Defender | Real-time protection for Microsoft Agent 365 (Preview) | Detects and blocks suspicious AI agent activity during runtime. | Detect and investigate threats to AI agents using Microsoft Defender (Preview) |
Default template automatic license assignment
The default template automatically assigns the license during activation. This automatic license assignment eliminates manual license management and ensures that every hired agent instance is properly licensed before it becomes operational.
Key benefits include:
- Faster onboarding - Administrators don't need to manually allocate licenses for each instance.
- Compliance assurance - Prevents unlicensed usage and maintains entitlement integrity.
- Scalable management - Supports large-scale deployments without increasing administrative overhead.
Block or unblock agents
Block or unblock agents for the entire organization by using the same controls that work for any other app in the Microsoft 365 admin center.
To block or unblock an agent, follow these steps:
Sign in to the Microsoft 365 admin center.
Select Agents > All agents.
In the All agents page, select an agent from the list of agents.
In the agent details pane that opens, immediately under the agent's name, select Block or Unblock.
In the Block agent or Unblock agent pane that opens, select either Block agent or Unblock agent, and then select Save.
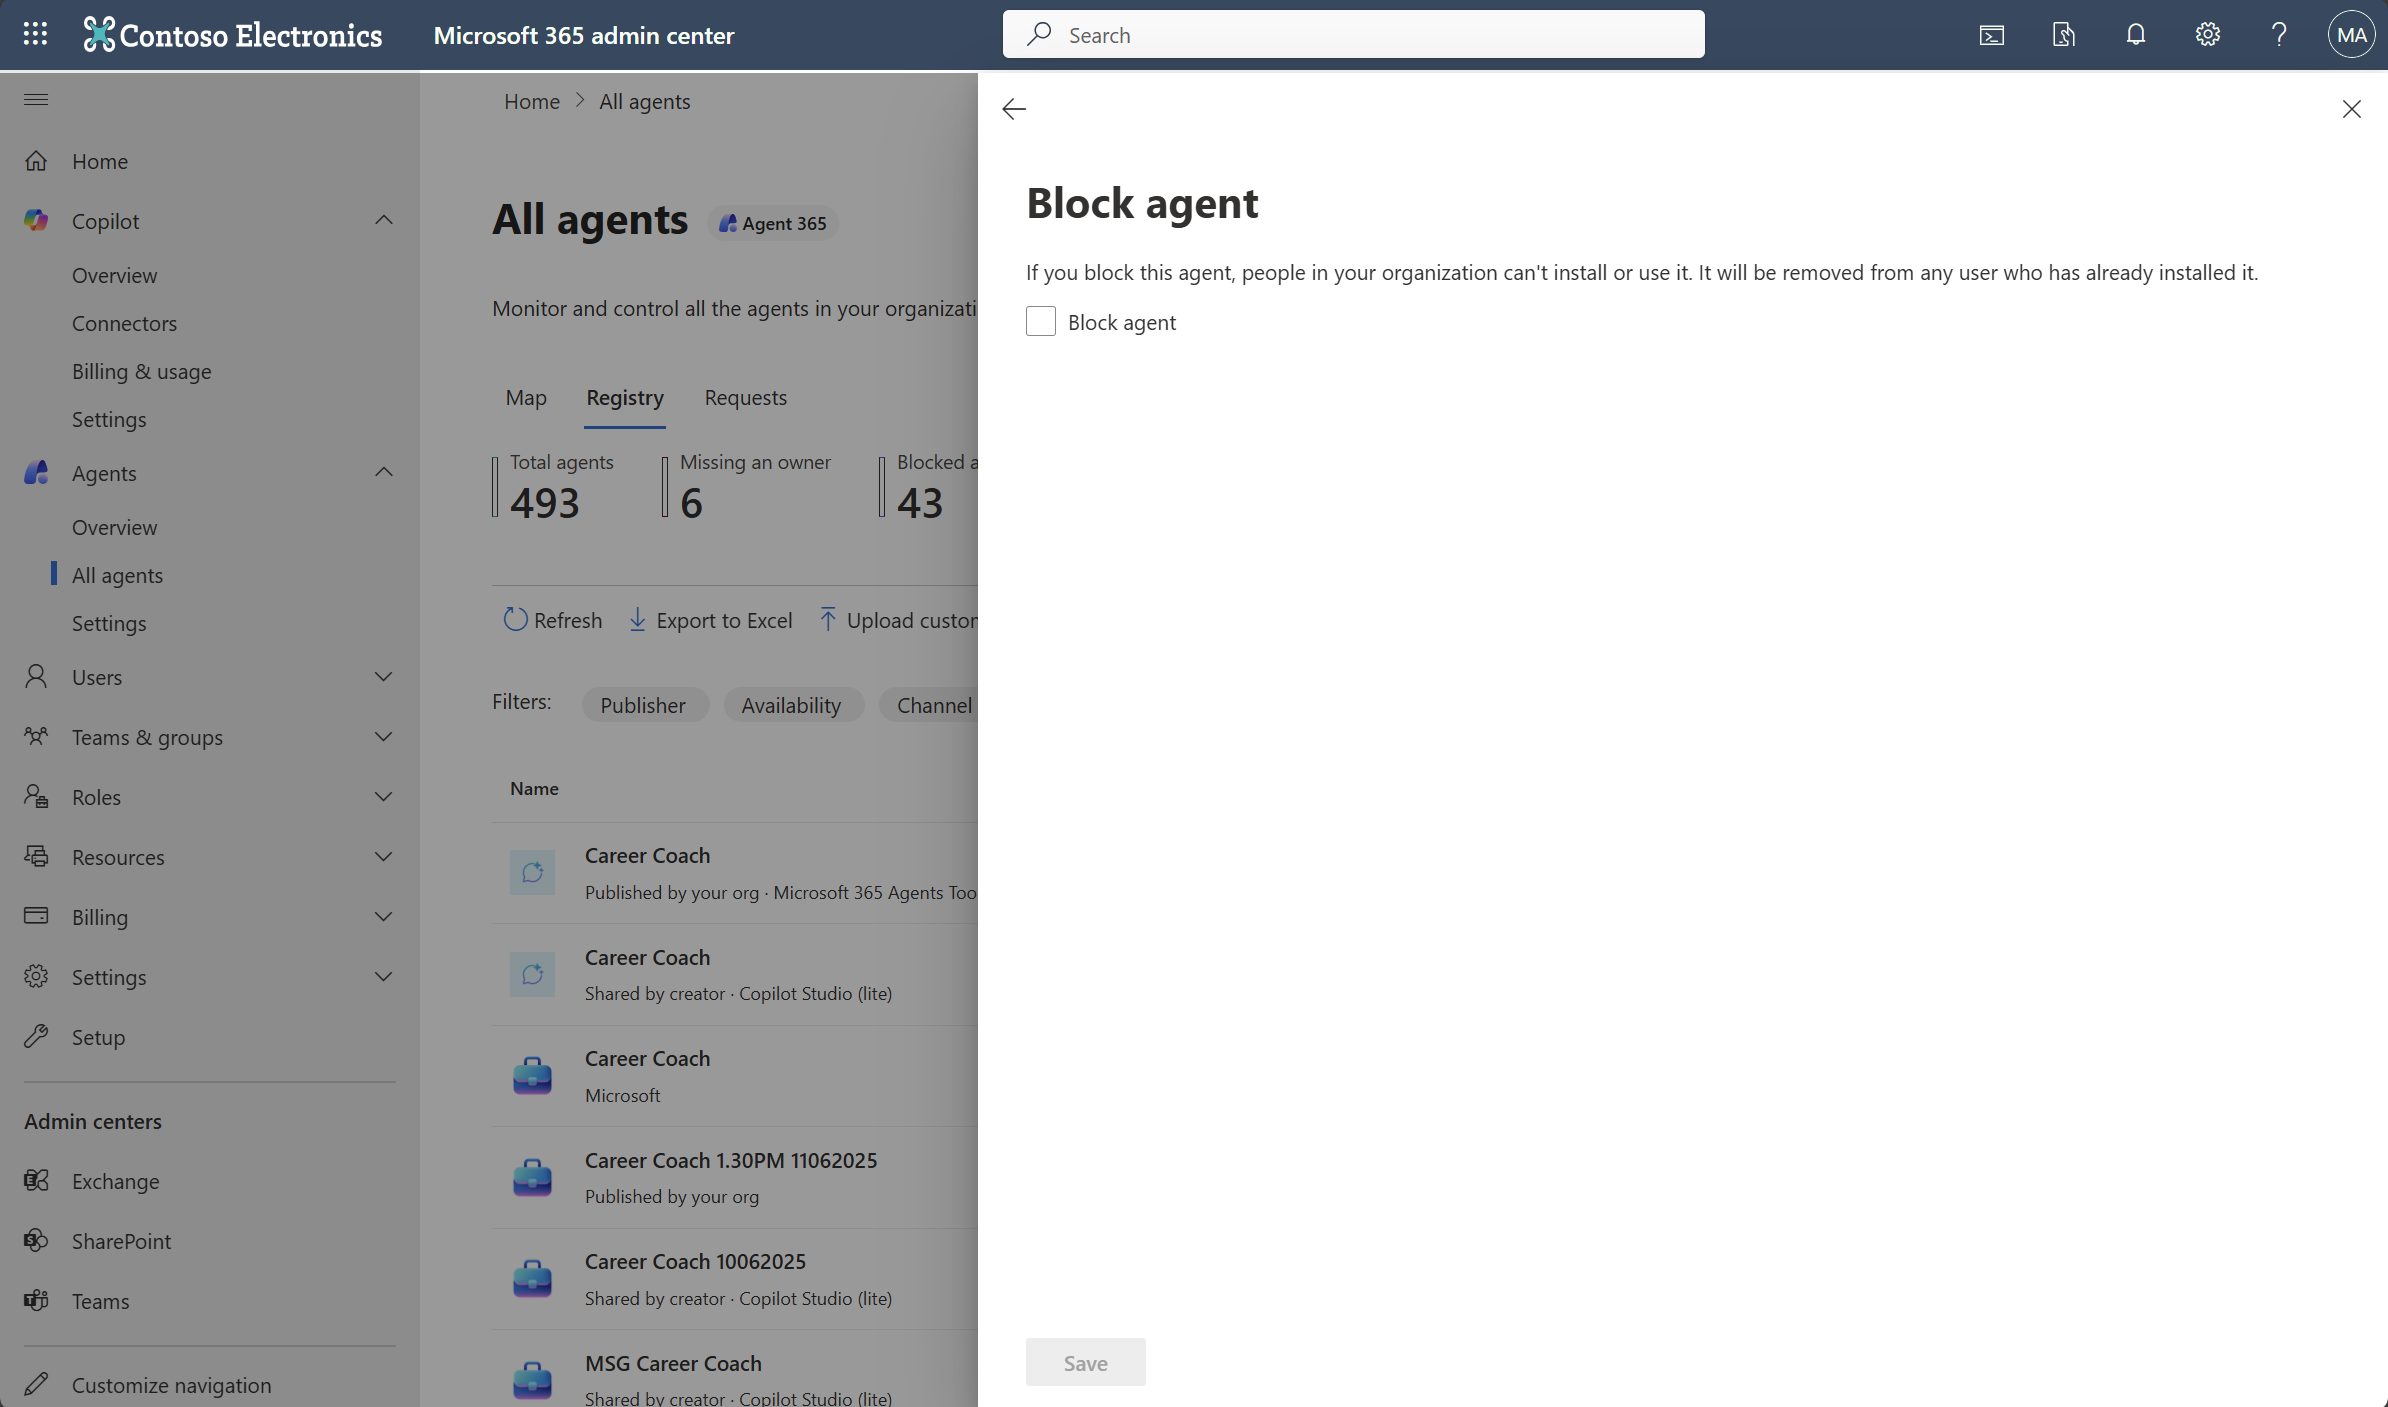
Blocking or unblocking an agent that you created by using Microsoft Copilot Agent Builder and Microsoft Copilot Studio affects its availability and functionality in Microsoft Copilot. It also affects availability and functionality in other host products, such as Microsoft Outlook, Microsoft Teams, or other Microsoft 365 applications. However, blocking an agent that you created by using SharePoint or Microsoft Foundry only impacts its availability in Microsoft Copilot Chat.
Note
For the Researcher and Analyst agents, the Edit users panel is disabled. To manage their availability, block the agent for the entire tenant by using the Block action in the Microsoft 365 admin center.
Delete agents
When you delete an agent in the Microsoft 365 admin center, the agent is soft deleted. A soft-deleted agent is unavailable to its maker and end users, but its properties and associated resources are retained for 30 days. Retained properties include the agent ID, metadata, channels, ownership, and connections.
During the 30-day retention period, you can restore the agent or permanently delete it. If you don't restore or permanently delete the agent, Microsoft 365 automatically permanently deletes it when the retention period ends. Soft-delete, restore, and permanent-delete events are recorded in the audit log with information about the system that initiated the action.
To delete an agent, follow these steps:
- Sign in to the Microsoft 365 admin center.
- Select Agents > All agents.
- On the All agents page, select the agent that you want to delete.
- In the agent details pane, select Delete agent.
- In the confirmation pane, select Delete.
Restore a deleted agent
You can restore an agent only while it's soft deleted and within its 30-day retention period. Restoring the agent returns it to an active state and makes it available to its maker and end users with its previous configuration.
To restore a deleted agent, follow these steps:
- Sign in to the Microsoft 365 admin center.
- Select Agents > All agents.
- On the All agents page, select Deleted.
- Select the agent that you want to restore.
- In the agent details pane, select Restore agent.
- In the confirmation dialog, select Restore.
Permanently delete an agent
Permanently deleting an agent removes the agent and its associated resources and can't be undone. You can permanently delete only an agent that's already soft deleted.
To permanently delete an agent before the 30-day retention period ends, follow these steps:
- Sign in to the Microsoft 365 admin center.
- Select Agents > All agents.
- On the All agents page, select Deleted.
- Select the agent that you want to permanently delete.
- In the agent details pane, select Permanently delete.
- In the confirmation dialog, select Delete.
Start or stop a Foundry agent
You can start or stop the underlying Azure infrastructure to govern Foundry agents.
Important
You must have an Azure AI Owner role.
Stop or Start operate on individual deployments by deallocating or provisioning Azure compute resources. These actions affect your underlying Azure infrastructure, not just how an agent is used in your organization.
To start or stop an agent, use the following steps:
- Sign in to the Microsoft 365 admin center.
- Select Agents > All agents.
- In the All agents page, find and select Microsoft Foundry agent that you want to stop or start.
The agent details pane is displayed. - If required, select Add role to add the Azure AI Owner role to manage Azure infrastructure for the agent.
- Select Stop or Start to control the underlying Azure infrastructure related to the agent.
Assign new owner to an agent
IT administrators can reassign ownership for agents that don't have an owner or that are active.
Important
You can only reassign ownership of shared agents for Agent Builder and Copilot Studio agents.
To reassign ownership of a shared agent, follow these steps:
Sign in to the Microsoft 365 admin center.
Select Agents > All agents.
In the All agents page, from the list of agents select an Agent Builder or Copilot Studio agent that you want to reassign.
Tip
To quickly find Agent Builder or Copilot Studio agents, use the Platform filter in the All agents page and then select either Agent Builder in Microsoft Copilot or Copilot Studio.
In the agent details pane, immediately under the agent name, select Assign new owner.
In the Assign a new owner pane, enter a new owner from your organization, and then select Assign.
The following changes occur after owner reassignment:
- The new owner gets full edit and delete permissions, plus access to any files the previous owner uploaded.
- The previous owner loses all access, including read rights.
Add an owner to an Agent Builder agent
Agent Builder agents support multiple owners. Admins can view the full owner list and add owners to help maintain continuity and accountability for shared agents.
Important
All owners have the same rights to edit, share, manage, and maintain an Agent Builder agent. There are no primary or secondary owner roles.
Before you begin, ensure that:
- You use an account that has permission to manage agents in the Microsoft 365 admin center.
- The agent was created with Agent Builder in Microsoft 365 Copilot.
- The owner you add is an individual user. Groups aren't supported as Agent Builder owners.
To add an owner, follow these steps:
Sign in to the Microsoft 365 admin center.
Select Agents > All agents.
Find and select the Agent Builder agent that you want to manage.
Tip
To narrow the list, use the Platform filter and select Agent Builder in Microsoft 365 Copilot.
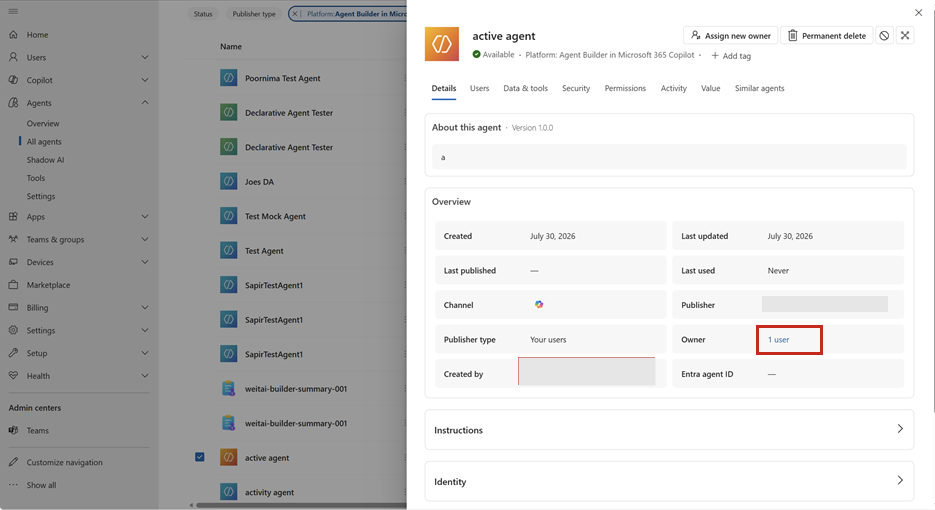
On the Details tab in the agent details pane, select the user link next to Owner.
In the Owners pane, select Add owner.
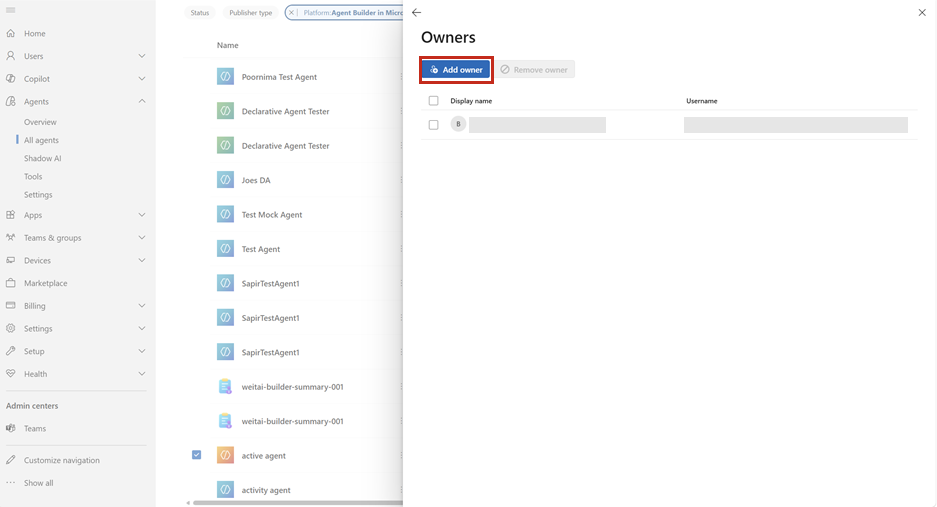
Search for and select a user in your organization.
Select Add to update the owner list.
Changes to the owner list are reflected for the agent in Microsoft Agent 365 and Agent Builder. Adding an owner doesn't change the Created by value.
Remove an owner from an Agent Builder agent
To remove an owner, follow these steps:
- Sign in to the Microsoft 365 admin center.
- Select Agents > All agents.
- Find and select the Agent Builder agent that you want to manage.
- On the Details tab in the agent details pane, select the user link next to Owner.
- In the Owners pane, select the owner that you want to remove.
- Select Remove owner.
- Review the change, and then select Remove.
You can't remove the last remaining owner. Add another owner before you remove the current owner. Use Add owner or Remove owner for agents that already have owners. For an ownerless agent, use the ownership reassignment experience described in Assign new owner to an agent.
Why multiple owners matter
Multiple owners reduce reliance on a single person and help teams continue to edit and maintain an agent when responsibilities change. Admin visibility and owner management in Microsoft Agent 365 also give organizations a consistent place to review accountability for shared Agent Builder agents.
Admin actions fail on agents behind Power Platform Firewall
If an admin action fails and doesn't run on the targeted agent, the agent might reside in an environment that's configured with Power Platform Firewall in active enforcement mode.
Admin actions behave differently depending on the firewall mode:
- Active enforcement mode – Admin actions that you initiate from the Microsoft 365 admin center fail and aren't applied to the agent. The IP address is the upstream service IP rather than the originating admin client IP, so the firewall rejects the request.
- Audit-only mode – Admin actions succeed and only generate an alert in Microsoft Purview.
Check whether the environment is in active enforcement mode
In the Power Platform admin center:
- Go to Security > Identity and access > IP firewall.
- Select the environment or environment group that contains the agent.
- Select the Advanced tab to see more IP firewall settings.
- Confirm the following settings:
- Set IP Firewall to On.
- Set Turn on IP firewall in audit-only mode to Off.
If Turn on IP firewall in audit-only mode is On, the firewall logs activity but allows requests regardless of IP address, and admin actions from the Microsoft 365 admin center succeed. If it's Off while IP Firewall is On, the environment is in active enforcement mode and admin actions are blocked.
For more information about firewall configuration, see IP firewall in Power Platform environments.
To resolve this issue, run the action directly against the Power Platform API (PPAPI). For more information, see the following resources: