Note
Access to this page requires authorization. You can try signing in or changing directories.
Access to this page requires authorization. You can try changing directories.
If your organization has Microsoft Purview Data Loss Prevention (DLP), you can define policies that help prevent people from sharing sensitive information in a Microsoft Teams channel or chat session. Here are some examples of how this protection works:
- Protecting sensitive information in messages. Suppose that someone attempts to share sensitive information in a Teams chat or channel with guests (external users). If you have a DLP policy defined to prevent this, messages with sensitive information that are sent to external users are deleted. This happens automatically, and within seconds, according to how your DLP policy is configured.
Note
DLP for Microsoft Teams blocks sensitive content when shared with Microsoft Teams users who have:
- guest access in teams and channels, or
- external access in meetings and chat sessions.
DLP for external chat sessions will only work if both the sender and the receiver are in Teams Only mode and using Microsoft Teams native federation. DLP for Teams does not block messages in interop with Skype or non-native federated chat sessions.
Protecting sensitive information in documents. Suppose that someone attempts to share a document with guests in a Microsoft Teams channel or chat, and the document contains sensitive information. If you have a DLP policy defined to prevent this, the document won't open for those users. Your DLP policy must include SharePoint and OneDrive in order for protection to be enforced. This is an example of DLP for SharePoint that shows up in Microsoft Teams, and therefore requires that users are licensed for Office 365 DLP (included in Office 365 E3), but doesn't require that users be licensed for Office 365 Advanced Compliance.
Protecting communications in Teams Shared Channels. For shared channels, the host Teams team DLP policy is applied. For example, let's say there's a shared channel owned by Team A of Contoso. Team A has a DLP policy P1. There are three ways to share a channel:
- Share with member: You invite User1 from Contoso to join the shared channel without making them a member of Team A. Everyone in this shared channel, including User1, is covered by P1.
- Share with team (internally): You share the channel with another team within Contoso, Team B. That other team might have a different DLP policy, but that doesn’t matter. P1 applies to everyone in this shared channel, including both Team A and Team B users.
- Share with team (cross tenant): You share the channel with a team, Team F, in Fabrikam. Fabrikam might have its own DLP policy, but that doesn't matter. P1 applies to everyone in this shared channel, including both Team A (Contoso) and Team F (Fabrikam) users.
Protecting communications when chatting with external users in Microsoft Teams. People from different Microsoft 365 organizations who are all using the external access feature can all join the same chat session. Each user is subject to the DLP policies of their own organization. For instance, say that UserA, UserB and UserC, all from Contoso, and UserX, UserY, and UserZ, all from Fabrikam, are in the same Teams chat. Contoso's DLP policies for sharing information in Teams apply to UserA, UserB and UserC, while Fabrikam's DLP policies apply to UserX, UserY, and UserZ. For more information on using Microsoft Teams to chat with people external to your organization, see Manage external meetings and chat with people and organizations using Microsoft identities
Tip
Get started with Microsoft Security Copilot to explore new ways to work smarter and faster using the power of AI. Learn more about Microsoft Security Copilot in Microsoft Purview.
DLP Licensing for Microsoft Teams
Data loss prevention capabilities include Microsoft Teams chat and channel messages, including private channel messages for:
- Office 365 E5/A5/G5
- Microsoft 365 E5/A5/G5
- Microsoft 365 E5/A5/G5 Information Protection and Governance
- Microsoft 365 E5/A5/G5/F5 Compliance and F5 Security & Compliance
Office 365 and Microsoft 365 E3 include DLP protection for SharePoint, OneDrive, and Exchange. This also includes files that are shared through Teams because Teams uses SharePoint and OneDrive to share files.
Support for DLP protection in Teams Chat requires an E5 license.
Important
For information on licensing, see Microsoft 365, Office 365, Enterprise Mobility + Security, and Windows 11 Subscriptions for Enterprises.
Scope of DLP protection
DLP protection is applied differently to Teams entities, as described in the table that follows.
To scope a DLP Teams policy to all chat types, either scope your policy to All locations, or verify that each Teams user is both in a Microsoft 365 group AND in a security group or distribution group that is scoped to the policy. For more information, Learn more about how to sync memberships.
| Policy scope | Teams Entities | DLP Protection |
|---|---|---|
| Individual user accounts | - 1:1/n chats - Standard and shared channel messages - Private channel messages |
- Yes - No - Yes |
| Security groups/Distribution group/Non-mail-enabled Security group | - 1:1/n chats - Standard and shared channel messages - Private channel messages |
- Yes - No - Yes |
| Microsoft 365 groups | - 1:1/n chats - Standard and shared channel messages - Private channel messages |
- Yes - Yes - No |
Note
When a DLP policy is scoped to Microsoft 365 groups, DLP protection applies to group members using the standard and shared channels associated with all Microsoft 365 groups they belong to and all 1:1/n chats also applies to the group members, except when optical character recognition is configured for Teams chat and channel messages.
Policy tips help educate users
Similar to how DLP policy tips work in (Exchange, Outlook, SharePoint, OneDrive, and on Windows Devices, policy tips in Teams appear when an action triggers with a DLP policy. Here's an example of a policy tip:
Here, the sender attempted to share a social security number in a Microsoft Teams channel. The What can I do? Link opens a dialog box that provides options for the sender to resolve the issue. Notice that the sender can opt to override the policy or notify an admin to review and resolve the issue.
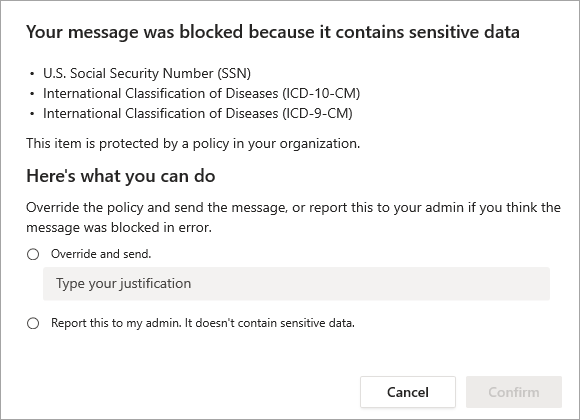
You can choose to allow users in your organization to override a DLP policy. When you configure your DLP policies, you can use the default policy tips, or customize policy tips for your organization.
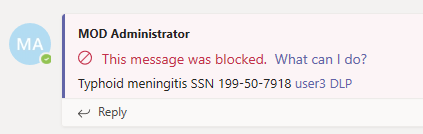
Returning to our example, when a sender has shares a social security number in a Teams channel, here's what the recipient sees:

DLP protections are applied to the actual messages in the chat or channel thread. Message information is also shown in the short preview in Activity notifications that are created from chat or channel message. When there's a match to a DLP policy, the corresponding preview is hidden, and a "Preview Unavailable" message is shown instead of the blocked preview. An Activity entry is also generated for the sender if the message sent matched a DLP policy. Flagged and blocked messages, activities are created stating “Your message has been blocked”.
DLP for Microsoft Teams does not send user notification emails like DLP for Exchange, SharePoint, and OneDrive. Instead, users only receive message flags as notifications.
To customize policy tips
To perform this task, you must be assigned a role that has permissions to edit DLP policies. To learn more, see Permissions in the Microsoft Purview portal.
Sign in to the Microsoft Purview portal >Data loss prevention > Policies.
Select a policy, and then choose Edit policy (the pencil icon).
Navigate through the tool until you come to the Customize advanced DLP rules screen.
Either create a new rule, or edit an existing rule for the policy.
Scroll down to User notifications and set the Use notifications to inform your users and help educate them on the proper use of sensitive info toggle to On.
Under Microsoft 365 services, select Notify users in Office 365 service with a policy tip.
Under Policy tips, select Customize the policy tip text.
Specify the text you want to use for the policy tip.
If the policy tip applies to user activities in Microsoft Exchange and you want a dialog box to display the tip before an email is sent, select Show the policy tip as a dialog for the end user before send.
Choose Save and then Next.
On the Policy mode page, check the box next to Show policy tips while in simulation mode if desired.
Choose Next, choose Submit, and then choose Done.
Add Microsoft Teams as a location to existing DLP policies
To perform this task, you must be assigned a role that has permissions to edit DLP policies. To learn more, see Permissions in the Microsoft Purview portal.md#permissions).
Sign in to the Microsoft Purview portal > Data loss prevention > Policies.
Select a policy, and then choose Edit policy (the pencil icon).
Navigate through the tool until you arrive at the Choose locations to apply the policy page.
Select Teams chat and channel messages.
Choose Next and work your way through to the end of the process.
Choose Submit.
Allow approximately one hour for your changes to work their way through your data center and sync to user accounts.
Define a new DLP policy for Microsoft Teams
For information about how to create and implement a new DLP policy, see Create and Deploy data loss prevention policies.
Prevent external access to sensitive documents
You can ensure that documents are protected until DLP scans and marks them as safe to share by marking new files as sensitive by default.
Recommended DLP policy structure
Conditions
Content contains any of these sensitive information types: [Select all that apply]
Content is shared from Microsoft 365 > with people outside my organization

Actions
Add an action
Restrict access or encrypt the content in Microsoft 365 locations > Block only people outside your organization

Use notifications to inform your users and help educate them on the proper use of sensitive info > Notify users in Office 365 with a policy tip
Notify these people [Select all that apply]
Policy tips [Select all that apply]

Note
The sender address for incident reports is now no-reply-MicrosoftInformationProtectionOnline@microsoft.com.