Note
Access to this page requires authorization. You can try signing in or changing directories.
Access to this page requires authorization. You can try changing directories.
Employee Self-Service ships as a set of declarative agent templates built on Microsoft Copilot Studio and Microsoft 365 Copilot. Declarative agents in Copilot Studio support Agent Lifecycle Management (ALM), an opt-in experience that moves an agent through Dev, Test, and Prod deployment quality gates. This article explains how the ALM experience applies specifically to the Employee Self-Service Hub, Employee Self-Service HR, and Employee Self-Service IT templates, and calls out where the maker journey differs across them.
ALM flow at a glance
Install the Employee Self-Service templates you need, then opt in to ALM for each agent. Author all agent configuration and publish changes in Dev, validate the deployed version in Test, and promote the validated version unchanged to Prod. All quality gates operate in the same Power Platform environment.
If a new or updated ServiceNow connection doesn't propagate correctly, apply only the ServiceNow connection ID workaround after deployment and before validation. This exception doesn't allow independent configuration changes in Test or Prod.
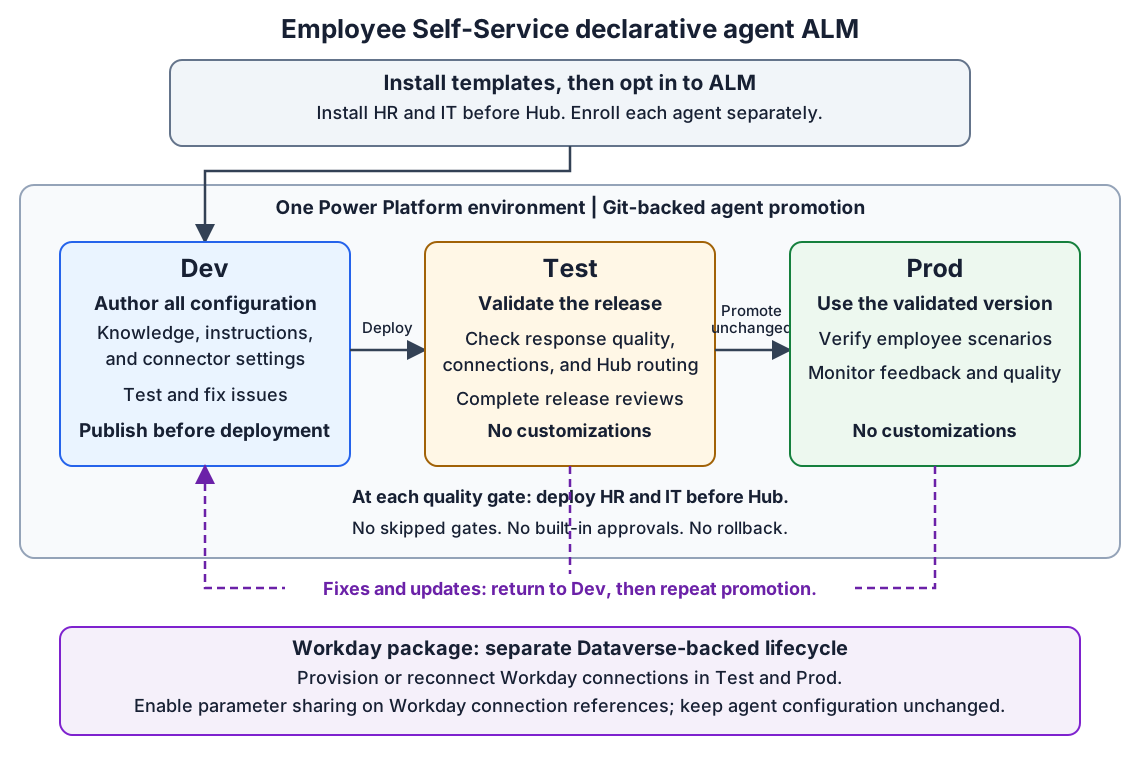
At each quality gate, deploy HR and IT before the Hub so its connected agents are available. If validation fails or employees need an update, make the change in Dev and repeat the promotion process; the return arrows represent new authoring, not rollback. Complete your organization's release reviews before promoting to Prod because ALM doesn't provide built-in approvals.
The Workday package remains Dataverse-backed, outside the Git-backed agent promotion flow. Provision or reconnect its connections in Test and Prod without changing the promoted agent configuration. See ALM for the Workday package.
The Employee Self-Service declarative agent templates
Employee Self-Service gives you three declarative agent templates to start from. Each template can be enrolled in ALM independently.
| Template | Purpose | Typical knowledge and connectors |
|---|---|---|
| Employee Self-Service Hub | A single front door for employees. It routes employee requests to the HR or IT template through a connected-agent handoff, so employees don't need to know which domain agent to open. | Routing topics and connections to the HR and IT templates you've installed. |
| Employee Self-Service HR | Helps employees self-serve HR questions and tasks, such as policy lookups and personal-information updates. | SharePoint and ServiceNow Knowledge Base for grounded answers; Workday connectors for employee lookups and updates to personal email and phone. |
| Employee Self-Service IT | Helps employees resolve IT issues through guided troubleshooting and ticketing. | SharePoint and Microsoft Self-Help knowledge sources; ServiceNow connectors to create, update, and retrieve tickets. |
Note
Employee Self-Service declarative agents appear in the classic Copilot Studio experience, not the new experience. This is expected behavior; use the classic experience to find and manage Employee Self-Service agents.
Because the Hub template depends on the HR and IT templates it routes to, plan your ALM enrollment and deployments with that dependency in mind, as described later in this article.
Before you enroll an Employee Self-Service template in ALM
Before you enroll any Employee Self-Service template, complete the following for each template you plan to manage:
- Identify the Employee Self-Service template (Hub, HR, or IT) you want to manage, the people who validate it in Test, and its intended production audience.
- Prepare representative prompts and expected outcomes for each template so testers can assess it consistently as it moves through the quality gates. Include prompts that exercise your Workday, ServiceNow, and SharePoint connections.
- If you use the Employee Self-Service Hub template, confirm the HR and IT templates it routes to are already installed and configured in the same environment.
Enroll an Employee Self-Service template in ALM
ALM is opt-in. Enroll each Employee Self-Service template separately to start managing its deployments through the quality gates.
Important
Enrollment can't be undone after you complete it.
- In Copilot Studio, open the Employee Self-Service template (Hub, HR, or IT) you want to enroll.
- Select Settings, and then select ALM.
- Select Get started to begin enrollment.
- Review the enrollment information and complete the opt-in process.
- Confirm that enrollment is complete before you deploy the template through the quality gates.
If you manage all three templates together, enroll the HR and IT templates first, and enroll the Hub template once its connected templates are enrolled. This order keeps the Hub's routing configuration aligned with the HR and IT agents it depends on.
Deploy Employee Self-Service agents through quality gates
Deploy each Employee Self-Service template through the required order: Dev -> Test -> Prod. You can't skip a quality gate or deploy directly from Dev to Prod. As with any declarative agent, you own the deployment criteria for each template; ALM doesn't provide built-in approval flows, so complete any reviews required by your organization outside of ALM.
Prepare changes in Dev
- Develop the template's changes in Dev, including instructions, knowledge sources, and connector configuration.
- Open Topics and enable the scenario topics required for the release.
- Try representative prompts against Workday, ServiceNow, or SharePoint, depending on the template, and address issues that would prevent meaningful validation in Test.
- For the Hub template, confirm that routing to HR and IT still resolves correctly after any changes.
- Publish the template before deployment. Unpublished changes aren't included when you deploy to the next quality gate.
Note
Keep all system topics enabled, including the system topics used by the required Power Platform connectors. In Topics, use the All or System filter to find them and set their Enabled toggles to On.
Deploy from Dev to Test
For Employee Self-Service templates, author all configuration — including envvar entries and connection references — only in Dev. Refresh the target configuration from its source quality gate during deployment rather than introducing independent overrides in Test or Prod. This keeps the response-quality baseline aligned across quality gates. The only post-deployment configuration exception is the ServiceNow connection ID workaround.
- Confirm the intended changes have been published.
- At the top of the template's page, open the Dev quality-gate dropdown next to the published status, and select Deploy to Test.
- In the Deploy to Test dialog, select Copy from Dev when redeploying to refresh
app.config.test.jsonwith the current Dev configuration. The source configuration appears automatically only during the initial deployment. - Review
app.config.test.jsonand confirm it matches the intended Dev configuration. Don't add Test-specific overrides. - Select Save, confirm that the save succeeded, and then select Deploy.
- When deployment completes, apply the ServiceNow connection ID workaround if needed, then validate the deployed template against your representative prompts. Make and publish content or customization changes in Dev, then deploy to Test again.
Note
A ServiceNow connection added after the first deployment, or a change to an existing connection, might not propagate to the next quality gate. The target connectionId can remain empty or retain the previous value. See ServiceNow connection ID workaround.
Note
If you change the SharePoint or ServiceNow Knowledge source in Dev after deploying to Test, one deployment might not refresh the knowledge configuration. Follow Knowledge-source updates after deployment, which requires two deployment cycles.
Deploy from Test to Prod
Important
Rollback isn't currently supported. Complete your release review before you deploy to Prod.
Note
Knowledge-source updates require two deployment cycles to Prod as well as to Test. After validating the updated sources in Test, follow Knowledge-source updates after deployment, using Copy from Test for the second deployment to Prod.
- Confirm the template in Test meets your release criteria, and complete any required organizational reviews.
- At the top of the template's page, open the Test quality-gate dropdown next to the published status, and select Deploy to Prod.
- In the Deploy to Prod dialog, select Copy from Test when redeploying to refresh
app.config.prod.jsonwith the validated Test configuration. The source configuration appears automatically only during the initial deployment. - Review
app.config.prod.jsonand confirm it matches the validated Test configuration. Don't add Prod-specific overrides. - Select Save, confirm that the save succeeded, and then select Deploy.
- When deployment completes, apply the ServiceNow connection ID workaround if needed, then confirm the deployed template behaves as expected for your employees.
If you manage the Hub, HR, and IT templates together, deploy the HR and IT templates to a quality gate before you deploy the Hub template to that same gate, so the Hub always routes to a template that's already available at that gate.
ServiceNow connection ID workaround
A known limitation can leave a new or updated ServiceNow connection ID out of sync after deployment. Compare the ServiceNow connection entry in the source and target configurations. If the target connectionId is empty or differs from the intended source value, synchronize only that field:
- For a Dev-to-Test deployment, copy the ServiceNow
connectionIdfrom the Dev configuration into the corresponding connection entry inapp.config.test.jsonafter deployment. - For a Test-to-Prod deployment, copy the ServiceNow
connectionIdfrom the validated Test configuration into the corresponding connection entry inapp.config.prod.jsonafter deployment. - Save the target configuration without changing any other values. Don't change endpoints, knowledge sources, instructions, or topics in Test or Prod.
- Verify connector authentication and the required ServiceNow actions, then rerun the representative prompts for that quality gate. Don't continue promotion if the connection or response-quality checks fail.
This is a connection-ID synchronization workaround, not permission to customize a deployed agent. Author all other changes in Dev and promote them through the quality gates.
Knowledge-source updates after deployment
If you change the SharePoint or ServiceNow Knowledge source used by an agent that has already been deployed, refresh the knowledge configuration with two deployment cycles at each target quality gate. Author the changes in Dev, validate them in Test, and then promote the validated version to Prod.
Refresh Test
- Update the knowledge source in Dev and publish the Dev agent.
- Deploy the published Dev agent to Test once and wait for deployment to complete.
- Open Deploy to Test again, select Copy from Dev, select Save, and then select Deploy. This second deployment refreshes the knowledge-source keys and configuration in Test.
- Validate the Test agent with representative prompts. Verify that answers and citations use the intended knowledge source before promoting to Prod. If validation fails, correct the source configuration in Dev and repeat the sequence.
Refresh Prod
After the updated Test agent passes validation and you complete the required release reviews, repeat the deployment sequence from Test to Prod:
- Deploy the validated Test agent to Prod once and wait for deployment to complete.
- Open Deploy to Prod again, select Copy from Test, select Save, and then select Deploy. This second deployment refreshes the knowledge-source keys and configuration in Prod.
- Validate the Prod agent with representative prompts and confirm that answers and citations use the intended knowledge source. If validation fails, correct the source configuration in Dev and repeat the Test and Prod sequences.
Don't edit knowledge sources directly in Test or Prod.
Release subsequent updates
Use the same flow for every update to any Employee Self-Service template: make and publish changes in Dev, deploy to Test for validation, and then deploy to Prod. Record what changed and which behavior was evaluated, so reviewers can make an informed release decision.
Note
After you publish the agent and add it to Microsoft 365 Copilot Chat, its icon might not render. Verify the icon after publication.
Manage customizations across environments
Follow these practices to keep Employee Self-Service customizations consistent across Dev, Test, and Prod:
- Author all configuration in Dev. Set
envvarentries and connection references, such as Workday, ServiceNow, and SharePoint settings, only in Dev. - Refresh configuration from the source quality gate. On redeployment, use Copy from Dev for Test and Copy from Test for Prod, then validate the promoted agent.
Note
Avoid customizing directly in Test or Prod. Make changes in Dev and let them flow forward through the quality gates. The ServiceNow connection ID workaround is a limited exception: copy only the intended source connectionId, leave all other values unchanged, and repeat validation.
Export and import Employee Self-Service agents
Export saves a template as a package. Import creates a new template in the same environment as the ALM-enabled template you start the import from; it doesn't update an existing template.
- Open the Employee Self-Service template you want to export.
- Select Settings, and then select ALM.
- Under Manage agents, select Export agent, choose a destination folder and a descriptive file name, and save the package.
To import a template, open an ALM-enabled template at the Dev or Test quality gate, select Settings > ALM, and then select Import agent under Manage agents. Import isn't supported at the Prod quality gate.
When you import the Hub template into a new environment, make sure the HR and IT templates it routes to are already present in that environment before you validate the imported Hub template. An import alone isn't evidence that a template is ready for Prod; review the imported template and complete validation before you promote it.
ALM for the Workday package
The Workday package that the Employee Self-Service HR template uses remains Dataverse-backed and doesn't follow the Git-backed ALM flow described earlier in this article. Because of this difference, deploying and promoting the Workday package through Dev, Test, and Prod might require additional or different steps from the rest of the Employee Self-Service HR template.
Note
Workday connections aren't automatically established in Test and Prod after deployment. Provision or reconnect the Workday connection in each target quality gate, and verify that the maker has sufficient Dataverse permissions for the associated flow. Enable connection parameter sharing on the Workday connection references; unlike Workday, direct connectors such as ServiceNow have connection parameter sharing enabled by default. Connection provisioning doesn't authorize independent agent customizations in Test or Prod.
Limitations
In addition to the general ALM limitations that apply to any declarative agent, keep the following in mind for Employee Self-Service:
| Area | Limitation |
|---|---|
| Template enrollment | Each Employee Self-Service template (Hub, HR, IT) enrolls in ALM independently. There isn't a combined enrollment flow for all three templates together. |
| Connected-agent deployment | The Employee Self-Service Hub template depends on the HR and IT templates it routes to. There isn't an automated flow to deploy the Hub and its connected templates as a single unit; deploy the HR and IT templates to a quality gate before the Hub template. |
| Quality gates | Templates must move through Dev -> Test -> Prod in order. You can't skip a quality gate. |
| Editing | Author content and customizations only in Dev. In Test or Prod, use only the documented ServiceNow connection-ID synchronization workaround when required. |
| Configuration promotion | On redeployment, select Copy from Dev or Copy from Test to refresh the target configuration. Don't introduce target-specific overrides, such as different Workday or ServiceNow endpoints. |
| Configuration validation | Deployment configuration validation checks JSON formatting only, not whether the promoted configuration values are correct for the target environment. |
| Import availability | Import is available only from ALM-enabled templates and isn't supported at the Prod quality gate. Each import creates a new template rather than updating an existing one. |
| Deployment scope | Cross-environment and cross-tenant deployments aren't supported. Quality gates operate within the same environment. |
| Rollback | Rollback isn't currently supported. |
Note
After deployment, adding or updating a ServiceNow connection can require a connectionId correction in Test or Prod. Follow the ServiceNow connection ID workaround; don't change any other target configuration values.
Related content
- Introduction to Employee Self-Service declarative agents
- Install an Employee Self-Service declarative agent
- Deployment overview
- Customize the Employee Self-Service declarative agent
- Agent evaluations for the Employee Self-Service declarative agent
- Publish the Employee Self-Service declarative agent to your organization
- Configure ServiceNow HR and IT for declarative agents
- Configure ServiceNow Knowledge for declarative agents