Note
Access to this page requires authorization. You can try signing in or changing directories.
Access to this page requires authorization. You can try changing directories.
This article is a reference for the administrators who take part in Integrate Workday with the Employee Self-Service declarative agent. Makers don't need to read it end to end. The /connect workday skill generates a handoff for each administrator with the values for your tenant. Administrators can use this article to plan and review the changes before they make them.
| Section | Who uses it |
|---|---|
| Microsoft Entra tasks | Application Administrator or Cloud Application Administrator |
| Workday tasks | Workday administrator |
| System topics | Maker |
| Customize Workday reference data | Maker and Workday administrator |
Microsoft Entra tasks
These tasks correspond to Phase 2 of the /connect workday skill. To grant admin consent, an administrator who can consent to permissions is also needed.
The handoff from the skill includes the values for your tenant:
- Microsoft Entra tenant ID: The directory where the Workday application is configured.
- Workday tenant name: For example,
contoso. - Expected Workday Service Provider ID (SAML Identifier):
http://www.workday.com/<tenant>.
Follow these rules throughout:
- Identify the enterprise application and its app registration by the expected Service Provider ID and the same Application ID. Don't select or pair applications by display name alone.
- Change only missing or incorrect settings. Keep existing scopes, authorized client applications, and permissions that aren't related to this setup.
- Return only non-secret values. Never return credentials, tokens, certificate contents, or private keys.
Entra task 1: Find the Workday enterprise application
- Sign in to the Microsoft Entra admin center, and select the directory that matches the tenant ID in the handoff.
- Go to Entra ID > Enterprise applications.
- Find the existing Workday SSO application. If your organization already uses Microsoft Entra SSO for Workday, reuse that application. Don't create another one. Otherwise, add Workday from the application gallery by following the Microsoft Entra SSO integration with Workday tutorial.
- Confirm that the application's SAML Identifier (Entity ID) is
http://www.workday.com/<tenant>. If more than one application uses this identifier, decide which one is authoritative before you continue.
Entra task 2: Configure SAML single sign-on
- In the Workday enterprise application, go to Single sign-on, and select SAML.
- Set or confirm Identifier (Entity ID) as
http://www.workday.com/<tenant>. - Confirm the Reply URL for your Workday tenant, and record it in the worksheet. The Reply URL typically has the format
https://<workday-host>/<tenant>/login-saml.htmld. - Create or activate the signing certificate that your organization requires.
- On the SAML Signing Certificate card, select Edit, and set Signing Option to Sign SAML response and assertion.
- Confirm that the Microsoft Entra Identifier and Login URL shown on the page belong to the selected tenant.
Entra task 3: Hand off the signing certificate
- From the active signing certificate row, download Certificate (Base64).
- Send the public certificate to the Workday administrator through your organization's approved collaboration channel.
- Confirm that the Workday administrator has the certificate file, its thumbprint, and its expiration date.
Important
Don't paste the certificate into the agent chat. The Microsoft Entra phase isn't complete until the Workday administrator confirms they have the certificate.
Entra task 4: Configure the app registration
Go to Entra ID > App registrations.
Find the Workday app registration that has the same Application ID as the enterprise application. Stop if there's no match or if more than one registration matches.
Select Expose an API.
Set or confirm Application ID URI as
api://followed by the Application ID, for exampleapi://11111111-1111-1111-1111-111111111111.Note
The Application ID URI (
api://<application-id>) and the Workday SAML Service Provider ID (http://www.workday.com/<tenant>) are different values. Never use one in place of the other.Add the
user_impersonationscope, or repair it if it exists. Keep other scopes.Add the authorized client application
4e4707ca-5f53-46a6-a819-f7765446e6fffor theuser_impersonationscope. This ID belongs to the Power Platform Workday connector. Keep other authorized client applications.
Entra task 5: Add API permissions and grant consent
- In the same app registration, select API permissions > Add a permission > Microsoft Graph > Delegated permissions.
- Add
openid,profile, andUser.Read. Keep other permissions. - Have an administrator who can consent to permissions select Grant admin consent.
Entra task 6: Assign employees and configure the NameID claim
- Return to the Workday enterprise application, and select Users and groups.
- If the application requires assignment, assign the security group of employees who will use the ESS HR agent. Use a maintained group instead of individual assignments.
- Select Single sign-on > Attributes & Claims.
- Edit Unique User Identifier (Name ID) so that its source attribute matches the Workday user name in your tenant, typically
user.mailoruser.userprincipalname.
Entra task 7: Return the Microsoft Entra worksheet
Fill in the Your tenant values column of the worksheet in the handoff, and return it to the maker through your approved channel. Example values are illustrative.
| Information | Where to find it | What to record | Example |
|---|---|---|---|
| Directory name | Entra ID > Overview | The exact display name of the directory. | Contoso |
| Enterprise application | Enterprise applications > Workday application > Overview | The exact application display name. | Workday |
| Application ID | Enterprise applications > Workday application > Overview | The Application ID. Don't record either Object ID. | 11111111-1111-1111-1111-111111111111 |
| Reply URL | Single sign-on > SAML > Basic SAML Configuration | The Reply URL for this Workday tenant. | https://wd5.myworkday.com/contoso/login-saml.htmld |
| NameID source | Single sign-on > SAML > Attributes & Claims > Unique User Identifier (Name ID) | The exact source attribute. | user.userprincipalname |
| SAML signing | SAML Signing Certificate > Edit > Signing Option | The value of Signing Option. | Sign SAML response and assertion |
| Certificate thumbprint | SAML Signing Certificate > active certificate row | The thumbprint of the active certificate. | A1B2C3D4E5F6... |
| Certificate expiration date | SAML Signing Certificate > active certificate row | The expiration date, exactly as displayed. | 1/1/2028 |
| SAML configuration | Single sign-on > SAML | Confirm that the Identifier, Reply URL, Login URL, NameID, and signing option match the handoff. | Yes, confirmed |
| Signing certificate | SAML Signing Certificate | Confirm that the Base64 certificate was transferred to the Workday administrator. | Yes, confirmed |
| Authorized connector | App registrations > Workday registration > Expose an API | Confirm the api:// Application ID URI, the user_impersonation scope, and the authorized connector. |
Yes, confirmed |
| Permissions and consent | App registrations > Workday registration > API permissions | Confirm that openid, profile, and User.Read are present and admin consent is granted. |
Yes, confirmed |
| Employee assignment | Enterprise applications > Workday application > Properties and Users and groups | Confirm that the employee group has access, or that assignment isn't required. | Yes, confirmed |
| Existing configuration | App registrations > Workday registration > Expose an API and API permissions | Confirm that unrelated scopes, authorized clients, and permissions were kept. | Kept without changes |
Workday tasks
These tasks correspond to Phase 3 of the /connect workday skill. Start them after the Microsoft Entra tasks are complete, and use the certificate that the Microsoft Entra administrator transferred.
The handoff from the skill includes these reference values for your tenant:
| Setting | Value |
|---|---|
| Identity provider Issuer | https://sts.windows.net/<entra-tenant-id>/ |
| Workday Service Provider ID | http://www.workday.com/<tenant> |
| Identity provider SSO service URL | https://login.microsoftonline.com/<entra-tenant-id>/saml2 |
| Sign-on redirect URL | The Reply URL from the Microsoft Entra worksheet. |
| Certificate thumbprint and expiration date | From the Microsoft Entra worksheet. |
| Microsoft Entra Application ID URI | api://<application-id>. Shown for reference only. Don't use it as the Workday Service Provider ID. |
Follow these rules throughout:
- Change only missing or incorrect settings. Keep healthy existing configuration.
- Don't replace another identity provider's SAML row.
- Return only non-secret values. Never return passwords, client secrets, tokens, cookies, certificate contents, private keys, or lists of employees.
Workday task 1: Verify SAML federation
- Sign in to your Workday tenant, and run the Edit Tenant Setup - Security task.
- Open SAML Setup.
- Find the enabled SAML Identity Providers row for Microsoft Entra ID whose Used for Environments value matches the employee environment you're connecting. If there's no Microsoft Entra row, add one.
- Confirm that the row's Issuer exactly matches the reference value. If it doesn't match, stop. Don't replace another federation.
Workday task 2: Add the Microsoft Entra signing certificate
- Run the Create x509 Public Key task.
- Paste the Base64 certificate from the Microsoft Entra administrator. Don't paste it into the agent chat.
- Give the public key a name that's easy to recognize, and save it.
- Return to the Microsoft Entra SAML row, and select the new public key in X509 Certificate.
- Verify that the key's expiration date matches the date from the Microsoft Entra worksheet. If the key is different, missing, or uncertain, resolve it in Workday before you continue.
Workday task 3: Configure tenant security
- Return to Edit Tenant Setup - Security.
- Turn on OAuth 2.0 Clients Enabled and Enable SAML Authentication.
- Set Service Provider ID to
http://www.workday.com/<tenant>. Don't use theapi://value. - Set the identity provider SSO service URL and the sign-on redirect URL to the reference values.
- Save the changes.
Workday task 4: Configure the API client
- Check whether an approved API client already exists for signed-in employees. Reuse it only if all of the following settings are true:
- Client Grant Type is SAML Bearer Grant.
- Include Workday Owned Scope is Yes.
- Scope (Functional Areas) is exactly Core Payroll, Organizations and Roles, Staffing, and Time Off and Leave.
- If no approved client meets these requirements, run the Register API Client task with these settings. Keep other approved clients.
Workday task 5: Configure domain security for your rollout
The agent calls Workday as the signed-in employee, so Workday domain security controls which data each employee can get through the agent. API client scopes don't replace domain security permissions. Configure both.
Start with the Worker Data: Public Worker Reports domain, which provides employee context information. Access to this domain doesn't give access to all data in the Core Payroll, Organizations and Roles, Staffing, or Time Off and Leave functional areas.
Choose the security group for your rollout:
- Testing or limited rollout: Use a security group that contains only the employees who will test or use the agent, including the test employee. Expand access when you're ready to roll out more broadly.
- Production rollout: Use All Employees when you deploy to your entire workforce.
Don't start with All Employees for a test rollout.
In the Workday search box, enter view domain, and then select the View Domain report.
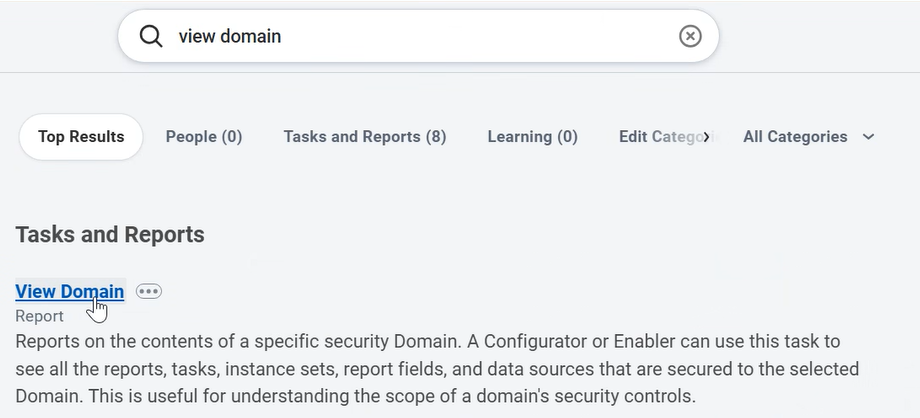
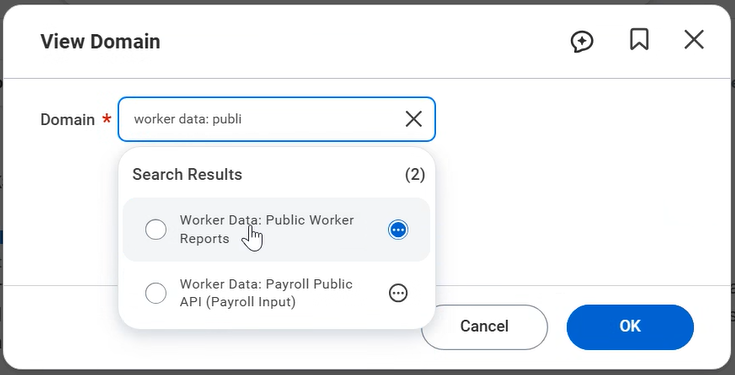
In Domain, enter Worker Data: Public Worker Reports, select it from the search results, and then select OK.
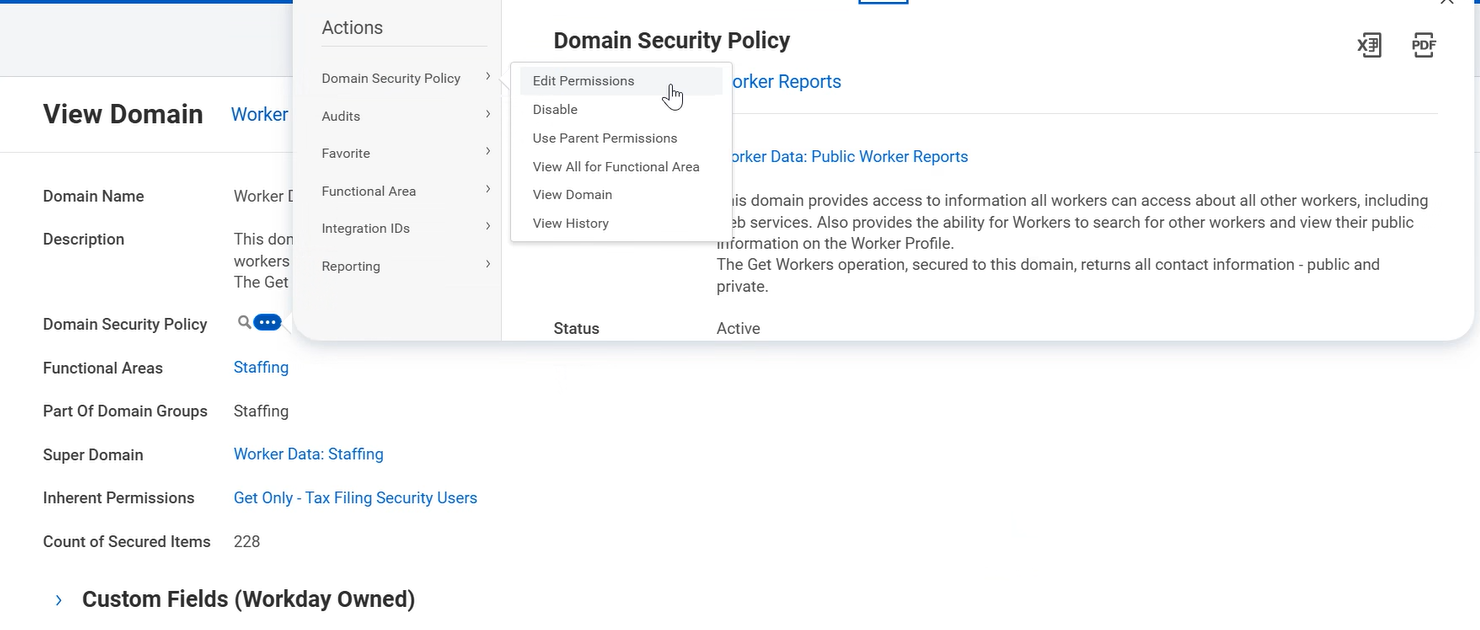
Next to Domain Security Policy, select the related actions button (...), and then select Domain Security Policy > Edit Permissions.
Under Integration Permissions, add the security group from step 1 and select Get. Grant access under Integration Permissions, not under Report/Task Permissions.
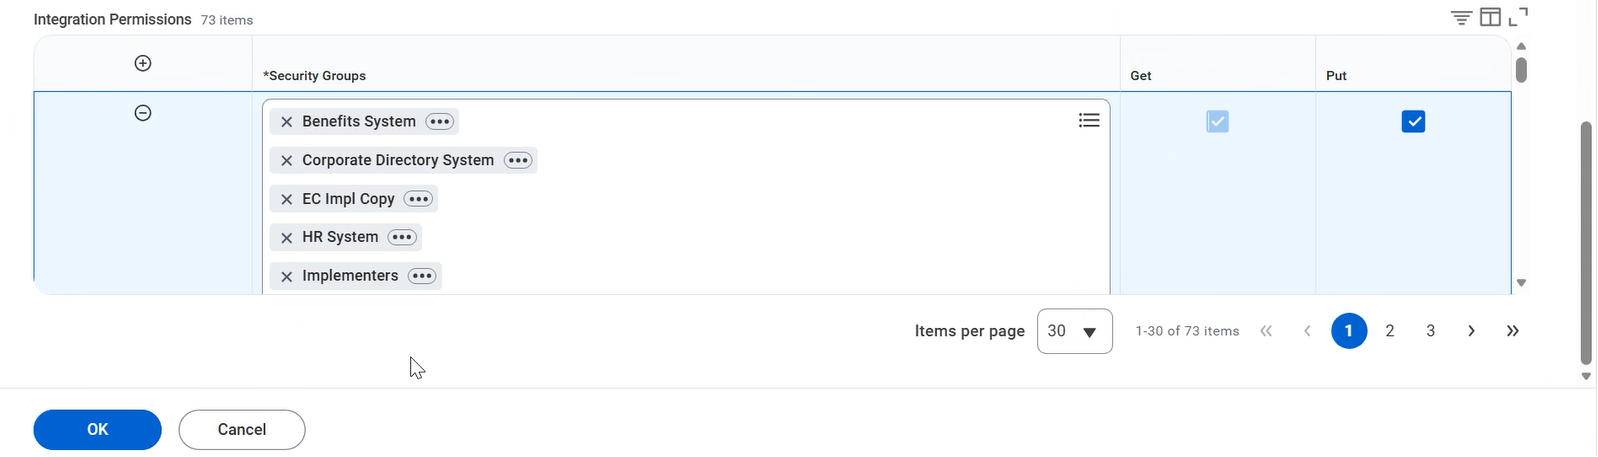
Select OK.
Configure additional domains for the scenarios you support
Which domain governs a given piece of employee data depends on how your tenant is configured. For example, phone numbers might be governed by Worker Data: Public Worker Reports or by another domain, such as Personal Data, Staffing, or Worker Data: Dependents.
For each employee scenario that you plan to support:
- Identify the security domain that governs the data for that scenario in your tenant.
- Repeat steps 2-6 for that domain, and grant Get under Integration Permissions to the same security group.
- Sign in as a test employee in that security group and confirm that the agent returns the data. If the agent returns a "Task not authorized" error, the data is governed by a domain that you haven't configured yet.
Grant only the permissions that the scenarios you support require. The example domains aren't a list of permissions that every deployment needs.
Workday task 6: Collect the API client values
- Run the View API Client task.
- Record the client ID and the token endpoint. The client ID isn't a secret.
- Record the REST base URL, which ends in
/ccx/api. - Find and record the SOAP base URL:
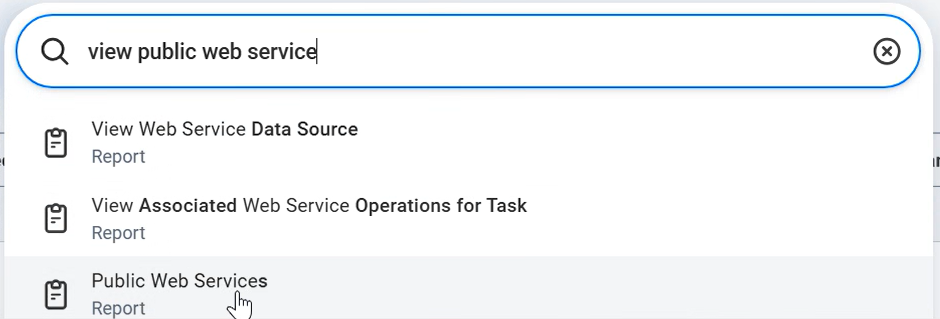
In the Workday search box, enter view public web services, and then select the Public Web Services report.
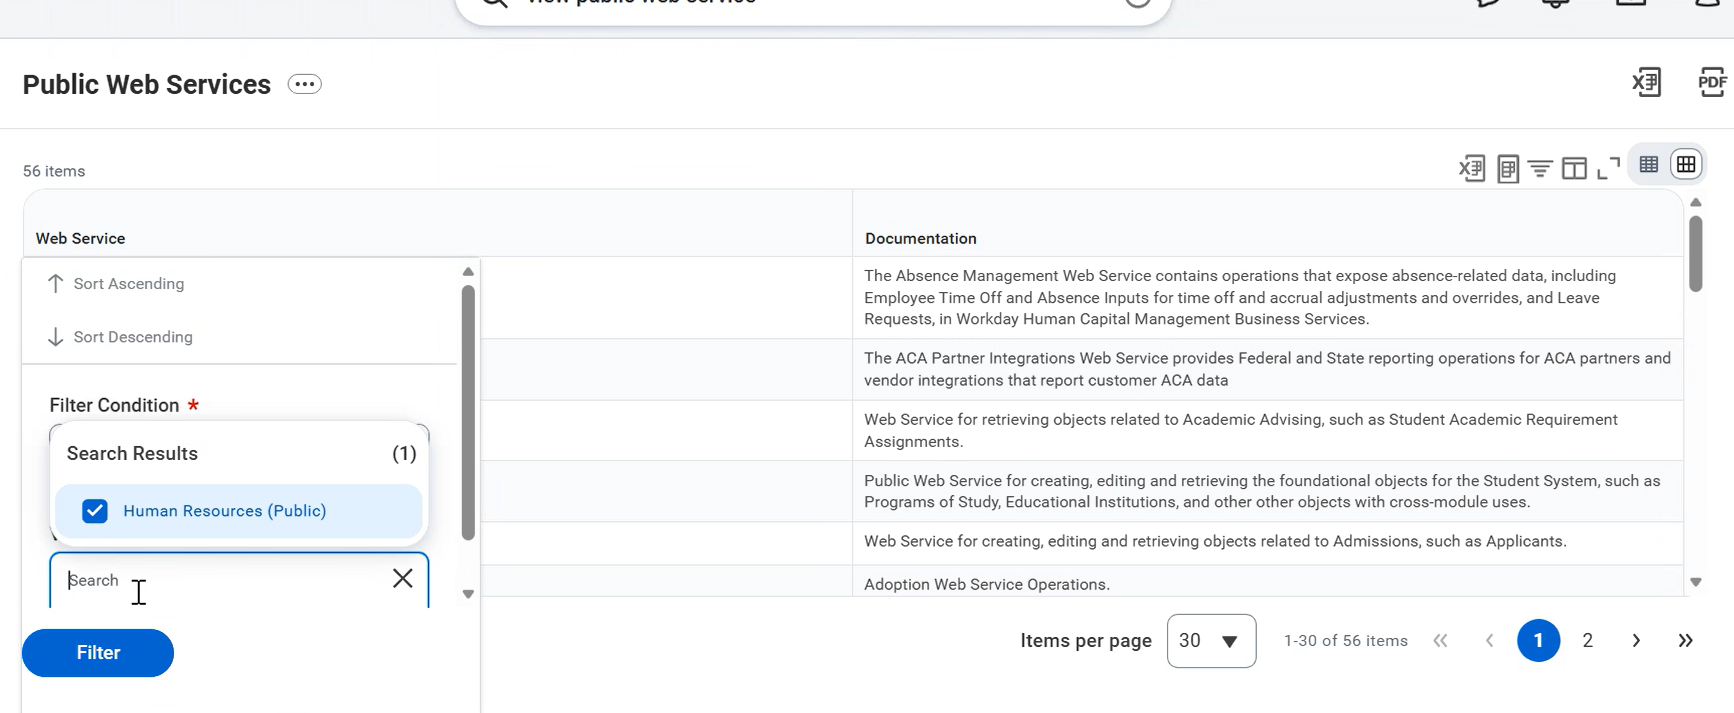
In the Web Service column, filter the table to show Human Resources (Public).
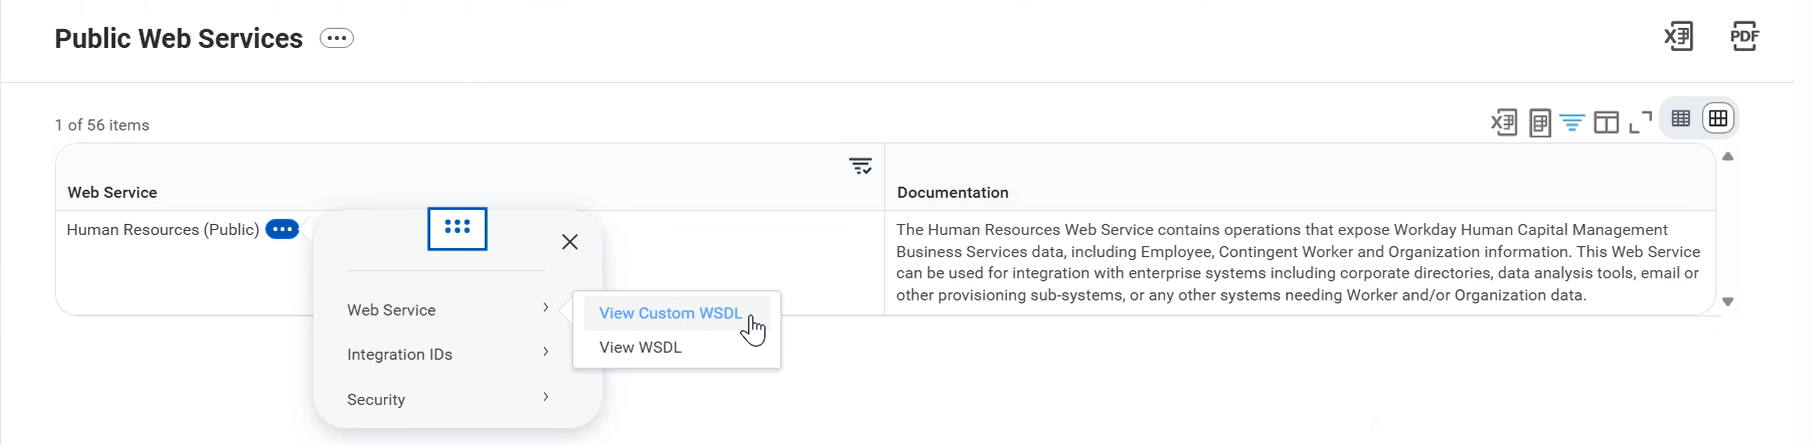
Select the related actions button (...) next to Human Resources (Public), and then select Web Service > View Custom WSDL. The WSDL opens in XML format.
Search the WSDL for
soapbind:address location.Copy the
locationvalue up to and including/ccx/service/. Don't include the tenant name, service name, or version that follow. For example, if the value ishttps://wd5-services1.myworkday.com/ccx/service/contoso/Human_Resources/v48.0, recordhttps://wd5-services1.myworkday.com/ccx/service/.
Workday task 7: Activate authentication policies
- Run the Manage Authentication Policies task for the employee environment.
- Confirm that an active rule allows SAML authentication for the employees who will use the agent. Keep administrator safeguards and network restrictions. Don't use an integration system user (ISU) rule, because this setup runs as the signed-in employee.
- If you change the policy, review every pending authentication policy change. Then run Activate All Pending Authentication Policy Changes.
Workday task 8: Confirm network readiness
- If your organization filters outbound network traffic, give the Workday REST and SOAP host names to your network administrator. For more information, see Network requirements.
- Confirm that both hosts are allowed, or that no firewall change is required.
Workday task 9: Return the Workday worksheet
Fill in the Your tenant values column of the worksheet in the handoff, and return it to the maker through your approved channel. Example values are illustrative.
| Information | Where to find it | What to record | Example |
|---|---|---|---|
| SAML row settings | Edit Tenant Setup - Security > SAML Setup | Confirm that the Microsoft Entra row matches the Issuer, Service Provider ID, SSO URL, and redirect URL. | Yes, all four values match |
| Certificate | SAML Setup > Microsoft Entra row > X509 Certificate | Confirm that the selected public key was created from the transferred certificate and that its expiration date matches the Microsoft Entra worksheet. | Yes, confirmed |
| OAuth client ID | View API Client > Client ID | The client ID. | <client-id> |
| API client settings | View API Client | Confirm that the grant type, Workday owned scope, and the four functional areas match Workday task 4. | Yes, confirmed |
| OAuth token URL | View API Client > Token Endpoint | The full HTTPS token endpoint. | https://wd5.myworkday.com/ccx/oauth2/contoso/token |
| REST base URL | Workday REST service endpoint | The base URL that ends in /ccx/api. |
https://wd5.myworkday.com/ccx/api |
| SOAP base URL | Public Web Services report > Human Resources (Public) > View Custom WSDL > soapbind:address location |
The URL up to and including /ccx/service/, without the tenant name. |
https://wd5-services1.myworkday.com/ccx/service/ |
| Domain security | View Domain > Domain Security Policy > Edit Permissions | Confirm that the rollout security group has Get under Integration Permissions on Worker Data: Public Worker Reports and on any additional domains for your supported scenarios. | Yes, verified |
| Authentication policy | Manage Authentication Policies | Whether an existing SAML rule is active, or you activated a reviewed policy. | An existing active policy allows SAML |
| Network readiness | Your organization's network policy | Whether both Workday hosts are allowed, or no change is required. | Both hosts are allowed |
Note
You can't verify employee authorization until the maker creates the Workday connection. If an employee gets a Task not authorized error after setup, see Troubleshooting.
System topics
The ESS HR agent includes the following supporting system topics. The employee-facing Workday topics depend on them.
| System topic | Purpose |
|---|---|
| Workday [System] - 1: Set Runtime Template Configurations | Loads the Workday runtime template configurations, including reference data. The conversation start topic calls this topic. |
| Workday [System] - 1: Set User Context V2 | Resolves the signed-in employee's Workday identity. |
| Workday System AccessCheck | Checks that the employee can access Workday through the agent. |
| Workday System Get CommonExecution | Runs shared Workday SOAP requests. |
| Workday System Get REST Execution | Runs shared Workday REST requests. |
| Workday System ManagerCheck | Determines whether the employee is a manager. |
| Workday System ParseError | Converts Workday errors into messages for employees. |
Caution
Don't edit, turn off, or delete the system topics. If you do, the employee-facing Workday topics stop working. The only exception is updating reference data values in the Set Runtime Template Configurations topic, as described in Customize Workday reference data.
Customize Workday reference data
Some Workday topics use reference data, such as passport, visa, and national ID types, languages, phone device types, and country/region codes. Microsoft prepopulates this data in the Workday package, based on the standard Workday catalog values. The data is stored in the Workday [System] - 1: Set Runtime Template Configurations topic, which the conversation start topic calls when a conversation begins. The agent doesn't read these lists from your Workday tenant.
If your organization customized any of these lists in Workday, update the matching values in the topic so that they match your tenant.
When to customize reference data
Customize reference data if:
- A topic that returns a list, such as passports or visas, returns no results or labels that look wrong for your tenant.
- A Workday update returns an
Invalid_Reference_IDerror. This error means that the agent sent a reference ID that your Workday tenant doesn't recognize. - Your Workday team confirms that your tenant uses customized reference IDs for any of the types listed in the following table.
If you don't see errors and all values look correct, you don't need to customize reference data.
Reference data in the agent
The topic includes 17 reference data types. Each type is stored as a separate scenario in the Workday [System] - 1: Set Runtime Template Configurations topic. Use the scenario name to find the type in the code editor.
Some types aren't used by the Workday topics that are included with the agent. They're available if you extend the agent with your own Workday scenarios. If you build a topic that uses one of these types, check its values against your tenant too.
| Reference data | Scenario name in the topic | Used by |
|---|---|---|
| Phone Device Type | HRWorkdayHCMReferenceData_PhoneDeviceType |
Workday Update PhoneNumber |
| Country/region phone code | HRWorkdayHCMReferenceData_CountryPhoneCode |
Workday Update PhoneNumber |
| ISO country/region | HRWorkdayHCMReferenceData_ISO3166Country |
Workday Update PhoneNumber |
| Passport ID Type | HRWorkdayHCMReferenceData_PassportIdType |
Workday Get Passports |
| National ID Type | HRWorkdayHCMReferenceData_NationalIdType |
Workday Get NationalIDs |
| Government ID Type | HRWorkdayHCMReferenceData_GovernmentIdType |
Not used by an included topic. Available for custom scenarios. |
| Visa ID Type | HRWorkdayHCMReferenceData_VisaIdType |
Workday Get Visas |
| Degree | HRWorkdayHCMReferenceData_Degree |
Workday Get Certifications |
| Field of Study | HRWorkdayHCMReferenceData_FieldOfStudy |
Not used by an included topic. Available for custom scenarios. |
| Language | HRWorkdayHCMReferenceData_Language |
Workday Get LanguageInformation |
| Language Ability Type | HRWorkdayHCMReferenceData_LanguageAbilityType |
Workday Get LanguageInformation |
| Language Proficiency | HRWorkdayHCMReferenceData_LanguageProficiency |
Workday Get LanguageInformation |
| Employee Type | HRWorkdayHCMReferenceData_EmployeeType |
Workday Get EmploymentInformation |
| Position Time Type | HRWorkdayHCMReferenceData_PositionTimeType |
Workday Get EmploymentInformation |
| Job Family | HRWorkdayHCMReferenceData_JobFamily |
Workday Get EmploymentInformation |
| Management Level | HRWorkdayHCMReferenceData_ManagementLevel |
Workday Get EmploymentInformation |
| Related Person Relationship | HRWorkdayHCMReferenceData_RelatedPersonRelationship |
Workday Get EmergencyContact |
Find the values in Workday
The source of truth for each reference data type is your Workday tenant. A Workday administrator or a member of your HRIS team completes these steps.
Sign in to Workday as a user with Integration Configuration access.
In the Workday search bar, enter Maintain Reference IDs, and run the task.
Select the Reference ID Type that you want to check. The Reference ID Type names in Workday match the Reference data column in the previous table. For example, select Passport ID Type to check the values for
HRWorkdayHCMReferenceData_PassportIdType.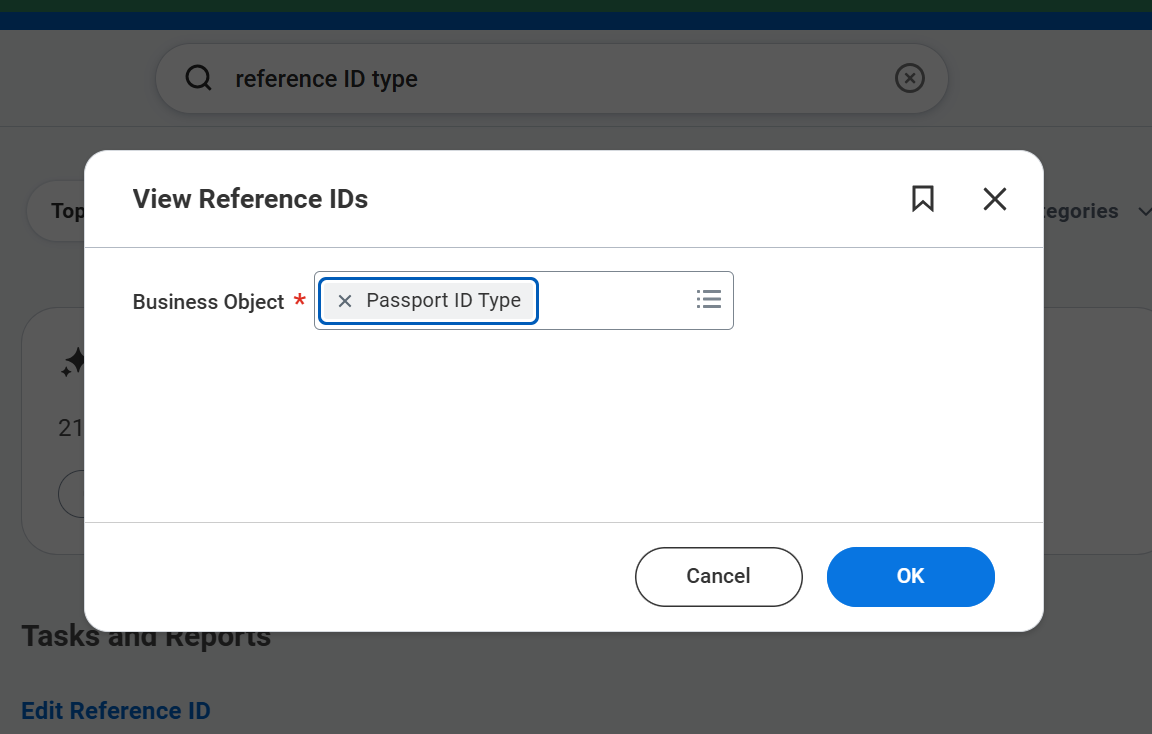
Review the list of reference IDs that are configured in your tenant. The Reference ID column is the key that the agent sends to Workday. The Name or Description column is the label that the agent shows to employees.
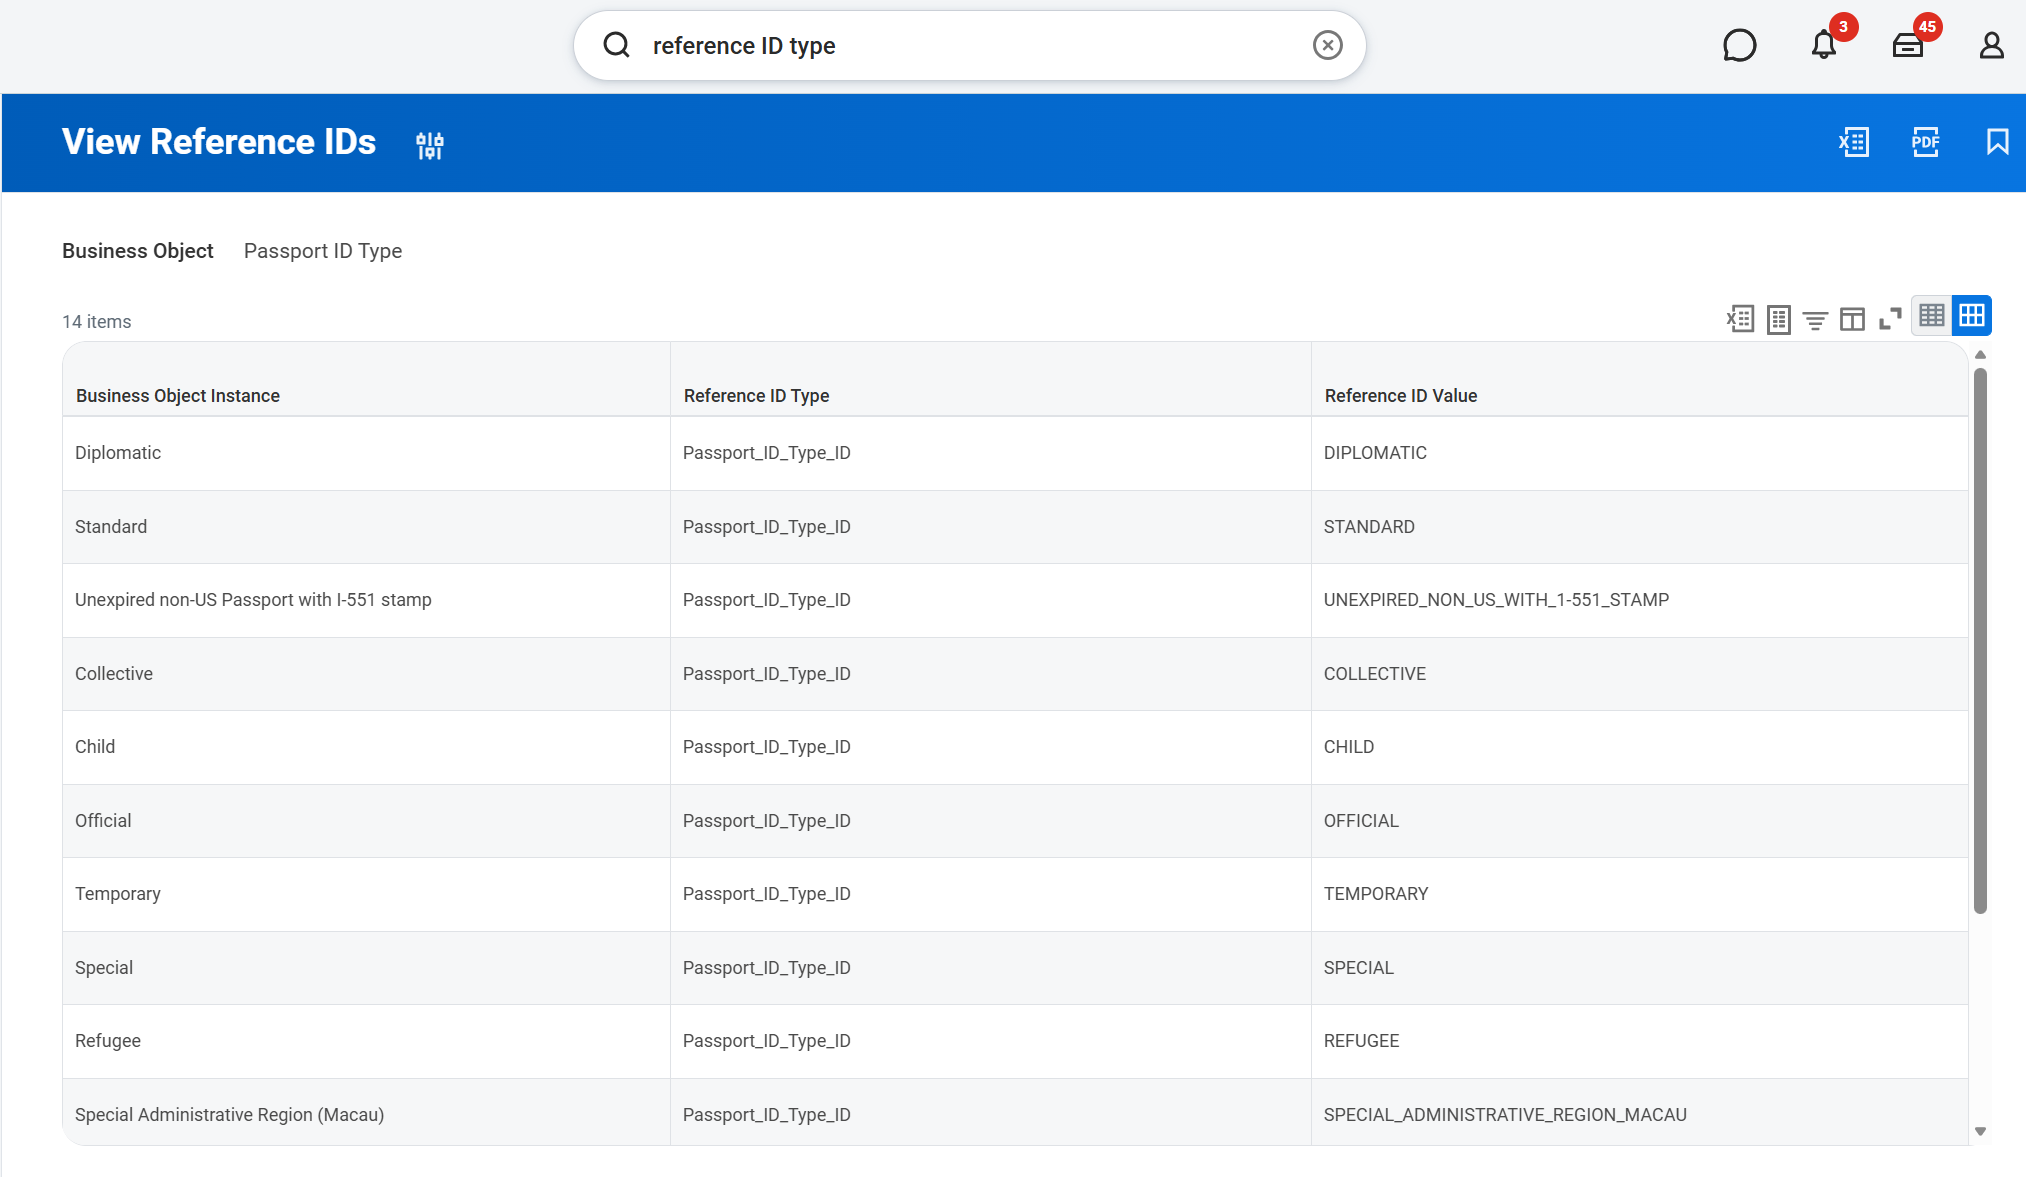
Export or copy the list so that the maker can compare it with the values in the agent.
If you don't have access to Maintain Reference IDs, use one of the following tasks, which return the same data:
- View Reference IDs: A read-only view of the same lists, with broader access.
- Maintain Languages, Maintain Language Abilities, and Maintain Language Proficiencies: Each task shows the reference IDs for the related language reference data type.
Update the values in the agent
You need maker access to the ESS HR agent in Copilot Studio. Update reference data in your Development environment first, and validate the change before you promote the agent.
In Copilot Studio, open the ESS HR agent, and select Topics.
Search for and open Workday [System] - 1: Set Runtime Template Configurations.
Select Open code editor.
Search for the scenario name of the reference data type that you want to update, such as
HRWorkdayHCMReferenceData_PassportIdType.Within that scenario, find the entries that you want to change. Each entry has the form
<i k=""ReferenceId"" v=""Display label""/>. Thekattribute is the Workday reference ID that the agent sends to Workday. Thevattribute is the label that the agent shows to employees.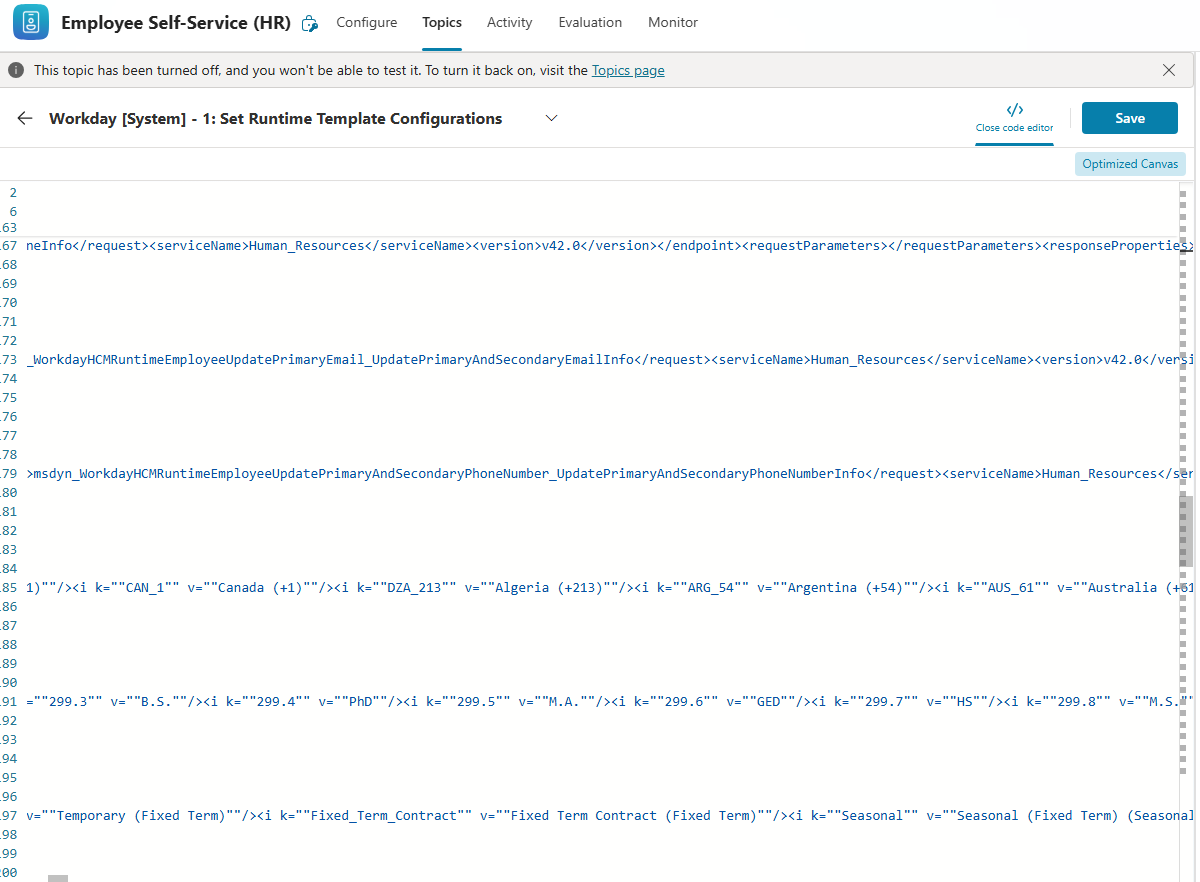
Compare each entry with the list from Workday, and update the topic:
- If a
kvalue doesn't exist in your tenant, change it to a valid reference ID, or remove the entry. - If a reference ID from Workday is missing, add an entry in the same form inside the scenario.
- If a
vlabel is outdated, update it. Labels are only displayed and aren't sent to Workday.
- If a
Select Save.
Test a Workday topic that uses the updated reference data, such as updating a phone number. Then publish the agent.
Important
The reference data is stored in a string inside the topic, so each quotation mark is doubled (""). Keep the doubled quotation marks and the <i ... /> structure when you edit an entry. If the topic has a syntax error, the Workday topics can't load their configuration and stop working.
Keep your changes
Your changes to reference data carry over when you promote the agent from Development to Test and Production. You don't need to make the changes again in each environment.
Upgrading the ESS HR agent or the Workday package resets the Workday [System] - 1: Set Runtime Template Configurations topic to the values that Microsoft provides. Before you upgrade the ESS HR agent or the Workday package, back up your changes. After the upgrade, reapply them, and then test the affected Workday topics.