Note
Access to this page requires authorization. You can try signing in or changing directories.
Access to this page requires authorization. You can try changing directories.
You can pin the Microsoft Copilot app to the Windows taskbar on domain-joined devices by using Group Policy (GPO). Use this method if your organization manages devices through on-premises Active Directory Domain Services (AD DS) instead of Intune.

Note
If you manage your devices with Intune, use the built-in setting in the Microsoft 365 admin center instead. For more information, see Pin Microsoft Copilot to the Windows taskbar.
How it works
Windows supports configuring applications pinned to the taskbar through policy. This article focuses specifically on using Group Policy to pin the Microsoft Copilot app.
Note
For general information about configuring taskbar pinned applications, taskbar layout XML, and supported deployment methods, see Configure the applications pinned to the taskbar.
When you use Group Policy, the Start Layout policy stores a UNC (network) path. Windows reads the XML file from that path each time it processes the policy and pins the apps it defines.
Devices that are managed by both Group Policy and Intune (MDM)
Avoid configuring the equivalent taskbar setting through both Group Policy and Intune/MDM on the same device. For information about policy conflicts and configuring precedence between MDM and Group Policy, see ControlPolicyConflict Policy CSP.
Prerequisites
Before you start, make sure you have the following available:
- Microsoft Copilot app installed on the targeted devices or users. If the app isn't installed, the policy can still apply successfully, but the Copilot pin won't appear on the taskbar.
- Active Directory Domain Services (AD DS) setup
- Group Policy Management Console (GPMC) installed
- Obtained permissions to create, edit, and link Group Policy Objects
- A network-accessible UNC path to host the taskbar XML file
- Read access to that UNC path for all targeted users or devices
- A targeting strategy based on organizational units (OUs) or security groups
Step 1: Create the taskbar layout file
Important
Check if you already manage a taskbar layout XML. Keep a copy as a backup and check if there are any other apps pinned in the taskbar layout XML. For more information about configuring taskbar layout, see Configure the Windows Taskbar Pinned Apps with Policy Settings.
If there's no existing taskbar XML, create an XML file (for example, CopilotTaskbar.xml shown in the following section) that lists the Copilot app to pin.
<?xml version="1.0" encoding="utf-8"?>
<LayoutModificationTemplate
    xmlns="http://schemas.microsoft.com/Start/2014/LayoutModification"
    xmlns:defaultlayout="http://schemas.microsoft.com/Start/2014/FullDefaultLayout"
    xmlns:start="http://schemas.microsoft.com/Start/2014/StartLayout"
    xmlns:taskbar="http://schemas.microsoft.com/Start/2014/TaskbarLayout"
    Version="1">
  <CustomTaskbarLayoutCollection>
    <defaultlayout:TaskbarLayout>
      <taskbar:TaskbarPinList>
        <taskbar:UWA AppUserModelID="Microsoft.MicrosoftOfficeHub_8wekyb3d8bbwe!Microsoft.MicrosoftOfficeHub" />
      </taskbar:TaskbarPinList>
    </defaultlayout:TaskbarLayout>
  </CustomTaskbarLayoutCollection>
</LayoutModificationTemplate>
Note
The AppUserModelID (AUMID) shown above is the current AUMID for the Microsoft Copilot app. AUMIDs can change between app versions or release channels, so verify it on a reference device before deploying broadly, using:
Get-StartApps | Where-Object { $_.Name -like "*Copilot*" }
Copy the value from the AppID column and use it in the AppUserModelID attribute. For more ways to find an AUMID, see Find the Application User Model ID of an installed app.
If there's already an existing taskbar layout XML file being used and you want to pin the Copilot app in addition to existing apps, add one <taskbar:UWA> line per app, in the order you want them to appear (left to right).
Step 2: Publish the file on a shared location
Share the XML file.
Create a network share. Save the XML file to a folder on a server, then share that folder over the network (use a central, highly available server).
Set permissions. Grant Authenticated Users Read permission on both the network Share permissions and the NTFS security permissions on the folder. This permission setting ensures every targeted device or user account can read the file during policy processing.
Note the UNC path. For example:
\\SERVER01\TaskbarLayout\CopilotTaskbar.xmlIn this example, theTaskbarLayoutis the shared folder name.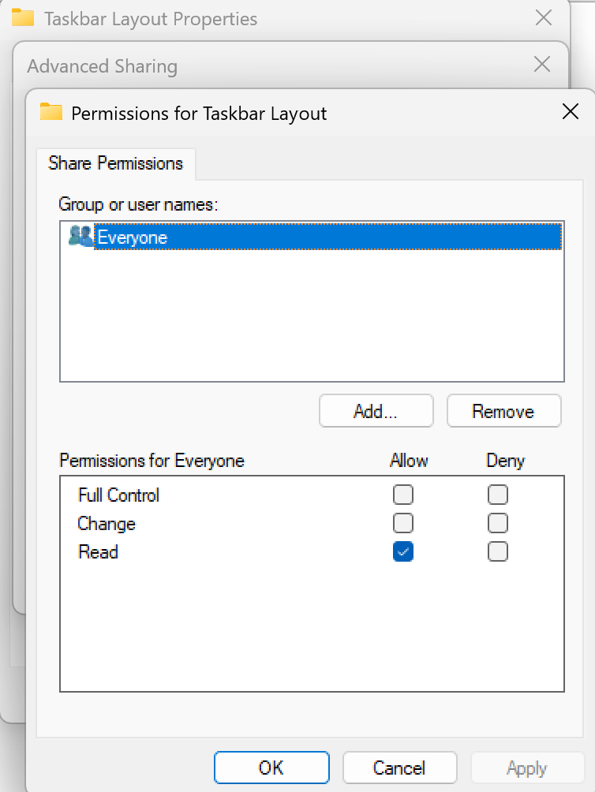
Step 3: Configure Group Policy Object (GPO)
Configure and save the GPO using the Group Policy Management Editor.
Open Group Policy Management Editor.
Right-click Group Policy Objects, and create a new GPO (for example, name it "Windows 11 Taskbar").
Right-click the new GPO and select Edit.
Determine whether to target users or devices, and validate your choice in a test environment before rolling it out broadly: User Configuration applies per user, regardless of which device they sign in to. Computer Configuration applies to the device, regardless of who signs in.
Navigate to the matching policy path: User Configuration > Policies > Administrative Templates > Start Menu and Taskbar, or Computer Configuration > Policies > Administrative Templates > Start Menu and Taskbar (if targeting devices).
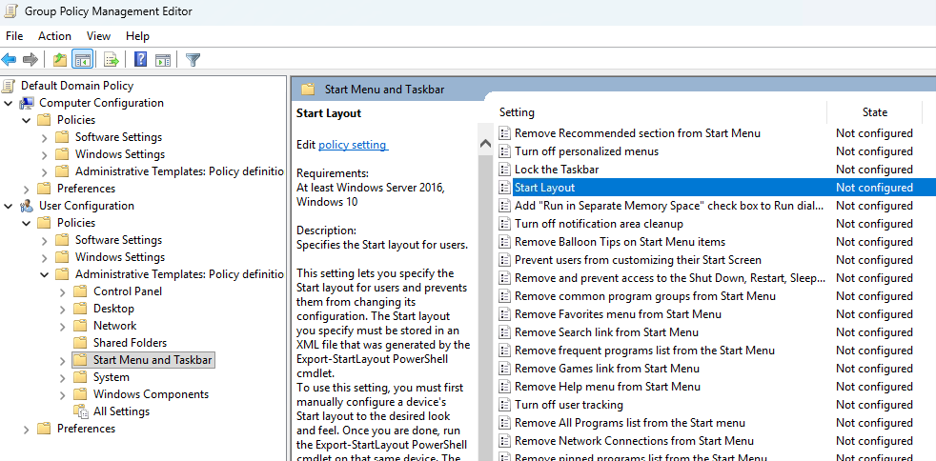
Open the Start Layout policy setting, select Enabled, and paste the UNC path to your XML file (from Step 2) into the path field Start Layout File. Don't include quotation marks around the UNC path.

Save the GPO by selecting OK.
Note
For more information about Group Policy Objects, see Define Group Policy Objects.
Step 4: Target the policy
- (Optional) Add a WMI filter. Link a WMI filter to the GPO if you need to restrict it to a specific OS version (for example, only Windows 11 devices).
- Link the GPO. Drag and drop the GPO onto the organizational unit (OU) that contains your target computers or users.
Step 5: Apply and verify
- On a test client machine, open Command Prompt and run:
gpupdate /force - Sign the user out and back in. The policy change requires a sign-out/sign-in cycle to take effect.
- Confirm that the Copilot app now appears pinned on the taskbar.
Once verified on a test device, the policy automatically applies to the rest of the targeted computers or users at their next Group Policy refresh interval.
Troubleshoot deployment
If the pin doesn't appear, check these items:
- The device can reach the network share that hosts the XML file.
- The GPO applies to the computer account.
- The taskbar layout file uses the correct app identifier or shortcut path.
- Another policy or user customization isn't replacing the pinned layout.
- If the app identifier is wrong, Windows ignores the pin entry. Recheck the identifier that matches the Microsoft Copilot app version you deploy.
Related content
- Configure the Windows taskbar pinned apps with policy settings
- Configure the Windows Start layout
- Find the Application User Model ID of an installed app
- Pin Microsoft Copilot to the Windows taskbar (Intune-managed devices)
- Policy CSP - ControlPolicyConflict (MDMWinsOverGP)
- Policy configuration service provider