Note
Access to this page requires authorization. You can try signing in or changing directories.
Access to this page requires authorization. You can try changing directories.
Microsoft uses a usage-based billing model that uses Copilot Credits to provide flexible payment options alongside fixed licensing. This model enables organizations to manage and optimize AI service expenses effectively through centralized tools like the Cost management dashboard in the Microsoft 365 admin center.
The Cost Management dashboard in the Microsoft 365 admin center helps organizations control, monitor, and optimize Copilot Credit spending for AI experiences enabled by usage-based billing. Administrators can allocate credits, set access policies and limits, use prepaid purchase plans or pay-as-you-go billing, and rely on budgets, alerts, and hard caps to track usage, understand cost drivers, and prevent overspending.
Important
The usage-based billing method currently only applies to Copilot Cowork and Work IQ API. Microsoft is working to bring more agents and services to be managed by this experience.
To learn more about discovery settings for AI experiences enabled by usage-based billing, see Discovery setting for AI experiences enabled by usage-based billing.
Role requirements
Global administrator and Billing administrator roles have access to add, select, and change billing methods, and set billing methods in policies.
AI administrator and License administrator roles have access to create spending policies, manage limits and alerts, and view the Cost management dashboard. They can't set or modify the billing method.
Important
Microsoft recommends that you use roles with the fewest permissions. Using roles with the fewest permissions helps improve security for your organization. Global administrator is a highly privileged role that you should limit to emergency scenarios when you can't use an existing role. For more information, see About administrator roles in the Microsoft 365 admin center.
To learn more about these roles, see Microsoft 365 admin roles.
Get started with usage-based billing
This section covers the initial setup to guide administrators through enabling usage-based billing and creating the first spending policy. This process activates the AI experiences, like Cowork, that are gated by usage-based billing.
Sign in to the Microsoft 365 admin center with one of the following administrator roles:
- Global administrator
- Billing administrator
In the Microsoft 365 admin center, go to Copilot and then the Cost Management node.
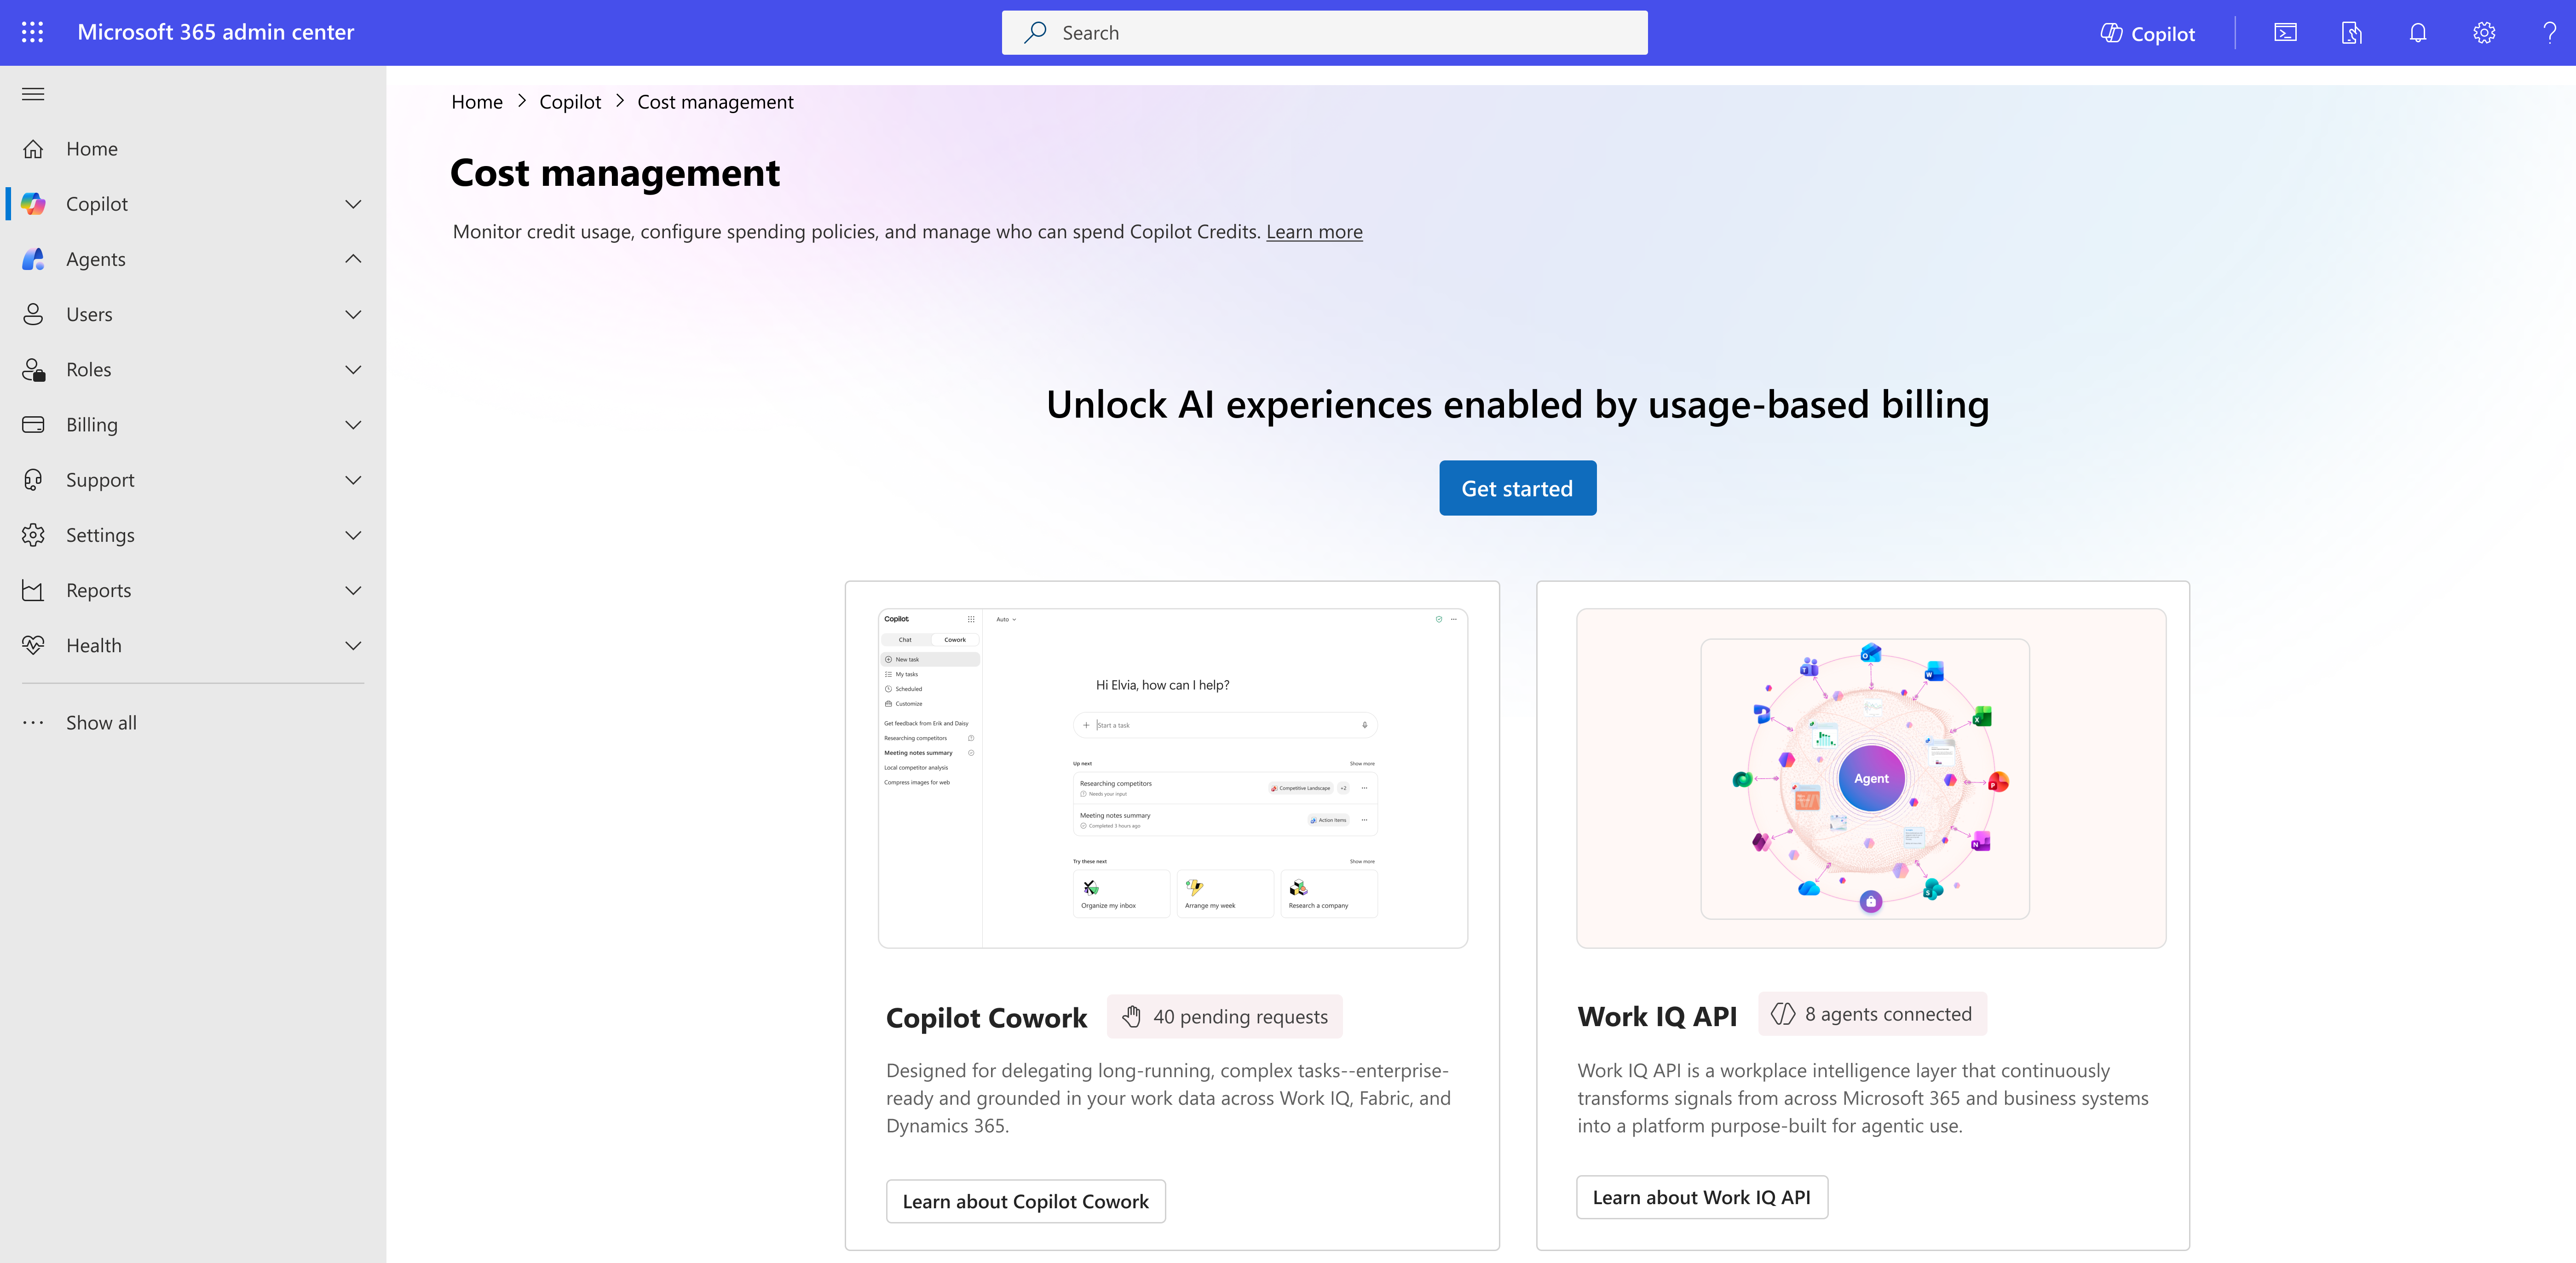
To unlock AI experiences enabled by usage-based billing, select Get Started. This feature is currently available for Cowork and Work IQ API.
A side-panel with the title Activate the default spending policy for your organization opens.
In the Billing method section, select how your organization is billed for Copilot credit usage. Select the default subscription for your organization. This subscription is selected by default for other policies that you create. For more detailed information on how the billing method is populated, see Configure billing method.
In the Set the monthly spending limit for this policy section, select one of the options.
Don't limit monthly spending - Allows the policy to use credits against the organization's billing method without restrictions.
Limit monthly spending - Limits the number of credits the default policy can spend each month.
In the Select the monthly spending limit for users (optional) section, set a monthly limit for users to prevent a single person from spending all available credits. Although this selection is optional, review and set this option for your organization to prevent runaway spending of Copilot Credits by one individual user.
In the Define alerts section, select who to send an email to when the credits usage reaches the threshold you specify for the policy. Select the stakeholders and then the alert threshold. Emails start at the threshold specified and continue weekly until the month resets, or you adjust the limits.
Note
The field prepopulates the logged in administrator email and suggests the administrators that you selected in billing notifications for alerting.
The default setup targets your entire organization and all users. Optionally, you can customize the default spending policy to specific groups or change the services it governs by selecting Customize setup configuration before selecting Activate.
Select Activate. You're notified that the set up is complete.
Select Manage Configuration. The Configuration tab within the Cost management page is displayed. Copilot consumptive services are now available. You can configure more policies to scope access to specific groups, users, or services.

Add or edit spending policies
You can edit the default spending policy or add more spending policies. Have a policy for All users as a default policy that applies when no other policy is assigned.
Select +Add spending policy and go through the screens to create the spending policy. The following sections describe the steps that you need to complete as you go through the tabs.
Scope user and group
Give this policy a name and select the specific groups that this policy applies to.
Create and name the policy.
Select the users or groups to which the policy applies. By default, All users is selected. To target this rule to a subset of users, switch to Specific groups and select the directory group. You can also select multiple groups.
At this time, specific users are only supported through security groups. To add specific users to a spending policy, ensure they're in a security group first and then select specific groups from the policy setup.
Select Next.
Set limits and alerts
For the users and groups that you selected for this policy, select the credit limits that apply to them, similar to what you did for the default spending policy.
Select the monthly spending limit for this policy.
Unlimited monthly budget: Applies to users and groups in this policy on a monthly basis.
Limited monthly budget: When you select a limited monthly budget, you limit the number of credits that this policy can spend each month.
When users hit the limit, they lose access to agents and services for the rest of the month until credits reset on the first of the month.
The policy always uses prepaid credits first, whether through capacity packs or through P3 plans, before moving to pay-as-you-go.
Select monthly budget limits for users (optional). Use the toggle to select this option and to set a monthly limit for users to prevent a single person from spending all available credits.
- Specify the maximum credit limit users can spend per month.
Define alerts for usage thresholds. Send an email to yourself or others when credits reach or approach the threshold you define.
- If you set user limits (ceilings), you can also set up alerts for when any users are hitting 70% of the limit you set for them.
Select Next.
Select agents and services
Select the agents and services that users and groups in this policy can access.
Use the check box to select the agents and services that can consume credits against the billing method tied to this policy.
By default, the Allow new services and agents as they become available toggle is selected. When new agents and services are released and become available for Copilot Credits, they're added to this policy. You can turn off the toggle if necessary or uncheck specific agents and services as you see fit.
Select Next.
Select billing method
By default, the field selects the billing method tied to the default spending policy.
If you're a Global administrator or a Billing administrator, you can override this selection and select how this policy should be billed. This feature enables you to do departmental billing and vary billing methods for each group, department, or set of users.
For Global or Billing administrators
Select Change to override.
If your tenant has capacity packs, you can choose to use them.
Alternatively, you can choose a different Azure subscription to bill against. For more information, see Configure billing methods.
Review and create
Review all the details and select Create spending policy to complete the setup.
You're notified that the spending policy is created. Select Done.
The spending policy now shows up in the Configuration list and starts applying to scoped users immediately.
Configure billing method
You have a few choices when configuring billing methods in spending policies.
Important
A default billing method is preconfigured, but you can change it at any time.
Copilot Credit Pre‑Purchase Plan (P3) and pay‑as‑you‑go aren't separate billing options. P3 is layered on top of pay‑as‑you-go.
Agent Pre‑Purchase Plan (Agent P3) isn't currently supported in this experience.
After you set a billing method for a spending policy and create the policy, you can't change it. To update it, you must delete the policy and create a new one.
Create a new Azure subscription
If you don't have an existing Azure subscription or prefer not to use one, create a new subscription directly from the Microsoft 365 admin center.
If you don't have access to any Azure subscriptions, the system automatically creates a subscription for you by using the billing account linked in the Microsoft 365 admin center.
You must be a Global administrator to create a new subscription this way.
Alternatively, you can manually create a subscription by selecting Create new from the subscription dropdown.
Use an existing Azure subscription
If you already have Azure subscriptions, the system shows the subscriptions linked to the billing account that you can access. These subscriptions appear in the Subscription dropdown by name, and you can hover to view the subscription ID.
To learn more about your subscriptions or decide which one to use for usage-based billing, review and manage them in the Azure portal: View Azure subscriptions.
Some subscriptions show an X prepaid credits available label. This label indicates that a Copilot Pre-purchase plan (P3) is attached. The process uses available prepaid credits first, and once they're exhausted, usage automatically continues on a pay-as-you-go basis.

If available, the system selects a subscription with P3 credits by default. Learn more about prepaid discounts.
Buy prepaid credits (Pre-purchase plan: P3)
You can purchase a Copilot Credit Pre‑Purchase Plan (P3) from the Microsoft 365 admin center by selecting Buy prepaid credits on the Cost Management > Configuration page. You can also complete this step through the Azure portal.
Note
Pre‑purchasing annual credits provides discounted rates compared to pay‑as‑you‑go pricing. Larger commitments unlock greater discounts, and any usage beyond your prepaid credits automatically continues on a pay‑as‑you-go basis. For more information, see prepaid discounts in Optimize Copilot Credit costs with a pre‑purchase plan.
Steps to purchase prepaid credits
Go to Cost Management > Configuration.
Select Buy prepaid credits.
In the side-panel, choose the Azure subscription you want to use.
Select the credit amount based on your expected usage.
Review your current available credits before adding more capacity.
View the Copilot Credit Pre‑Purchase Plan (P3) details and total cost.
Select Go to checkout.
Review the purchase details, including Important information and Additional notes.
Select Purchase to complete the transaction.
After you purchase, a notification appears on the Configuration tab once processing is complete. The prepaid credits are available to select when you're selecting the subscription in the billing method when configuring spending policies.
Use existing prepaid capacity packs
If you purchased prepaid capacity packs, you can use them with the services in this experience.
During initial setup, if capacity packs are detected, they're set as the default billing method. We also recommend enabling a pay-as-you-go meter to ensure your services continue once prepaid credits are exhausted.
You can choose to apply capacity packs at the individual spending policy level in the Review billing method step.
You must be a Global administrator or Billing administrator to override or set the billing method.
Note
If both capacity packs and an Azure subscription with P3 prepaid credits are selected, billing is applied in the following order to keep spending predictable:
Capacity packs
P3 prepaid credits
Pay-as-you-go billing
For more information on other purchasing methods such as Capacity packs, see Microsoft Copilot Studio Licensing Guide.
Monitoring spending of Copilot Credits
Overview tab
This dashboard provides a centralized view of spending patterns, helping administrators identify where credits are used, who consumes them, and how usage trends evolve over time.
As an administrator, use these insights to monitor and understand organizational usage and adjust credit allocation as needed.
In the Microsoft 365 admin center, go to Copilot > Cost Management.
Select the Overview tab.
Review these sections:
Total Copilot Credits used.
Prepaid capacity pack credits usage (if applicable).
Pay-as-you-go credit used (includes Copilot pre-purchase plan (P3) credits).
Number of Active users of Copilot Credits.
From the Top Actions section, you can View credit requests and Manage spending policies by being alerted of spending policies credit usage near limit or users credit usage near limit.
Managing credit requests
To view and approve credit requests from end users, select View requests. End users in your organization can submit credit requests for first-time use or limit increases.
The Credit requests page helps administrators review and manage requests from users who need access to Copilot services or more spending capacity.
Each request shows key details like the requested app, license status, and current policy, making it easy to identify users who are blocked (for example, 'Not in a policy') or need higher limits.
Administrators can act on requests by:
Adding users to a spending policy to grant access and apply limits.
Creating new policies or groups to onboard teams at scale.
Adjusting policy limits to accommodate increased demand.
Exporting requests for triaging offline.
Manage spending policies
If users, groups, or policies are nearing their spending limits, they appear in the Top actions section. Select Manage spending policies to update the limits or create a new policy for the affected users or groups.
Review consumption trends to see which groups, agents, services, and users consume the most or least credits over time. Use these trends to decide whether to update spending limits, adjust policies, or redistribute credits.
Monitor usage across groups, users, and services
The dashboard surfaces key insights to help you quickly understand consumption.
- Select the Consumption tab.
Group-level spending View which groups use the most and least Copilot credits in the current period. This view helps you identify teams that drive usage and those that might need enablement or controls.
User-level spending See which individual users consume the most credits, making it easier to detect high usage patterns or outliers.
Agents and services consumption Track which Copilot experiences (such as Copilot agents or APIs) drive the highest credit usage across your tenant.
Each of these views includes quick actions, such as Manage group spending or Manage user spending, so you can take action directly from the insights.
Understand consumption trends
The spending trend chart provides a visual breakdown of Copilot credit usage over time, including:
- Prepaid credits consumption (for example, credits from a Pre‑Purchase Plan)
- Pay-as-you-go usage
- Total cumulative consumption
This chart helps you:
Track how quickly credits are consumed
Monitor shifts between prepaid and pay-as-you-go usage
Identify spikes or steady growth in demand across days or weeks
Consumption tab
The Consumption tab provides reporting experiences for monitoring how users, groups, and services consume credits.
In the Microsoft 365 admin center, go to Copilot > Cost Management.
Select the Consumption tab.
In the Users view, review each user's credit limit, credit usage, last activity date, and session count. Select a user to open the details panel and view usage against their credit limit, assigned policies, available services and agents, daily credit consumption, and service or agent usage levels.
In the Groups view, review groups included in spending policies. Select a group to open the details panel and view daily usage, assigned policy, and monthly credit limit.
In the Agents and services view, review usage for supported services, including Cowork and Work IQ API. This view shows active users, credits used, and session count for each supported service.
Compare usage across users, groups, agents, and services to help adjust policies or redistribute credit budgets.