Note
Access to this page requires authorization. You can try signing in or changing directories.
Access to this page requires authorization. You can try changing directories.
Overview
The Microsoft Teams Shifts connector for Blue Yonder enables you to integrate the Shifts app in Microsoft Teams with Blue Yonder Workforce Management (Blue Yonder WFM). Your frontline workers can seamlessly view and manage their schedules in Blue Yonder WFM from within Shifts.
In this article, we walk you through how to run the Shifts connector wizard in the Microsoft 365 admin center to connect Shifts to Blue Yonder WFM.
Note
If you prefer, you can use PowerShell to integrate Shifts with Blue Yonder WFM. To learn more, see Use PowerShell to connect Shifts to Blue Yonder Workforce Management.
The wizard creates a connection to your Blue Yonder WFM system and a connection instance. A connection instance applies the sync settings and team mappings you choose.
- Sync settings determine the schedule information and what entities sync between Blue Yonder WFM and Shifts.
- Team mappings define the sync relationship between your Blue Yonder WFM instances and teams in Teams.
You can create one or more connection instances, each with different sync settings. For example, if your organization has multiple locations with different schedule requirements, create a connection instance with unique sync settings for each location. A Blue Yonder WFM instance should only be mapped once to a team in Teams at any given time. However, it's possible in the wizard to have different connection instances with the same mappings. This means that you can create connection instances with duplicate mappings.
With Blue Yonder WFM as your system of record, your frontline workers can efficiently manage their schedules and availability in Shifts on their devices. Frontline managers can continue to use Blue Yonder WFM to set up schedules.
Terms used in this article
| Term | Definition |
|---|---|
| Connection | A connection enables access to all WFM instances created in your Blue Yonder WFM system. To create a connection, you provide your Blue Yonder WFM details, which include your service account name, password, and service URLs. |
| Connection instance | To create a connection instance, you configure the following settings:
|
| WFM instance | This term refers to a site in your Blue Yonder WFM system. |
Prerequisites
Before you get started, make sure you meet all the following prerequisites.
- You're a Microsoft 365 Global Administrator.
You have Blue Yonder WFM version 2020.3, 2021.1, or 2021.2.
Note
If you have Blue Yonder WFM 2020.3 or 2021.1, apply the 2020.3.0.4 or 2021.1.0.3 patch. This patch fixes an issue where users get a persistent error message in Shifts. It also fixes an issue that prevents users from updating their availability in Shifts.
You know your Blue Yonder WFM service account name, password and service URLs:
- Federated authentication URL
- Cookie authentication URL
- Employee self-service URL
- Retail web API URL
- Site manager API URL
- Administration API URL
If you don't have all this information, contact Blue Yonder support. A Blue Yonder account is created at the root enterprise level by a Blue Yonder enterprise administrator. It must have API Access, Client Admin, Store Manager, and Worker access. The account and password are required to create a connection.
Federated SSO authentication is enabled in your Blue Yonder WFM environment. Contact Blue Yonder support to make sure federated SSO is enabled. They'll need the following information:
- federatedSSOValidationService:
https://wfmconnector.teams.microsoft.com/api/v1/fedauth/{tenantId}/6A51B888-FF44-4FEA-82E1-839401E9CD74/authorizewhere{tenantId}is your tenantId - proxyHeader: X-MS-AuthToken
- federatedSSOValidationService:
You have at least one team set up in Teams.
You added a general account, what we call the Microsoft 365 system account, as team owner to all teams you want to map.
Create this account in the Microsoft 365 admin center and assign it a Microsoft 365 license. Then, add the account as a team owner to all teams that you want to map. The Shifts connector uses this account when syncing Shifts changes from Blue Yonder WFM. We recommend you create an account specifically for this purpose and not use your personal user account.
- Make sure the teams you want to map don't have any schedules in Shifts or Blue Yonder WFM. If a team has an existing schedule, follow the steps in the next section to remove schedule entities from the team before you map a WFM instance to it. Otherwise, you'll see duplicate shifts.
Remove schedule entities from teams you want to map
Note
Complete this step if you're mapping WFM instances to existing teams that have schedule entities. If you're mapping to teams that don't have any schedules or if you're creating new teams to map to, you can skip this step.
Use PowerShell to remove schedule entities from teams.
First, you'll need to install the PowerShell modules and get set up. Follow the steps to set up your environment.
Run the following command:
Remove-CsTeamsShiftsScheduleRecord -TeamId <Teams team ID> -DateRangeStartDate <start time> -DateRangeEndDate <end time> -ClearSchedulingGroup:$false -EntityType <the scenario entities that you want to remove, the format is @(scenario1, scenario2, ...)> -DesignatedActorId <Teams team owner ID>To get a list of scenarios for the
EntityTypeparameter, run Get-CsTeamsShiftsConnectionConnector. Schedule data will be removed for the date and time range that you specify.
To learn more, see Remove-CsTeamsShiftsScheduleRecord.
Run the Shifts connector wizard
Create a connection
In the left navigation of the Microsoft 365 admin center, choose Setup, and then under Featured collections, select Frontline workers.
Select Connector Management Console.
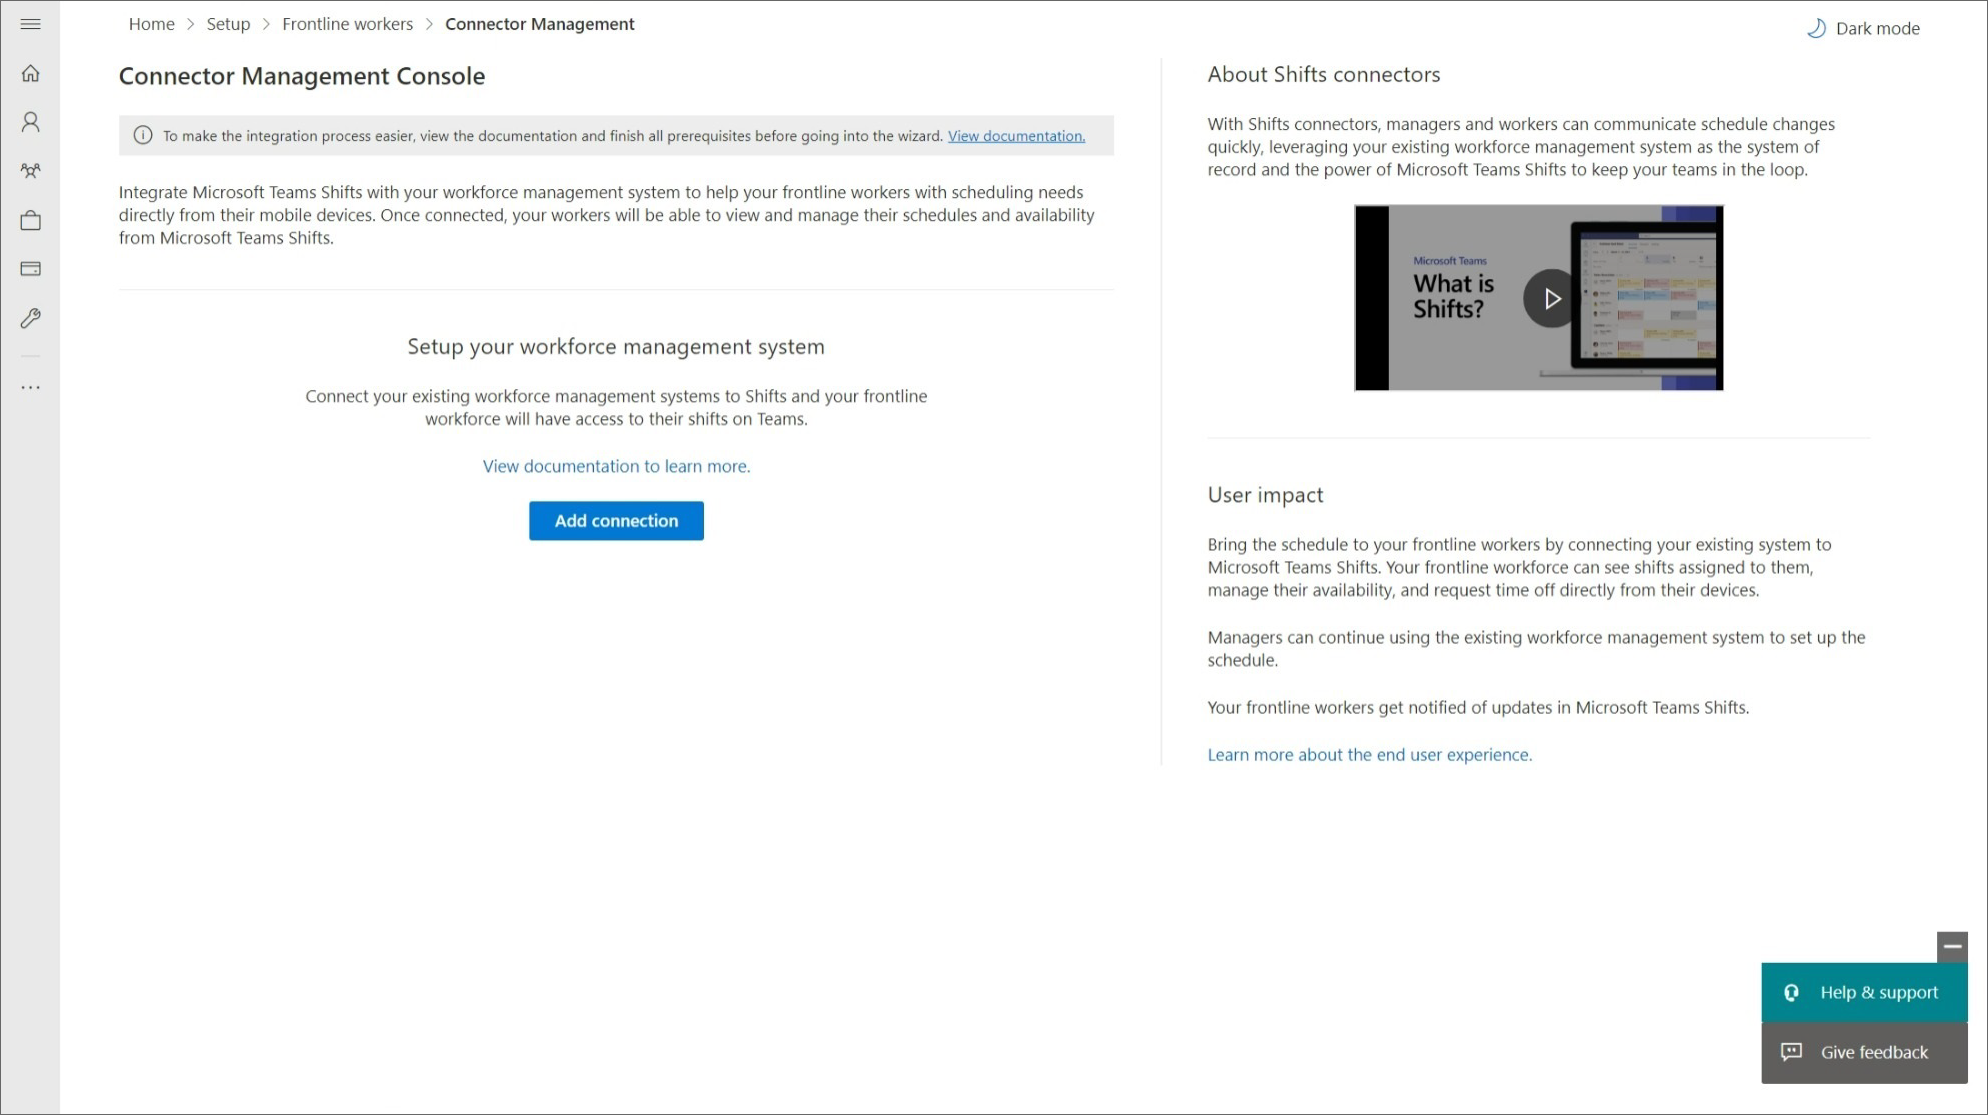
To create a new connection, choose Add connection.
In the Choose your connector pane, choose Blue Yonder Workforce Management, and then select Next to create a Blue Yonder WFM connection.
In the Connection settings pane, give your connection a unique name. It can't be longer than 100 characters or have any special characters.
Enter your Blue Yonder WFM service account name and password and service URLs. If you don't know one or more of your connection details, contact Blue Yonder support.
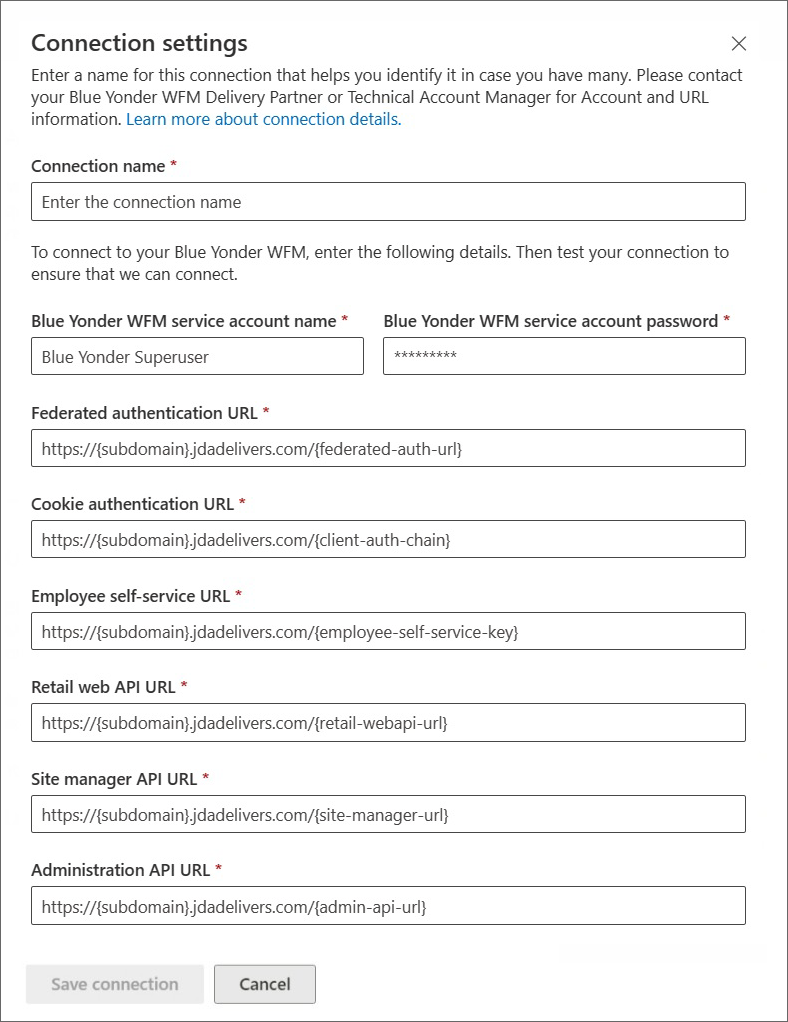
When you're done, select Save connection.


Note
If you need to create another connection, go to the Connector Management Console page, and then select Add connection.
Create a connection instance
After you create a connection, you can set up one or more connection instances in that connection.
The connections that you created are listed on the Connector Management Console page. Under the connection where you want to create a new instance, select Create instance.

Choose settings
On the Instance settings page, you choose the information to sync from Blue Yonder WFM to Shifts, the sync frequency, and whether Shifts users can make changes to the data.

Enter a name for your connection instance. It can't be longer than 100 characters or have any special characters.
Enter your Microsoft 365 system account. This is the account that you created as a prerequisite that's a team owner of all the teams you want to map.
Under Email notification recipients, choose who receives email notifications about this connection instance. You can add individual users and groups. The email notifications contain information about setup status and any issues or errors that may occur after the connection instance is set up.
Choose your sync settings.
For each of these settings, you have the following options to choose from:- Shifts users will not see provider data: Data won't sync between Blue Yonder WFM and Shifts.
- Shifts users can see provider data: Data syncing is unidirectional from Blue Yonder WFM to Shifts.
- Shifts users can see and change provider data: Data syncing is bidirectional between Blue Yonder WFM and Shifts.
Important
Before you disable a feature by selecting the Shifts users will not see provider data option, be aware that:
- If the Schedules, groups, shifts, and activities setting is disabled, then all other settings, such as Time off and Employee availability, and more, are also disabled.
- If the Open shift setting is disabled, Open shift request is also disabled.
- If the Time off setting is disabled, Time off request is also disabled.
Choose your sync frequency.
When you're done choosing your settings, select Next.
Important
If you chose any of the following options to disable open shifts, open shift requests, swap requests, or time off requests, there's another step you need to do to hide the capability in Shifts.
- Open shifts: Shifts users will not see provider data
- Swap requests: Shifts users will not see provider data
- Time off requests: Shifts users will not see provider data
After you run the wizard, make sure you follow the steps in the Disable open shifts, open shifts requests, swap requests, and time off requests section later in this article.
Map WFM instances to teams
Choose the WFM instances that you want to connect to Shifts, and then map each instance to a team in Teams. You can map up to 400 instances.
To complete this step, you can:
Manually map WFM instances to teams

On the Mapping page, start by choosing the WFM instances that you want to map to teams in Teams.
Select the checkbox for each WFM instance you want to map. An instance is only mapped if the checkbox is selected.
Next, search for and choose the correct team in Teams. Keep in mind that teams that are already mapped to a WFM instance in this connection instance aren't available to map again.
Choose the time zone. The closest city is automatically filled in, but you can change it.
When you're done mapping all your teams, select Next.
Use a CSV file to map WFM instances to teams
On the Mapping page, choose CSV upload tool.
Select Download template to get the CSV mapping file. The template includes a list of all your WFM instances and their IDs. The top rows of your template will look like this:
Blue Yonder WFM Instance ID Blue Yonder WFM Instance Name Team ID Team Name Time Zone Automatically prefilled Automatically prefilled Blank Blank Default* And the bottom rows of your template will look like this:
Blue Yonder WFM Instance ID Blue Yonder WFM Instance Name Team ID Team Name Time Zone Blank Blank Automatically prefilled Automatically prefilled Default* Choose a team that you want to map to a WFM instance. Cut and paste the Team ID and Team Name from the bottom half of your template to be in line with the WFM instance that you want. A completed row of your template should look like this:
Blue Yonder WFM Instance ID Blue Yonder WFM Instance Name Team bottomID Team Name Time Zone Automatically pre-filled Automatically pre-filled Team ID that you moved Team Name that you moved Default* Repeat this step for all your mappings.
Enter the correct location in the Time Zone column if needed.
Note
The wizard supports approximately 460 locations. The time zone must be in tz format. If the specific location that you chose isn't supported, you'll see an error in the wizard. Try using the closest city or major city within the same time zone.
On the Mapping page, select Browse to find and upload your completed CSV file.
Choose Done if your file uploaded correctly. Otherwise, review the error report and upload a corrected file.
Your new mappings are listed on the Mappings page.
Choose Next.
Review and finish
Before finishing, review the summary of the connection instance creation process. If you need to make changes during the connection instance creation process, choose Back. When you're ready, select Finish.

The wizard starts the process to set up the connection instance, which may take some time to complete. If you try to edit the connection instance before setup is complete, you most likely won't be able to view the mappings you created previously.
The email notification recipients you chose will receive email notifications about setup status in case there are any errors.
Select Done to exit the wizard.
Disable open shifts, open shifts requests, swap requests, and time off requests
Important
Follow these steps only if you chose any of the following options to disable open shifts, open shift requests, swap requests, or time off requests in the wizard. Completing this step hides the capability in Shifts.
- Open shifts: Shifts users will not see Blue Yonder WFM data
- Swap requests: Feature is disabled for all users
- Time off requests: Feature is disabled for all users
Without this second step, users will still see the capability in Shifts, and will get an "unsupported operation" error message if they try to use it.
To hide open shifts, swap requests, and time off requests in Shifts, use the Graph API schedule resource type to set the following parameters to false for each team that you mapped to a Blue Yonder WFM instance:
- Open shifts:
openShiftsEnabled - Swap requests:
swapShiftsRequestsEnabled - Time off requests:
timeOffRequestsEnabled
To hide open shifts requests in Shifts, go to Settings in Shifts, and then turn off the Open shifts setting.
Manage your connection and connection instance
After a connection is set up, you can manage and make changes to it in the Microsoft 365 admin center or by using PowerShell.
Use the Microsoft 365 admin center
The Connector Management Console page lists each connection and connection instance that you've set up, along with information such as health status and sync interval details. You can also access the wizard to create new connections and connection instances and make changes to any of your existing ones. For example, you can update sync settings and team mappings.
To learn more, see Use the Microsoft 365 admin center to manage your Shifts connection to Blue Yonder Workforce Management.
Use PowerShell
You can use PowerShell to view an error report, change connection settings, disable sync, and more. For step-by-step guidance, see Use PowerShell to manage your Shifts connection to Blue Yonder Workforce Management.