Note
Access to this page requires authorization. You can try signing in or changing directories.
Access to this page requires authorization. You can try changing directories.
This guide provides steps for deploying the Microsoft 365 Learning Tool Interoperability® (LTI) app in Brightspace.

Important
The person who deploys this integration should be an Administrator role in the learning management system (LMS). A person in your organization who is a Microsoft 365 Global Administrator is also needed to help complete the configuration of the app before first time use. Learn more about administrator roles in the Microsoft 365 admin center.
By installing and using the Microsoft Education LTI app, educators and students can transmit grades to the LMS where the terms of use and privacy policy of that application apply.
LMS requirements for the integration
User matching between Microsoft 365/Entra ID and the LMS
To fully integrate with your LMS environment and perform tasks on behalf of users like populating students and co-teachers into OneNote Class Notebooks, setting file permissions, or sending grades from Assignments to the LMS gradebook, the Microsoft 365 LTI app must be able to map Student and Teacher identities between the LMS and the Microsoft Entra ID directory services. It's required to populate the LMS user Email field (which is the same email value returned from the LTI Names and Roles Provisioning Service) with the user's Microsoft 365/Entra User UPN or Primary Email address. Verify this for people in every course that will use the integration to ensure the Microsoft apps can match LMS users.
One-time setup by an LMS administrator
To register the application in the Microsoft registration portal:
Sign in with your Microsoft 365 user account to the Microsoft Registration Portal.
Select Add new registration.
Select Microsoft 365 LTI and then select Next.
Enter a friendly Registration name (for example: "Microsoft 365 for Brightspace") and select D2L/Brightspace as the LMS platform (during Preview, 'Other' can be selected). Select Next.
You're given a list of keys that need to be added to a registration you'll do in Brightspace. Copy these names and values; they're needed to complete the next few steps.
Leave your browser window open while you complete the tool registration steps. The Microsoft tool registration is completed later when the LMS Client ID and Deployment ID are available.
To register the new extensibility tool, add a deployment, and add links to the tool to your courses in Brightspace:
Log into Brightspace as an Administrator or Super Administrator with permission to Manage Extensibility and External Tools.
In Brightspace, navigate to Admin Tools (gear icon) > Manage Extensibility, select the LTI Advantage tab, and then select the Register Tool button.
Select the Standard registration radio button and enter the values listed in the table:
Field in Brightspace Value Name Microsoft 365 LTI Domain Copy the Target Link URL value from the Microsoft registration. Redirect URLs Copy the Redirect URL value from the Microsoft registration. OpenID Connect Login URL Copy the Open ID connection URL value from the Microsoft registration. Target Link URI Copy the Target Link URL value from the Microsoft registration. Keyset URL Copy the JWKS URL from Microsoft registration. Check the following Extensions options, and add the following Substitution Parameters to the registration:
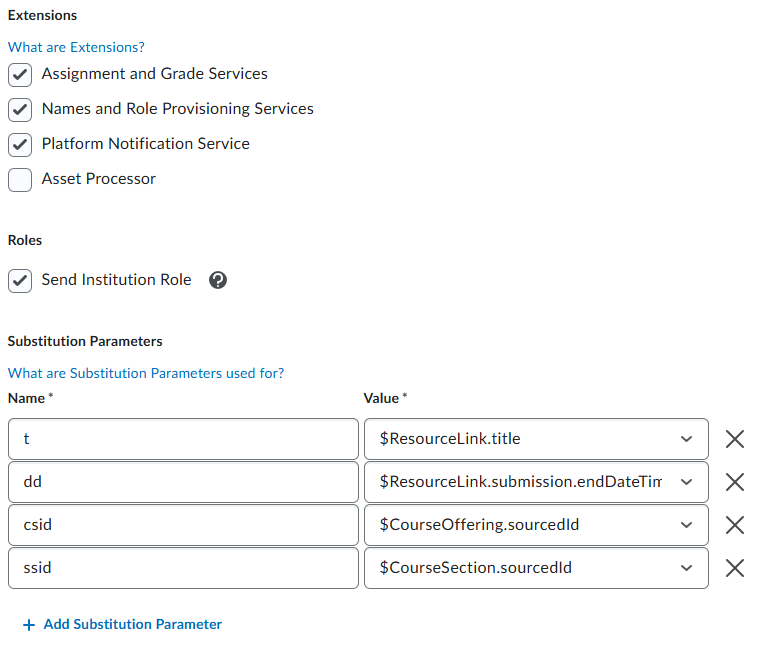
Select the Register button.
A modal with Brightspace registration details appears. Copy these names and values as they need to be entered into the Microsoft Registration Portal to complete registration. You can return to the registration to copy the values later if needed.
To add a deployment of Microsoft Education in your D2L Brightspace courses:
Navigate to Admin Tools > External Learning Tools.
Select New Deployment.
Select Microsoft 365 LTI as the Tool and enter Microsoft 365 LTI as the Name.
Select all Security Settings except Anonymous (including Org Unit information, User Information, Link Information).
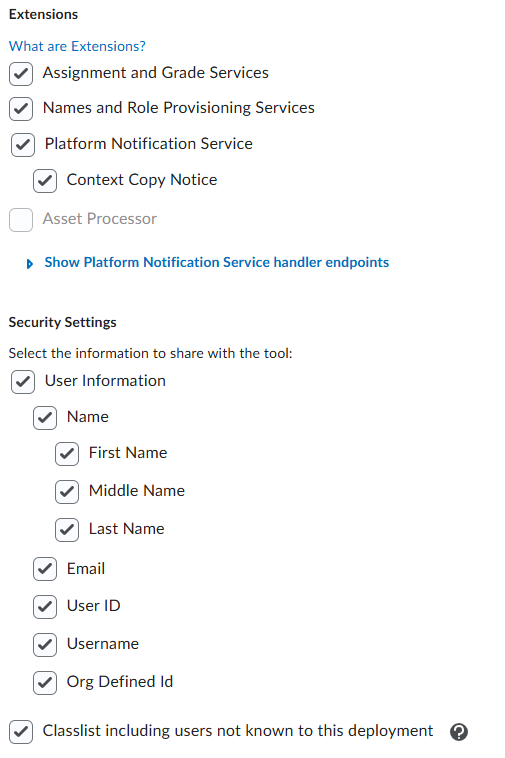
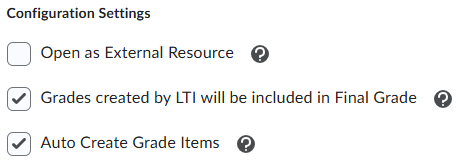
In Configuration Settings, select Grades created by LTI will be included in Final Grade. Make sure that Open as External Resource is not checked.
Select Add Org Units. Select the orgs you wish to deploy to, or the root org or all units to deploy the app for all orgs by searching for the Organization name and selecting All Descendants.
Select Create Deployment and confirm the deployment. A pop-up appears, showing the Deployment ID. Save it with the Name chosen on step 3, as it will be required in the Microsoft Registration Portal.
To save the values obtained from Brightspace in the Microsoft tool registration portal:
On the LMS provided registration keys tab, select Next to navigate to LMS provided registration keys. Enter the values listed in the table that were copied from Brightspace in the previous steps.
Microsoft registration field Brightspace registration value Issuer ID URL Issuer Client ID Client ID Keyset URL Brightspace Keyset URL Platform authentication URL OpenID Connect Authentication Endpoint Deployment ID Deployment ID Access Token URL Brightspace OAuth2 Access Token URL Select Next, review the Review and save page, and then select Save and exit to complete the update.
You now have a tool registration configured in the Microsoft registration portal and both a registration and a deployment of the tool in Brightspace. The next steps create links in Brightspace to add to courses.
To add links to the Microsoft Education tools in your D2L Brightspace courses:
In Brightspace, navigate to Admin Tools > External Learning Tools.
Select Microsoft 365 LTI.
Scroll down to select View Links.
To create a Basic Launch Link for course navbars:
Select New Link.
Enter Microsoft Education as the Name.
For the URL, enter:
https://lti.edu.cloud.microsoft/tool.For the Type, select Basic Launch.
Select Save and Close to create the link.
To create a Deep Linking Quicklink for documents:
Select New Link.
Enter Microsoft 365 Document as the Name.
For the URL, enter:
https://lti.edu.cloud.microsoft/tool.Select Deep Linking Quicklink for the Type.
Create a Custom Parameter named launchType with value linkSelection.
Select Save and Close to create the link.
To create a Deep Linking Quicklink for content activities:
Select New Link.
Enter Microsoft Education Activity as the Name.
For the URL, enter:
https://lti.edu.cloud.microsoft/tool.Select Deep Linking Quicklink for the Type.
Create a Custom Parameter named launchType with value courseAssignments.
Select Save and Close to create the link.
To create a Deep Linking Insert Stuff link for documents:
Select New Link.
Enter Microsoft 365 Document as the Name.
For the URL, enter:
https://lti.edu.cloud.microsoft/tool.Select Deep Linking Quicklink for the Type.
Create a Custom Parameter named launchType with value link-selection.
Select Save and Close to create the link.
To create a Deep Linking Quicklink link for document collaborations:
Select New Link.
Enter Microsoft 365 Document Collaboration as the Name.
For the URL, enter:
https://lti.edu.cloud.microsoft/tool.Select Deep Linking Quicklink for the Type.
Create a Custom Parameter named launchType with value collaborations.
Select Save and Close to create the link.
To create a Widget link to add to course homepage layouts:
Select New Link.
Enter Microsoft Education as the Name.
For the URL, enter:
https://lti.edu.cloud.microsoft/tool.For the Type, select Widget.
Select Save and Close to create the link.
To add links to your Navigation and Themes for instructors to use in their courses:
Navigate to Admin Tools > Navigation and Themes.
Select the Navbar that you wish to modify and then Add Links.
Select Create Custom Link.
Enter Microsoft Education as the Name.
For the URL, select Insert Quicklink, and then Microsoft Education.
Select Same window for Behavior.
Select Create.
Ensure that the Microsoft Education checkbox is selected, and then select Add.
Drag the Microsoft Education link to your preferred location in the Navbar.
Select Save and Close.
Enable Microsoft 365 LTI OneDrive Filepicker Placements across Brighspace
To add the Microsoft 365 LTI app to Brightspace for quick access, you need to set a Config Variable with the link ID of the LTI app.
Note
D2L recommends that the Config Variable d2l.3rdParty.Microsoft.OneDriveLTI.LinkId should be set at the Organization level to be available to all Org Units. In the rare case that the customer wants to restrict the Microsoft 365 LTI app to some Programs or Departments, then the Config Variable d2l.3rdParty.Microsoft.OneDriveLTI.LinkId should be set only for those Org Units in the Override Values Section.
To collect the Link ID:
- Navigate to Admin Tools by selecting the gear icon at the top right.
- Select Manage Extensibility to view the LTI Advantage Deployments list.
- Select the Microsoft 365 LTI LTI Advantage app you created.
- Scroll to the bottom of the page and select View Deployments.
- Select the Microsoft 365 LTI app deployment you created.
- Scroll down to the bottom of the page and select View Links.
- Select the Microsoft 365 Document link with the Deep Linking Quicklink type.
- Move your mouse to the URL address bar in your browser.
- Copy the numeric digits after the final / in the URL. For example, if the link url is
https://example.desire2learn.com/d2l/le/ltiadvantage/deployments/3bfcc0b7-2fb6-4ffe-b353-95b520d4bae6/links/details/259, copy the 259 numeric value.
To update the Config Variables:
- In the Brightspace admin portal, navigate to Admin Tools by selecting the top right gear icon.
- Select Config Variable Browser.
- In the All Variables menu on the left, navigate to 3rdParty > Microsoft > OneDriveLTI. You should see the variable name 3rdparty.microsoft.onedriveLTI.linkId in the right pane.
- Select the LinkId variable name.
- On the LinkId configuration screen, select Add Value to select an Org Unit and paste the numeric Link ID value you collected previously. D2L recommends selecting the OrgUnit at the Organization level so the app is available across the entire environment.
- If you need to restrict the Microsoft LTI app for just some Org Units, repeat this for each Org Unit you wish to use the Quicklinks placements.
- To have this setting applied to descendant org types of those you added, you can edit the Cascading Org Unit Types and select which types and in which order the settings will apply.
First-time configuration by an LMS administrator
You must launch the app for the first time as a user with the Brightspace System Administrator role to complete the configuration for your deployment and activate the tool. Users won't have access until you complete this step!
As a Brightspace System Administrator, access any Course that has the Microsoft Education link added.
Continue with the Microsoft 365 LTI first-time configuration steps to complete the configuration for your organization.
Ongoing use by instructors and students in a course
On first access, users must sign in using their Microsoft 365 (Microsoft Entra) account.
Learn more about Microsoft 365 LTI application scenarios for Instructors and Students.
Browser settings
Cookies should be allowed for Microsoft apps.
Popups shouldn't be blocked for Microsoft apps.
If you receive an error message regarding cookies being blocked, check your browser's address bar for an icon to allow third-party cookies and popups. If this issue persists, review your settings related to cookies and popups to make sure they're allowed for this app.
Migration guidance for Brightspace LMS
When migrating from any legacy app replaced by the Microsoft 365 LTI app, disable links for the classic app, and don't uninstall the app until all users are using the new app and content is migrated to or recreated with it. Because the classic LTI apps have different resource links to files and data, the process of migrating educators and their content to the new apps might be unique.
Migration principles
- Don't immediately remove legacy LTIs. Disable or hide them first while migration is in progress.
- Migration isn't fully automated. You might need to manually update existing links and activities.
- Microsoft 365 content (Teams, files, notebooks) stays intact, but legacy LTI links might break.
- Plan for a phased migration across courses and terms.
Pre-migration checklist
Before you begin, make sure that you complete the following steps:
- Configure the Microsoft 365 LTI app (LTI 1.3) in Brightspace. For more information, see Deploy the Microsoft 365 LTI® app in Brightspace by D2L.
- Complete the institutional review of Microsoft 365 LTI capabilities.
- Prepare a communication plan for instructors and learners.
Migrating from classic Microsoft Teams Classes and Teams Meetings integration
The classic Teams Classes and Teams Meetings app is retiring on September 15, 2025. There's no required migration for any Team connected to a course by the classic Teams Assignments LTI's Manage Connected Teams feature. The new Teams app that's included in the Microsoft 365 LTI app is backwards compatible and displays any previously connected Teams, as well as any Teams created by Microsoft 365 LTI Team sync going forward. Review the additional guidance on choosing a Teams sync option.
To avoid errors, replace the links from the legacy app in Brightspace:
- Identify where legacy LTI links are currently used.
- (Suggestion) Document: Courses affected, types of links or activities, level of usage.
- Disable legacy LTI Links:
- Hide legacy LTI tools from content creation menus.
- Prevent new usage while allowing existing links to remain temporarily accessible.
- Replace Course Content links available to instructors for Teams (Classes) and Teams Meetings:
- Inside your course in Brightspace, select Content, locate the unit that the Microsoft Teams Classes or Teams Meetings LTI link is embedded in. Select Add Existing and then External Tool Activity. In the pop-up window, select the LTI link for the desired tool, created when deploying the Microsoft 365 LTI® app in Brightspace.
- In the Classic experience, locate the Module where the Microsoft Teams Classes or Teams Meetings LTI link is embedded. Select Existing Activities and then External Learning Tools. From there, select the desired LTI link.
- To remove the old LTI link, delete the topic from the content as usual.
- Inside your course in Brightspace, select Content, locate the unit that the Microsoft Teams Classes or Teams Meetings LTI link is embedded in. Select Add Existing and then External Tool Activity. In the pop-up window, select the LTI link for the desired tool, created when deploying the Microsoft 365 LTI® app in Brightspace.
Migrating from classic OneNote Class Notebook LTI 1.1 app
The classic OneNote Class Notebook LTI 1.1 app is retiring on September 17, 2026. You can still access all notebooks created by the classic app directly through the notebook owner's personal OneDrive and on the OneNote Microsoft 365 web homepage.
You can't automatically migrate a Class Notebook created with the classic OneNote LTI 1.1 to a Microsoft 365 LTI OneNote Class Notebook. However, you can create a new notebook by using the Microsoft 365 LTI OneNote app and copy content from a classic Class Notebook in the OneNote app for Windows by using the right-click menu option on Sections and Pages to move or copy to another OneNote Notebook. There are also copy options in OneNote for Mac, iOS, or Android. Students can also export a copy of their work from OneNote Class Notebooks.
After deploying Microsoft 365 LTI with OneNote Class Notebooks enabled, keep the classic OneNote Class Notebook LTI app installed to keep existing notebooks accessible in active courses, but disable the Links in the classic LTI so no new content is created by using the classic tool.
Brightspace administrators should replace the links from the classic One Note Class app in Brightspace to avoid errors:
- Identify where legacy LTI links are currently used.
- (Suggestion) Document: Courses affected, types of links or activities, level of usage.
- Disable legacy LTI links:
- Hide legacy LTI tools from content creation menus.
- Prevent new usage while allowing existing links to remain temporarily accessible.
- Replace Course Content links available to instructors for the classic One Note Class app:
- Inside your course in Brightspace, select Content, locate the Unit that the classic One Note Class app LTI link is embedded in. Select Add Existing and then External Tool Activity. In the pop-up window, select the LTI link for the desired tool, created when deploying the Microsoft 365 LTI® app in Brightspace.
- On the Classic experience, locate the Module where the classic One Note Class app LTI link is embedded. Select Existing Activities and then External Learning Tools. From there, select the desired LTI link.
- To remove the old LTI link, delete the topic from the content as usual.
- Inside your course in Brightspace, select Content, locate the Unit that the classic One Note Class app LTI link is embedded in. Select Add Existing and then External Tool Activity. In the pop-up window, select the LTI link for the desired tool, created when deploying the Microsoft 365 LTI® app in Brightspace.
Migrating from classic Microsoft OneDrive LTI
The classic Microsoft OneDrive LTI will be sunset on September 17, 2026. After that date, any content links in courses from the classic LTI will stop working. However, files created by the classic app will remain accessible through the course's Microsoft 365 Group and SharePoint site. There are resources for locating Microsoft 365 Groups associated with LMS courses on GitHub to assist your Microsoft 365 Administrators in locating these assets.
Currently, there's no automatic migration path or copy available from classic Microsoft OneDrive file links to Microsoft 365 LTI file links used in Brightspace courses. You can manually migrate files by reselecting and re-linking or embedding the file through the Microsoft 365 LTI in Brightspace course content.
After deploying Microsoft 365 LTI with OneDrive enabled, we recommend that you leave the classic Microsoft OneDrive app installed until all content you wish to keep active or reuse is migrated to keep existing file links accessible in active courses but delete the Links in the classic LTI, so no new content is created using the classic tool.
Brightspace administrators should replace the links from the classic OneDrive app in Brightspace to avoid problems:
- Identify where the classic OneDrive LTIs links are currently used.
- (Suggestion) Document: Courses affected, types of links or activities, level of usage.
- Disable legacy LTI links:
- Hide legacy LTI tools from course navigation and content creation menus.
- Prevent new usage while allowing existing links to remain temporarily accessible.
- Update NavBars and course content links accessible to instructors for the new Microsoft 365 LTI file links :
- On the Navbar that you want to edit, create a custom link with the Quicklink for the new OneDrive LTI. Remove the custom link created for the classic OneDrive LTI.
- On the course offering, to replace the classic OneDrive LTIs link, go to Content, locate the Topic where the classic OneDrive app LTI link is embedded. Edit the page, select the Insert Stuff button. In the pop-up window, select the LTI link for the OneDrive app, created when deploying the Microsoft 365 LTI® app in Brightspace.
Migrating from classic Microsoft Teams Assignments LTI
You can reuse Teams Assignments created by the classic Teams Assignments LTI app as Microsoft 365 LTI (Microsoft Education) Assignments. You can copy and reuse any Team Assignment created in the LMS or via the assignments app in Microsoft Teams for Education by using the Copy from Existing functionality in the Create Assignment instructor flow.
After deploying the Microsoft 365 LTI with Teams Assignments enabled, we recommend leaving the classic Teams Assignments app installed to keep existing files and links accessible in active courses, but disabling its Links so new assignments are created only via the Microsoft 365 LTI app via Microsoft Education menu items.
Brightspace administrators should replace the links from the classic Teams Assignments LTI app in Brightspace to avoid errors:
- Identify where legacy LTI links are currently used.
- (Suggestion) Document: Courses affected, types of links or activities, level of usage.
- Disable legacy LTI links:
- Hide legacy LTI tools from content creation menus.
- Prevent new usage while allowing existing links to remain temporarily accessible.
- Replace course content links available to instructors for the classic Teams Assignments LTI app:
- Inside your course in Brightspace, select Content and locate the unit that the classic Teams Assignments LTI app LTI link is embedded in. Select Add Existing and then External Tool Activity. In the pop-up window, select the LTI link for the desired tool, created when deploying the Microsoft 365 LTI® app in Brightspace.
- On the Classic experience, locate the Module where the classic Teams Assignments LTI app LTI link is embedded. Select Existing Activities and then External Learning Tools. From there, select the desired LTI link.
- To remove the old LTI link, delete the topic from the content as usual.
Once all assignments have been copied into new courses and courses with existing classic Teams Assignments have been archived, the classic Teams Assignments app can be removed.
Migrating from Reflect LTI
No migration is required for reflections created in the legacy LTI 1.3 app. The new Reflect app in Microsoft 365 LTI continues to work with any existing reflections. Delete the classic app after installing the new Microsoft 365 LTI.
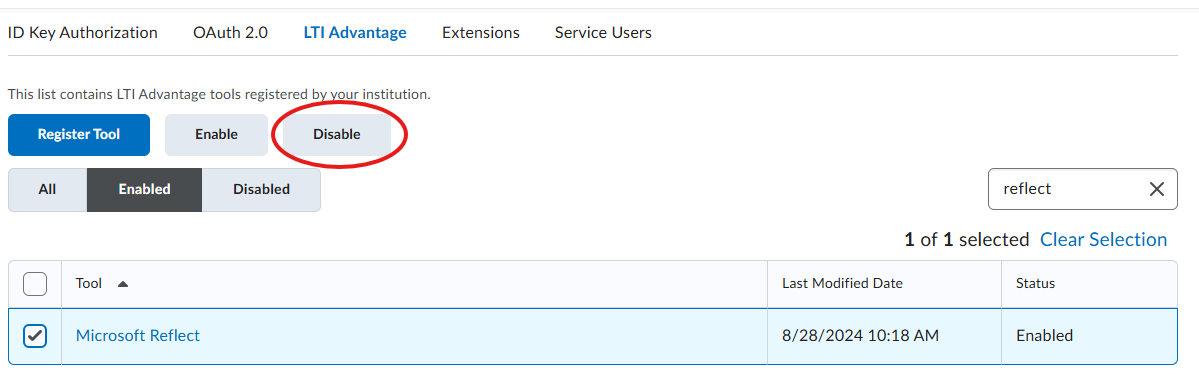
To remove the classic app before retirement in Brightspace, go to Admin Tools (gear icon) > Manage Extensibility, select the LTI Advantage tab. Select the registered Tool (Microsoft Reflect) and select Disable.
Getting help and giving feedback
LMS and Microsoft 365 admins can contact Microsoft Education Support to help resolve configuration and deployment issues, for themselves or on behalf of users.
Educators and Learners can contact support or give feedback directly from the app through the help and feedback menu.

Learning Tools Interoperability® (LTI®) is a trademark of the 1EdTech Consortium, Inc. (1edtech.org)