Note
Access to this page requires authorization. You can try signing in or changing directories.
Access to this page requires authorization. You can try changing directories.
Buildings, floors, and sections
Microsoft Places depends on a fully established hierarchy of rooms/workspaces/desks, sections, floors, and buildings. This page guides you through the steps.
Plan the workplace hierarchy
Most Places features depend on a structured hierarchy:
- Buildings
- Floors
- Sections
- Rooms
- Workspaces
- Desks
This hierarchy enables workplace presence, building-based location, desk booking, room discovery, space analytics, workplace services, and wayfinding. Because of this dependency, hierarchy configuration is the foundation of any deployment.
The Initialize-Places cmdlet parses existing rooms, and workspaces in your organization, and generates the hierarchy on your behalf. Specifically, the cmdlet uses the RoomList information to infer the building and floor name of each room, or workspace. The cmdlet builds a hierarchy of places, allows you to review and revise the results, and upload the final file.
Alternatively, to manually configure all of your buildings, floors, sections, workspaces, and rooms, see the Alternative - Manual setup section of this article.
Important
By default, buildings are not visible across Microsoft Places experiences (Work plans, Workplace presence, Places cards, and so on).
You can enable building visibility in PowerShell:
Set-PlacesSettings -EnableBuildings 'Default:true'
For more information, see Set-PlacesSettings.
Step 1 - Create buildings, floors, and sections hierarchy
Launch PowerShell 7 as an Administrator.
Run the following command if the Microsoft Places PowerShell module is not installed. This step needs to be done once per PC from which you plan to configure Microsoft Places.
Install-Module -Name MicrosoftPlaces -ForceRun the following command:
Connect-MicrosoftPlacesRun the following command:
Initialize-Places
You should see the following options:
- Export suggested mapping CSV of rooms and workspaces to buildings/floors/sections.
- Import mapping CSV to automatically create buildings/floors/sections and mapping of rooms and workspaces.
- Export PowerShell script with commands to manually create buildings/floors/sections and mapping of rooms and workspaces based on an imported CSV.
Note
Use Option 1 to create a CSV file.
Step 2 - Review and revise the CSV
- Add or correct building and floor names in the first two columns:
InferredBuildingNameandInferredFloorName. The other columns include more metadata which can help you update your building and floor names. - Remove all columns except
InferredBuildingName,InferredFloorName,InferredSectionName, andPrimarySmtpAddress. - Save and close this CSV file before moving on to the next step.
Step 3 - Upload the finalized CSV
- Run the Initialize-Places cmdlet again and use Option 2 to import your CSV file.
- The script generates a file summarizing the results and then exports the file to the same folder as the imported file.
Step 4 - Verify
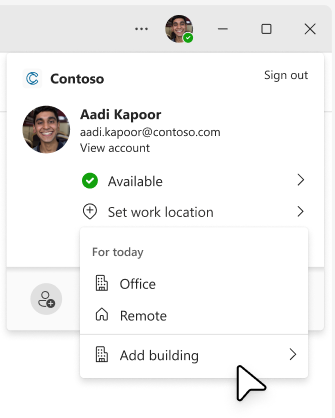
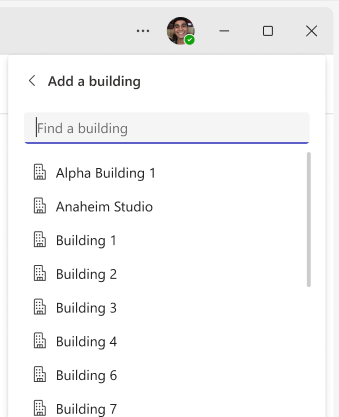
Open the account manager in Microsoft Teams, or the calendar in New Outlook, and check whether you can set your workplace presence to a specific building. For example:
| Teams account control | |
|---|---|
 |
 |
Note
New buildings, floors, and sections should be visible in Microsoft Places right away. However, any changes made to rooms, and workspaces may take up to 24 hours to update.
Step 5 - Add metadata
Use Set-PlaceV3 to add additional metadata on buildings, floors, and rooms/workspaces. We recommend adding capacity, A/V equipment, room pictures, etc. This step is optional and can be taken up later. Check out Set-PlaceV3 for the full list.
Example
Here's what the CSV file generated at step 1 would look like for an organization with meeting rooms in two buildings, "Austin 550" and "NYC Times Square" and a desk pool in "NYC Times Square":
| InferredBuildingName | InferredFloorName | InferredSectionName | PrimarySmtpAddress |
|---|---|---|---|
| Austin 550 | Mezzanine | baker@contoso.com | |
| Austin 550 | 1 | adams@contoso.com | |
| Austin 550 | 2 | rainier@contoso.com | |
| NYC Times Square | Unknown | olympus@contoso.com | |
| NYC Times Square | Unknown | Unknown | desks4.1.5@contoso.com |
You should review all building, floor, and section names in the CSV file before uploading it as part of Step 3. In this example, you should fix the floor, and section names in the NYC building (last two rows).
Alternative - Manual setup
Manual setup for the floor can be done in two ways:
- Using Places management portal
- Using PowerShell
Manual setup using Places Management portal
The Places Management Portal allows you to manually create and manage buildings, floors, sections, rooms, workspaces, and desks through a user-friendly interface. You can access the portal via the Places space management portal or through the Places Meta OS application within Microsoft Teams or Outlook. To use the portal, you must be assigned a built-in or custom role with the necessary permissions.
Once inside the portal, you can:
- Create new buildings.
- Add floors associated with specific buildings.
- Define sections within each floor.
- Add rooms to a section or directly to a floor.
- Add desk pools (workspaces) or individual desks to a section.
- You can also use the management portal to add or update metadata for both new and existing Places objects, including buildings, floors, sections, rooms, workspaces, and desks.
Note
Not all built-in roles have permissions to create every type of Places object. For a detailed breakdown of role-specific permissions and capabilities, refer to the Configure administrator roles section.
Manual setup using Places PowerShell
To set up places manually using PowerShell, you need to run individual PowerShell cmdlets to create each building and floor:
- Create the building.
- Create the floors with
ParentIdset to a building. - Create sections on all such floors.
ParentIdof sections should be set to a floor. - Set the room's
ParentIdto the floor or section, if desired, as shown in the example. Workspace'sParentIdmust be set to a section. - Use Set-PlaceV3 to add any extra metadata on buildings, floors, or rooms/workspaces.
New-Place -Type Building -Name "Austin 550"
New-Place -Type Floor -Name "1" -ParentId {PlaceId of Austin550}
Set-PlaceV3 -Identity {smtpAddressOfRoom} -ParentId {PlaceId of Floor1}
For more information, see New-Place and Set-PlaceV3.
Note
Use Exchange PS cmdlets to create new rooms.
Frequently Asked Questions
For more information, see Configure buildings and floors.