Note
Access to this page requires authorization. You can try signing in or changing directories.
Access to this page requires authorization. You can try changing directories.
Workplace presence enables employees to:
- Indicate where they plan to work
- Coordinate in-office schedules
- View building-level presence
- Improve collaboration planning
To support these experiences, configure buildings, floors, work plans, presence, and building visibility. A complete Places hierarchy is required for these experiences to function correctly.
Enable building visibility using:
Set-PlacesSettings -EnableBuildings 'Default:true'
Work Location in Microsoft 365
Work location is an extension of the online presence signal in Microsoft Teams and the working hours settings in Microsoft 365. By bringing together working hours, work location, and online presence, users can more easily understand where coworkers are working in addition to whether they're available.
Two location signals are supported:
- Planned work location: User-entered intent. Users can create recurring work plans in Outlook or Teams settings and create one-off plans directly in the calendar.
- Actual work location: A detected or manually set location based on check-in activity. Users can choose whether to share their work location with coworkers. Work location is only visible within their organization.
Configure automatic update of workplace presence
This section explains how automatic work location updates work, including prerequisites, supported methods, and configuration requirements. Work location can be updated through:
- Manual updates
- Desk peripherals
- Wi-Fi detection
- A combination of methods
Organizations can choose the approach that best fits their deployment. Peripheral-based detection is designed for managed desk environments where employees regularly use assigned peripherals. Wi Fi-based detection provides building-level workplace awareness and requires:
- Wi Fi SSIDs and BSSID mapping
- A configured Places hierarchy
- Microsoft Teams policy configuration
Many organizations begin with manual work location updates and later enable automated detection as their Places deployment matures.
Automatic Update of work location
Automatic Update is a Teams feature that helps users spend less time manually updating their status and more time enjoying in-person collaboration. Automatic Update applies to the actual work location signal. Planned location remains unchanged.
At the end of a user's working hours, their actual location is cleared, and the history of actual location isn't available. Furthermore, if a user connects after their set work hours, their work location won't be updated.
For more information about setting work hours, see Set your work hours and location in Outlook.
Automatic Update of work location is always off by default and must be explicitly enabled and configured for your organization. You can enable Automatic Update for your entire organization or for select users.
When Automatic Update is enabled, users' work location can be updated through two signals:
- Connection to a wireless network
- Connection to a desk peripheral, such as a monitor
Setting up both signals improves the accuracy of users' work location.
What Automatic Update of work location does
- Leverages organization devices and wireless networks to update a user's work location at the building level if buildings are configured in your organization. Otherwise, Automatic Update can only determine in-office versus remote.
- Works when the Teams app detects a network change or a device connection.
- Replaces the need for manual check-in, but doesn't remove the option.
What Automatic Update doesn't do
Automatic Update is not a tracking tool and can't be used to monitor employee attendance. The feature is designed to facilitate collaboration, not compliance or oversight.
- Automatic Update doesn't prevent users from manually setting or clearing their work location.
- Automatic Update doesn't provide admins with monitoring or reporting views, nor with historical location data.
Note
Automatic Update by plugging into desk peripherals is generally available. Automatic Update via wireless networks is currently in preview and is expected to be generally available soon.
User control
Automatic Update of work location requires end users to consent to the Teams desktop app accessing the operating system's Location API.
For more details, see Manage location sharing in Microsoft Teams.
Users can also opt in or opt out of Automatic Update based on wireless networks through Teams settings.
Admin configuration options
The same policy controls Automatic Update based on desk peripherals and wireless networks.
For desk peripheral updates, the policy supports a simple on/off switch.
For wireless updates, the policy supports an additional parameter that determines whether Automatic Update is enabled by default:
- Inform mode. Users see an informational banner in Microsoft Teams when Automatic Update becomes active. The banner explains that the feature is enabled and provides an option to opt out. In this mode, a user's location is shared with coworkers unless they opt out.
- Ask mode. Users see an informational banner in Microsoft Teams when Automatic Update becomes available. The banner explains that the feature is available and provides an option to opt in. In this mode, a user's location isn't shared with coworkers unless they choose to opt in.
- Off. Automatic Update is turned off, users aren't prompted, and the feature is disabled regardless of user action.
In Inform and Ask modes, users can change their mind at any time and turn Automatic Update on or off in Teams Settings.
In Off mode, users can't enable Automatic Update independently.
Tenant admins can configure one policy for their entire tenant or apply different configurations to specific user groups, for example, based on geography.
Prerequisites
- Review What is Places? to verify you have the necessary tools installed.
- Configure buildings in Microsoft Places. See Configure buildings and floors.
- Configure desk pools or individual desk accounts. See Configure desk booking.
- Important: You must be a Microsoft Teams administrator to enable Automatic Update of work location in Teams. If you're only a Places administrator, ask your Teams administrator to complete the configuration.
- You must be a Microsoft Exchange administrator to configure the SSID list and the BSSID list.
- Automatic Update of work location requires the Microsoft Teams desktop app on Windows or macOS. Web and mobile versions of Teams aren't supported.
Enable Automatic Update policy
Use Teams PowerShell cmdlets to create a new Teams Automatic Update policy instance, then add users or groups for whom you want to enable Automatic Update to the policy instance.
New-CsTeamsWorkLocationDetectionPolicy -Identity wld-enabled -EnableWorkLocationDetection $true
Grant-CsTeamsWorkLocationDetectionPolicy -PolicyName wld-enabled -Identity testuser@testorg.example.com
For more information on how to configure the policy, see:
- New-CsTeamsWorkLocationDetectionPolicy
- Set-CsTeamsWorkLocationDetectionPolicy
- Get-CsTeamsWorkLocationDetectionPolicy
- Grant-CsTeamsWorkLocationDetectionPolicy
Enable Automatic Update of location via peripheral plug-in
Desk peripherals must be associated with desk pools or individual desks for Automatic Update of location via peripheral plug-in to work.
For more information, see Configure autocheckin desk peripherals
After configuring peripherals, wait 24–48 hours for your changes to propagate before testing.
When a user is signed into Teams on their Windows or macOS device and plugs into a peripheral that an admin has configured at a desk that's available to book, their work location automatically updates to in-office. If the desk pool or individual desk is parented to a building, the user's work location updates to a specific building.
To learn more about the end-user experience, see First things to know about bookable desks in Microsoft Teams.
Enable Automatic Update of location via connection to a wireless network
To enable Automatic Update of location via connection to a wireless network, an admin must first configure buildings and floors, then configure the SSID list and configure the BSSID list.
Once the configuration is complete, Teams can update users' work location to the building associated with the BSSID that the device is connected to.
Configure the SSID list
- Identify the SSIDs of your wireless networks.
- Configure the SSID list in Places with the following command. You can separate multiple SSIDs with a semicolon (
;).
Set-PlacesSettings -Collection Presence -WorkplaceWifiNetworkSSIDList 'Default:SSID-1;SSID-2'
If you configure the SSID list but not the BSSID list, users' locations will show as In the office when they connect to a wireless network. To enable building-level work location, you must also configure the BSSID list.
Configure the BSSID list
To map BSSIDs to buildings in the Places directory:
- Create a
.csvfile containing all BSSIDs and their corresponding building names. - Include a header row with the fields
BSSIDandBuildingName. - Map building names to Places directory buildings.
| BSSID | BuildingName |
|---|---|
| D0:4D:C6:AA:1B:20 | Dublin 5 |
| A1:4D:B6:25:1B:40 | Dublin 5 |
| 15:AD:C6:AF:1B:11 | Building 4 |
Add-WifiDevices -Action MapBuildings -InputFilePath test-file.csv
This command compares the building names from your input file with Places directory building names (case insensitive). It then generates a BuildingMapping.csv file that shows the building names from your input file and their corresponding Places directory building names.
| BuildingName | PlacesDirectoryBuildingName |
|---|---|
| Dublin 5 | Dublin 5 |
| Building 4 | building 4 |
| bldg3 | |
| building 2 |
This command also generates a PlacesDirectoryBuildings.csv file. This file lists all available Places directory buildings and is intended to help with manual mapping.
Update BuildingMapping.csv as necessary so that all building names correspond to valid Places directory building entries.
Upload the BSSID list:
Add-WifiDevices -Action UploadEntries -InputFilePath test-file.csv -BuildingMappingFile mapping-file.csv
Manage Places directory entries individually
If you prefer to manage device entries individually, you can use the following cmdlets:
Note
When using these cmdlets, ensure that the BSSID is set to both the DeviceId and MACAddress fields.
Onboarding checklist
The following checklist helps administrators and users complete the required setup steps and ensure workplace check-in is configured correctly.
Check 1. Has the tenant admin enabled workplace check-in?
In Teams, go to Settings > Privacy. If the user sees "Automatically setting your work location has been turned off by your IT department", it means that the tenant admin hasn't enabled this feature for the user.

Contact the tenant admin if the user wants to enable this feature.
Check 2. Has the user granted OS location permissions to Teams?
Workplace check-in requires users to allow the Teams app to access their location through their operating system's location settings.
In Windows, go to Settings > Privacy & security > Location, and verify that location access is enabled for Teams.

In macOS, verify similar settings in System Settings.
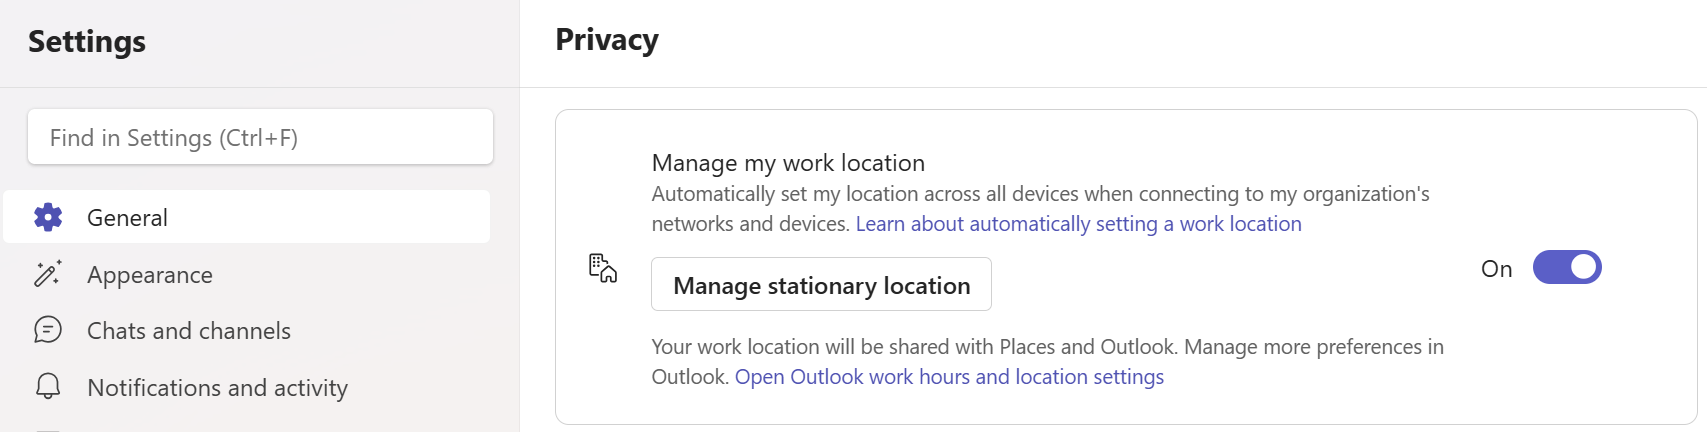
Check 3. Has the user enabled the Manage my work location setting in Teams?
In Teams, go to Settings > Privacy, and verify that Manage my work location is turned on.
Check 4. Is the user connected to an onboarded corporate Wi-Fi network?
To enable workplace check-in via Wi-Fi, users must connect to a corporate Wi-Fi network whose SSID has been onboarded by the tenant admin.
Verify that the device is connected to Wi-Fi and not to a wired Ethernet network. Workplace check-in via Wi-Fi isn't supported when the device is connected to Ethernet, either directly or through a docking station.