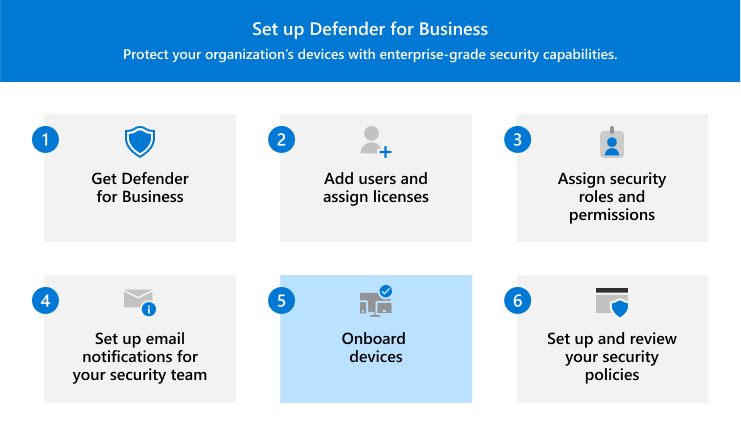
This article describes how to onboard devices to Defender for Business.
Onboard your business devices to protect them right away. You can choose from several options to onboard your company's devices. This article walks you through your options and describes how onboarding works.
Windows 10 and 11
Note
Windows devices must be running one of the following operating systems:
- Windows 10 or 11 Business
- Windows 10 or 11 Professional
- Windows 10 or 11 Enterprise
For more information, see Microsoft Defender for Business requirements.
Choose one of the following options to onboard Windows client devices to Defender for Business:
- Local script (for onboarding devices manually in the Microsoft Defender portal)
- Group Policy (if you're already using Group Policy in your organization)
- Microsoft Intune (if you're already using Intune)
Local script for Windows 10 and 11
You can use a local script to onboard Windows client devices. When you run the onboarding script on a device, it creates a trust with Microsoft Entra ID (if that trust doesn't already exist), enrolls the device in Microsoft Intune (if it isn't already enrolled), and then onboards the device to Defender for Business. If you're not currently using Intune, the local script method is the recommended onboarding method for Defender for Business customers.
Tip
We recommend that you onboard up to 10 devices at a time when you use the local script method.
Go to the Microsoft Defender portal (https://security.microsoft.com), and sign in.
In the navigation pane, choose Settings > Endpoints, and then under Device management, choose Onboarding.
Select Windows 10 and 11.
Under Connectivity type, select Streamlined.
In the Deployment method section, choose Local script, and then select Download onboarding package. We recommend that you save the onboarding package to a removable drive.
On a Windows device, extract the contents of the configuration package to a location, such as the Desktop folder. You should have a file named WindowsDefenderATPLocalOnboardingScript.cmd.
Open a command prompt as an administrator.
Type the location of the script file. For example, if you copied the file to the Desktop folder, you would type %userprofile%\Desktop\WindowsDefenderATPLocalOnboardingScript.cmd, and then press the Enter key (or select OK).
After the script runs, Run a detection test.
Group Policy for Windows 10 and 11
If you prefer to use Group Policy to onboard Windows clients, follow the guidance in Onboard Windows devices using Group Policy. This article describes the steps for onboarding to Microsoft Defender for Endpoint. The steps for onboarding to Defender for Business are similar.
Intune for Windows 10 and 11
You can onboard Windows clients and other devices in Intune by using the Intune admin center (https://intune.microsoft.com). There are several methods available for enrolling devices in Intune. We recommend using one of the following methods:
Enable automatic enrollment for Windows 10 and 11
When you set up automatic enrollment, users add their work account to the device. In the background, the device registers and joins Microsoft Entra ID and is enrolled in Intune.
Go to the Azure portal (https://portal.azure.com/) and sign in.
Select Microsoft Entra ID > Mobility (MDM and MAM) > Microsoft Intune.
Configure the MDM User scope and the MAM user scope.
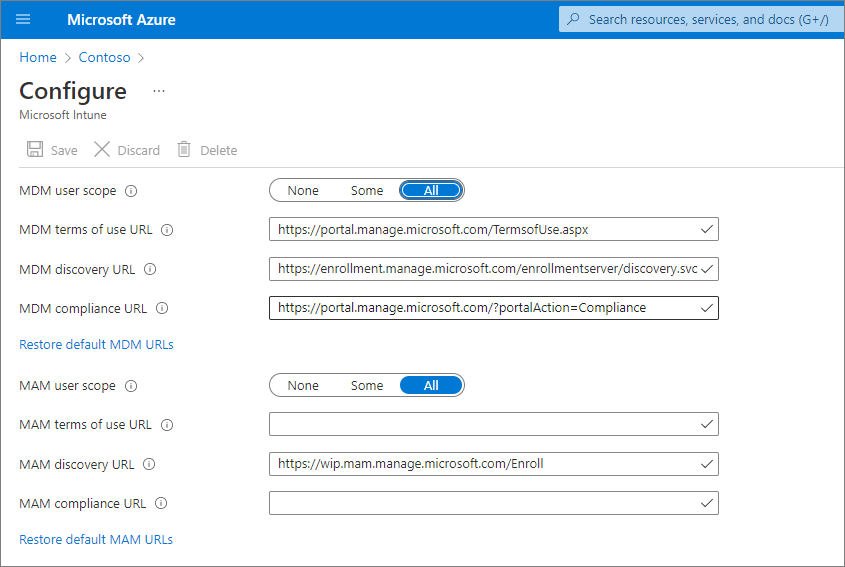
For MDM User scope, we recommend that you select All so that all users can automatically enroll their Windows devices.
In the MAM user scope section, we recommend the following default values for the URLs:
- MDM Terms of use URL
- MDM Discovery URL
- MDM Compliance URL
Select Save.
After a device is enrolled in Intune, you can add it to a device group in Defender for Business. Learn more about device groups in Defender for Business.
Ask users to enroll their Windows 10 and 11 devices
Watch the following video to see how enrollment works:
Share this article with users in your organization: Enroll Windows 10/11 devices in Intune.
After a device is enrolled in Intune, you can add it to a device group in Defender for Business. Learn more about device groups in Defender for Business.
Run a detection test on a Windows 10 or 11 device
After you've onboarded Windows devices to Defender for Business, you can run a detection test on the device to make sure that everything is working correctly.
On the Windows device, create a folder: C:\test-MDATP-test.
Open Command Prompt as an administrator, and then run the following command:
powershell.exe -NoExit -ExecutionPolicy Bypass -WindowStyle Hidden $ErrorActionPreference = 'silentlycontinue';(New-Object System.Net.WebClient).DownloadFile('http://127.0.0.1/1.exe', 'C:\\test-MDATP-test\\invoice.exe');Start-Process 'C:\\test-MDATP-test\\invoice.exe'
After the command runs, the Command Prompt window closes automatically. If successful, the detection test is marked as completed, and a new alert appears in the Microsoft Defender portal (https://security.microsoft.com) for the newly onboarded device within about 10 minutes.
Mac
Choose one of the following options to onboard Mac:
Local script for Mac
When you run the local script on Mac, it creates a trust with Microsoft Entra ID (if that trust doesn't already exist), enrolls the Mac in Microsoft Intune (if it isn't already enrolled), and then onboards the Mac to Defender for Business. We recommend that you onboard up to 10 devices at a time using this method.
Go to the Microsoft Defender portal (https://security.microsoft.com), and sign in.
In the navigation pane, choose Settings > Endpoints, and then under Device management, choose Onboarding.
Select macOS.
Under Connectivity type, select Streamlined.
In the Deployment method section, choose Local script, and then select Download onboarding package. Save the package to a removable drive. Also select Download installation package, and save it to your removable device.
On your Mac, save the installation package as wdav.pkg to a local directory.
Save the onboarding package as WindowsDefenderATPOnboardingPackage.zip to the same directory you used for the installation package.
Use Finder to navigate to wdav.pkg you saved, and then open it.
Select Continue, agree with the license terms, and then enter your password when prompted.
You're prompted to allow installation of a driver from Microsoft (either System Extension Blocked or Installation is on hold, or both). You must allow the driver installation. Select Open Security Preferences or Open System Preferences > Security & Privacy, and then select Allow.
Use the following Bash command to run the onboarding package:
/usr/bin/unzip WindowsDefenderATPOnboardingPackage.zip \
&& /bin/chmod +x MicrosoftDefenderATPOnboardingMacOs.sh \
&& /bin/bash -c MicrosoftDefenderATPOnboardingMacOs.sh
After Mac is enrolled in Intune, you can add it to a device group. Learn more about device groups in Defender for Business.
Intune for Mac
If you already have Intune, you can enroll Mac computers by using the Intune admin center (https://intune.microsoft.com). There are several methods available for enrolling Mac in Intune. We recommend one of the following methods:
Options for company-owned Mac
Choose one of the following options to enroll company-managed Mac devices in Intune:
| Option |
Description |
| Apple Automated Device Enrollment |
Use this method to automate enrollment on devices purchased through Apple Business Manager or Apple School Manager. Automated device enrollment deploys the enrollment profile "over the air," so you don't need to have physical access to devices.
See Automatically enroll Mac with the Apple Business Manager or Apple School Manager. |
| Device enrollment manager (DEM) |
Use this method for large-scale deployments and when there are multiple people in your organization who can help with enrollment setup. Someone with device enrollment manager (DEM) permissions can enroll up to 1,000 devices with a single Microsoft Entra account. This method uses the Company Portal app or Microsoft Intune app to enroll devices. You can't use a DEM account to enroll devices via Automated Device Enrollment.
See Enroll devices in Intune by using a device enrollment manager account. |
| Direct enrollment |
Direct enrollment enrolls devices with no user affinity, so this method is best for devices that aren't associated with a single user. This method requires you to have physical access to the Macs you're enrolling.
See Use Direct Enrollment for Mac. |
Ask users to enroll their own Mac in Intune
If your business prefers to have people enroll their own devices in Intune, direct users to follow these steps:
Go to the Company Portal website (https://portal.manage.microsoft.com/) and sign in.
Follow the instructions on the Company Portal website to add their device.
Install the Company Portal app at https://aka.ms/EnrollMyMac, and follow the instructions in the app.
Confirm that a Mac is onboarded
To confirm that the device is associated with your company, use the following Python command in Bash:
mdatp health --field org_id.
If you're using macOS 10.15 (Catalina) or later, grant Defender for Business consent to protect your device. Go to System Preferences > Security & Privacy > Privacy > Full Disk Access. Select the lock icon at the bottom of the dialog to make changes, and then select Microsoft Defender for Business (or Defender for Endpoint, if that's what you see).
To verify that the device is onboarded, use the following command in Bash:
mdatp health --field real_time_protection_enabled
After a device is enrolled in Intune, you can add it to a device group. Learn more about device groups in Defender for Business.
Mobile devices
You can use the following methods to onboard mobile devices, such as Android and iOS devices:
Use the Microsoft Defender app
Mobile threat defense capabilities are now generally available to Defender for Business customers. With these capabilities, you can now onboard mobile devices (such as Android and iOS) by using the Microsoft Defender app. With this method, users download the app from Google Play or the Apple App Store, sign in, and complete onboarding steps.
Important
Make sure that all of the following requirements are met before onboarding mobile devices:
- Defender for Business has finished provisioning. In the Microsoft Defender portal, go to Assets > Devices.
- If you see a message that says, "Hang on! We're preparing new spaces for your data and connecting them," then Defender for Business hasn't finished provisioning. This process is happening now, and it can take up to 24 hours to complete.
- If you see a list of devices, or you're prompted to onboard devices, it means Defender for Business provisioning has completed.
- Users have downloaded the Microsoft Authenticator app on their device, and have registered their device using their work or school account for Microsoft 365.
| Device |
Procedure |
| Android |
1. On the device, go to the Google Play store.
2. If you haven't already done so, download and install the Microsoft Authenticator app. Sign in, and register your device in the Microsoft Authenticator app.
3. In the Google Play store, search for the Microsoft Defender app, and install it.
4. Open the Microsoft Defender app, sign in, and complete the onboarding process. |
| iOS |
1. On the device, go to the Apple App Store.
2. If you haven't already done so, download and install the Microsoft Authenticator app. Sign in, and register your device in the Microsoft Authenticator app.
3. In the Apple App Store, search for the Microsoft Defender app.
4. Sign in and install the app.
5. Agree to the terms of use to continue.
6. Allow the Microsoft Defender app to set up a VPN connection and add VPN configurations.
7. Choose whether to allow notifications (such as alerts). |
Use Microsoft Intune
If your subscription includes Microsoft Intune, you can use it to onboard mobile devices, such as Android and iOS/iPadOS devices. See the following resources to get help enrolling these devices into Intune:
After a device is enrolled in Intune, you can add it to a device group. Learn more about device groups in Defender for Business.
Servers
Choose the operating system for your server:
Windows Server
Important
Make sure that you meet the following requirements before you onboard a Windows Server endpoint:
- You have a Microsoft Defender for Business servers license. (See How to get Microsoft Defender for Business servers.)
- The enforcement scope for Windows Server is turned on. Go to Settings > Endpoints > Configuration management > Enforcement scope. Select Use MDE to enforce security configuration settings from MEM, select Windows Server, and then select Save.
You can onboard an instance of Windows Server to Defender for Business by using a local script.
Local script for Windows Server
Go to the Microsoft Defender portal (https://security.microsoft.com), and sign in.
In the navigation pane, choose Settings > Endpoints, and then under Device management, choose Onboarding.
Select an operating system, such as Windows Server 1803, 2019, and 2022, and then in the Deployment method section, choose Local script.
If you select Windows Server 2012 R2 and 2016, you have two packages to download and run: an installation package and an onboarding package. The installation package contains an MSI file that installs the Defender for Business agent. The onboarding package contains the script to onboard your Windows Server endpoint to Defender for Business.
Select Download onboarding package. We recommend that you save the onboarding package to a removable drive.
If you selected Windows Server 2012 R2 and 2016, also select Download installation package, and save the package to a removable drive
On your Windows Server endpoint, extract the contents of the installation/onboarding package to a location such as the Desktop folder. You should have a file named WindowsDefenderATPLocalOnboardingScript.cmd.
If you're onboarding Windows Server 2012 R2 or Windows Server 2016, extract the installation package first.
Open a command prompt as an administrator.
If you're onboarding Windows Server 2012R2 or Windows Server 2016, run the following command:
Msiexec /i md4ws.msi /quiet
If you're onboarding Windows Server 1803, 2019, or 2022, skip this step, and go to step 8.
Type the location of the script file. For example, if you copied the file to the Desktop folder, you would type %userprofile%\Desktop\WindowsDefenderATPLocalOnboardingScript.cmd, and then press Enter (or select OK).
Go to Run a detection test on Windows Server.
Run a detection test on Windows Server
After you onboard your Windows Server endpoint to Defender for Business, you can run a detection test to make sure that everything is working correctly:
On the Windows Server device, create a folder: C:\test-MDATP-test.
Open Command Prompt as an administrator.
In the Command Prompt window, run the following PowerShell command:
powershell.exe -NoExit -ExecutionPolicy Bypass -WindowStyle Hidden $ErrorActionPreference = 'silentlycontinue';(New-Object System.Net.WebClient).DownloadFile('http://127.0.0.1/1.exe', 'C:\\test-MDATP-test\\invoice.exe');Start-Process 'C:\\test-MDATP-test\\invoice.exe'
After the command runs, the Command Prompt window will close automatically. If successful, the detection test is marked as completed, and a new alert appears in the Microsoft Defender portal (https://security.microsoft.com) for the newly onboarded device within about 10 minutes.
Linux Server
Important
Make sure that you meet the following requirements before you onboard a Linux Server endpoint:
Onboard Linux Server endpoints
You can use the following methods to onboard an instance of Linux Server to Defender for Business:
After you've onboarded a device, you can run a quick phishing test to make sure the device is connected and that alerts are generated as expected.