Note
Access to this page requires authorization. You can try signing in or changing directories.
Access to this page requires authorization. You can try changing directories.
Applies to:
- Microsoft Defender for Endpoint Plan 1
- Microsoft Defender for Endpoint Plan 2
- Microsoft Defender for Business
If you're using Intune to manage Defender for Endpoint settings, you can use it to deploy and manage device control capabilities. Different aspects of device control are managed differently in Intune, as described in the following sections.
Configure and manage device control in Intune
Go to the Intune admin center and sign in.
Go to Endpoint security > Attack surface reduction.
Under Attack surface reduction policies, either select an existing policy, or select + Create Policy to set up a new policy, using these settings:
- In the Platform list, select Windows 10, Windows 11, and Windows Server. (Device control is not currently supported on Windows Server, even though you select this profile for device control policies.)
- In the Profile list, select Device Control.
On the Basics tab, specify a name and description for your policy.
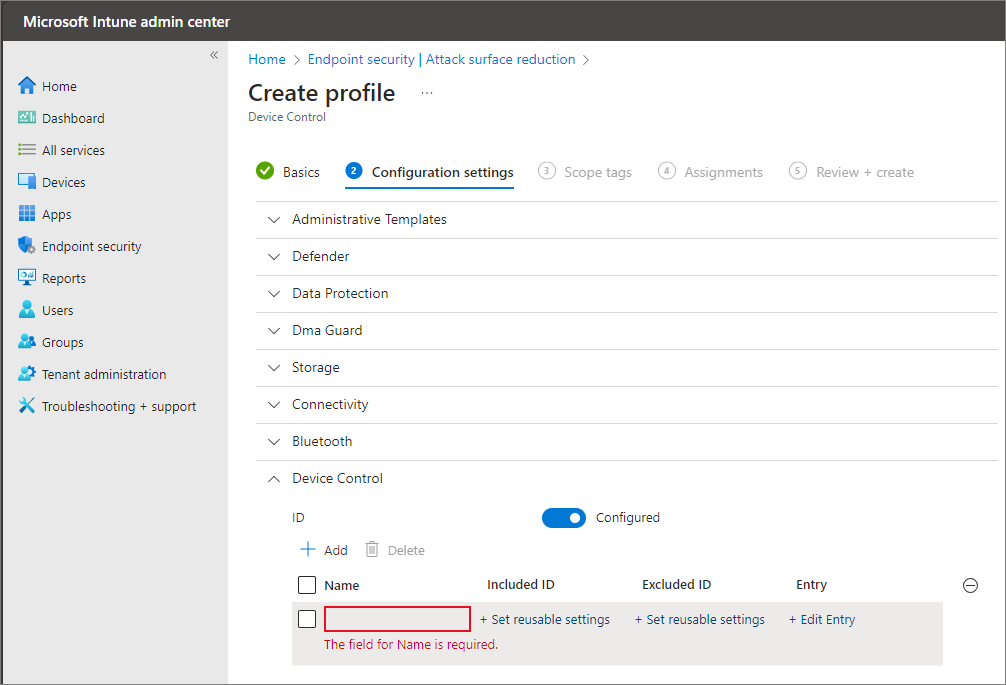
On the Configuration settings tab, you see a list of settings. You don't have to configure all of these settings at once. Consider starting with Device Control.
- Under Administrative Templates, you have Device Installation and Removable Storage Access settings.
- Under Defender, see Allow Full Scan Removable Drive Scanning settings.
- Under Data Protection, see Allow Direct Memory Access settings.
- Under Dma Guard, see Device Enumeration Policy settings.
- Under Storage, see Removable Disk Deny Write Access settings.
- Under Connectivity, see Allow USB Connection** and Allow Bluetooth settings.
- Under Bluetooth, see a list of settings that pertain to Bluetooth connections and services. For more details, see Policy CSP - Bluetooth.
- Under Device Control, you can configure custom policies with reusable settings. For more details, see Device control overview: Rules.
- Under System, see Allow Storage Card settings.
After you have configured your settings, proceed to the Scope tags tab, where you can specify scope tags for the policy.
On the Assignments tab, specify groups of users or devices to receive your policy. For more details, see Assign policies in Intune.
On the Review + create tab, review your settings, and make any needed changes.
When you're ready, select Create to create your device control policy.
Device control profiles
In Intune, each row represents a device control policy. The included ID is the reusable setting that the policy applies to. The excluded ID is the reusable setting that's excluded from the policy. The entry for the policy contains the permissions allowed and the behavior for device control that comes into force when the policy applies.
For information on how to add the reusable groups of settings that are included in the row of each device control policy, see the Add reusable groups to a Device Control profile section in Use reusable groups of settings with Intune policies.
Policies can be added and removed using the + and – icons. The name of the policy appears in the warning to users, and in advanced hunting and reports.
You can add audit policies, and you can add Allow/Deny policies. It is recommended to always add an Allow and/or Deny policy when adding an audit policy so that you don't experience unexpected results.
Important
If you only configure audit policies, the permissions are inherited from the default enforcement setting.
Note
- The order in the which policies are listed in the user interface isn't preserved for policy enforcement. The best practice is to use Allow/Deny policies. Ensure that the Allow/Deny policies option is non-intersecting by explicitly adding devices to be excluded. Using Intune's graphical interface, you cannot change the default enforcement. If you change the default enforcement to
Deny, and create anAllowpolicy to be applied specific devices, all devices are blocked except for any devices that are set in theAllowpolicy.
Defining Settings with OMA-URI
Important
Using Intune OMA-URI to configure device control requires the Device Configuration workload to be managed by Intune, if the device is co-managed with Configuration Manager. For more information, see How to switch Configuration Manager workloads to Intune.
In the following table, identify the setting you want to configure, and then use the information in the OMA-URI and data type & values columns. Settings are listed in alphabetical order.
| Setting | OMA-URI, data type, & values |
|---|---|
| Device control default enforcement Default enforcement establishes what decisions are made during device control access checks when none of the policy rules match |
./Vendor/MSFT/Defender/Configuration/DefaultEnforcementInteger: - DefaultEnforcementAllow = 1- DefaultEnforcementDeny = 2 |
| Device types Device types, identified by their Primary IDs, with device control protection turned on. You must specify the product family IDs, separated by a pipe. When selecting multiple devices types you need to ensure the string is all one word with no spaces. A configuration that does not follow this syntax will cause unexpected behavior. |
./Vendor/MSFT/Defender/Configuration/SecuredDevicesConfigurationString: - RemovableMediaDevices- CdRomDevices- WpdDevices- PrinterDevices |
| Enable device control Enable or disable device control on the device |
./Vendor/MSFT/Defender/Configuration/DeviceControlEnabledInteger: - Disable = 0- Enable = 1 |
Creating policies with OMA-URI
When you create policies with OMA-URI in Intune, create one XML file for each policy. As a best practice, use the Device Control Profile or Device Control Rules Profile to author custom policies.
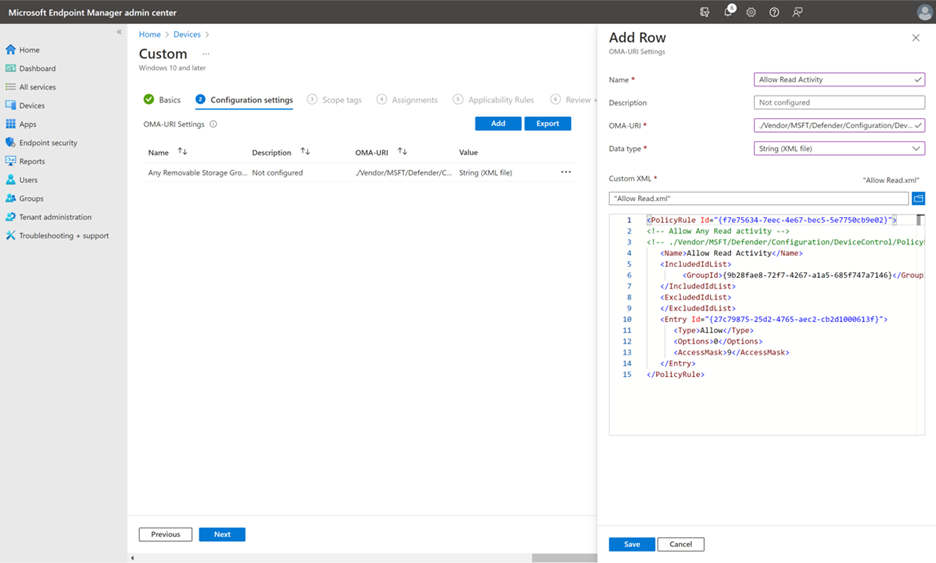
In the Add Row pane, specify the following settings:
- In the Name field, type
Allow Read Activity. - In the OMA-URI field, type
./Vendor/MSFT/Defender/Configuration/DeviceControl/PolicyRules/%7b[PolicyRule Id]%7d/RuleData. (You could use the PowerShell commandNew-Guidto generate a new Guid, and replace[PolicyRule Id].) - In the Data Type field, select String (XML file), and use Custom XML.
You can use parameters to set conditions for specific entries. Here's a group example XML file for Allow Read access for each removable storage.
Note
Comments using XML comment notation <!-- COMMENT --> can be used in the Rule and Group XML files, but they must be inside the first XML tag, not the first line of the XML file.
Creating groups with OMA-URI
When you create groups with OMA-URI in Intune, create one XML file for each group. As a best practice, use reusable settings to define groups.
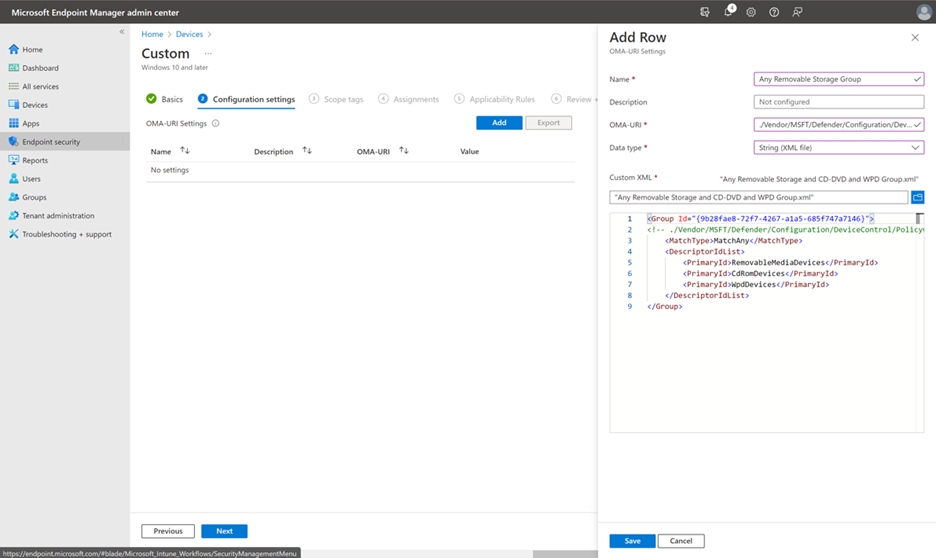
In the Add Row pane, specify the following settings:
- In the Name field, type
Any Removable Storage Group. - In the OMA-URI field, type
./Vendor/MSFT/Defender/Configuration/DeviceControl/PolicyGroups/%7b[GroupId]%7d/GroupData. (To get your GroupID, in the Intune admin center, go to Groups, and then select Copy the Object ID. Or, you could use the PowerShell commandNew-Guidto generate a new Guid, and replace[GroupId].) - In the Data Type field, select String (XML file), and use Custom XML.
Note
Comments using XML comment notation <!-- COMMENT -- > can be used in the Rule and Group XML files, but they must be inside the first XML tag, not the first line of the XML file.
Configure removable storage access control using OMA-URI
Go to the Microsoft Intune admin center and sign in.
Choose Devices > Configuration profiles. The Configuration profiles page appears.
Under the Policies tab (selected by default), select + Create, and choose + New policy from the drop-down that appears. The Create a profile page appears.
In the Platform list, select Windows 10, Windows 11, and Windows Server from the Platform drop-down list, and choose Templates from the Profile type drop-down list.
Once you choose Templates from the Profile type drop-down list, the Template name pane is displayed, along with a search box (to search the profile name).
Select Custom from the Template name pane, and select Create.
Create a row for each setting, group, or policy by implementing Steps 1-5.
View device control groups (Reusable settings)
In Intune, device control groups appear as reusable settings.
Go to the Microsoft Intune admin center and sign in.
Go to Endpoint Security > Attack Surface Reduction.
Select the Reusable Settings tab.


