Microsoft Defender Antivirus production ring deployment using Group Policy and Windows Server Update Services
Applies to:
- Microsoft Defender for Endpoint Plan 2
- Microsoft Defender XDR
- Microsoft Defender Antivirus
Platforms
- Windows
- Windows Server
Want to experience Microsoft Defender for Endpoint? Sign up for a free trial.
Microsoft Defender for Endpoint is an enterprise endpoint security platform designed to help enterprise networks prevent, detect, investigate, and respond to advanced threats.
Tip
Microsoft Defender for Endpoint is available in two plans, Defender for Endpoint Plan 1 and Plan 2. A new Microsoft Defender Vulnerability Management add-on is now available for Plan 2.
Before you begin
This article assumes that you have experience with Windows Server Update Services (WSUS) and/or already have WSUS installed. If you aren't already familiar with WSUS, see the following articles for important configuration details:
- Configure WSUS - Applies to: Windows Server 2022, Windows Server 2019, Windows Server 2016, Windows Server 2012 R2, Windows Server 2012)
- [Configure Windows Server Update Services (WSUS) in Analytics Platform System][/sql/analytics-platform-system/configure-windows-server-update-services-wsus.md] - Analytics Platform System
Setting up the production environment
This section provides information about setting up the production environment using Group Policy and Windows Server Update Services (WSUS).

Note
Security intelligence update (SIU) is equivalent to signature updates, which is the same as definition updates.
On the left pane of Server Manager, select Dashboard > Tools > Windows Server Update Services.
Note
If the Complete WSUS Installation dialog box appears, select Run. In the Complete WSUS Installation dialog box, select Close when the installation successfully finishes.
The WSUS Configuration Wizard opens. On the Before you Begin page, review the information, and then select Next.
Read the instructions on the Join the Microsoft Update Improvement Program page. Keep the default selection if you want to participate in the program, or clear the checkbox if you don't. Then select Next.
On the Choose Upstream Server page, select Synchronize from another Windows Server Update Services server.
- In Server name, enter the server name. For example, type YR2K19.
- In Port number enter the port on which this server communicates with the upstream server. For example, type 8530.
This is shown in the following figure.

Select Next.
An autonomous downstream server, like a replica server, also uses another WSUS server as its master repository, but allows for individual approvals for updates different from approvals of the master. The autonomous server:
- Allows flexibility in creating computer groups
- Doesn't have to be in the same Active Directory forest as the master
(Optional, depending on configuration) On the Specify Proxy Server page, select the Use a proxy server when synchronizing checkbox. Then enter the proxy server name and port number (port 80 by default) in the corresponding boxes.
Important
You must complete this step if you identified that WSUS needs a proxy server to have internet access.
- If you want to connect to the proxy server by using specific user credentials, select the Use user credentials to connect to the proxy server checkbox. Then enter the user name, domain, and password of the user in the corresponding boxes.
- If you want to enable basic authentication for the user who is connecting to the proxy server, select the Allow basic authentication (password is sent in cleartext) checkbox.
Select Next.
On the Connect to Upstream Server page, select start Connecting. When WSUS connects to the server, select Next.
On the Choose Languages page, you can select the languages from which WSUS receives updates: all languages or a subset of languages. Selecting a subset of languages saves disk space, but it's important to choose all the languages that all the clients need on this WSUS server.
If you choose to get updates only for specific languages, select Download updates only in these languages, and then select the languages for which you want updates. Otherwise, leave the default selection.
Warning
If you select the option Download updates only in these languages, and the server has a downstream WSUS server connected to it, selecting this option will force the downstream server to also use only the selected languages.
After you select the language options for your deployment, select Next.
The Set Sync Schedule page opens. (The Choose Products and Choose Classifications pages are grayed out and can't be configured).
- Select Synchronize automatically, the WSUS server synchronizes at set intervals.
- In First synchronization specify a time for the first synchronization. For example, select 5:00:00 PM.
- In Synchronizations per day, specify the number of times you want synchronizations to occur. For example, select 1, and then select Next.
On the Finished page, select Next.
On the What's next page, select Next to finish.

Define the order of sources for downloading security intelligence updates
On your Group Policy management computer, open the Group Policy Management Console, right-click the Group Policy Object you want to configure and select Edit.
In the Group Policy Management Editor go to Computer configuration, select Policies, then select Administrative templates.
Expand the tree to Windows components > Windows Defender > Signature updates.
Double-click the Define the order of sources for downloading security intelligence updates setting and set the option to Enabled.
In Options, type InternalDefinitionUpdateServer, and then select OK. The configured Define the order of sources for downloading security intelligence updates page is shown in the following figure.

In Define the order of sources for downloading security intelligence updates, select Enabled. In Options, enter the order of sources for downloading security intelligence updates. For example, type InternalDefinitionUpdateServer.

If you encounter problems
If you encounter problems with your deployment, create or append your Microsoft Defender Antivirus policy:
In Group Policy Management Console (GPMC, GPMC.msc), create or append to your Microsoft Defender Antivirus policy using the following setting:
Go to Computer Configuration > Policies > Administrative Templates > Windows Components > Microsoft Defender Antivirus > (administrator-defined) PolicySettingName. For example, MDAV_Settings_Production, right-click, and then select Edit. Edit for MDAV_Settings_Production is shown in the following figure:

Select Define the order of sources for downloading security intelligence updates.
Select the radio button named Enabled.
Under Options, change the entry to FileShares, select Apply, and then select OK. This change is shown in the following figure:

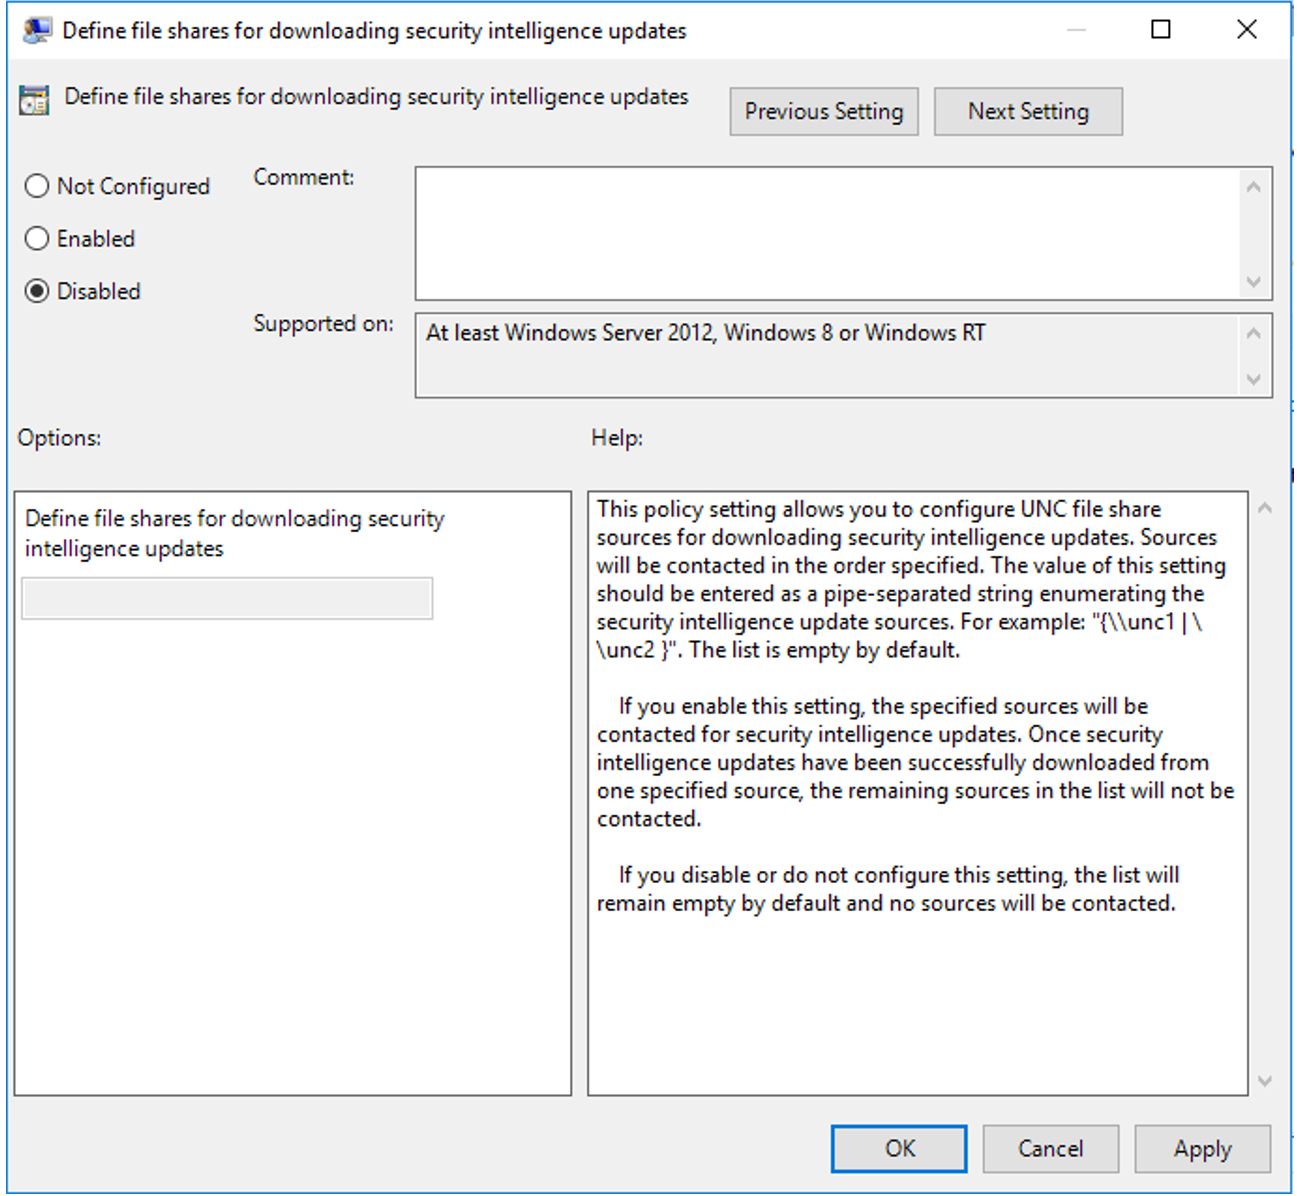
Select Define the order of sources for downloading security intelligence updates.
Select the radio button named Disabled, select Apply, and then select OK. The disabled option is shown in the following figure:
The change is active when Group Policy updates. There are two methods to refresh Group Policy:
- From the command line, run the Group Policy update command. For example, run
gpupdate / force. For more information, see gpupdate - Wait for Group Policy to automatically refresh. Group Policy refreshes every 90 minutes +/- 30 minutes.
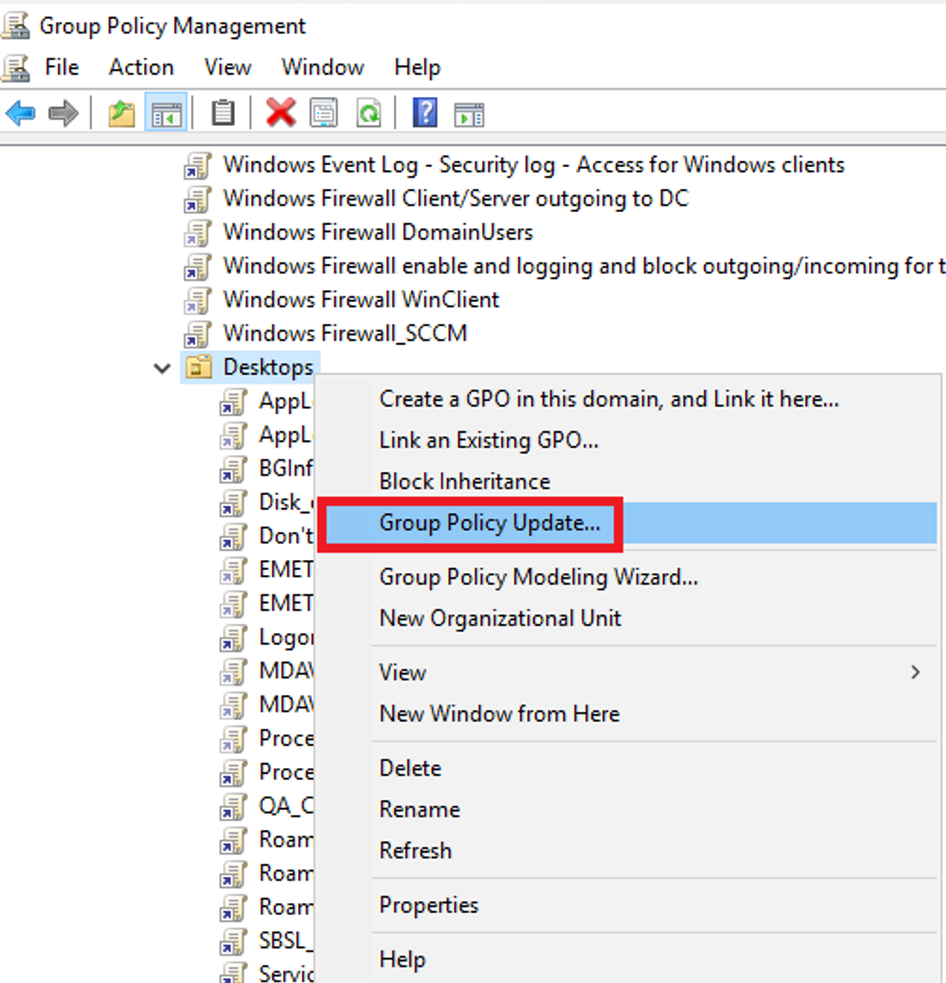
If you have multiple forests/domains, force replication or wait 10-15 minutes. Then force a Group Policy Update from the Group Policy Management Console.
Right-click on an organizational unit (OU) that contains the machines (for example, Desktops), select Group Policy Update. This UI command is the equivalent of doing a gpupdate.exe /force on every machine in that OU. The feature to force Group Policy to refresh is shown in the following figure:
- From the command line, run the Group Policy update command. For example, run
After the issue is resolved, set the Signature Update Fallback Order back to the original setting.
InternalDefinitionUpdateServer|MicrosoftUpdateServer|MMPC|FileShare.


See also:
Feedback
Coming soon: Throughout 2024 we will be phasing out GitHub Issues as the feedback mechanism for content and replacing it with a new feedback system. For more information see: https://aka.ms/ContentUserFeedback.
Submit and view feedback for