Integrating a Large Language Model on Azure with Power Platform
Level: Beginner
In this tutorial, you'll learn how to create an Azure Machine Learning Workspace and deploy a Large Language model (LLM). You'll then integrate the LLM with Power Apps and Power Automate. Enhance your technical skills and explore the power of Azure and Power Automate in text generation and creative writing.
- Azure Machine Learning: Empowers data scientists and developers to build, deploy, and manage high-quality models faster and with confidence. It accelerates time to value with industry-leading machine learning operations (MLOps), open-source interoperability, and integrated tools. This trusted AI learning platform is designed for responsible AI applications in machine learning.
- Power Apps: Empower your team to start building and launching apps right away using an AI copilot, prebuilt templates, drag-and-drop simplicity, and quick deployment then roll out continuous improvements as needed. Give everyone the power to build the apps they need with advanced functionality previously only available to professional developers including pre-built components and AI-assisted natural language development. Provide professional developers the tools to seamlessly extend app capabilities with Azure Functions and custom connectors to proprietary or on-premises systems.
- Power Automate: Empower everyone to build automated processes using low-code, drag-and-drop tools. With hundreds of prebuilt connectors, thousands of templates, and AI assistance, it’s easy to automate repetitive tasks. Record and visualize your end-to-end processes with Power Automate Process Mining. It takes the guesswork out of what to automate by providing guided recommendations for creating flows. Make your automation even smarter using generative AI capabilities in AI Builder. Create user-intuitive flows by embedding powerful language models and build unique scenarios with advanced low-code AI.
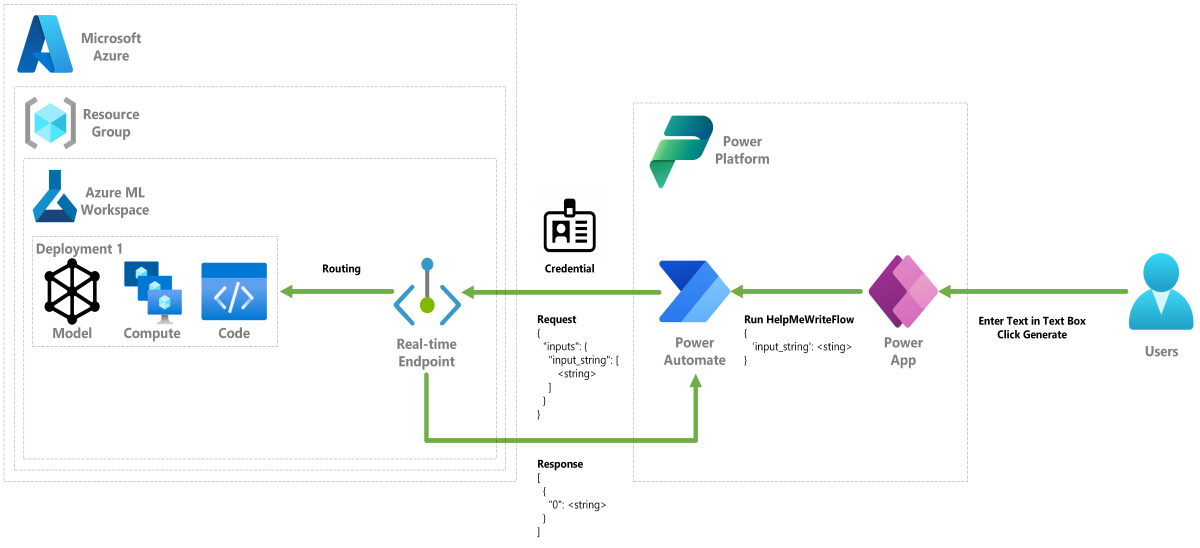
In this tutorial, you'll construct a Power App that captures user input, sends it to a Power Automate cloud flow, retrieves a response from your machine learning model, and displays the result on-screen. Here's an overview of the solution:
Overview of the Solution's Architecture
Prerequisites
-
Note
If you're a student you can use the Azure subscription for Students
Microsoft Cloud Technologies used in this Tutorial
- Azure Machine Learning
- GitHub
- Power Apps
- Power Automate
Create an Azure Machine Learning Workspace
In this exercise, you'll create an Azure Machine Learning Workspace to be able to provision your own machine learning artifacts.
An Azure Machine Learning Workspace is a top-level resource providing a centralized place for your resources and assets, including Models, Endpoints, Compute, and many more.
In this exercise, you will:
- Open Azure portal.
- Create an Azure Machine Learning Workspace.
Let's get started by opening the Azure portal!
Visit the Azure portal in your browser and sign in.
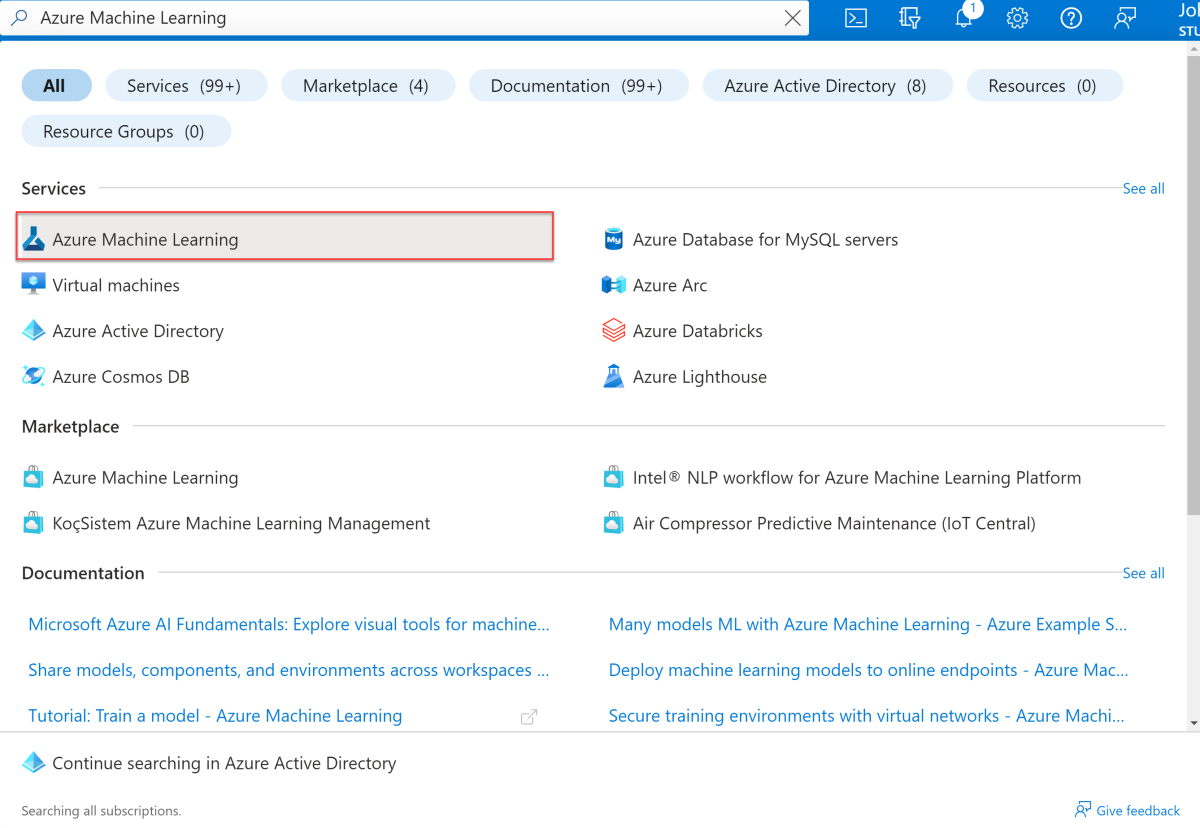
Type Azure Machine Learning in the search bar at the top of the portal page and select Azure Machine Learning from the options that appear.
Select Create from the toolbar. Select New workspace to create a new machine learning workspace.

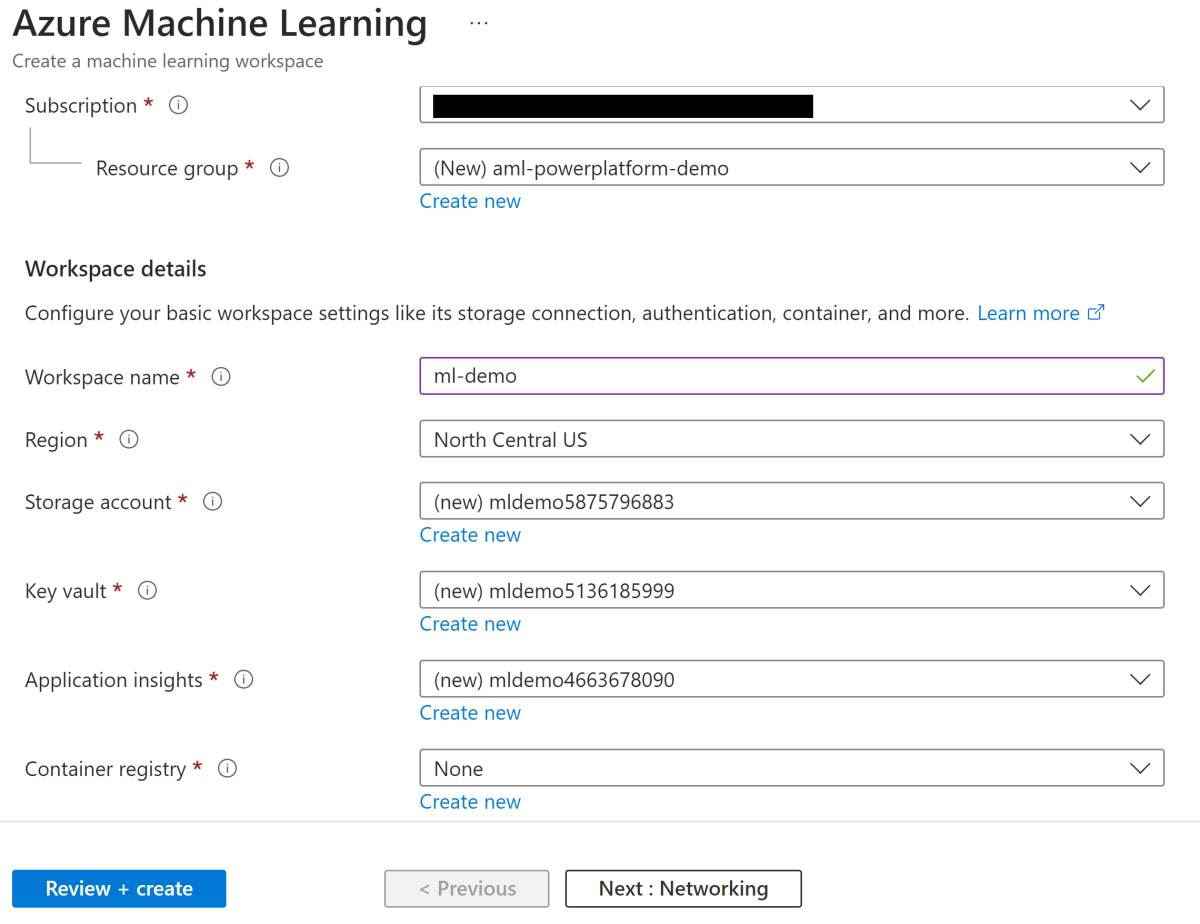
Perform the following tasks:
- Select your Subscription.
- Select the Resource group to use (create a new one if needed).
- Enter the Workspace name. It must be a unique value.
- Select the Region you'd like to use.
Note
While populating your Workspace details, all the other options including: Storage account, Key vault, Application insights, and Container registry, will be set automatically.
Select Review + create. Select Create.
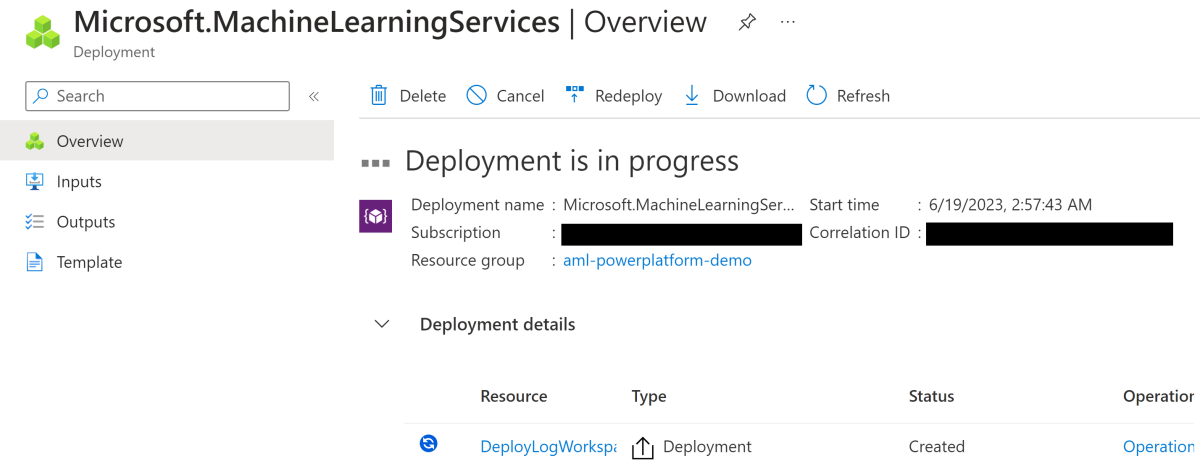
Wait for the deployment to finish. Select Go to resource.
Deploy a Machine Learning Model using templates
In this exercise, you'll deploy a Large Language Model (LLM) to a real-time endpoint in Azure Machine Learning studio. A Large Language Model is a type of natural language processing model that is trained on a large amount of text data. These models can generate human-like text and code and are used for applications like text generation, translation, question answering, and more.
In this exercise, you will:
- Open Azure Machine Learning studio.
- Configure an endpoint that can be used in your application.
Let's get started by opening Azure Machine Learning studio!
Open Azure Machine Learning studio using the Studio web URL.

Select All workspaces to access the shared resources in your tenant.
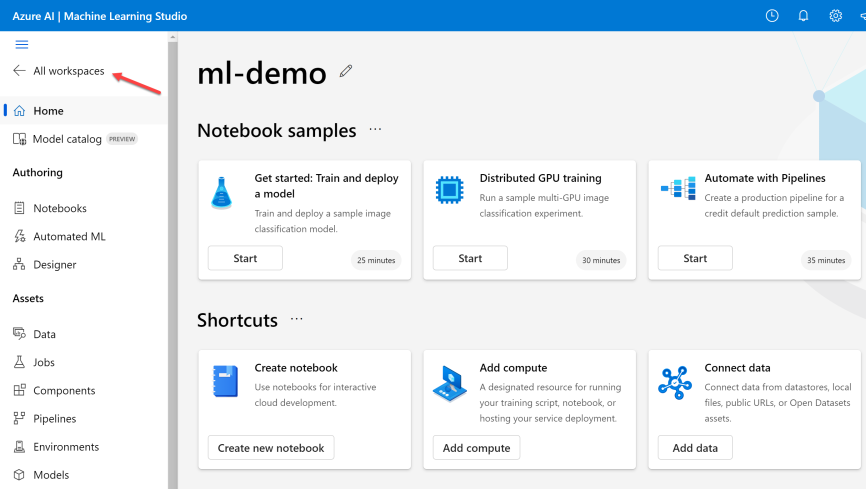
Select Models under the Shared assets from the left side menu to view the model template that you want to deploy.
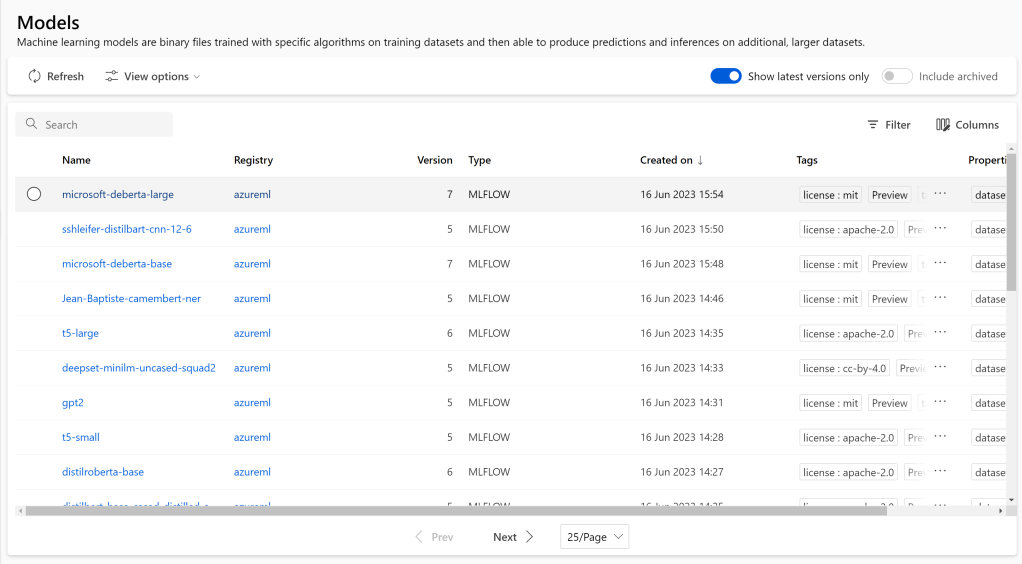
Note
Here you can find binary files for different machine learning models trained with specific algorithms on training datasets and then able to produce predictions and inferences on additional, larger datasets provided by AzureML and HuggingFace.
In this tutorial, you choose GPT-2 for text generation. This model can effectively be used for different applications like sentiment analysis and many more.
Feel free to try other models later.
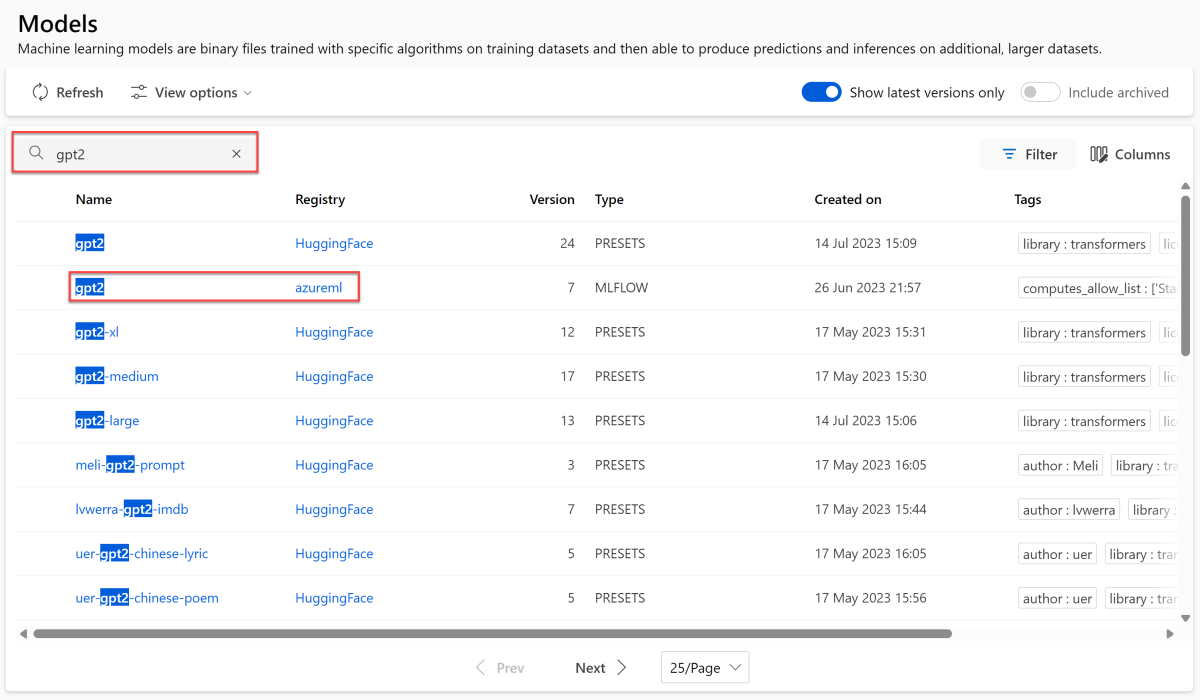
Type gpt2 in the search bar at the top of the models page followed by selecting the gpt2 model provided by the azureml registry from the options that appear.
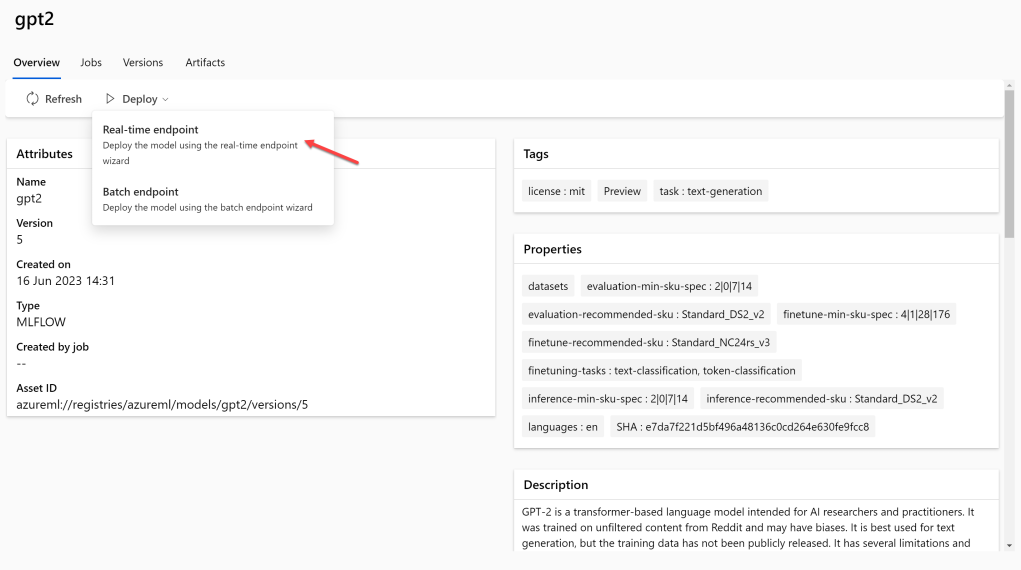
Select Deploy followed by Real-time endpoint.
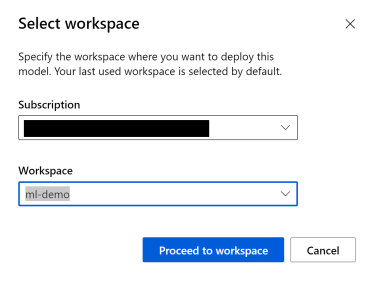
Select your Subscription and your Workspace. Select Proceed to workspace.
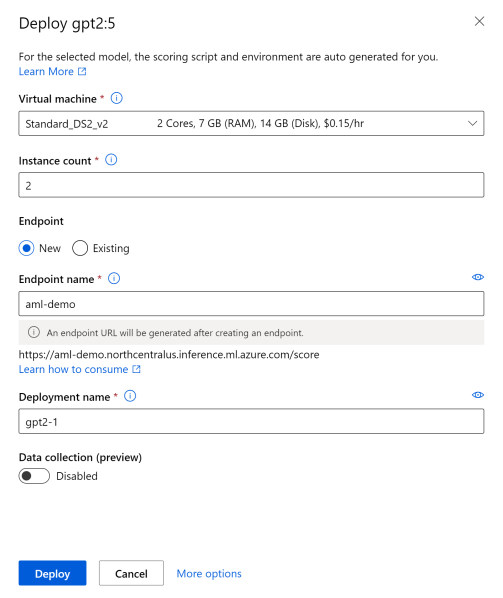
Perform the following tasks:
- Select the Virtual machine you'd like to use.
- Enter an Instance count of at least 3.
Tip
For high availability, Microsoft recommends you set it to at least 3.
- Enter an Endpoint name. Any unique name works.
- Enter a Deployment name.
Warning
Selecting a large Virtual machine will incur more charges and increasing the number of instances from the selected machine will also contribute to that. This may increase the speed and/or availability of your model but at the cost of paying more money.
Select Deploy.
Note
While the deployment is being created, you can proceed to the next step as it will take a couple of minutes.
In addition to creating and using models in Azure Machine Learning Workspace, your application can also use models available in Azure OpenAI.
Open Power Apps and Import the Solution
In this exercise, you will clone a GitHub repository that has a Solution package and import it into Power Apps to enable you to integrate your deployed machine learning model with Power Automate and use it in Power Apps.
A Solution is a package that helps us transport apps and components from one environment to another. It can contain one or more apps as well as other components such as tables, flows, and more.
In this exercise, you will:
- Clone a GitHub repository.
- Import a Solution into Power Apps.
Let's get started by cloning a GitHub repository!
Clone the Solution
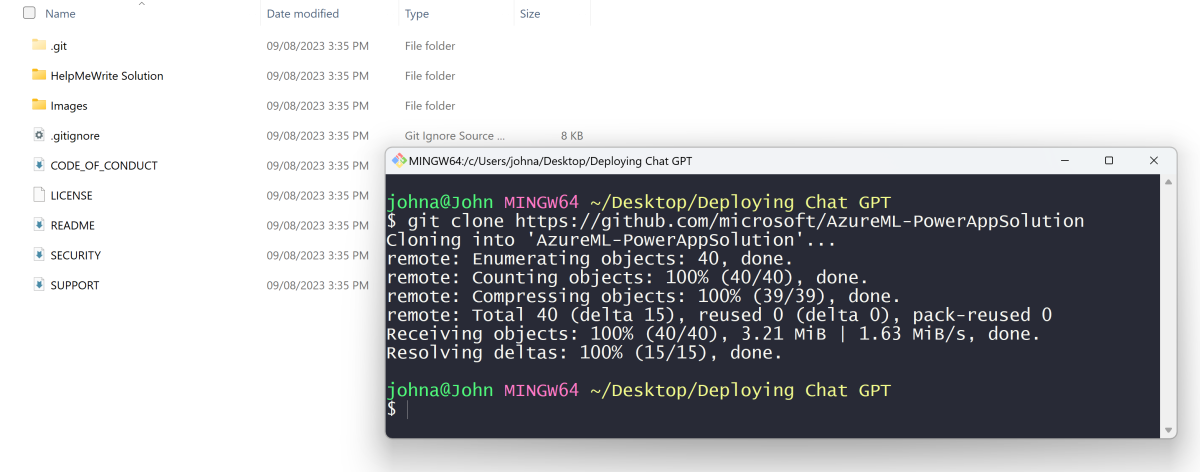
Run the following command to clone the Solution's GitHub Repository to your machine.
Tip
If you hover over the code you can select the "copy" icon to copy the code to your clipboard.
git clone https://github.com/microsoft/AzureML-PowerAppSolutionNotice the Solution folder as it contains the packaged solution that you will import into Power Apps.
Import the Solution Into Power Apps
Visit Power Apps Studio in your browser and sign in.

Note
You need to create a Power Platform environment before being able to move forward by following the guide included in the Prerequisites.
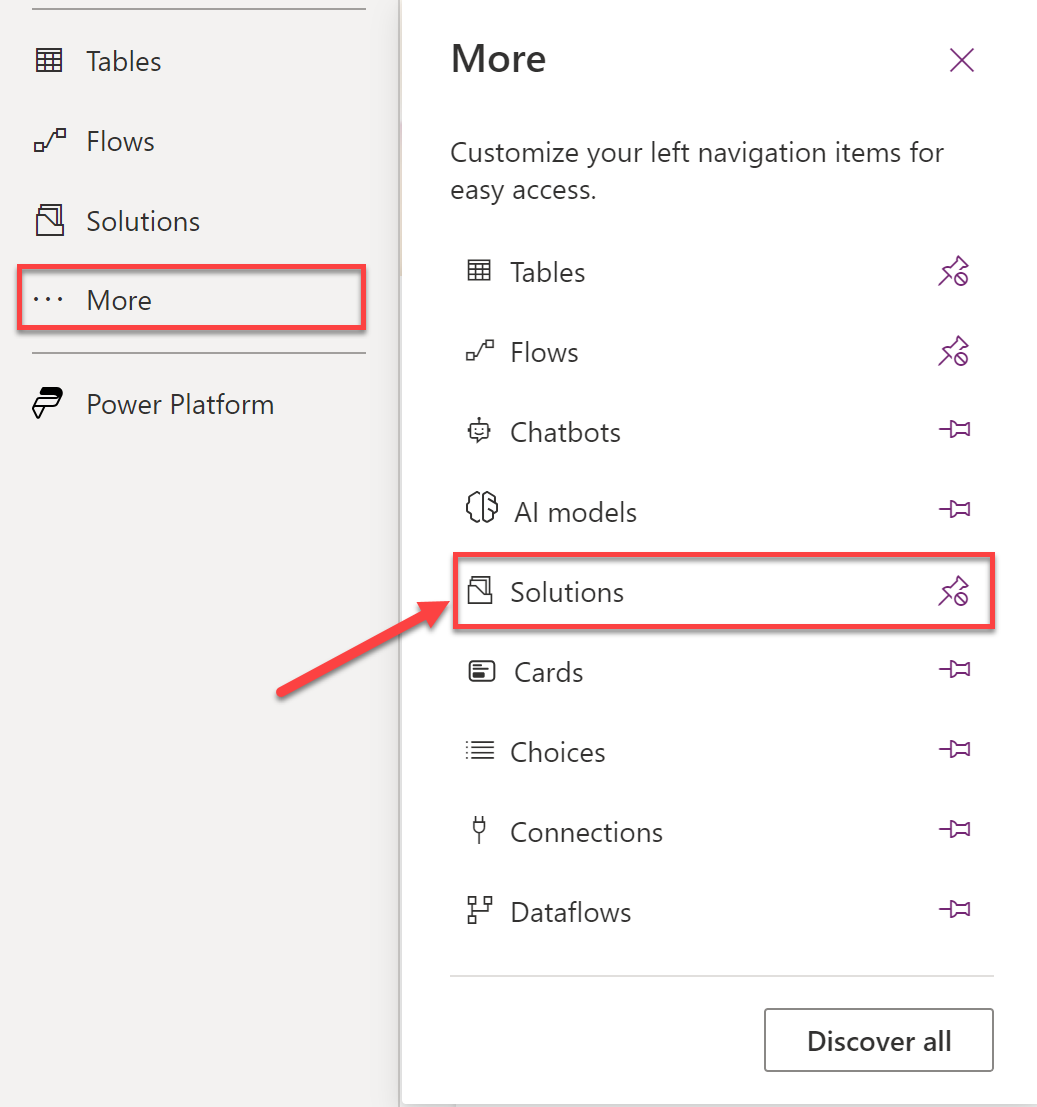
Select More from the left side window. Select Solutions.
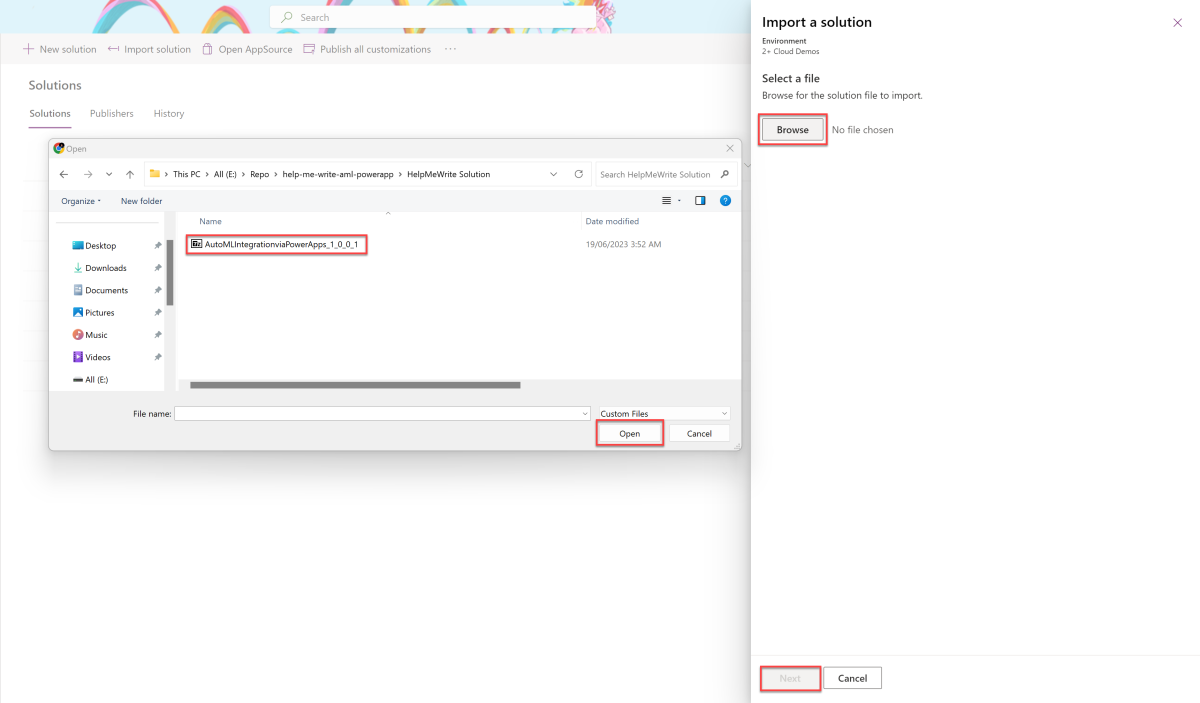
Select Import solution to load the .zip file that you cloned.

Perform the following tasks:
- Select Browse
- Select the .zip file that you cloned.
- Select Open followed by Next.
- After it finishes processing, select Import.
You can now find a solution named AML PowerApps HelpMeWrite Sample in the solutions table ready for you to use.

Edit the Power Automate Flow
In this exercise, you will open the Power Automate Cloud Flow and add the secrets that were created when you deployed the Large Language Model (LLM) to enable communication between the Power App and the deployed Model.
A Power Automate Cloud Flow is an automation capability that can be integrated with other services to perform an action when triggered. For example, it can send our text to the deployed model, receive the response, and send it to Power Apps with a click of a button.
In this exercise, you will:
- Open a Canvas App.
- Get secrets from an Azure Machine Learning endpoint.
- Edit a Power Automate Cloud Flow.
Let's get started by opening the Solution!
Open the solution by selecting it's Display name.
Select the canvas app Help Me Write Display name to open the application in edit mode.
Note
You can edit the application if you want to change colors, fonts, and backgrounds or leave it as it is.

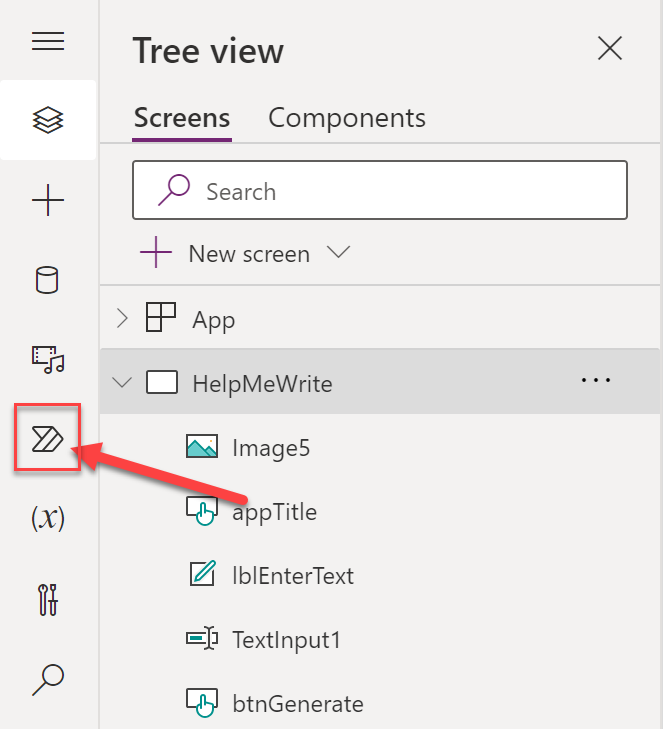
Select the Power Automate Icon from the left side menu.
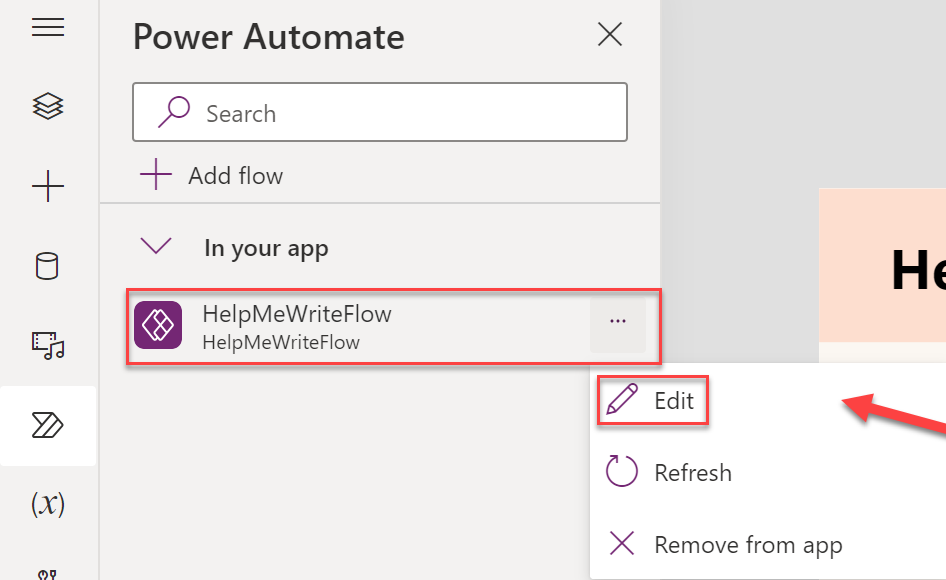
Hover over the flow name HelpMeWriteFlow and select the three dots. Select Edit.
Go back to Azure Machine Learning Studio to get the secrets.
In the endpoints tab you should see that the deployment has completed:
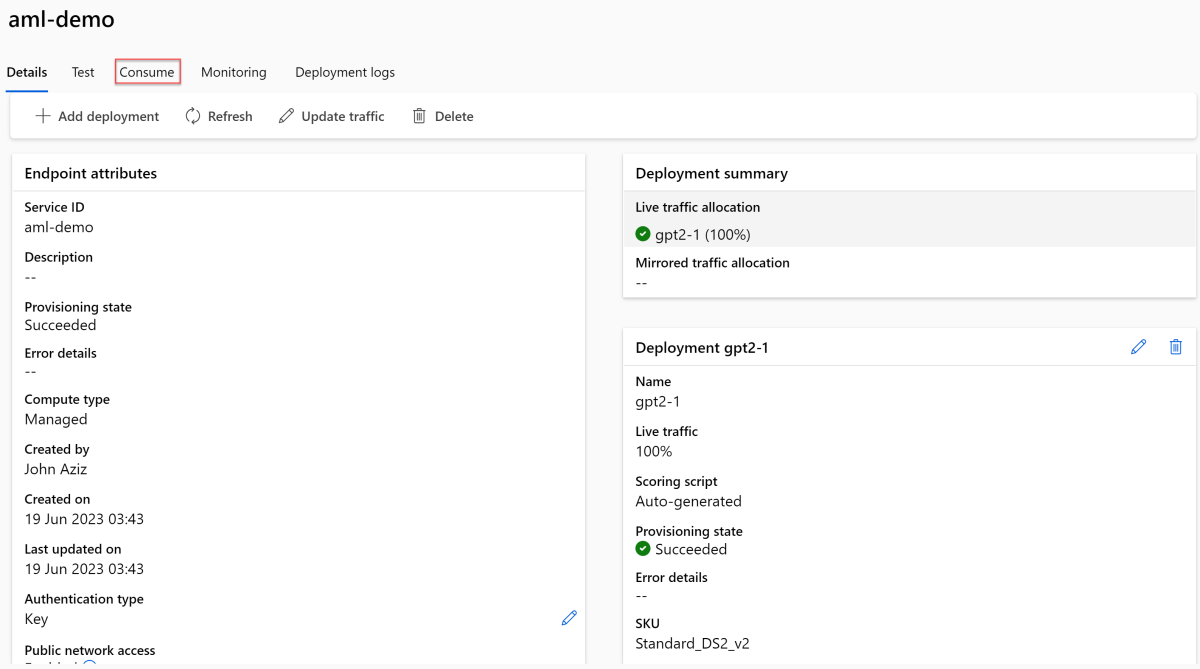
Perform the following tasks:
- Select Consume.
- Copy the REST endpoint.
Note
This is the ML Endpoint variable in the Power Automate Flow.
- Copy the Primary authentication key.
Note
This is the ML API Key variable in the Power Automate Flow.
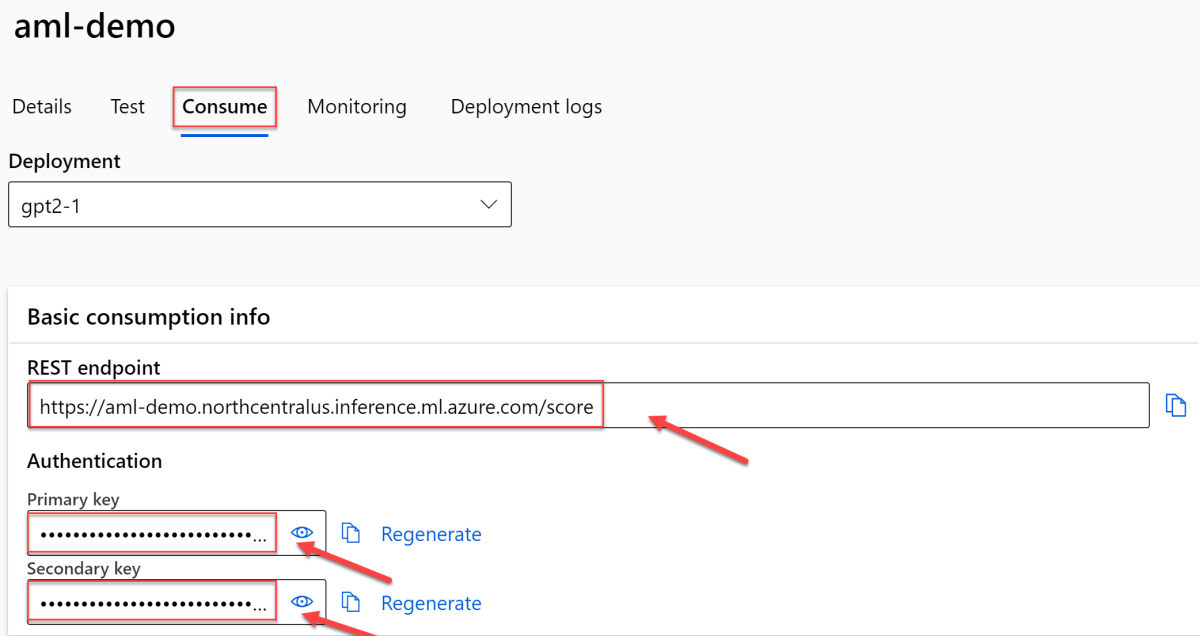
Tip
If you scroll down inside the Consume tab, you will find a code sample ready to use in three different programming languages: Python, C#, and R. You can copy and paste it anywhere, and it will send a request to the deployed model and get a response back from it. For example, it could be used in your website or within a serverless function.
Go back to Power Automate and add the copied values in the places shown below:
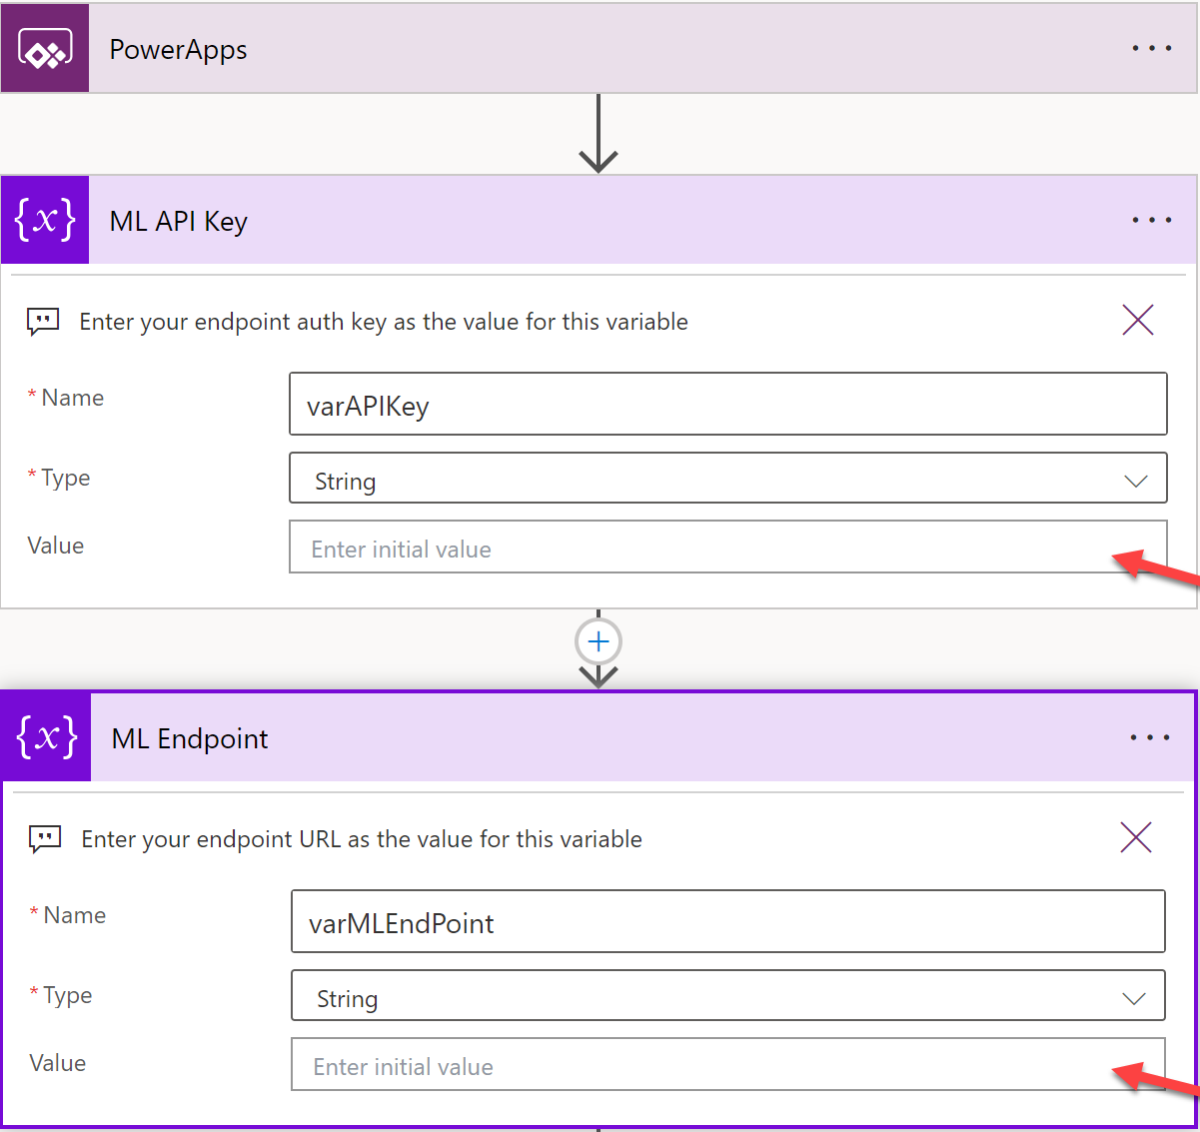
Select Save and close the flow using the X button.
Publish your Power App
In this exercise, you will:
- Test the Power App to ensure everything is working.
- Publish it to make it available to anyone with whom you share the app.
Select the Play button from the navigation menu.
Tip
You can run the application by pressing on F5 from your keyboard.

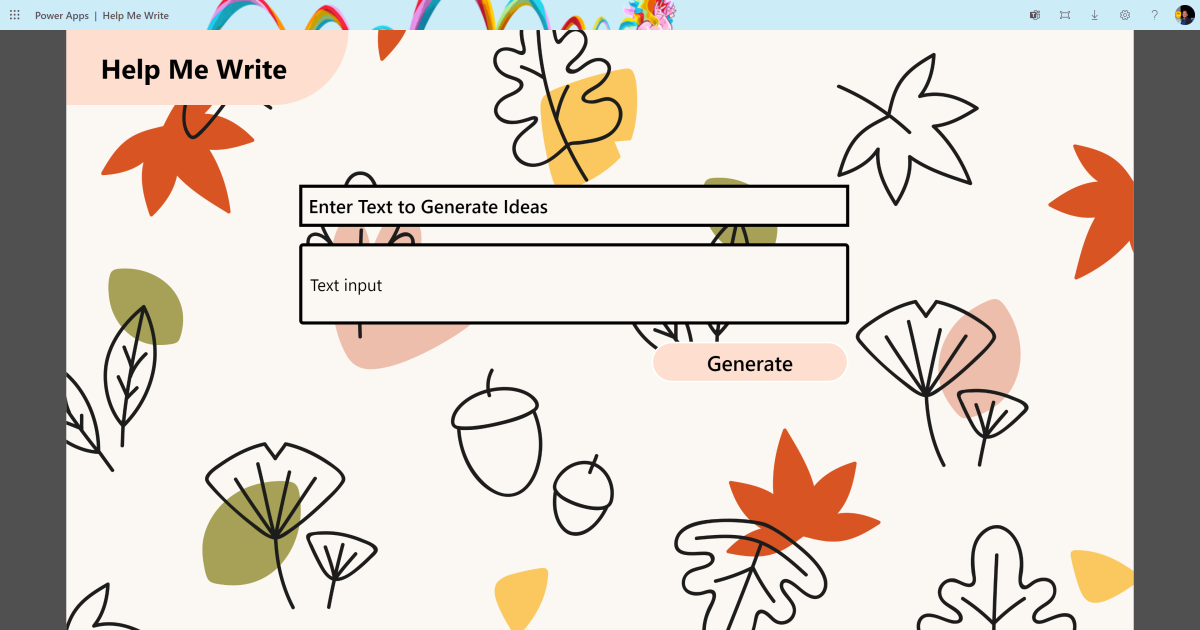
Enter any text in the Text Input box and then select Generate to generate text.
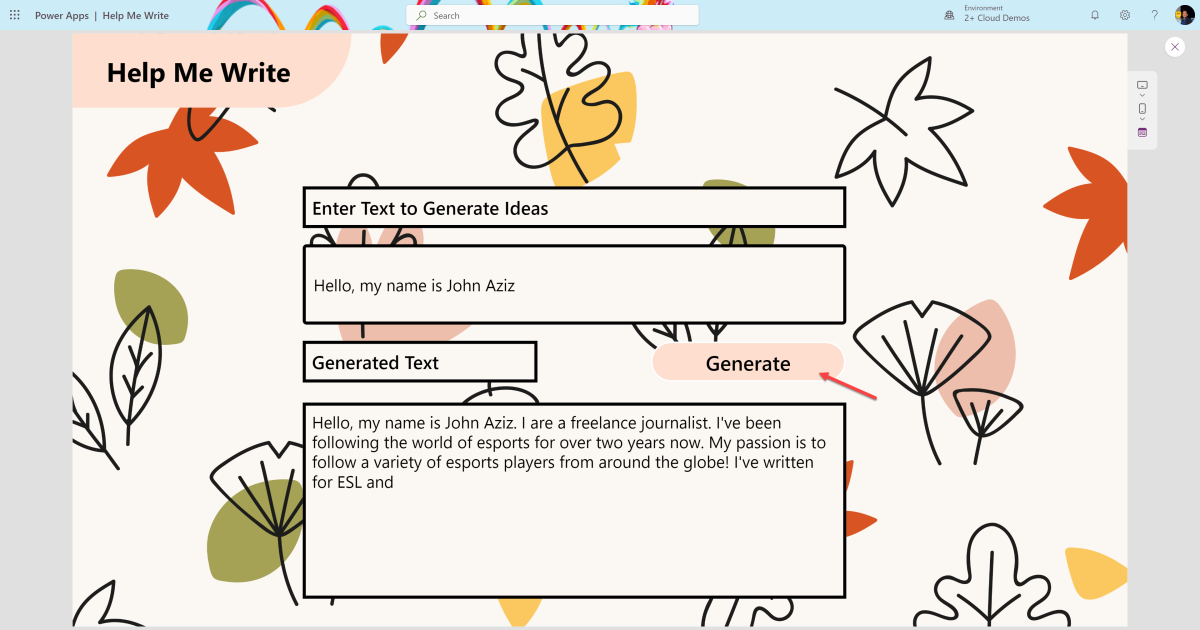
Perform the following tasks to publish the application:
- Select the Save icon to save your changes.
- Select the Publish icon to publish the application.

Note
Whenever you save changes to a canvas app, you automatically publish them only for yourself and anyone else who has permissions to edit the app. When you finish making changes, you must explicitly publish them to make them available to everyone with whom the app is shared.
Now you can find the application in your Microsoft 365 Online Apps section.
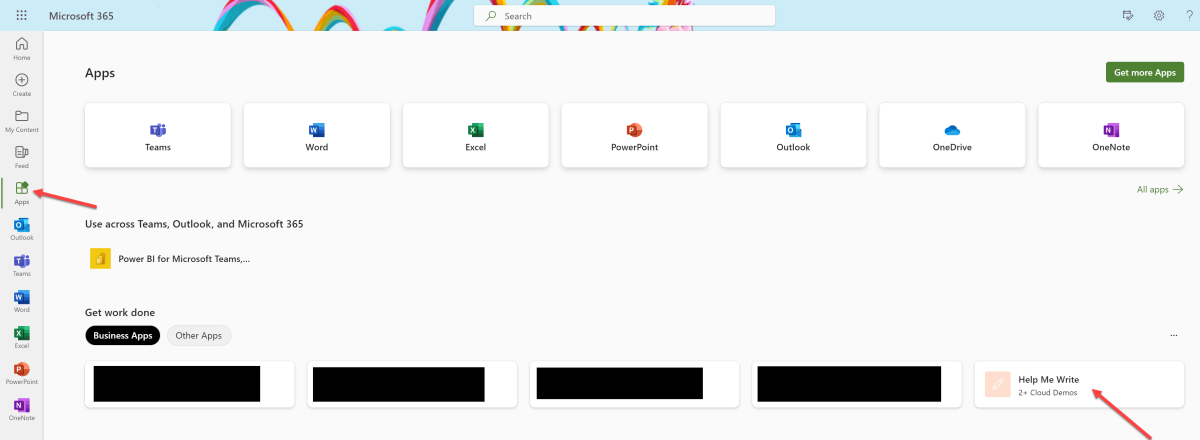
Share your application with anyone you want.
Congratulations!
You've completed this tutorial
Congratulations! You've learned how to create an Azure Machine Learning workspace, how to deploy a Large Language model from Azure Model Registry, how to import a pre-built Power App solution into Power Apps, how to consume a deployed model with Power Automate cloud flow, and how to publish your application to share it with others. By using these technologies you can explore the power of Azure and Power Automate in text generation and creative writing.
Clean Up Azure Resources
Cleanup your Azure resources to avoid additional charges to your account. Go to the Azure portal and delete the following resources:
- The Azure Machine Learning Workspace
- The Azure Resource group
Clean Up Power Apps Resources
Cleanup your Power Apps resources to avoid additional charges to your account. Go to the Power Apps Studio and delete the following resources:
- The Power App Canvas App.
- The Power Automate Cloud Flow.
- The Solution.
Next Steps
Documentation
- Subscriptions, licenses, accounts, and tenants for Microsoft's cloud offerings
- Manage Azure resource groups by using the Azure portal
- Storage account overview
- Managed online endpoints SKU list
- Endpoints for inference in production
- What is Power Apps?
- Solutions overview
- What are canvas apps?
- Get started with Power Automate
- Create a cloud flow in Power Automate
Training Content
Have an issue with this section? If so, please give us some feedback so we can improve this section.