Note
Access to this page requires authorization. You can try signing in or changing directories.
Access to this page requires authorization. You can try changing directories.
You can configure proactive messages for agents and classic chatbots that you create and customize in Copilot Studio. After you publish an agent and make the agent available to users in Microsoft Teams, it can send proactive messages to notify users ("recipients") in Teams. Proactive messages use Power Automate flows to deliver their content, and they're useful in many scenarios, including:
- Letting a recipient know that their earlier request is complete. For example, the user's time-off request is approved.
- Providing reminders or news updates. For example, the agent sends a reminder to complete online training.
Important
An agent can't deliver messages if the recipient:
- Doesn't install the agent in Teams.
- Uninstalls the agent.
- Blocks the agent.
- Doesn't have permission to chat with the agent. In this case, you need to share the agent.
Prerequisites
- Publish and deploy agents
- Connect and configure agents for Microsoft Teams
- Get started with Power Automate
- Overview of cloud flows
Known limitations
- If the agent disconnects and reconnects to Teams, users don't receive proactive messages until they reinstall the agent.
- All proactive messages from Copilot Studio are subject to Power Automate limits and throttling limits of the Microsoft Teams connector.
- Proactive messages don't appear in conversation transcripts or analytics session data.
- Proactive messages must be in the same environment as the Power Automate flow.
- Proactive messages can only go to a personal chat with the agent.
Send a proactive message
In Power Automate, open the flow that you want to use to send a proactive message.
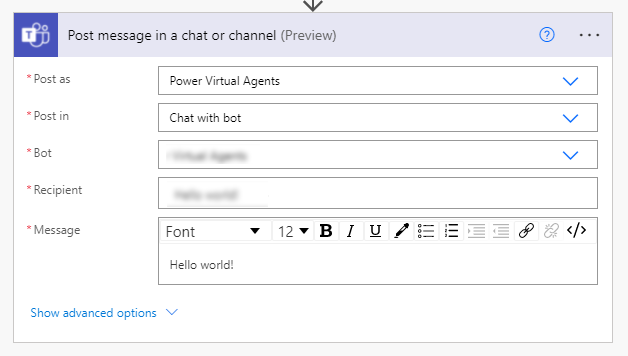
Add the Microsoft Teams connector action Post message in a chat or channel.
For Post as, select Microsoft Copilot Studio agent.
For Post in, select Chat with agent.
For Agent, select the agent that you want the message to be sent from.
For Recipient, enter the recipient's name or email address. You can also use dynamic content if the recipient info comes from an earlier step in the flow.
For Message, enter the message you want to send.
When the flow runs, the recipient receives the proactive message from the agent in Teams.
Send a proactive Adaptive Card
This section explains how to send proactive Adaptive Cards by using Power Automate flows. On a proactive Adaptive Card, users can receive information from an inactive conversation with an agent.
Adaptive Cards are an open card exchange format that lets developers exchange UI content in a common and consistent way. You can author Adaptive Cards by hand in JSON, or if you prefer a drag-and-drop interface, you can use the Adaptive Cards Designer.
Note
Power Automate doesn't support Adaptive Cards that use the templating feature.
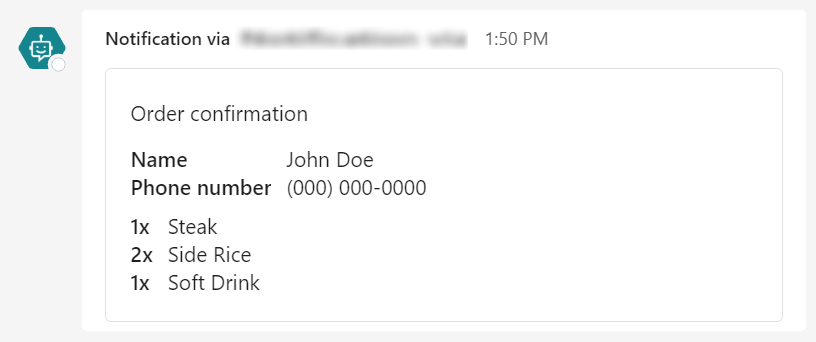
In this example, you send an order summary card for the user to review.
In Power Automate, add the Microsoft Teams connector action Post adaptive card in a chat or channel at the step where you want to send card in your flow.
For Post as, select Microsoft Copilot Studio agent.
For Post in, select Chat with agent.
For Agent, select the agent that you want the message to be sent from.
For Recipient, enter the recipient's name or email address. You can also use dynamic content if the recipient info comes from an earlier step in the flow.
For Adaptive Card, enter the following template JSON:
{
    "type": "AdaptiveCard",
    "$schema": "http://adaptivecards.io/schemas/adaptive-card.json",
    "version": "1.5",
    "body": [
        {
            "type": "TextBlock",
            "text": "Order summary",
            "wrap": true,
            "style": "heading"
        },
        {
            "type": "FactSet",
            "facts": [
                {
                    "title": "Name",
                    "value": "John Doe"
                },
                {
                    "title": "Phone number",
                    "value": "(000) 000-0000"
                }
            ]
        },
        {
            "type": "Container",
            "items": [
                {
                    "type": "FactSet",
                    "facts": [
                        {
                            "title": "1x",
                            "value": "Steak"
                        },
                        {
                            "title": "2x",
                            "value": "Side Rice"
                        },
                        {
                            "title": "1x",
                            "value": "Soft Drink"
                        }
                    ],
                    "spacing": "Small"
                }
            ],
            "spacing": "Small"
        }
    ]
}
When the flow runs, the recipient receives the Adaptive Card from the agent in Teams.
Send a proactive Adaptive Card and wait for the user response
Adaptive Cards support collecting user input. In these scenarios, you want to wait for the user's response before the flow continues.

Note
Power Automate doesn't support Adaptive Cards that use the templating feature.
In this example, you send an order confirmation card that allows the user to make changes before the order is submitted.
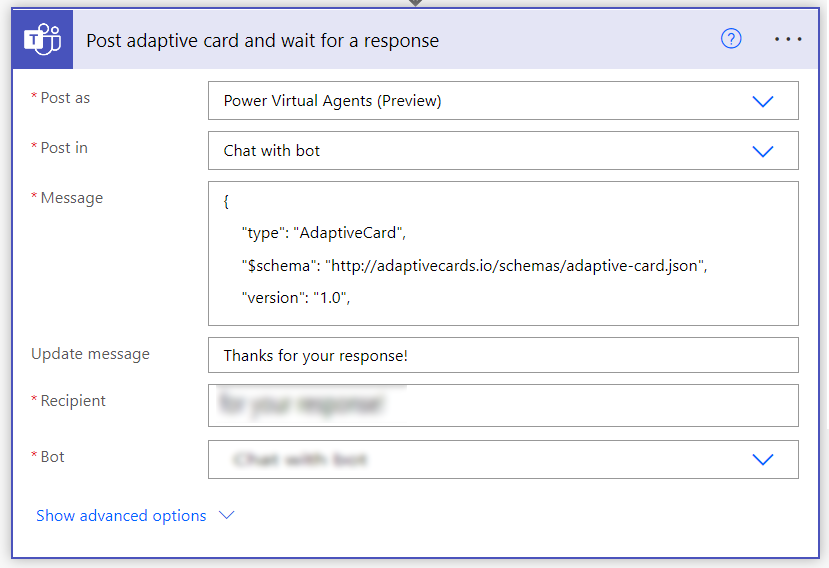
In Power Automate, add the Microsoft Teams connector action Post adaptive card and wait for a response at the step where you want to send card in your flow.
For Post as, select Microsoft Copilot Studio agent.
For Post in, select Chat with agent.
For Message, enter the following template JSON. The properties in the
actionselement determine the options that the user sees.{ "type": "AdaptiveCard", "$schema": "http://adaptivecards.io/schemas/adaptive-card.json", "version": "1.0", "body": [ { "type": "TextBlock", "text": "Order confirmation", "wrap": true, "style": "heading" }, { "type": "FactSet", "facts": [ { "title": "Name", "value": "John Doe" }, { "title": "Phone number", "value": "(000) 000-0000" } ] }, { "type": "Container", "items": [ { "type": "FactSet", "facts": [ { "title": "1x", "value": "Steak" }, { "title": "2x", "value": "Side Rice" }, { "title": "1x", "value": "Soft Drink" } ], "spacing": "Small" } ], "spacing": "Small" } ], "actions": [ { "type": "Action.Submit", "title": "Submit Order" }, { "type": "Action.Submit", "title": "Edit Order" } ] }For Update message, enter the message that the recipient sees after providing their response.
For Recipient, enter the recipient's name or email address. You can also use dynamic content if the recipient info comes from an earlier step in the flow.
For Agent, select the agent that you want the card to be sent from.
When the flow runs, the recipient receives the adaptive card from the agent in Teams that they can then respond to.
To use the response from the recipient, select submitActionId from the dynamic content flyout menu. The value of this variable is the title of the action the user selected.
Send proactive messages to multiple recipients
In some scenarios, you might want to send the same proactive message to multiple recipients.
This section contains examples for sending messages to multiple recipients.
Important
Each recipient must meet the prerequisites mentioned in this article.
For example, you can send the same message to 10 recipients in one action. If three of the 10 recipients don't have the agent installed, those three recipients don't receive the message.
Send to teammates
In this example, the agent sends a reminder to the members of a team to complete their online training.
Add the Microsoft Teams connector and select the Get a team action in your Power Automate flow.
For Team, choose the team with the members that you want to send the message to.
Add the Office 365 Groups connector and select the List group members action.
For Group Id, select Custom value.
Select Team ID from the dynamic content of the Get a team action.
Add the Microsoft Teams connector and select the Post message in a chat or channel action.
For Post as, select Microsoft Copilot Studio agent.
For Post in, select Chat with agent.
For Agent, select the agent that you want the message to be sent from.
For Recipient, select the dynamic content User Principle Name from the List group members action.
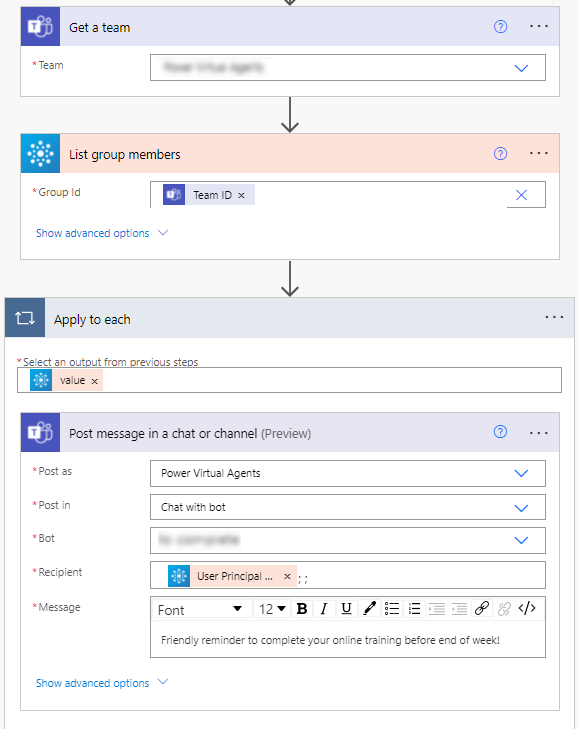
For Message, enter the message you want to send.
When the flow runs, each user in the team receives the proactive message in a private chat with the agent.
Send to a security group
In this example, the agent sends a reminder to a security group to complete their online training.
Add the Microsoft Entra ID connector and select the Get group members action in your Power Automate flow.
For Group Id, enter the security group's GUID.
Add the Microsoft Teams connector and select the Post message in a chat or channel action.
For Post as, select Microsoft Copilot Studio agent.
For Post in, select Chat with agent.
For Agent, select the agent that you want the message to be sent from.
For Recipient, select the dynamic content Group Members User Principle Name from the Get group members action.
For Message, enter the message you want to send.
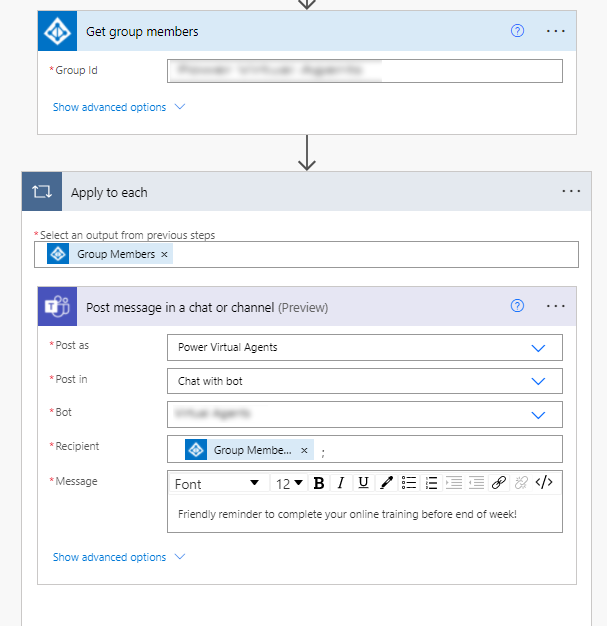
When the flow runs, each user in the security group receives the proactive message in a private chat with the agent.
Send proactive message to multiple recipients in parallel
Normally, when an agent sends a proactive message to multiple recipients, it sends one message after another. However, in some situations, it might be better to send the message to multiple recipients at the same time.
Warning
All proactive messages from Copilot Studio are subject to limits on Power Automate and throttling limits of the Microsoft Teams connector.
If you're sending messages to a large group of recipients, you see errors if you hit the throttling limit. You can reduce the degree of parallelism, or reduce the number of recipients in the group.
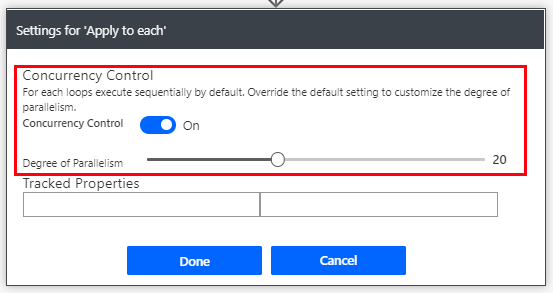
In the Apply to each action, select the three dots (…) and then select Settings.
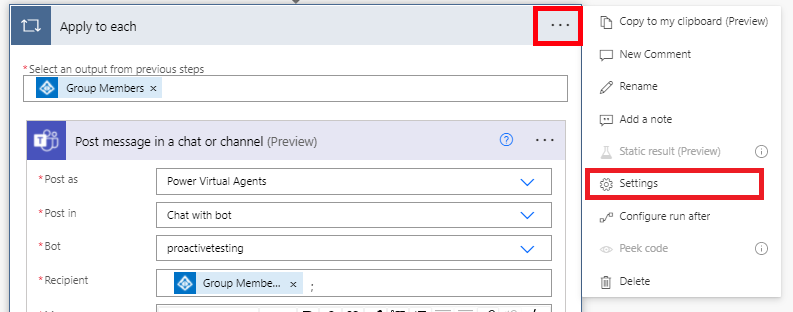
Turn on Concurrency control and set the degree of parallelism.
Configure advanced options for proactive messages
Copilot Studio allows you to control detailed behavior on your agent under Show advanced options in the Microsoft Teams connector.
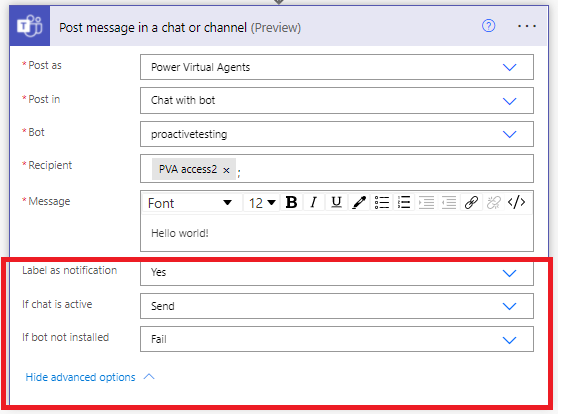
Label sent message as a notification
Label as notification controls whether the message has the text "Notification via" in front of the agent's name. Labeling the agent's response allows the recipient to identify the agent's response to their inquiry.

When the recipient is currently in an active chat with the agent
An agent could be sending a proactive message when the recipient is in an active conversation with the agent. You might want to postpone sending the proactive message until the end of the conversation to avoid disrupting the conversation flow.
The If the chat with the agent is active option controls the behavior:
Send: the agent sends the proactive message as normal.
Don't send and succeed: the agent doesn't send the proactive message when the recipient is in an active conversation. Status code 300 is returned.
Don't send and fail: the agent doesn't send the proactive message when the recipient is in an active conversation. The flow run is marked as a failure.
When the recipient hasn't installed the agent
The agent can only deliver messages to recipients who installed the agent in Teams. Some recipients might not want to install the agent or might uninstall the agent.
For lower importance messages, you can set the flow run to be marked as succeeded even when the recipient doesn't have the agent installed.
The If the agent is not installed option controls the behavior:
Fail: the flow run is marked as a failure when the recipient hasn't installed the agent in Teams.
Succeed with status code: the flow run is marked as succeeded even though the recipient can't receive the message because they didn't install the agent. Status code 100 is returned.
Status code definition
Use the returned status code to define different follow-up behaviors in your flow. For example, you can specify that the flow should try again over a period of time or log a record about the failure.
| Status code | Succeeded (Boolean) | Description |
|---|---|---|
| 200 | True | Message is successfully delivered. |
| 100 | False | Message can't be delivered because the recipient doesn't have the agent installed. |
| 300 | False | Message can't be delivered because the recipient is in an active conversation with the agent. |