Note
Access to this page requires authorization. You can try signing in or changing directories.
Access to this page requires authorization. You can try changing directories.
This article provides step-by-step instructions for installing Microsoft BitLocker Administration and Monitoring (MBAM) 2.5 in a standalone configuration. This guide uses a two-server configuration. One of the servers is a database server running Microsoft SQL Server 2012. This server hosts the MBAM databases and reports. The other server is a Windows Server 2012 web server hosting "Administration and Monitoring Server" and "Self-Service Portal."
Preparation steps before installing MBAM 2.5 server software
Step 1: Installation and configuration of servers
First make sure that both servers are configured with the MBAM system requirements. For more information, see MBAM 2.5 supported configurations. Select a configuration that meets these requirements.
Step 1.1: Deploying prerequisites for database and reporting server
Install and configure a server running Windows Server 2008 R2 (or later) operating system.
Install Windows PowerShell 3.0.
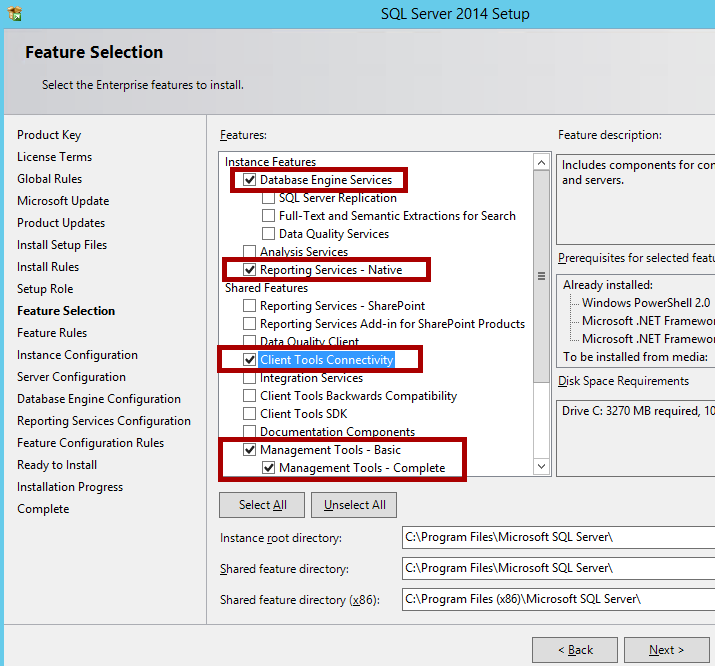
Install Microsoft SQL Server 2008 R2 or a later version that includes the latest service pack. If you're installing a new instance of SQL Server for MBAM, make sure the SQL Server you install includes the SQL_Latin1_General_CP1_CI_AS collation. You have to install the following SQL Server features:
- Database Engine
- Reporting Services
- Client Tools Connectivity
- Management Tools - Complete
Note
Optionally, you can also install the transparent data encryption (TDE) feature in SQL Server. For more information, see MBAM 2.5 security considerations
SQL Server Reporting Services must be installed and configured in "native" mode and not in unconfigured or "SharePoint" mode.
If you plan to use SSL for the Administration and Monitoring website, make sure that you configure SQL Server Reporting Services (SSRS) to use the Secure Sockets Layer (SSL) protocol before you configure the Administration and Monitoring website. Otherwise, the Reports feature uses unencrypted (HTTP) data transport instead of encrypted (HTTPS).
You can follow Configure SSL Connections on a Native Mode Report Server to configure SSL on Report Server.
Note
You can follow the SQL Server Installation Guide for your respective version of SQL Server to install SQL Server. The links are as follows: > - SQL Server 2014 > - SQL Server 2012 > - SQL Server 2008 R2
In the post-installation of SQL Server, make sure that you provision the user account in SQL Server, and assign the following permissions to the user who configures the MBAM database and reporting roles on the database server.
Roles for the instance of SQL Server:
dbcreatorprocessadmin
Rights for the instance of SQL Server Reporting Services:
- Create Folders
- Publish Reports
Your database server is ready for configuration of MBAM 2.5 roles. Let's move to the next server.
Step 1.2: Deploying prerequisites for administration and monitoring server
Choose a server that meets the required hardware configurations. For more information, see MBAM 2.5 supported configurations. It must be running Windows Server 2008 R2 or a later operating system together with latest service pack and updates. After the server is ready, install the following roles and features:
Roles
IIS Management Scripts and Tools
Web Server Role Services
Common HTTP features
- Static Content
- Default Document
Application development
- ASP.NET
- .NET Extensibility
- ISAPI Extensions
- ISAPI Filters
- Security
- Windows Authentication
- Request Filtering
Web Service IIS Management Tools
Feature
.NET Framework 4.5 features
Microsoft .NET Framework 4.5
For Windows Server 2012 or Windows Server 2012 R2, .NET Framework 4.5 is already installed for these versions of Windows Server. However, you must enable it.
For Windows Server 2008 R2, .NET Framework 4.5 isn't included with Windows Server 2008 R2. So, you must download .NET Framework 4.5 and install it separately.
WCF Activation
- HTTP Activation
- Non-HTTP Activation
TCP Activation
Windows Process Activation Service:
- Process Model
- .NET Framework Environment
- Configuration APIs
For the self-service portal to work, you should also download and install ASP.NET MVC 4.0.
The next step is to create the required MBAM users and groups in Active Directory.
Step 2: Creating users and groups in Active Directory Domain Services
As part of the prerequisites, define certain roles and accounts that MBAM uses to provide security and access rights to specific servers and features. For example, the databases that run on the instance of SQL Server and the web applications that run on the Administration and Monitoring Server.
Create the following groups and users in Active Directory. (You can use any name for the groups and users.) Users don't have to have greater user rights. A domain user account is sufficient. You have to specify the name of these groups during configuration of MBAM 2.5:
MBAMAppPool
Type: Domain User
Description: Domain user who has Read or Write permission to the Compliance and Audit Database and the Recovery Database to enable the web applications to access the data and reports in these databases. The application pool also uses it for the web applications.
Account Roles (During Configuration of MBAM):
- Web service application pool domain account
- Compliance and Audit Database and Recovery Database read/write user for reports
MBAMROUser
Type: Domain User
Description: Domain user who has Read-Only access to the Compliance and Audit Database to enable the reports to access the compliance and audit data in this database. It's also the domain user account that the local SQL Server Reporting Services instance uses to access the Compliance and Audit Database.
Account Roles (During Configuration of MBAM):
- Compliance and Audit Database read-only user for reports
- Compliance and Audit Database domain user account
MBAMAdvHelpDsk
Type: Domain Group
Description: MBAM Advanced Helpdesk Users access group: Domain user group whose members have access to all areas of the Administration and Monitoring Website. Users who have this role have to enter only the recovery key, not the user's domain and user name, when they help users recover their drives. If a user is a member of both the MBAM Helpdesk Users group and the MBAM Advanced Helpdesk Users group, the MBAM Advanced Helpdesk Users group permissions override the MBAM Helpdesk Group permissions.
Account Roles (During Configuration of MBAM): MBAM Advanced Helpdesk Users
MBAMHelpDsk
Type: Domain Group
Description: MBAM Helpdesk Users access group: Domain user group whose members have access to the Manage TPM and Drive Recovery areas of the MBAM Administration and Monitoring Website. People who have this role must fill in all fields when they use either option. These fields include the user's domain and account name.
Account Roles (During Configuration of MBAM): MBAM Helpdesk Users
MBAMRUGrp
Type: Domain Group
Description: Domain user group whose members have read-only access to the reports in the Reports area of the Administration and Monitoring Website.
Account Roles (During Configuration of MBAM):
- Reports read-only domain access group
- MBAM Report Users access group
Step 3 (Optional): Configure and install SSL certificate on administration and monitoring server
Although it's optional, we highly recommend that you use a certificate to help secure the communication between the MBAM client and the Administration and Monitoring Website and the Self-Service Portal websites. We don't recommend that you use self-signed certificates because of obvious security reasons. We suggest that you use a Web Server Type Certificate from a trusted Certification Authority. For more information, see MBAM and secure network communication.
After the certificate is issued, you should add the certificate to the personal store of the Administration and Monitoring Server. To add the certificate, open the Certificates store on the local computer. To complete this action, follow these steps:
Right-select Start, and then select Run.
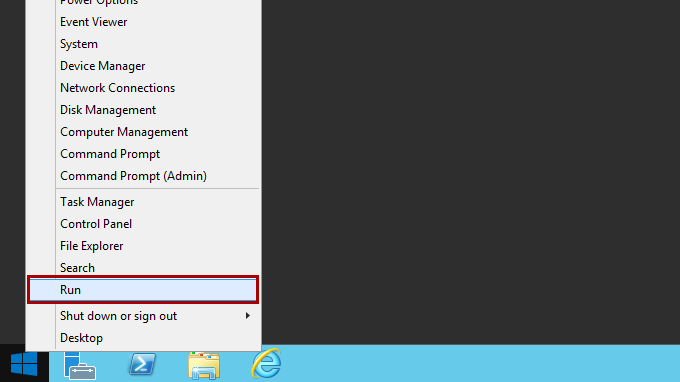
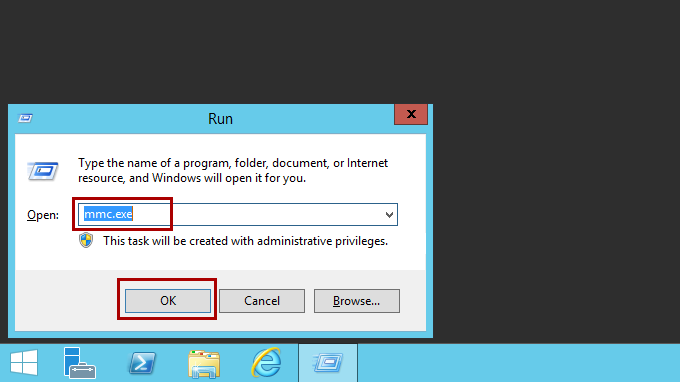
Type "MMC.EXE" (without the quotation marks), and then select OK.
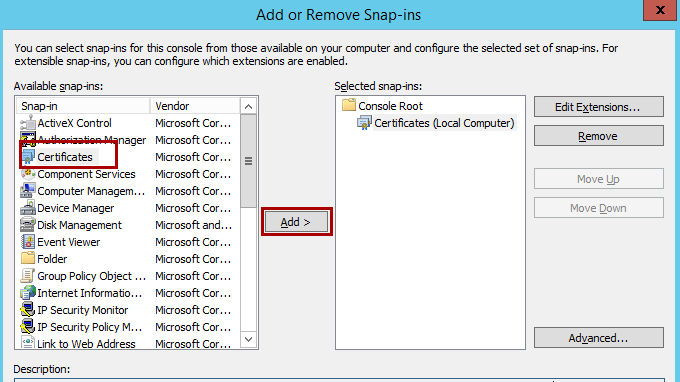
Select File in the new MMC that you opened, and then select Add/Remove Snap-in.

Highlight the Certificates snap-in, and then select Add.
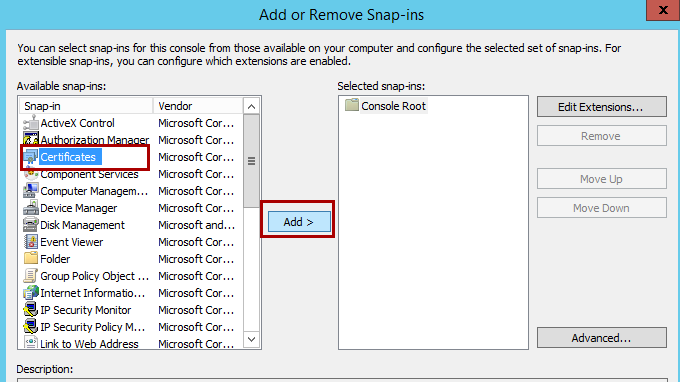
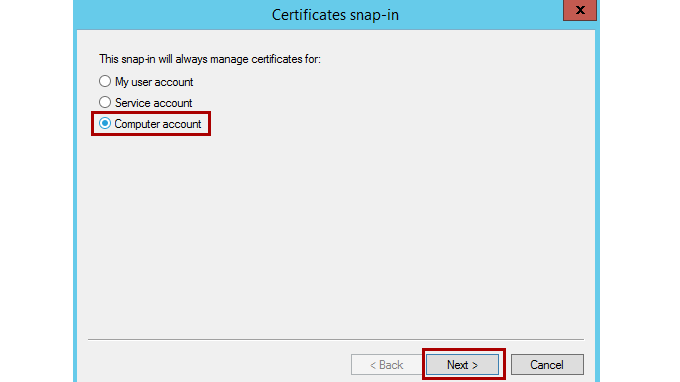
Select the Computer account option, and then select Next.
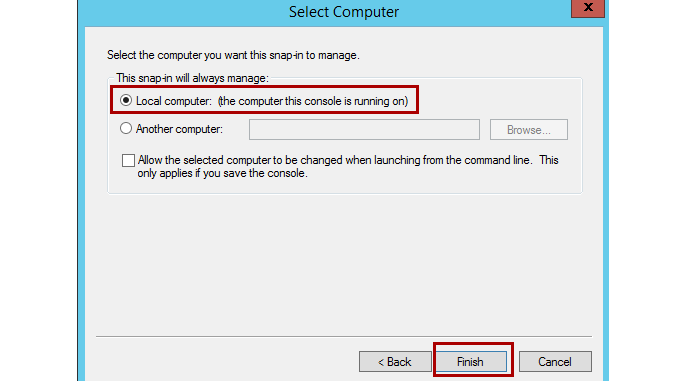
Select Local Computer on the next screen, and then select Finish.
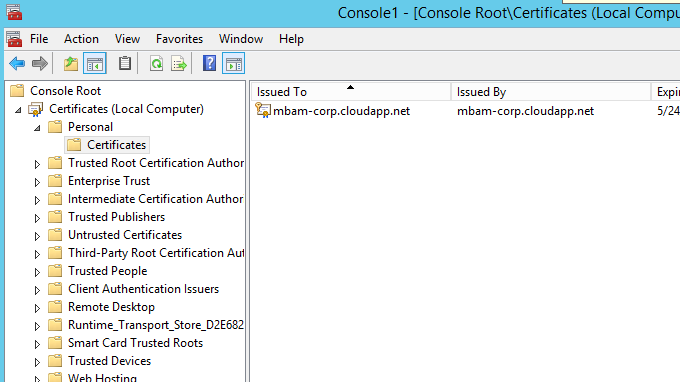
You added the Certificates snap-in. It lets you work with any certificates in your computer's certificate store.
Import the web server certificate into your computer's certificate store.
Now that you have access to the Certificates snap-in, you can import the web server certificate into your computer's certificate store.
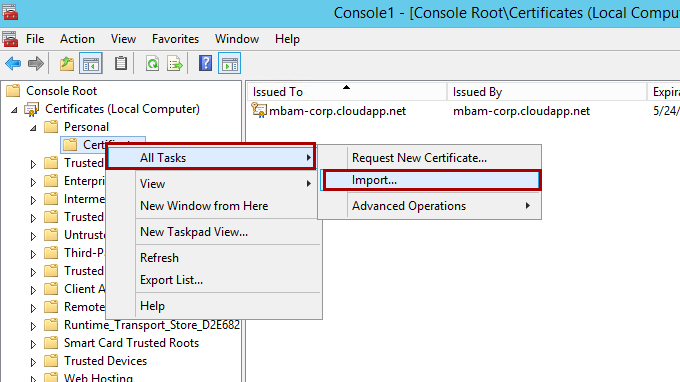
Open the Certificates (Local Computer) snap-in, and browse to Personal and then Certificates.
Note
The Certificates snap-in may not be listed. If it isn't, no certificates are installed.
Right-select Certificates, select All Tasks, and then select Import.
When the wizard starts, select Next. Browse to the file that you created that contains your server certificate and private key, and then select Next.
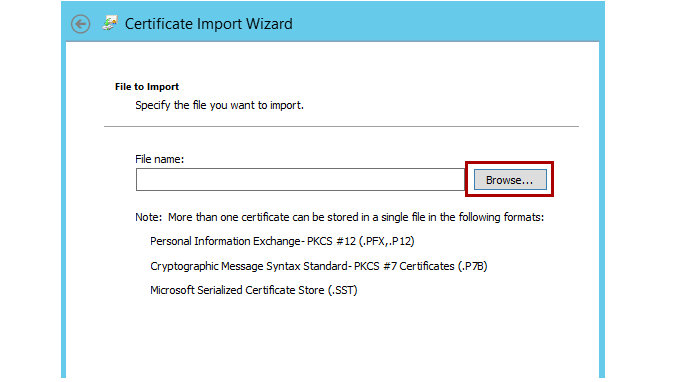
Enter the password if you specified one for the file when you created it.

Note
If you want to be able to export the key pair again from this computer, make sure that the Mark the key as exportable option is selected. As an added security measure, you may want to leave this option cleared to make sure that no one can make a backup of your private key.
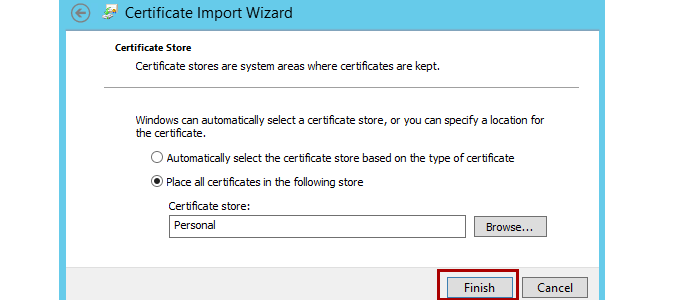
Select Next, and then select the Certificate Store to which you want to save the certificate.
Note
You should select Personal, because it is a web server certificate. If include the certificate in the certification hierarchy, it's also added to this store.
Select Next, and then select Finish.
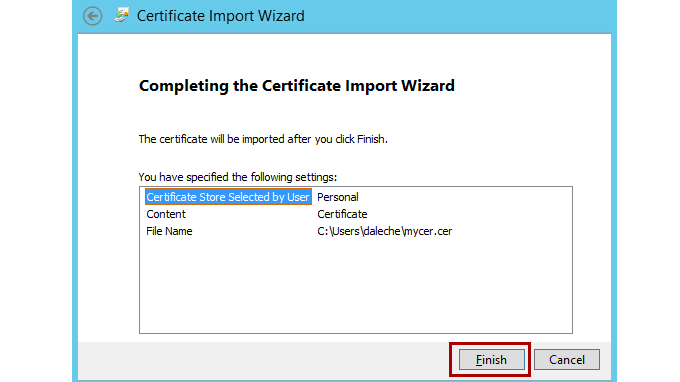
You now see the server certificate for your web server in the Personal Certificates list. It's listed by the common name of the server. You can find this name in the subject section of the certificate.
For more information, see the following articles:
The next step is to register a service principle name for the application pool account.
Step 4: Configuring SSL certificate for MBAM Web Server
If you use SSL communication between the client and server, you should make sure that the certificate has Enhanced Key Usage OIDs (1.3.6.1.5.5.7.3.1) and (1.3.6.1.5.5.7.3.2). In other words, you should make sure Server Authentication and Client Authentication are added.
If you receive a certificate error when you try to browse service URLs, the certificate might be issued to a different name, or you're browsing by using an incorrect URL.
Although the browser might prompt you with a certificate error message but let you continue, the MBAM web service doesn't ignore certificate errors and blocks the connection. The MBAM client's MBAM Admin event log shows certificate-related errors. If you use an alias to connect to the Administration and Monitoring server, you should issue a certificate to the alias name. That is, the subject name of the certificate should be the alias name, and the local server's DNS name should be added to the Subject Alternative Name field of the certificate.
Example 1
If the virtual name is "bitlocker.contoso.com" and the MBAM Administration and Monitoring server name is "adminserver.contoso.com," the certificate should be issued to bitlocker.contoso.com (subject name), and adminserver.contoso.com should be added to Subject Alternative Name field of the certificate.
Similarly, if you have multiple Administration and Monitoring servers installed to balance the load by using a load balancer, you should issue the SSL certificate to the virtual name. That is, the subject name field of the certificate should have the virtual name, and the names of all the local servers should be added in the Subject Alternative Name field of the certificate.
Example 2
If the virtual name is "bitlocker.contoso.com" and the servers are "adminserver1.contoso.com" and "adminiserver2.contoso.com," the certificate should be issued to bitlocker.contoso.com (subject name) and adminserver1.contoso.com, and adminiserver2.contoso.com should be added to the Subject Alternative Name field of the certificate.
For more information on how to configure SSL communication for MBAM, see MBAM and Secure Network Communication.
Step 5: Register SPNs for the application pool account and configure constrained delegation
Note
Constrained delegation is required only for 2.5 and isn't required for 2.5 Service Pack 1 and later.
To enable the MBAM servers to authenticate communication from the Administration and Monitoring Website and the Self-Service Portal, you must register a Service Principal Name (SPN) for the host name under the domain account that you use for the web application pool. For more information on step-by-step instructions to register SPNs, see Planning how to secure the MBAM websites.
After you have the SPN configured, you should set up constrained delegation on the SPN. To complete this action, follow these steps:
Go to Active Directory, and find the app pool credentials that you configured for MBAM websites in the previous steps.
Right-click the credentials, and then select properties.
Select the delegation tab.
Select the option for Kerberos authentication.
Select browse, and browse again for your app pool credentials. You should then see the all the SPNs that are set up on the app pool credentials account. The SPN should resemble
http/bitlocker.fqdn.com. Highlight the SPN that is the same as the host name that you specified during the MBAM installation.Select OK.
The prerequisites are complete. In the next steps, install the MBAM software on the servers and configure it.
Installing and configuring MBAM 2.5 server software
Step 6: Install MBAM 2.5 server software
To install the MBAM server software by using the Microsoft BitLocker Administration and Monitoring Setup wizard both on Database Server and on Administration and Monitoring Server, follow these steps.
On the server on which you want to install MBAM, run MBAMserversetup.exe to start the Microsoft BitLocker Administration and Monitoring Setup wizard.
On the Welcome page, select Next.
Read and accept the Microsoft Software License Agreement, and then select Next to continue the installation.
Decide whether to use Microsoft Update when you check for updates, and then select Next.
Decide whether to participate in the Customer Experience Improvement Program, and then select Next.
To start the installation, select Install.
Select Finish.
Before proceeding with configuring MBAM, install the latest MDOP servicing release update. Otherwise your database server isn't recognized or supported. When you try to validate the database configuration, the configuration wizard reports an error.
October 2020 servicing release for Microsoft Desktop Optimization Pack
You can configure MBAM by using the MBAM server Configuration shortcut that the server installation creates on your Start menu.
For more information, see Installing the MBAM 2.5 server software.
Step 7: Configure MBAM 2.5 database and reports role
Use the MBAM Wizard to configure the MBAM 2.5 databases and reporting component:
Configure the Compliance and Audit Database and the Recovery Database by using the wizard:
On the server on which you want to configure the databases, start the MBAM server Configuration wizard. You can select MBAM server Configuration on the Start menu to open the wizard.
Select Add New Features, select Compliance and Audit Database, Recovery Database and Reports, and then select Next. The wizard checks that all prerequisites for the databases are met.
If the prerequisite check is successful, select Next to continue. Otherwise, resolve any missing prerequisites, and then select Check prerequisites again.
Using the following descriptions, enter the field values in the wizard:
Compliance and audit database
Field Description SQL Server name Name of the server on which you configure the Compliance and Audit Database.
You must add an exception on the Compliance and Audit Database computer to enable incoming inbound traffic on the SQL Server port. The default port number is 1433.SQL Server database instance Name of the database instance where MBAM stores the compliance and audit data. If you use the default instance, you must leave this field blank. You must also specify where the database information is located. Database name Name of the database that stores the compliance data. Note the name of the database that you specify here because you have to provide this information in later steps. Read/write permission domain user or group Specify the name of the MBAMAppPool user as configured in step 2. Read-only access domain user or group Specify the name of the MBAMROUser user as configured in step 2. Recovery database.
Field Description SQL Server name Name of the server on which you configure the Recovery Database. You must add an exception on the Recovery Database computer to enable incoming inbound traffic on the SQL Server port. The default port number is 1433. SQL Server database instance Name of the database instance that stores the recovery data. If you use the default instance, you must leave this field blank. You must also specify where the database information is located. Database name Name of the database that stores the recovery data. Read/write permission domain user or group Domain user or group that has read/write permission to this database to enable the web applications to access the data and reports in this database.
If you enter a user in this field, it must be the same value as the value in the Web service application pool domain account field on the Configure Web Applications page.
If you enter a group in this field, the value in the Web service application pool domain account field on the Configure Web Applications page must be a member of the group that you enter in this field.When you finish your entries, select Next. The wizard checks that all prerequisites for the databases are met.
If the prerequisite check is successful, select Next to continue. Otherwise, resolve any missing prerequisites, and then select Next again.
Reports.
Field Description SQL Server Reporting Services instance Instance of SQL Server Reporting Services where you configure the reports. If you use the default instance, you must leave this field blank. Reporting role domain group Specify the name of the MBAMRUGrp as mentioned in step 2. SQL Server name Name of the server on which the Compliance and Audit Database is configured. SQL Server database instance Name of the database instance where the compliance and audit data is configured. If you use the default instance, you must leave this field blank.
You must add an exception on the Reports computer to enable incoming traffic on the port of the Reporting Server. (The default port is 80.)Database name Name of the Compliance and Audit Database. By default, the database name is MBAM Compliance Status. Compliance and Audit Database domain account Specify the name of the MBAMROUser user as configured in step 2. When you finish your entries, select Next. The wizard checks that all prerequisites for the Reports feature are met. Select Next to continue. On the Summary page, review the added features.
For more information, see the following article: How to configure the MBAM 2.5 databases.
Step 8: Configure the MBAM 2.5 web applications role
On the server on which you want to configure the web applications, start the MBAM server Configuration wizard. You can select MBAM server Configuration on the Start menu to open the wizard.
Select Add New Features, select Administration and Monitoring Website and Self-Service Portal, and then select Next. The wizard checks that all prerequisites for the databases are met.
If the prerequisite check is successful, select Next to continue. Otherwise, resolve any missing prerequisites, and then select Check prerequisites again.
Use the following descriptions to enter the field values in the wizard.
Field Description Security certificate Select a previously created certificate in step 3 to optionally encrypt the communication between the web services and the server on which you configure the Administration and Monitoring website. If you select Do not use a certificate, your web communication might not be secure. Host name Name of the host computer on which you configure the Administration and Monitoring website.
It doesn't have to be the hostname of the machine, it could be anything. However, if the hostname is different than the netbios name of the computer, you have to create an A record and make sure the SPN uses the custom hostname, not the netbios name. This configuration is common on load balancing scenarios.Installation path Path on which you install the Administration and Monitoring website. Port Port number to use for website communication.
You must set a firewall exception to enable communication through the specified port.Web service application pool domain account and password Specify the user account and password of the MBAMAppPool user as configured in step 2.
For improved security, set the account that is specified in the credentials to have limited user rights. Also, set the password of the account to never expire.Verify that the built-in IIS_IUSRS account or the application pool account was added to the Impersonate a client after authentication and the Log on as a batch job local security settings.
To check whether the account was added to the local security settings, open the Local Security Policy editor, expand the Local Policies node, select the User Rights Assignment node, and double-select Impersonate a client after authentication and Log on as a batch job policies in the right-side pane.
Use the following field descriptions to configure the connection information in the wizard for the Compliance and Audit Database.
Field Description SQL Server name Name of the server on which the Compliance and Audit Database is configured. SQL Server database instance Name of the instance of SQL Server (for example, <Server Name>) and on which the Compliance and Audit Database is configured. If you use the default instance, leave this field blank. Database name Name of the Compliance and Audit Database. By default, it's "MBAM Compliance Status." Use the following field descriptions to configure the connection information in the wizard for the Recovery Database.
Field Description SQL Server name Name of the server on which the Recovery Database is configured. SQL Server database instance Name of the instance of SQL Server (for example, <Server Name>) on which the Recovery Database is configured. If you use the default instance, leave this field blank. Database name Name of the Recovery Database. By default, it's "MBAM Recovery and Hardware." Use the following descriptions to enter the field values in the wizard to configure the Administration and Monitoring Website.
Field Description Advanced Helpdesk role domain group Specify the name of the MBAMAdvHelpDsk Group as configured in step 2. Helpdesk role domain group Specify the name of the MBAMHelpDsk Group as configured in step 2. Use System Center Configuration Manager Integration Select to clear this check box. Reporting role domain group Specify the name of the MBAMRUGrp Group as configured in step 2. SQL Server Reporting Services URL Specify the Web Service URL for the SSRS server on which the MBAM reports are configured. You can find this information by logging in to Reporting Services Configuration Manager on the Database Server.
Example of a fully qualified domain name:https://MyReportServer.Contoso.com/ReportServer
Example of a custom host name:https://MyReportServer/ReportServerVirtual directory Virtual directory of the Administration and Monitoring Website. This name corresponds to the website's physical directory on the server and is appended to the website's host name. For example:
https://<host name>:<port>/HelpDesk/
If you don't specify a virtual directory, it uses the value "HelpDesk."Use the following description to enter the field values in the wizard to configure the Self-Service Portal.
Field Description Virtual directory Virtual directory of the web application. This name corresponds to the website's physical directory on the server and is appended to the website's host name. For example:
https://<host name>:<port>/SelfService/
If you don't specify a virtual directory, it uses the value "SelfService."When you finish your entries, select Next. The wizard checks that all prerequisites for the web applications are met.
Select Next to continue.
On the Summary page, review the added features.
Select Add to add the web applications to the server, and then select Close.
Customizing and validating steps after installing MBAM 2.5 server software
Step 9: Customizing the self-server portal for your organization
To customize the Self-Service Portal by adding custom notice text, your company name, pointers to more information, and so on, see Customizing the Self-Service Portal for Your organization.
Step 10: Configure the self-server portal if client computers can't access the CDN
Determine whether your client computers have access to the Microsoft AJAX content delivery network (CDN). The CDN gives the Self-Service Portal the access it requires to certain JavaScript files. If you don't configure the Self-Service Portal when client computers can't access the CDN, it only displays the company name and the account under which the user signed in. It doesn't show an error message.
Do one of the following actions:
If your client computers have access to the CDN, do nothing. Your Self-Service Portal configuration is complete.
If your client computers don't have access to the CDN, follow the steps in How to configure the Self-Service Portal when client computers can't access the Microsoft content delivery network.
Step 11: Validate the MBAM 2.5 server feature configuration
To validate your MBAM server deployment to use the standalone topology, follow these steps.
On each server on which an MBAM feature is deployed, select Control Panel > Programs > Programs and Features. Verify that Microsoft BitLocker Administration and Monitoring appears in the Programs and Features list.
Note
To do the validation, you must use a domain account that has local computer administrative credentials on each server.
On the server on which the Recovery Database is configured, open SQL Server Management Studio, and verify that the MBAM Recovery and Hardware database is configured.
On the server on which the Compliance and Audit Database is configured, open SQL Server Management Studio, and verify that the MBAM Compliance Status Database is configured.
On the server on which the Reports feature is configured, open a web browser by using administrative credentials, and browse to the homepage of the SQL Server Reporting Services site.
The default homepage location of a SQL Server Reporting Services site instance is as follows:
https://<MBAM Reports Server Name>:<port>/Reports.aspxTo find the actual URL, use the Reporting Services Configuration Manager tool, and select the instances that you specified during setup.
Verify that a reports folder that is named Microsoft BitLocker Administration and Monitoring contains a data source that is named MaltaDataSource. This data source contains folders that have names that represent language locales (for example, en-us). The reports are in the language folders.
Note
If you configure SQL Server Reporting Services (SSRS) as a named instance, the URL should resemble the following example:
https://<MBAM Reports Server Name>:<port>/Reports_<SSRS Instance Name>If you didn't configure SSRS to use Secure Socket Layer (SSL), the URL for the reports will be set to "HTTP" instead of "HTTPS" when you install the MBAM server. If you then go to the Administration and Monitoring Website (also known as Helpdesk) and select a report, you receive the following message: "Only Secure Content is Displayed." To show the report, select Show All Content.
On the server on which the Administration and Monitoring Website feature is configured, run Server Manager, browse to Roles, and then select Web Server (IIS) > Internet Information Services (IIS) Manager.
In Connections, browse to <computer name> and then select Sites > Microsoft BitLocker Administration and Monitoring. Verify that the following are listed:
- MBAMAdministrationService
- MBAMComplianceStatusService
- MBAMRecoveryAndHardwareService
On the server on which the Administration and Monitoring Website and Self-Service Portal are configured, open a web browser by using administrative credentials.
Browse to the following websites to verify that they load successfully:
httpss://<MBAM Administration Server Name>:<port>/HelpDesk/(confirm each link for navigation and reports)https://<MBAM Administration Server Name>:<port>/SelfService/
Note
It is assumed that you configured the server features on the default port without network encryption. If you configured the server features on a different port or virtual directory, change the URLs to include the appropriate port. For example:
https://<host name>:<port>/HelpDesk/https://<host name>:<port>/<virtualdirectory>/
If you configured the server features without network encryption, change
https://tohttp://.Browse to the following web services to verify that they load successfully. A page opens to indicate that the service is running. However, the page displays no metadata.
https://<MBAM Administration Server Name>:<port>/MBAMAdministrationService/AdministrationService.svchttps://<MBAM Administration Server Name>:<port>/MBAMUserSupportService/UserSupportService.svchttps://<MBAM Administration Server Name>:<port>/MBAMComplianceStatusService/StatusReportingService.svchttps://<MBAM Administration Server Name>:<port>/MBAMRecoveryAndHardwareService/CoreService.svc
Step 12: Configure the MBAM Group policy templates
To deploy MBAM, you have to set group policy settings that define MBAM implementation settings for BitLocker Drive Encryption. To complete this task, you must copy the MBAM group policy templates to a server or workstation that can run Group Policy Management Console (GPMC) or Advanced Group Policy Management (AGPM), and then edit the settings.
Important
Don't change the group policy settings in the BitLocker Drive Encryption node or MBAM will not work correctly. When you configure the group policy settings in the MDOP MBAM (BitLocker Management) node, MBAM automatically configures the BitLocker Drive Encryption settings for you.
Copying the MBAM 2.5 group policy templates
Before you install the MBAM client, you must copy MBAM-specific group policy objects (GPOs) to the management workstation. These GPOs define MBAM implementation settings for BitLocker. You can copy the group policy templates to any server or workstation that is a supported Windows-based server or client computer and that can run the Group Policy Management Console (GPMC) or Advanced Group Policy Management (AGPM).
For more information, see Copying the MBAM 2.5 group policy templates.
Editing MBAM 2.5 GPO settings
After you create the necessary GPOs, you must deploy the MBAM group policy settings to your organization's client computers. To view and create GPOs, you must have Group Policy Management Console (GPMC) or Advanced Group Policy Management (AGPM) installed.
For more information, see Editing the MBAM 2.5 group policy settings and Planning for MBAM 2.5 group policy requirements.
Step 13: Deploying the MBAM 2.5 client
Depending on when you deploy the MBAM client software, you can enable BitLocker on a computer in your organization either before the user receives the computer or afterward by configuring group policy and deploying the MBAM client software by using an enterprise software deployment system.
Deploy the MBAM client to desktop or portable computers
After you configure group policy settings, you can use an enterprise software deployment system product such as Microsoft System Center 2012 Configuration Manager or Active Directory Domain Services (AD DS) to deploy the MBAM client installation Windows Installer files to target computers. You can use either the 32-bit or 64-bit MbamClientSetup.exe files or the 32-bit or 64-bit MBAMClient.msi files. These files are provided together with the MBAM client software.
For more information, see How to deploy the MBAM client to desktop or laptop computers.
Deploy the MBAM client as part of a Windows deployment
In organizations in which computers are received and configured centrally, you can install the MBAM client to manage BitLocker Drive Encryption on each computer before any user data is written to it. The benefit of this process is that every computer is then BitLocker-compliant. This method doesn't rely on user action because the administrator has already encrypted the computer. A key assumption for this scenario is that the policy of the organization is to install a corporate Windows image before the computer is delivered to the user. If the group policy settings are configured to require a PIN, users are prompted to set a PIN after they receive the policy.
For more information, see How to deploy the MBAM client as part of a Windows deployment.
How to deploy the MBAM client by using a command line
For more information, see How to deploy the MBAM client by using a command line.
Post-deployment of clients
Next, review the following logs and determine whether the clients are reporting successfully to the MBAM database.
Frequently asked questions (FAQ)
How to create load balanced IIS servers
SPN must be registered only to the friendly name (for example: bitlocker.corp.net), and must not be registered to individual IIS servers.
If a certificate is used, the certificate must have both FQDN and NetBIOS names entered into the Subject Alternative Name field for all IIS servers in the load balance group and also as the Friendly Name (for example: bitlocker.corp.net). Otherwise, the browser doesn't trust the certificate when you browse load-balanced addresses.
For more information, see IIS network load balancing and Registering SPNs for the application pool account.
How to configure a certificate
You need two certificates. One certificate is used for SQL server, and the other is used for IIS. They must be installed before starting MBAM installation.
We recommend that you use the installer to add the certificate to the IIS configuration instead of manually editing the web.config file.
If the "Issued To" field on the certificate doesn't match the name of the server, the MBAM Configurator doesn't accept the certificate. Temporarily create a self-signed certificate from the IIS console, and use it in the Configurator. This action makes sure that the web apps are installed for SSL and HTTPS. After that, you can change the certificate to one from IIS bindings for the MBAM website.
The SQL permissions requirement for installation
Create an account for MBAM app pool, and give it only SecurityAdmin, Public, and DBCreator permissions.
For more information, see MBAM database configuration - minimum permissions.
Note
- In some situations, more permissions are required for the initial installation and upgrade operations.
- Use an account that has temporary SA for the installation.
- Don't start the Configurator in the context of a user account (Run As) that doesn't have enough permissions to make changes to SQL Server. This action causes installation errors.
- You must be signed in with an account that has permissions on SQL Server. Only SQL Server databases can be created or updated by running MBAM Configurator remotely. For SSRS server, you must install MBAM and run Configurator locally to install or update the MBAM SSRS reports.
The permission required for SPN Registration
An account that's used for IIS portal installation must have Write ServicePrincipalName and Write Validated SPN permissions. Without these permissions, the installation returns a warning message that states that it can't register the SPN.
Note
You'll receive this warning message twice. It doesn't mean that the SPN must have two objects registered to it.
Did I have to update the ADMX templates to the latest version?
You'll see multiple OS options in the MBAM root node for GPO after you update the ADMX templates to their latest versions. For example, Windows 7, Windows 8.1, and Windows 10, version 1511 and later versions.
For more information about how to update the ADMX templates, see the following articles: