Get started viewing and changing the DOM
To learn the basics of viewing and changing the Document Object Model (DOM) of a page using Microsoft Edge DevTools, follow these interactive tutorial sections.
To understand the difference between the DOM and HTML, see Appendix: HTML versus the DOM, below.
View DOM nodes
The DOM Tree of the Elements tool is where you do all DOM-related activities in DevTools.
Inspect a node
When you are interested in a particular DOM node, Inspect is a fast way to open DevTools and investigate that node.
- Open the DOM Examples demo page in a new window or tab. (To open a link in a new window or tab, right-click the link. Or, press and hold Ctrl (Windows, Linux) or Command (macOS) and then click the link.)
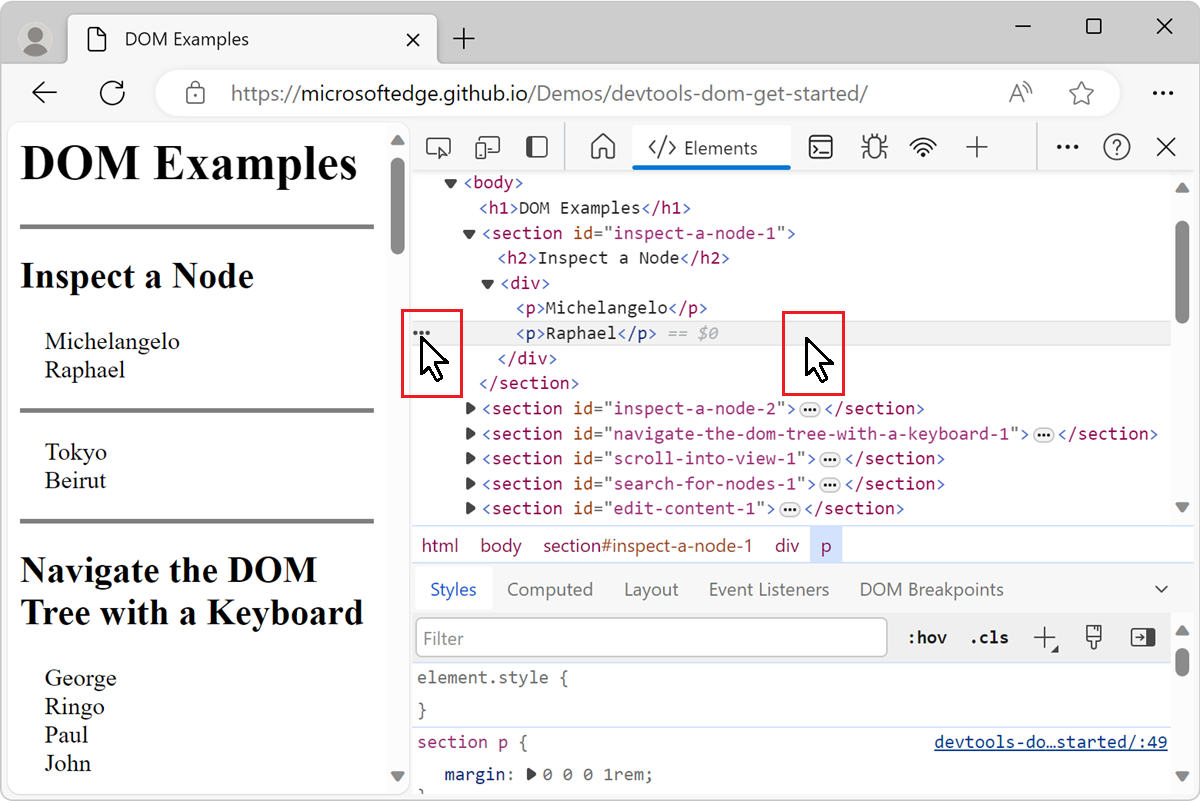
In the rendered webpage, under Inspect a Node, right-click Michelangelo and then select Inspect:
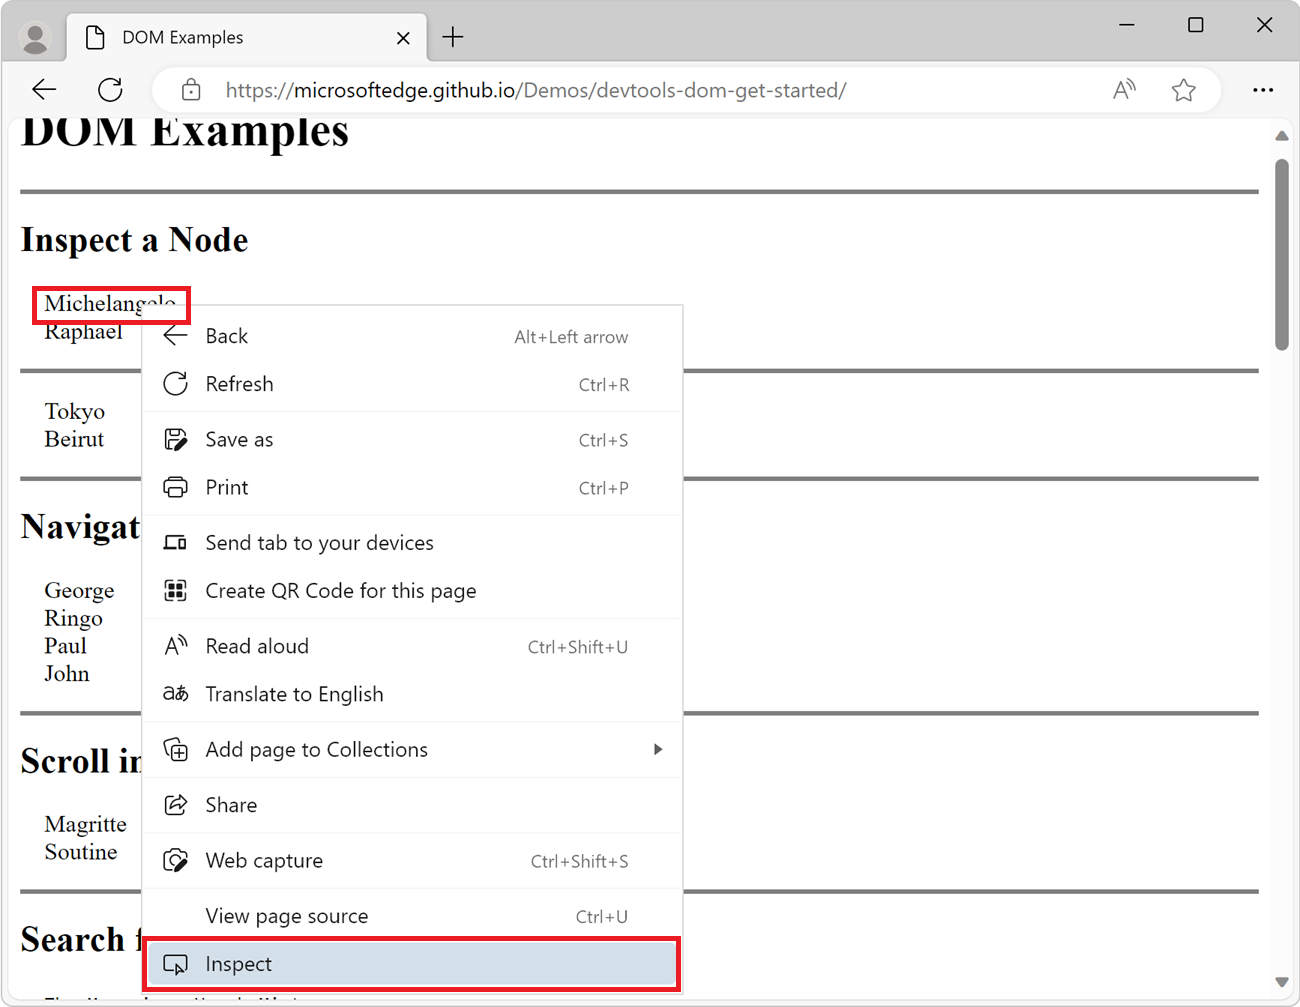
The Elements tool of DevTools opens. The
<p>Michelangelo</p>node is highlighted in the DOM Tree:
Click the Inspect (
 ) icon in the top-left corner of DevTools:
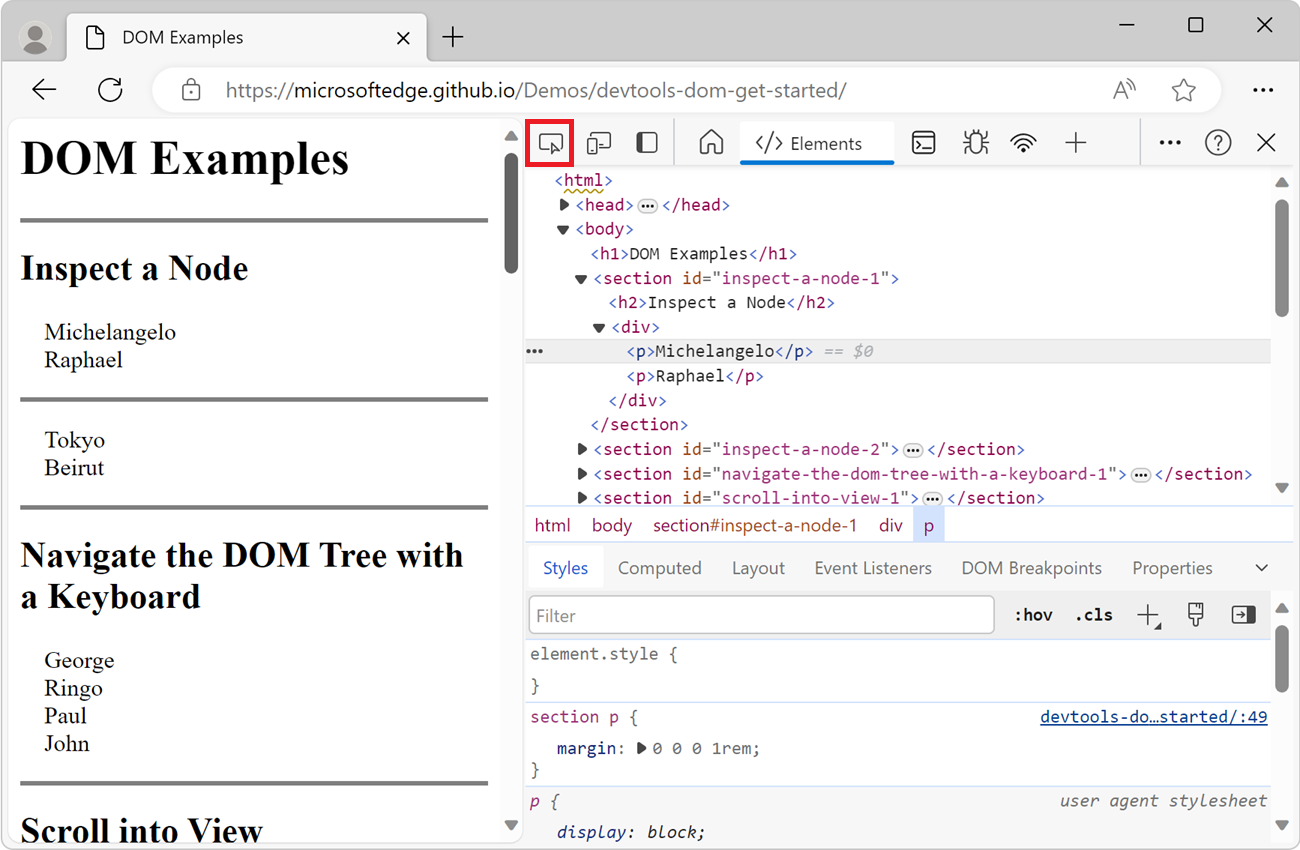
Under Inspect a Node, click the Tokyo text. Now,
<p>Tokyo</p>node is highlighted in the DOM Tree.
Inspecting a node is also the first step towards viewing and changing the styles of a node. See Get started viewing and changing CSS.
Navigate the DOM Tree with a keyboard
Once you have selected a node in the DOM Tree, you can navigate the DOM Tree with your keyboard.
Open the DOM Examples demo page in a new window or tab.
In the rendered webpage, under Navigate the DOM Tree with a Keyboard, right-click Ringo and then select Inspect.
<p>Ringo</p>is selected in the DOM Tree:
Press the Up Arrow key two times.
<div>is selected: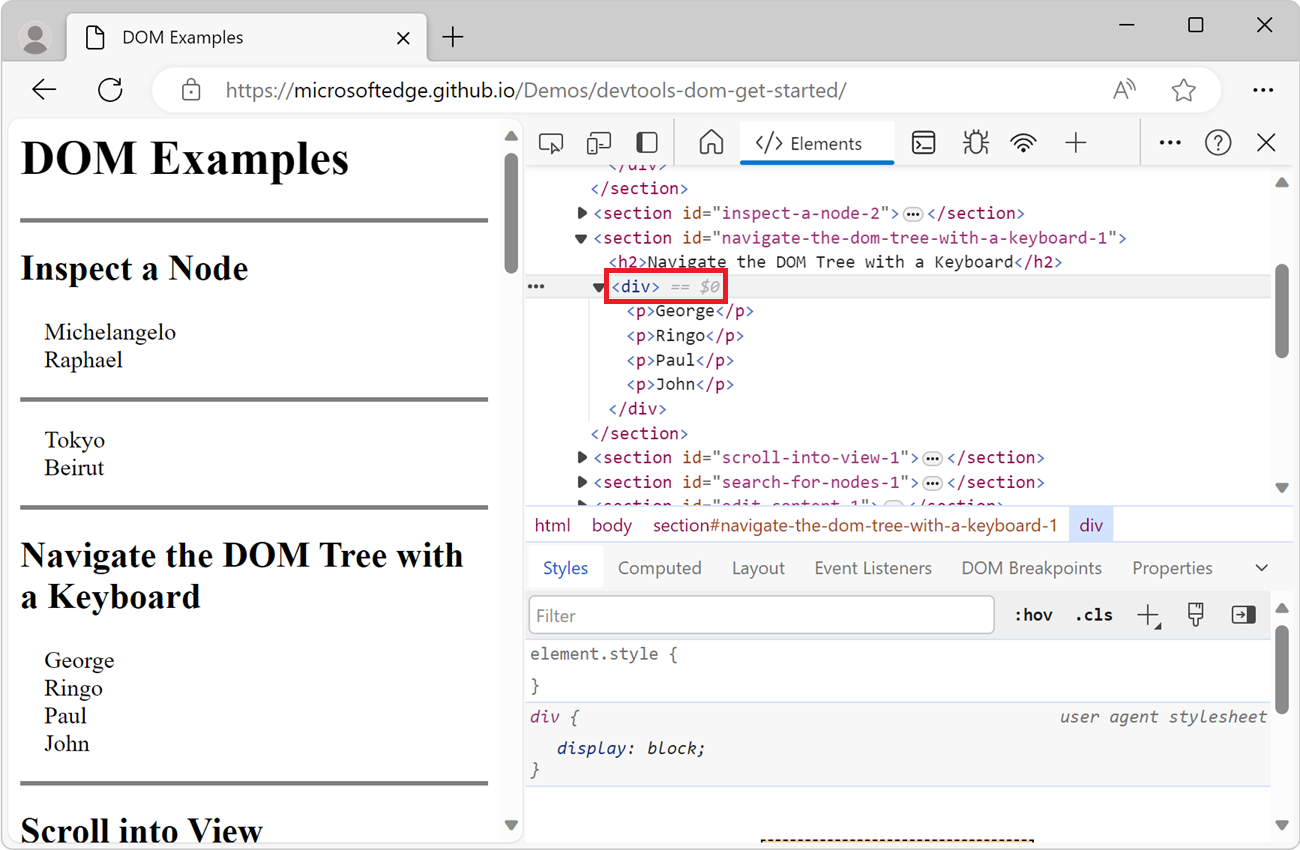
Press the Left Arrow key. The
<div>list collapses.Press the Left Arrow key again. The parent of the
<div>node is selected. In this case, it's the<section>that has the IDnavigate-the-dom-tree-with-a-keyboard-1.Press the Down Arrow key two times, so that you have re-selected the
<div>list that you just collapsed.It should look like this:
<div>... </div>.Press the Right Arrow key. The list expands.
Scroll into view
When viewing the DOM Tree, you may find yourself interested in a DOM node that isn't currently visible in the rendered webpage. For example, suppose that you scrolled to the bottom of the page, and you're interested in the <h1> node at the top of the page. Scroll into view lets you quickly reposition the viewport so that you can see the node.
Open the DOM Examples demo page in a new window or tab.
In the rendered webpage, under Scroll into View, right-click Magritte and then select Inspect.
Scroll to the bottom of the DOM Examples page.
The
<p>Magritte</p>node should still be selected in your DOM Tree. If not, go back to Scroll into view and start over.Right-click the
<p>Magritte</p>node, and then select Scroll into view: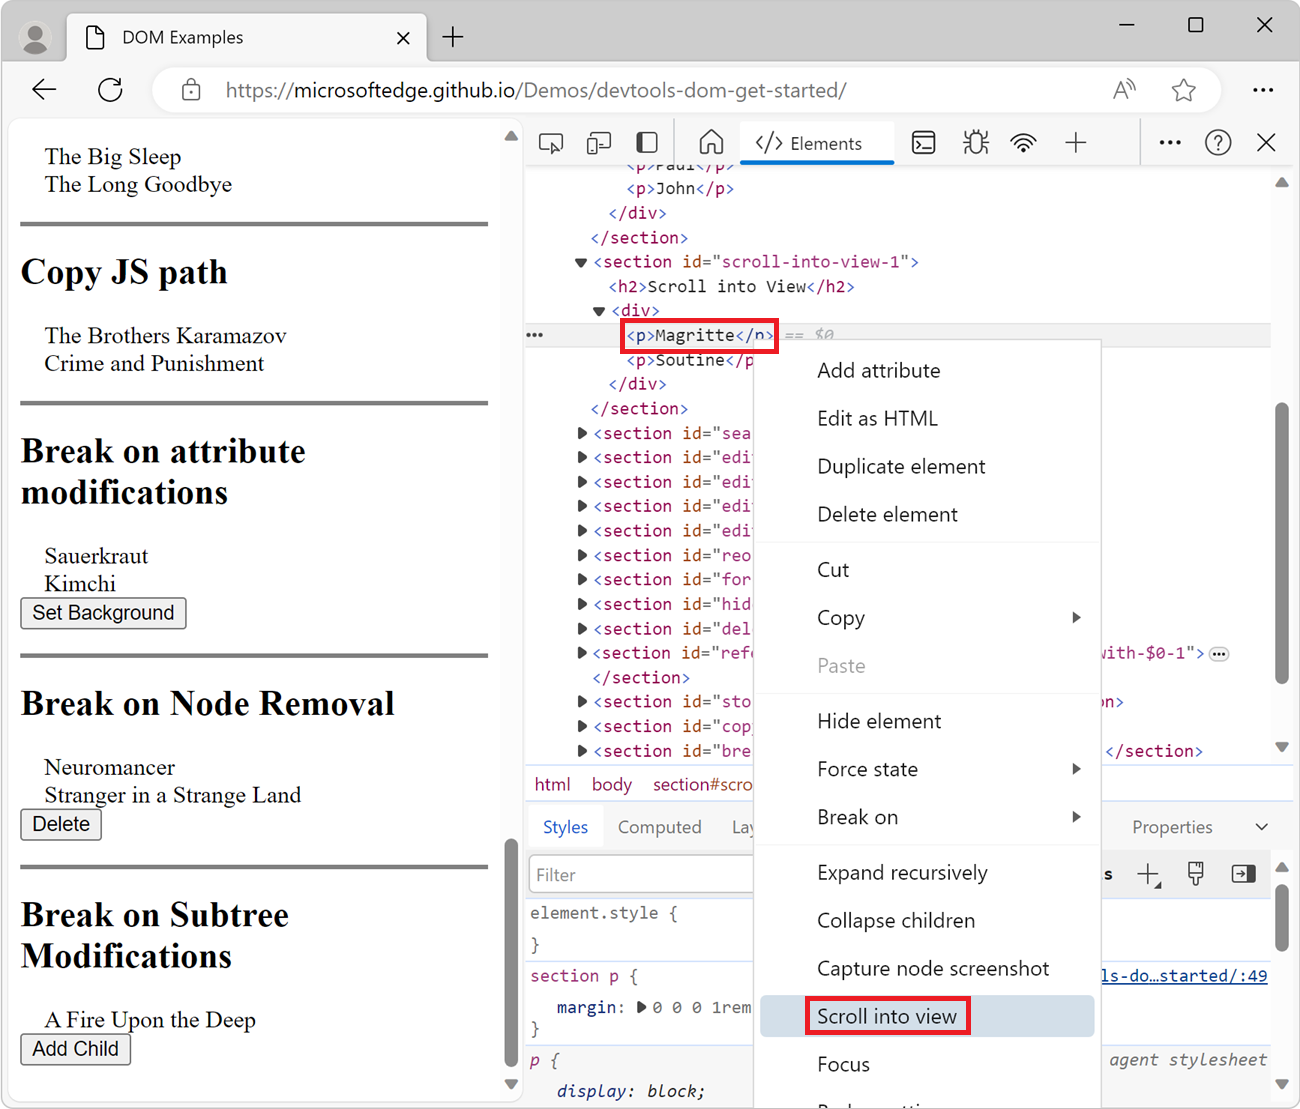
Your viewport scrolls back up to display the Magritte node. See Appendix: Missing options if the Scroll into view option isn't displayed.
Search for nodes
You can search the DOM Tree by string, CSS selector, or XPath selector.
Focus your cursor on the Elements tool, such as by clicking the Elements tab.
Press Ctrl+F (Windows, Linux) or Command+F (macOS). The Search bar opens at the bottom of the DOM Tree.
Type The Moon is a Harsh Mistress. The last sentence is highlighted in the DOM Tree:
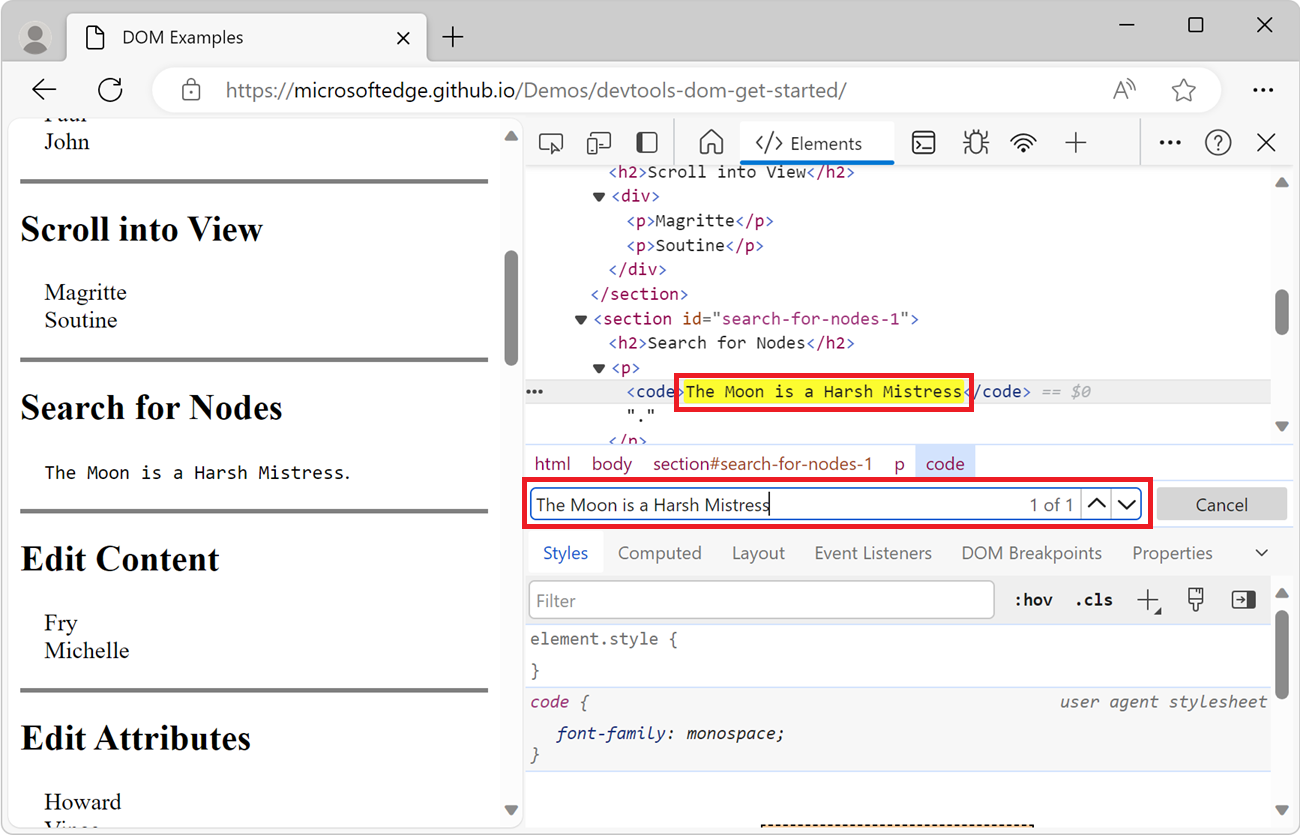
The Search bar also supports CSS and XPath selectors.
Edit the DOM
You can edit the DOM in DevTools and view how the changes affect the page in real time.
Edit text content
To edit the text content of a node, double-click the content in the DOM Tree, as follows:
Open the DOM Examples demo page in a new window or tab.
In the rendered webpage, under Edit Content, right-click Michelle and then select Inspect.
In the DOM Tree, double-click the text
Michelle, between the<p>and</p>tags. The text is highlighted to indicate that it's selected: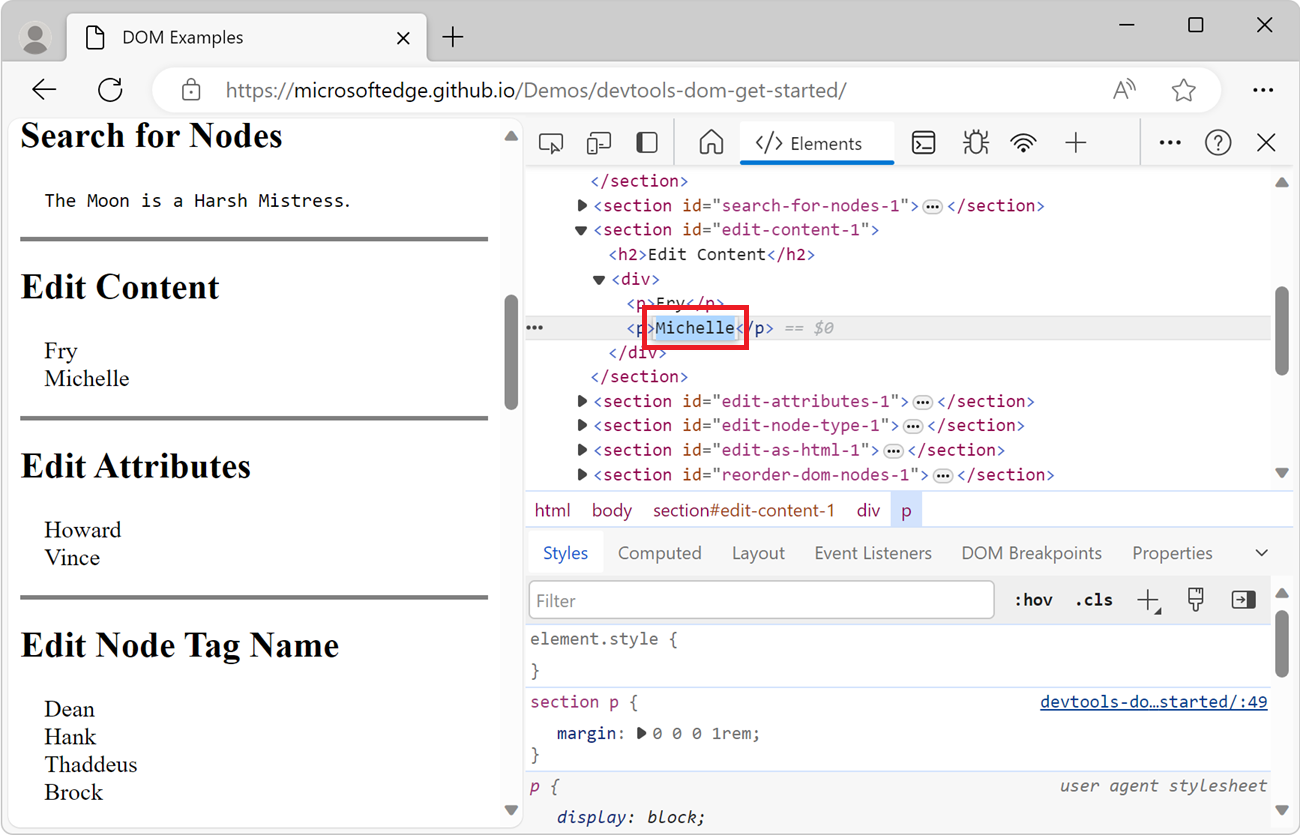
Delete
Michelle, typeLeela, then press Enter to confirm the change. The text in the DOM changes from Michelle to Leela.
Edit or add attributes
To edit an existing attribute, double-click the attribute name or value.
To add a new attribute, double-click the element for which to add an attribute, as follows:
Open the DOM Examples demo page in a new window or tab.
In the rendered webpage, under Edit Attributes, right-click Howard and then select Inspect.
Double-click
<p>. The text is highlighted to indicate that the node is selected: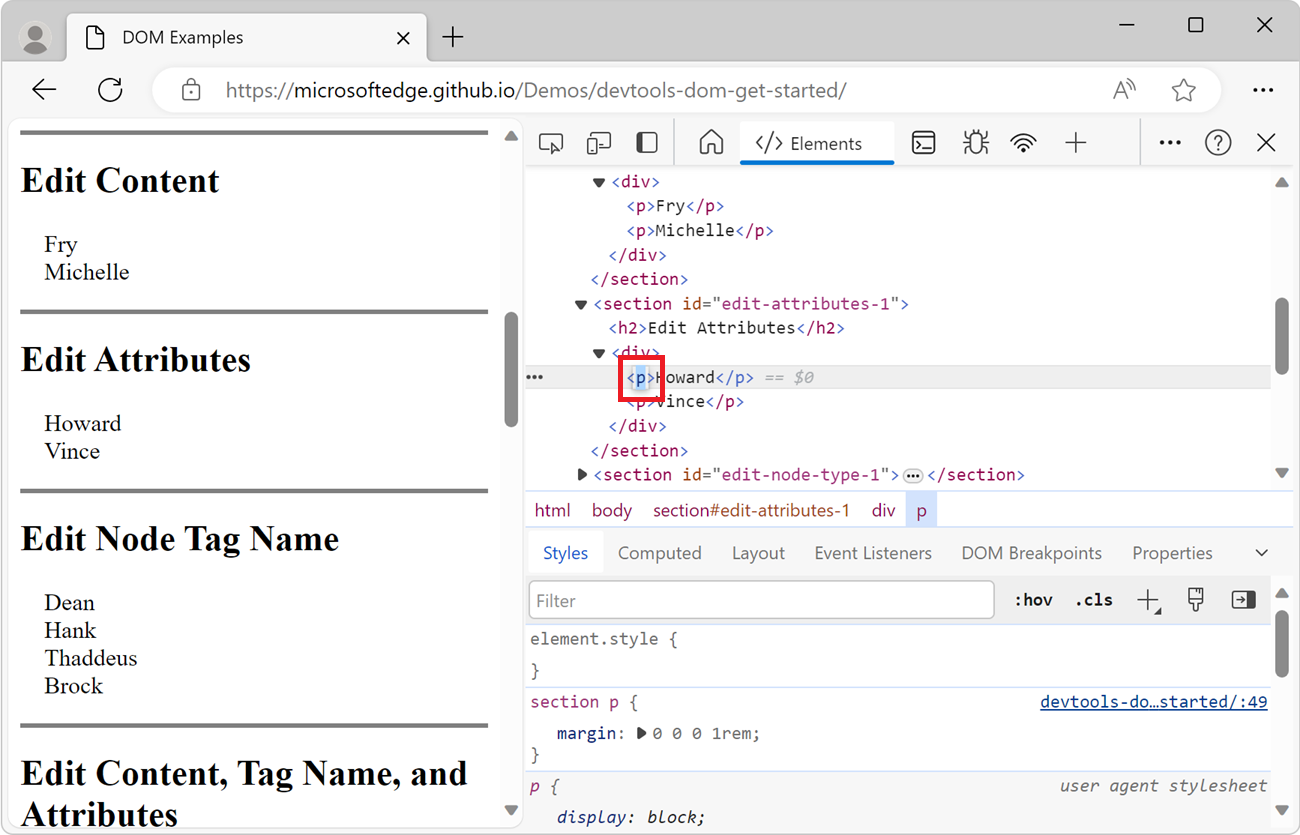
Press the Right Arrow key, add a space, type
style="background-color:gold", and then press Enter. The background color of the node changes to gold: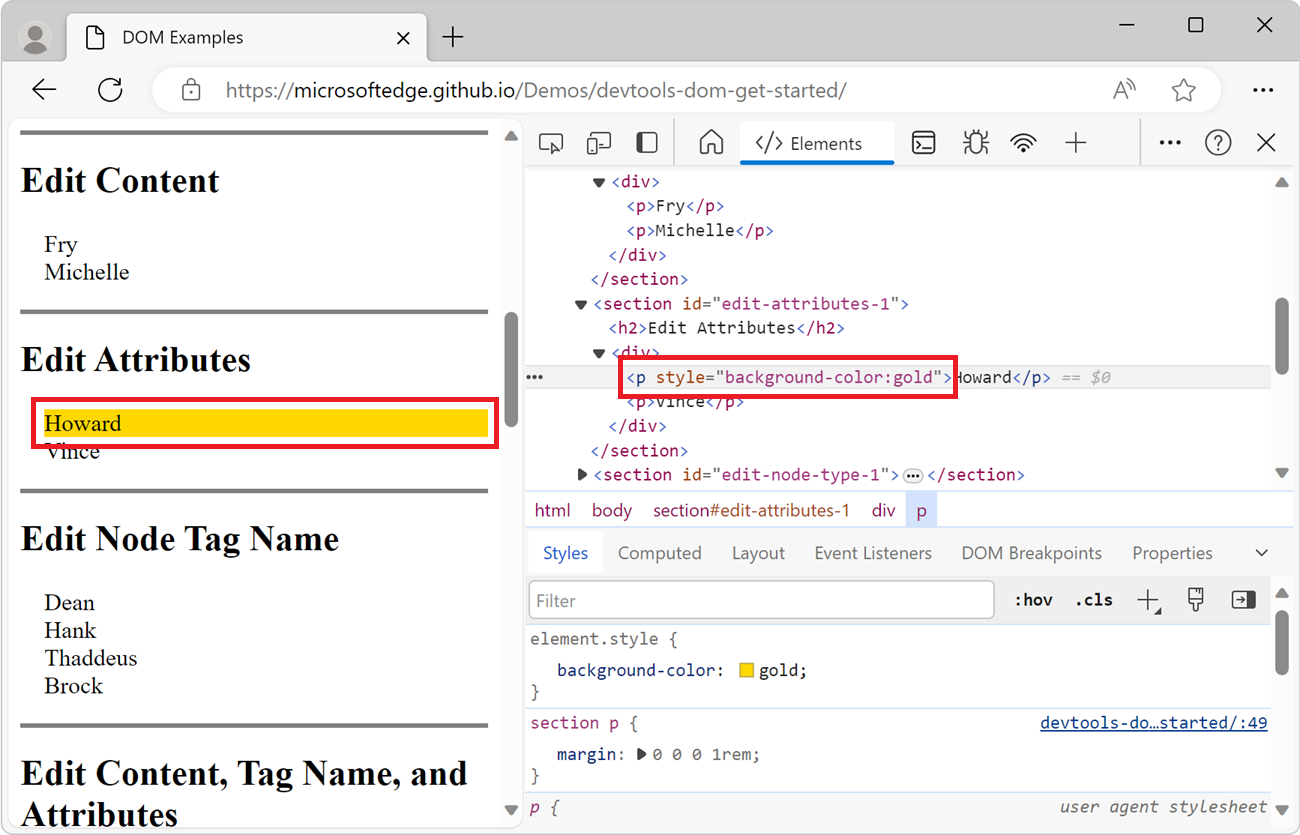
Edit node tag name
To edit the tag name of a node, double-click the tag name and then type in the new tag name.
Open the DOM Examples demo page in a new window or tab.
In the rendered webpage, under Edit Node Tag Name, right-click Hank and then select Inspect.
Double-click
<p>. The textpis highlighted.Delete
p, typebutton, then press Enter. The<p>node changes to a<button>node: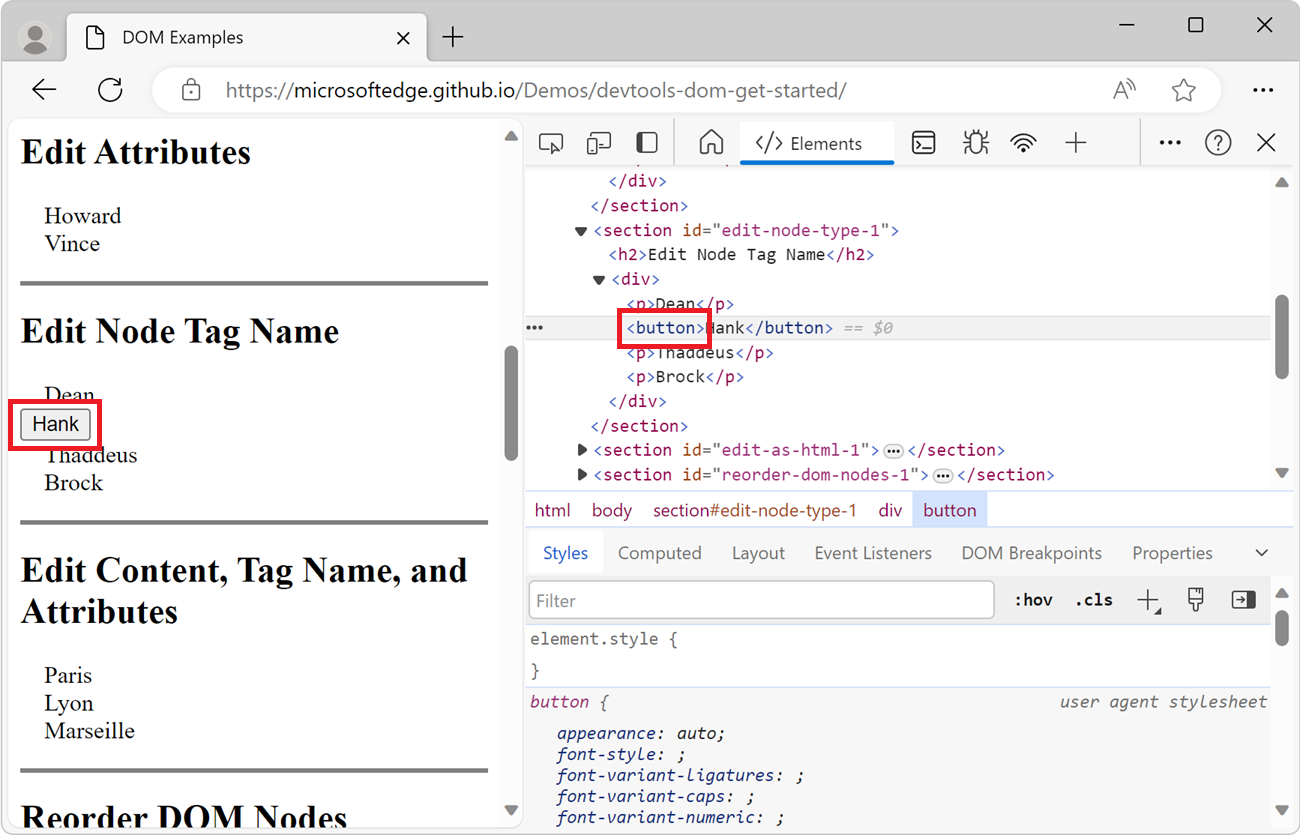
Edit multiple nodes, text, and attributes
To change the tag name, text content, or attributes of multiple nodes at once, you can edit part of the DOM by using the DOM tree's HTML text editor, as follows:
Open the DOM Examples demo page in a new window or tab.
In the rendered webpage, right-click in the Edit Content, Tag Name, and Attributes section, and then select Inspect.
In the DOM Tree, right-click the
<section id="edit-as-html-1">node, and then select Edit as HTML. The HTML editor appears within the DOM tree, with a box around the section that's being edited: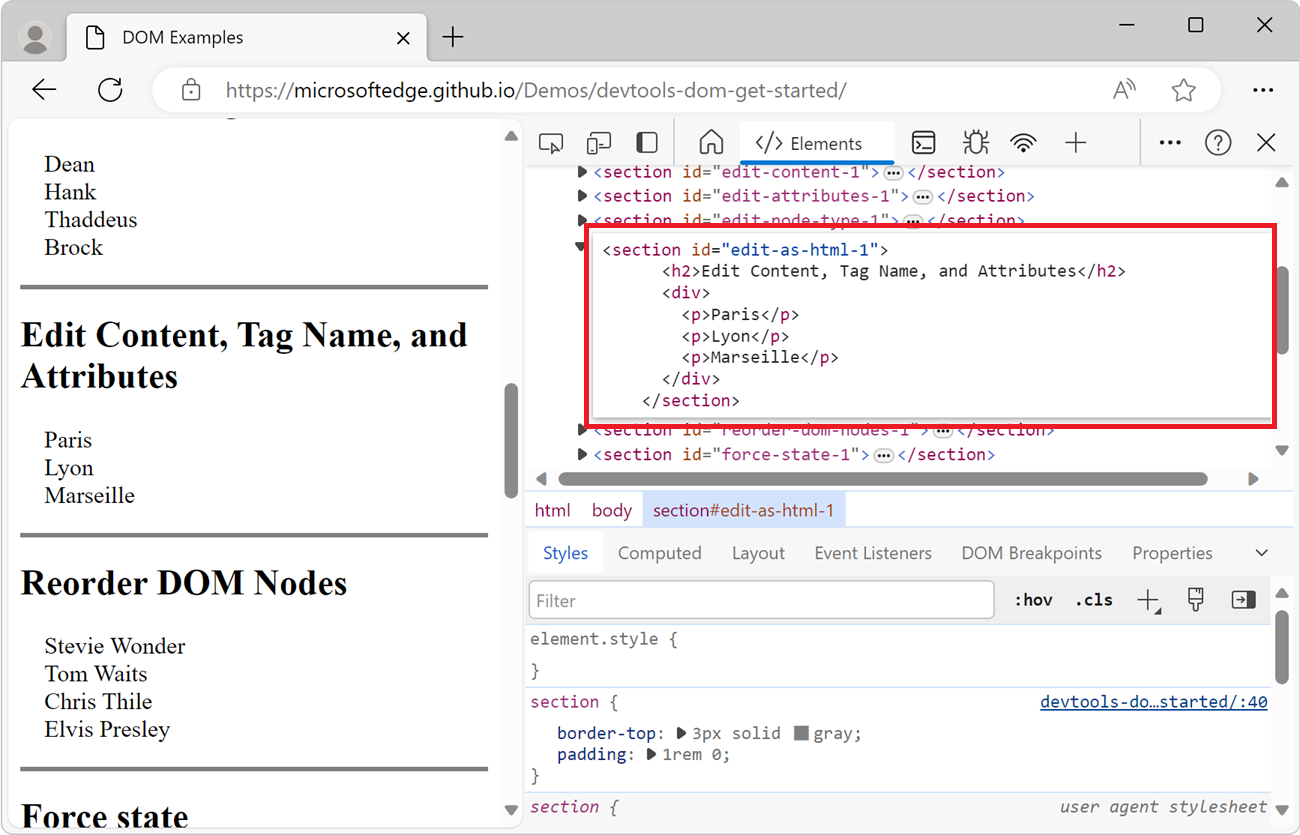
Type the changes you want to make in the HTML editor, such as:
- Adding, deleting, or editing attributes.
- Adding or deleting nodes.
- Editing nodes' text content or tag names.
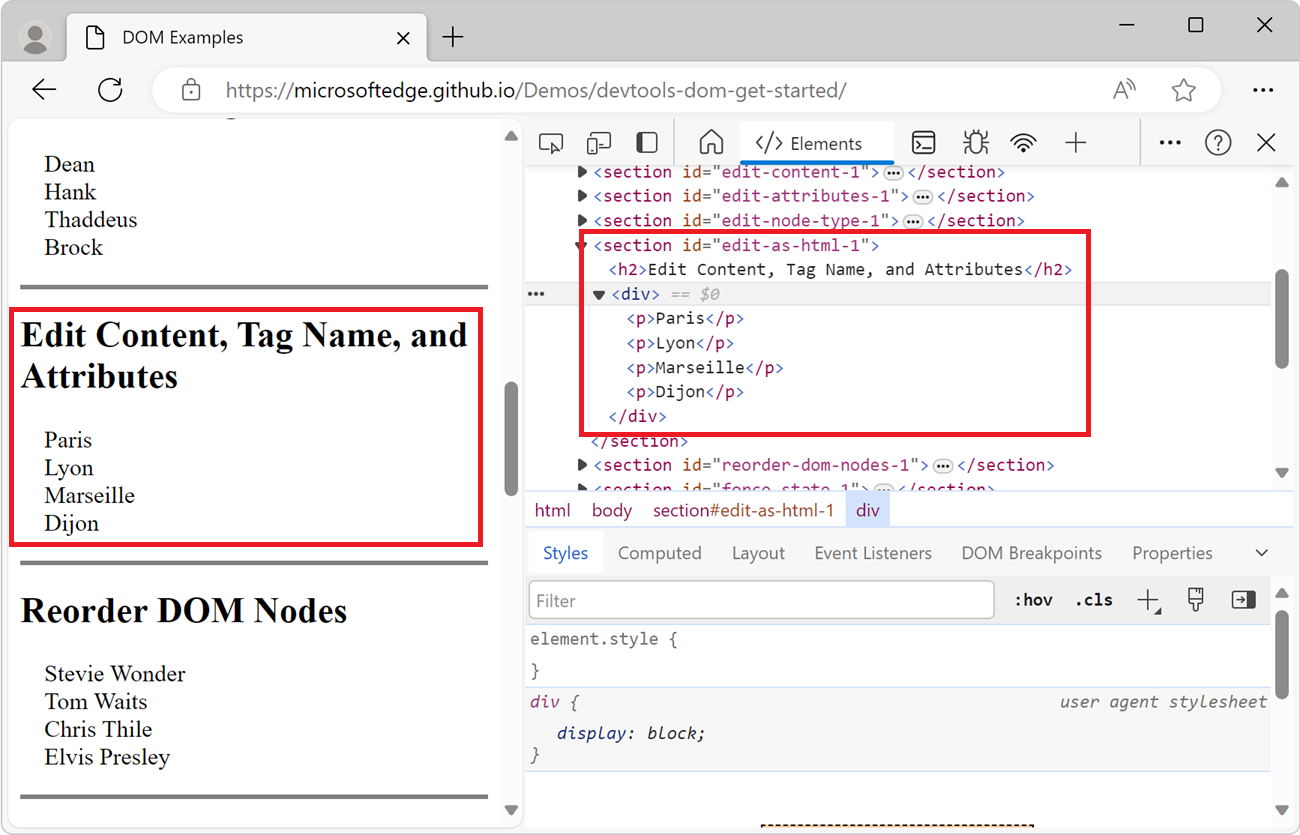
For example, add
<p>Dijon</p>after the<p>Marseille</p>line.Click the DOM tree outside the HTML editor, or press Ctrl+Enter. Your edits are applied to the DOM tree and the rendered webpage, and the HTML editor closes:
Reorder DOM nodes
To reorder nodes in the DOM tree, drag the nodes, as follows:
Open the DOM Examples demo page in a new window or tab.
In the rendered webpage, under Reorder DOM Nodes, right-click Elvis Presley and then select Inspect.
In the DOM Tree, drag
<p>Elvis Presley</p>to the top of the list: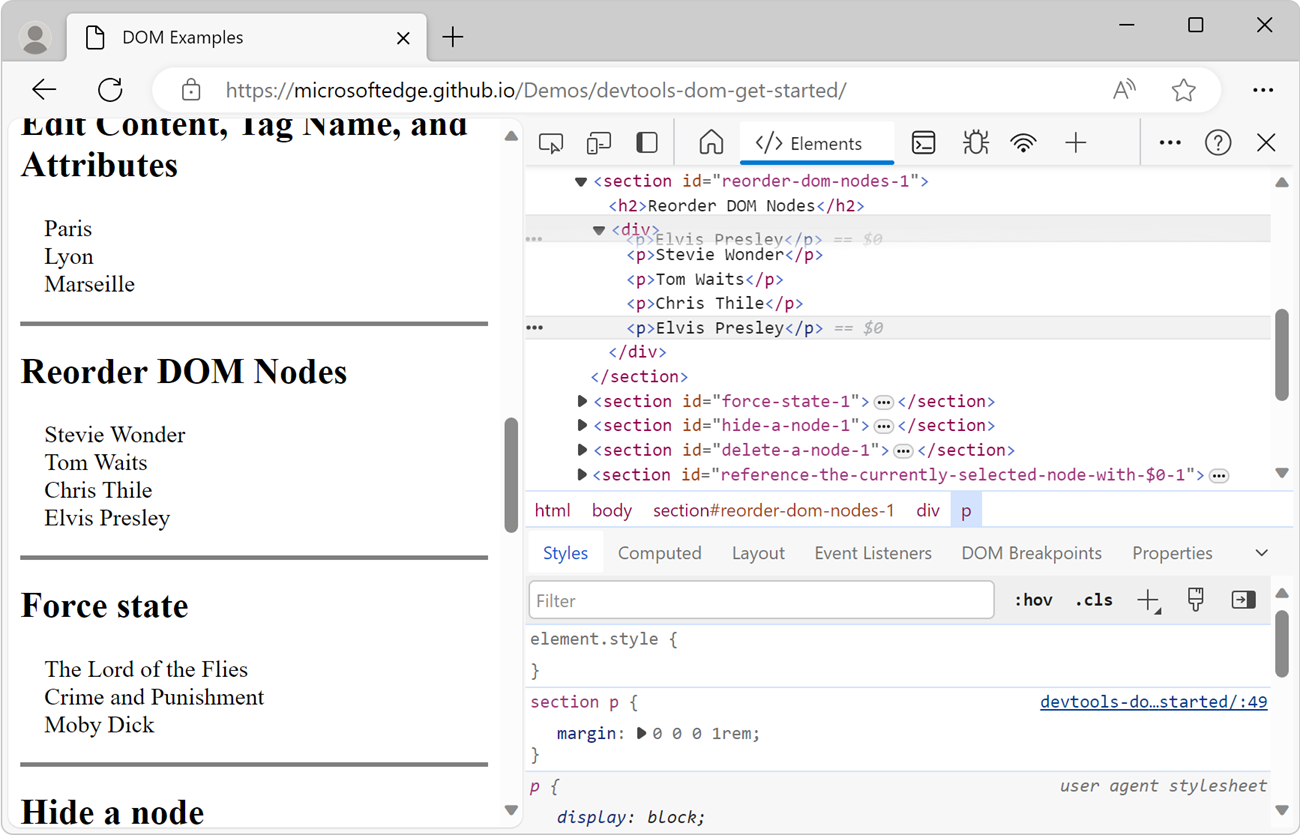
Force state
You can force nodes to remain in states including :active, :hover, :focus, :visited, and :focus-within, as follows:
Open the DOM Examples demo page in a new window or tab.
In the rendered webpage, under Force state, hover on The Lord of the Flies. The background color becomes orange.
Right-click The Lord of the Flies, and then select Inspect.
Right-click
<p class="demo--hover">The Lord of the Flies</p>, and then select Force State > :hover. If that option isn't displayed, see Appendix: Missing options, below. The background color remains orange, even though you aren't actually hovering over the node.
Hide a node
Press H to hide a node, as follows:
Open the DOM Examples demo page in a new window or tab.
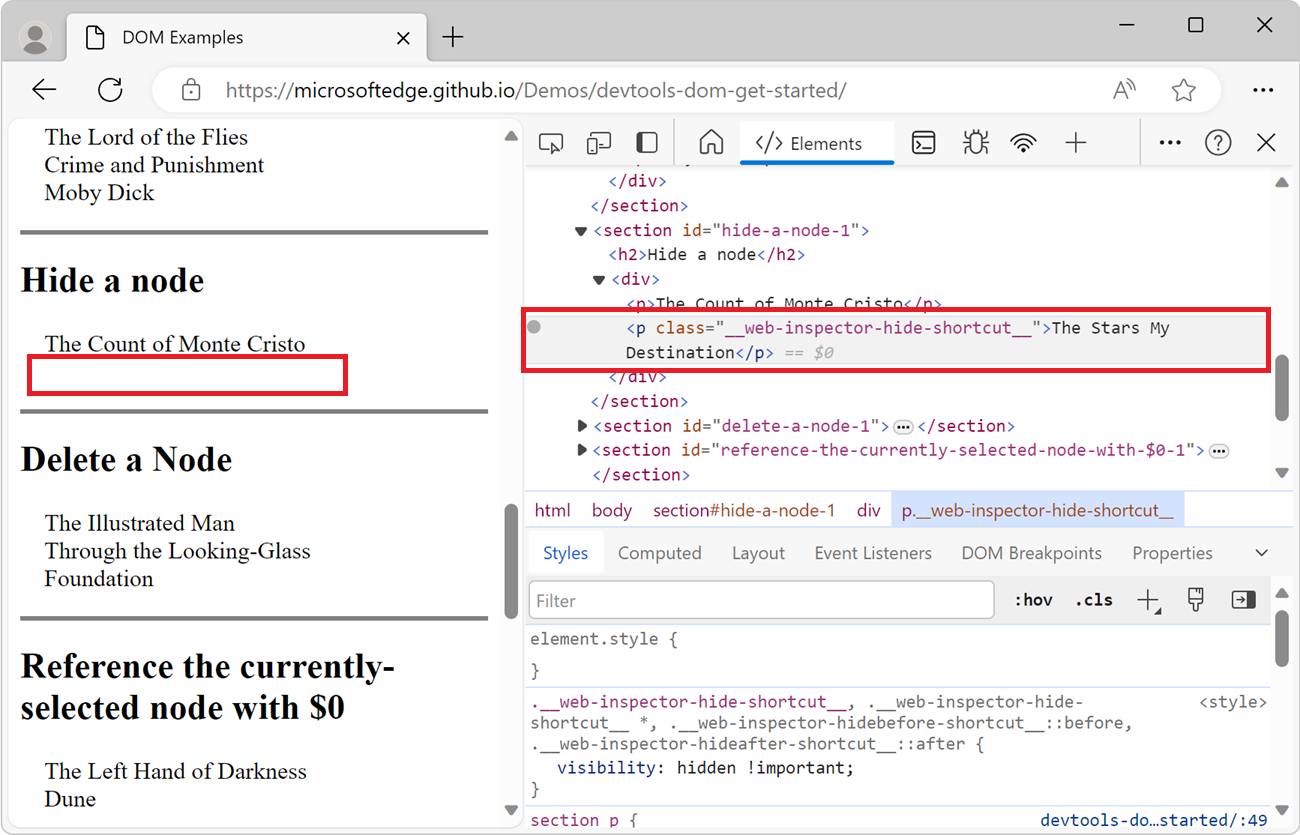
In the rendered webpage, under Hide a node, right-click The Stars My Destination and then select Inspect.
Press the H key. The node is hidden from the rendered webpage:
Press the H key again. The node is shown again.
Delete a node
Press Delete to delete a node, as follows:
Open the DOM Examples demo page in a new window or tab.
In the rendered webpage, under Delete a Node, right-click Foundation and then select Inspect.
Press Delete. The node is deleted.
Press Ctrl+Z (Windows, Linux) or Command+Z (macOS). The last action is undone and the node reappears.
Access nodes in the Console
DevTools provides a few shortcuts for accessing DOM nodes from the Console tool, or getting JavaScript references to each one.
Reference the currently-selected node with $0
When you inspect a node, the == $0 text next to the node means that you can reference this node in the Console with the variable $0.
Open the DOM Examples demo page in a new window or tab.
In the rendered webpage, under Reference the currently-selected node with $0, right-click The Left Hand of Darkness and then select Inspect.
Press the Esc key to open the Console tool in the Quick View panel.
Type
$0and press Enter. The result of the expression shows that$0evaluates to<p>The Left Hand of Darkness</p>: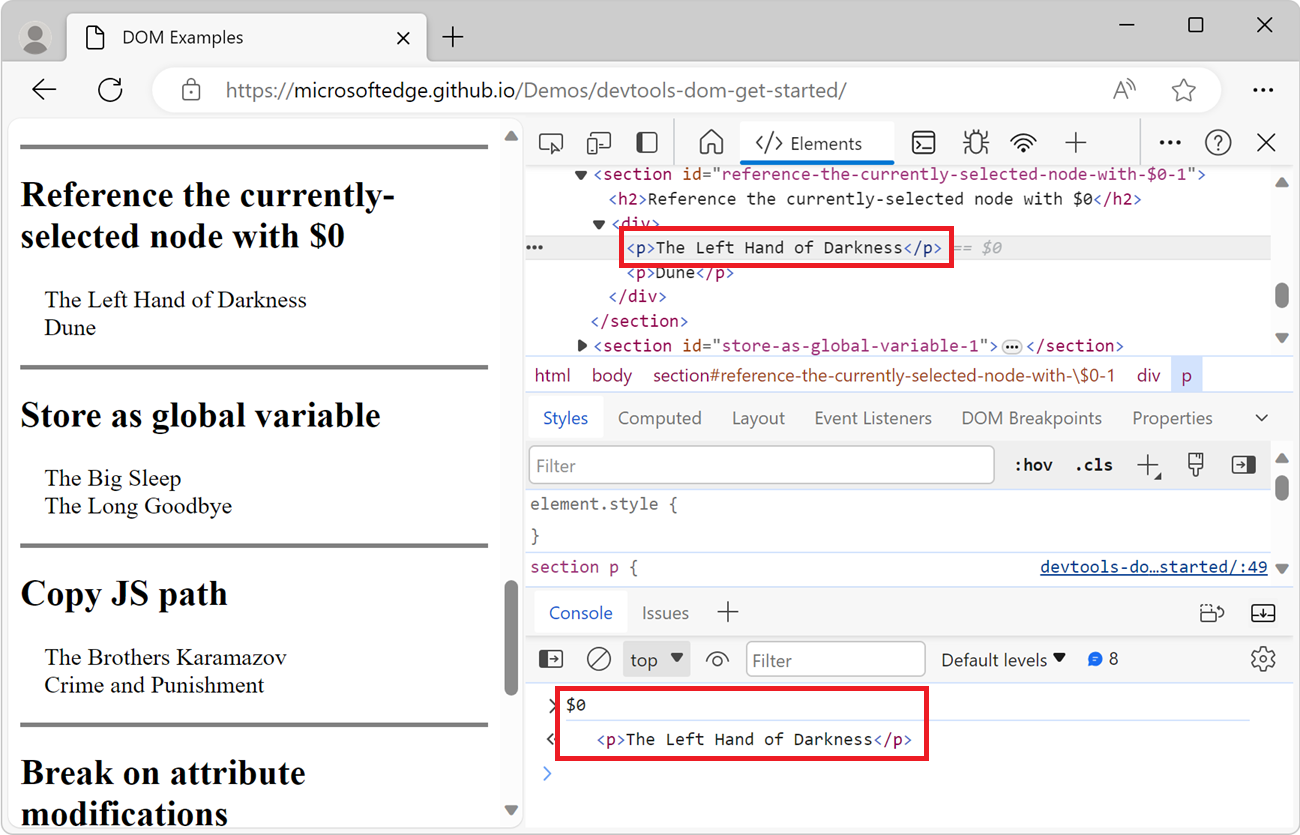
Hover over the result. The node is highlighted in the viewport.
Click
<p>Dune</p>in the DOM Tree, type$0in the Console again, and then press Enter again. Now,$0evaluates to<p>Dune</p>: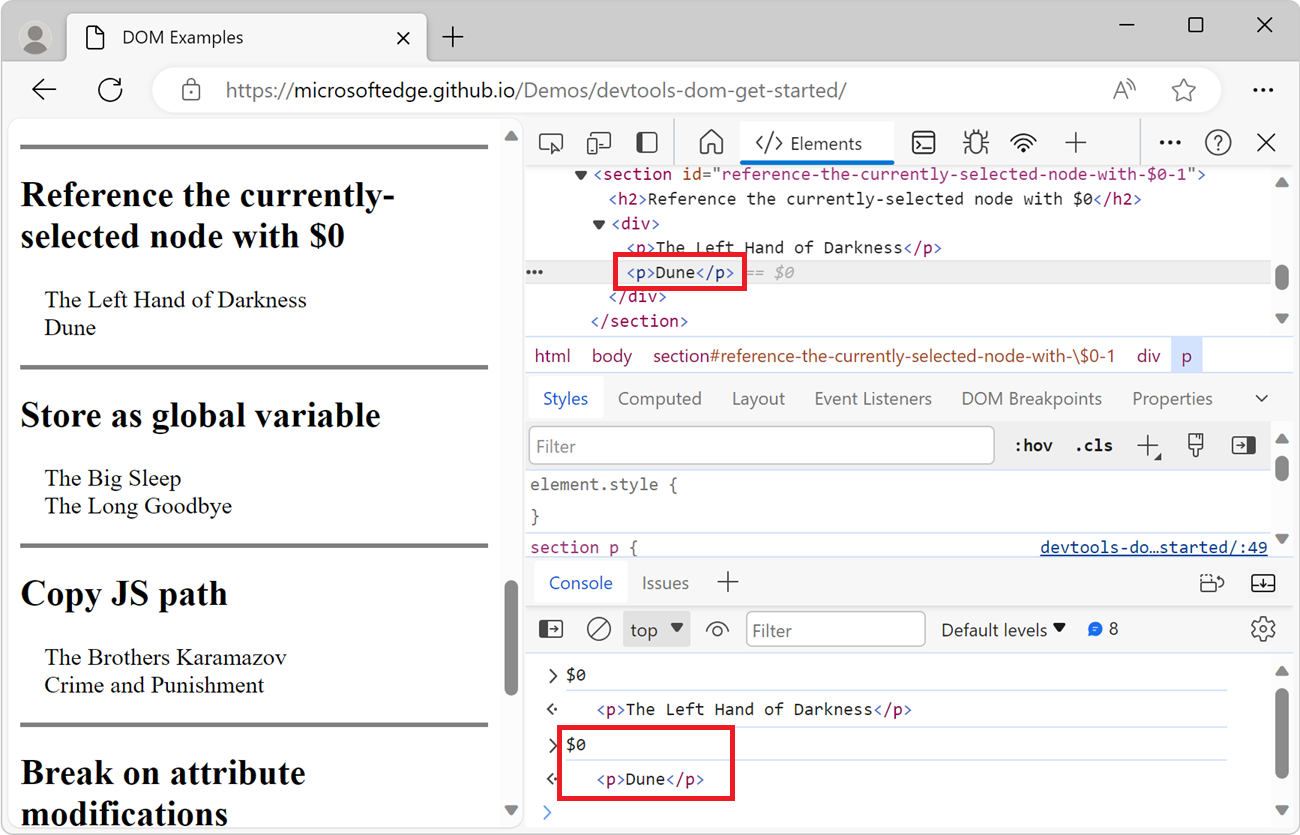
Store as global variable
If you need to refer back to a node many times, store it as a global variable.
Open the DOM Examples demo page in a new window or tab.
In the rendered webpage, under Store as global variable, right-click The Big Sleep, and then select Inspect.
Right-click
<p>The Big Sleep</p>in the DOM Tree, and then select Store as global variable. If that option isn't displayed, seeAppendix: Missing options, below.Type
temp1in the Console and then press Enter. The result of the expression shows that the variable evaluates to the node: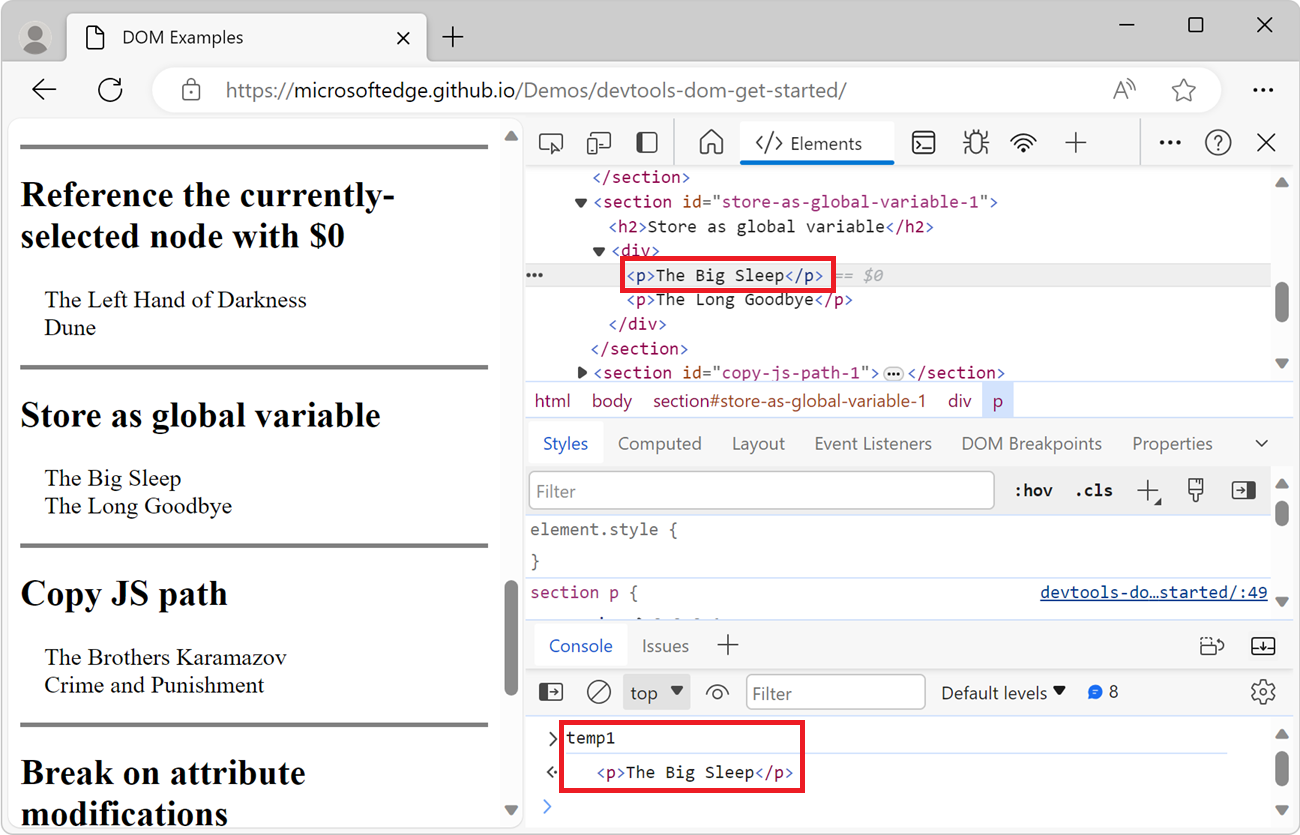
Copy JS path
Copy the JavaScript path to a node when you need to reference it in an automated test.
Open the DOM Examples demo page in a new window or tab.
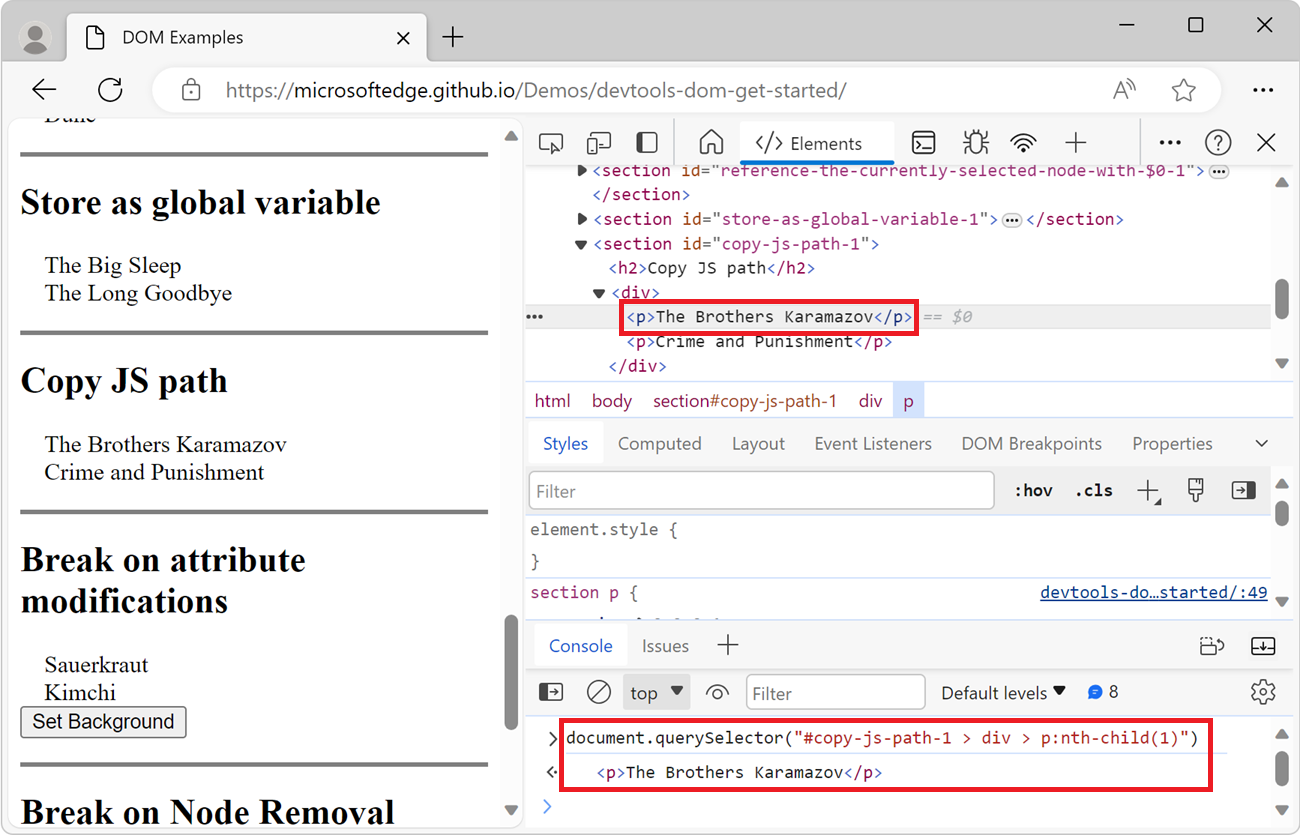
In the rendered webpage, under Copy JS path, right-click The Brothers Karamazov, and then select Inspect.
Right-click
<p>The Brothers Karamazov</p>in the DOM Tree, and then select Copy > Copy JS Path. Adocument.querySelector()expression that resolves to the node has been copied to your clipboard.Press Ctrl+V (Windows, Linux) or Command+V (macOS) to paste the expression into the Console tool.
Press Enter to evaluate the expression. The Copy JS Path expression evaluates to the node:
Break on DOM changes
DevTools enables you to pause the JavaScript of a page when the JavaScript modifies the DOM.
Break on attribute modifications
Use attribute modification breakpoints when you want to pause the JavaScript that causes any attribute of a node to change.
Open the DOM Examples demo page in a new window or tab.
In the rendered webpage, under Break on attribute modifications, right-click Sauerkraut and then select Inspect.
In the DOM Tree, right-click
<p id="botm_target">Sauerkraut</p>, and then select Break On > Attribute Modifications: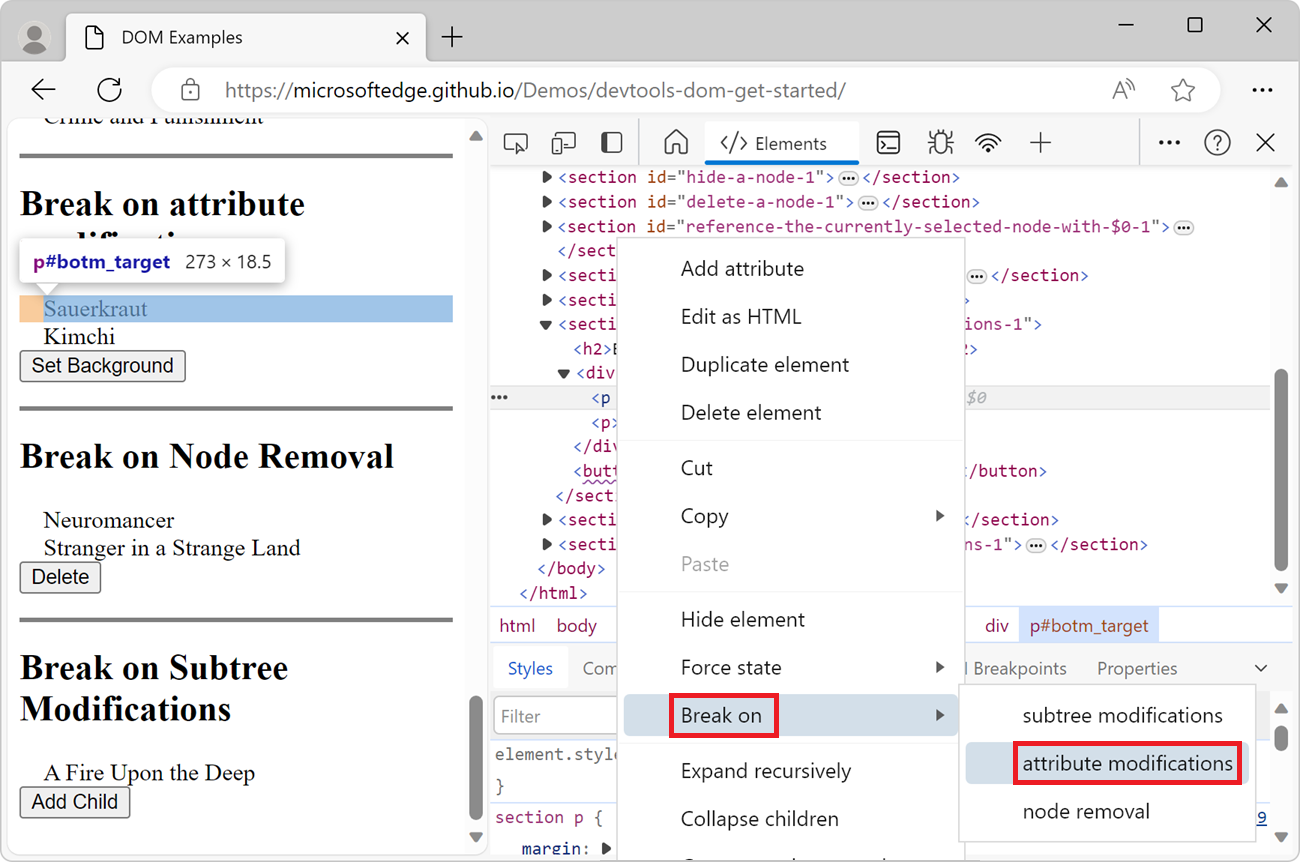
See Appendix: Missing options if the option isn't displayed.
Click the Set Background button. This sets the
styleattribute of the node tobackground-color:thistle. DevTools pauses the page and highlights the code that caused the attribute to change in the Sources tool: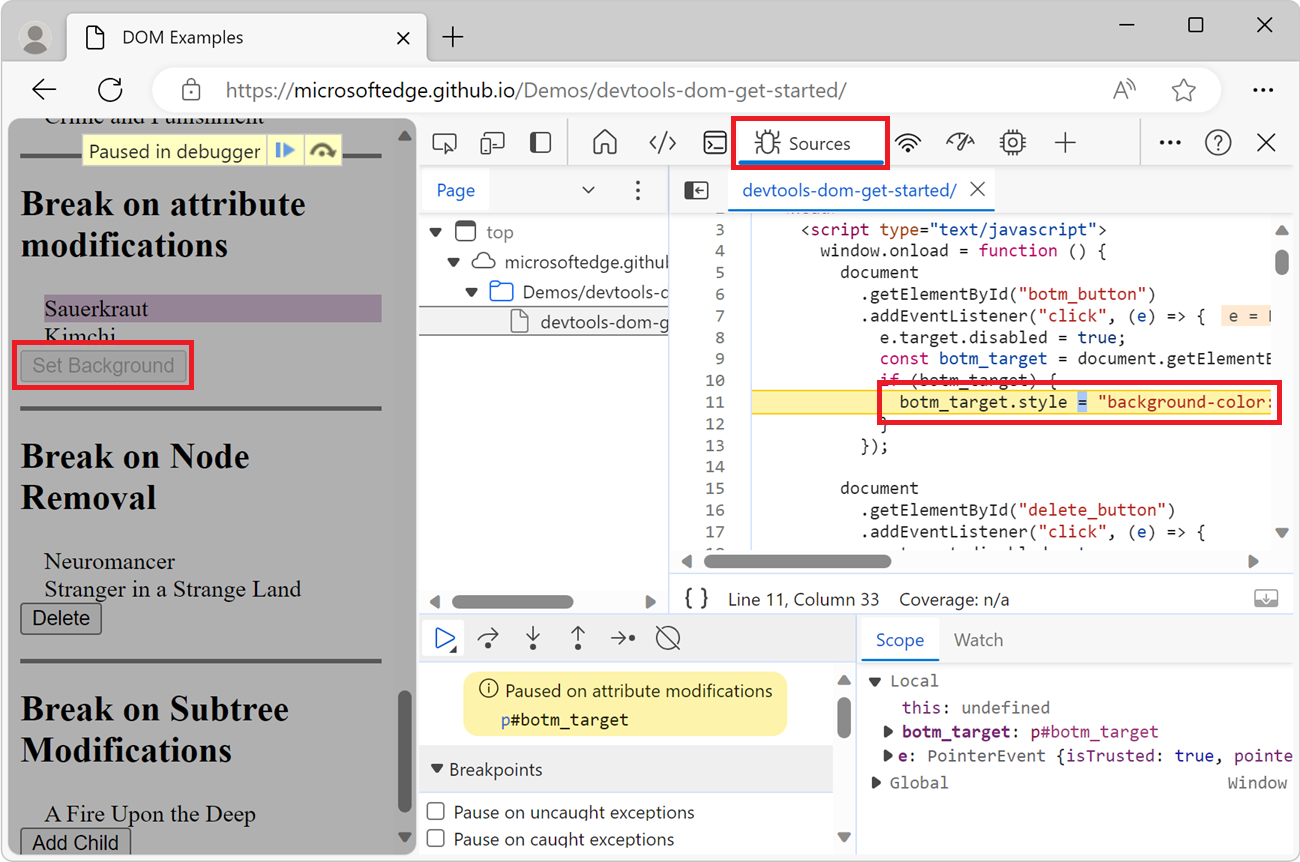
Click Resume Script (
 ) to resume the JavaScript execution.
Break on node removal
If you want to pause when a particular node is removed, use node removal breakpoints.
Open the DOM Examples demo page in a new window or tab.
In the rendered webpage, under Break on Node Removal, right-click Neuromancer and then select Inspect.
In the DOM Tree, right-click
<p id="target">Neuromancer</p>, and then select Break On > Node Removal. See Appendix: Missing options if the option isn't displayed.Click the Delete button above. DevTools pauses the page and highlights the code that caused the node to be removed.
Select Resume Script (
).
Break on subtree modifications
After you put a subtree modification breakpoint on a node, DevTools pauses the page when any of the descendants of the node are added or removed.
Open the DOM Examples demo page in a new window or tab.
In the rendered webpage, under Break on Subtree Modifications, right-click A Fire Upon The Deep and then select Inspect.
In the DOM Tree, right-click
<div id="ul_target">, which is the node above<p>A Fire Upon the Deep</p>, and then select Break On > Subtree Modifications. If the Subtree Modifications command doesn't appear, see Appendix: Missing options.Click Add Child. The code pauses because a
<p>node was added to the list.Select Resume Script (
).
Next steps
That covers most of the DOM-related features in DevTools. You can discover the rest of the features by right-clicking nodes in the DOM Tree, and experimenting with the other options that were not covered in this tutorial. See also Elements tool keyboard shortcuts.
Check out Overview of DevTools to discover everything else you can do with DevTools.
Appendix: HTML versus the DOM
This section explains the difference between HTML and the DOM.
When you use a web browser to request a page, the server returns HTML code like this:
<!doctype html>
<html>
    <head>
        <title>Hello, world!</title>
    </head>
    <body>
        <h1>Hello, world!</h1>
        <p>This is a hypertext document on the World Wide Web.</p>
        <script src="/script.js" async></script>
    </body>
</html>
The browser then parses the HTML and creates a tree of objects based on the HTML like this:
html
    head
        title
    body
        h1
        p
        script
This tree of objects, or nodes, representing the content of the page is called the Document Object Model (DOM). Right now the DOM tree looks the same as the HTML, but suppose that the script referenced at the bottom of the HTML runs the following code:
const h1 = document.querySelector('h1');
h1.parentElement.removeChild(h1);
const p = document.createElement('p');
p.textContent = 'Wildcard!';
document.body.appendChild(p);
That code removes the h1 node and adds another p node to the DOM. The complete DOM now looks like this:
html
    head
        title
    body
        p
        script
        p
The page's HTML is now different than its DOM. In other words, HTML represents the initial page content, and the DOM represents the current page content. When JavaScript adds, removes, or edits nodes, the DOM becomes different than the HTML.
See Introduction to the DOM to learn more.
Appendix: Missing options
Many of the instructions in this tutorial instruct you to right-click a node in the DOM Tree and then select an option from the context menu that pops up. If the specified option isn't listed in the context menu, right-click away from the node text, or click the ... button to the left of the node:
Note
Portions of this page are modifications based on work created and shared by Google and used according to terms described in the Creative Commons Attribution 4.0 International License. The original page is found here and is authored by Kayce Basques (Technical Writer, Chrome DevTools & Lighthouse).
![]() This work is licensed under a Creative Commons Attribution 4.0 International License.
This work is licensed under a Creative Commons Attribution 4.0 International License.
Feedback
Coming soon: Throughout 2024 we will be phasing out GitHub Issues as the feedback mechanism for content and replacing it with a new feedback system. For more information see: https://aka.ms/ContentUserFeedback.
Submit and view feedback for