Note
Access to this page requires authorization. You can try signing in or changing directories.
Access to this page requires authorization. You can try changing directories.
This article covers general-purpose setup of your development environment for WebView2 development. Some Getting Started tutorials point here for preliminary setup steps, and then add platform-specific or project-specific setup steps.
Install Visual Studio
Install Visual Studio 2015 or later, such as Visual Studio Professional 2019, or Visual Studio 2022 Community edition. Most of the WebView2 samples were created and tested using Visual Studio 2019. If a sample was created using Visual Studio 2019, you should build and run the sample in Visual Studio 2019, before using the sample in Visual Studio 2022.
The WebView2 samples are designed for Microsoft Visual Studio, not Microsoft Visual Studio Code.
If you are installing Visual Studio, you can accept the defaults for now; you can click Install, and then decline installing the Workloads at this time. Visual Studio will prompt you later, when you open a particular
.slnfile, to install the platform-appropriate workloads.
Install a preview channel of Microsoft Edge
Install any Microsoft Edge preview channel (Beta, Dev, or Canary) on a supported operating system:
- Windows 10
- Windows 11
To download a preview channel of Microsoft Edge (Beta, Dev, or Canary), go to Become a Microsoft Edge Insider.
We recommend using the Canary channel. The minimum required version is 82.0.488.0.
The preview channels of Microsoft Edge are required in order to use a prerelease version of the WebView2 SDK. A prerelease SDK enables testing your app against the latest APIs, and trying out the latest APIs.
Download the WebView2Samples repo
There are two repos containing WebView2 samples:
You can download a repo as a .zip file, or clone the repo.
If you download the repo (as a
.zipfile), you get a snapshot copy of the repo. You can then download another, updated copy of the repo later.If you clone the repo, you can update your local copy using git commands or features of various Dev apps.
To download the repo (as a .zip file):
Open the WebView2Samples repo (or the WebView2Browser repo) in a new window or tab.
Click the green Code button in the upper right of the GitHub repo, and then click Download ZIP.
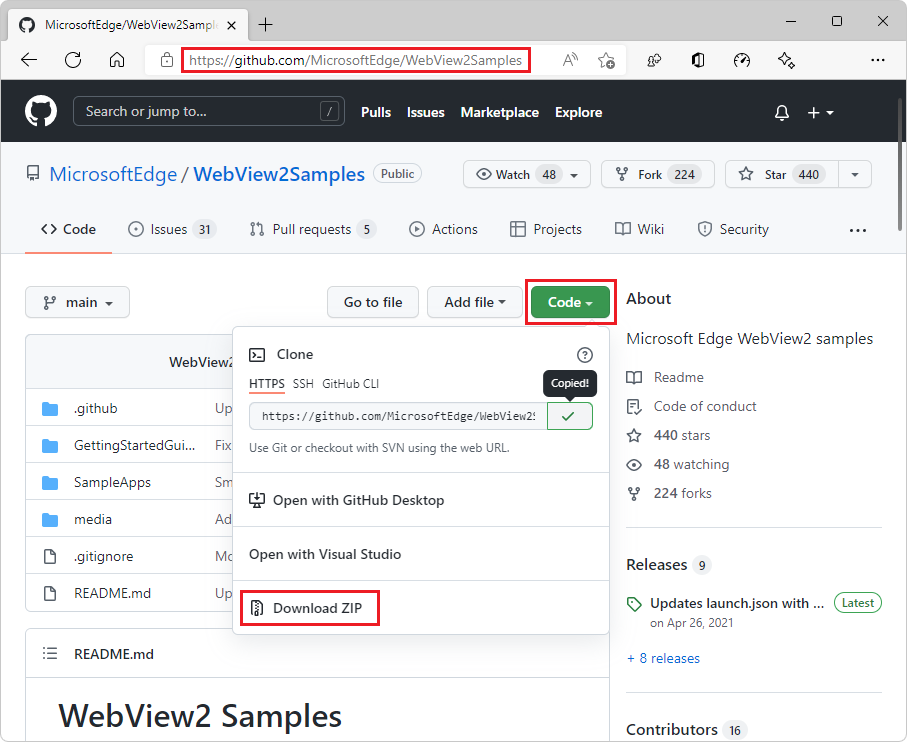
The Download pop-up appears in Microsoft Edge:

In Microsoft Edge, if the Download pop-up isn't visible, click Settings and more (...) and then click Downloads.
In the Downloads pop-up window, hover to the right of
WebView2Samples-main.zipand then click the Show in folder (folder) icon.It is recommended that you don't click the Open file link, because that immediately unzips the file in your Downloads area, which could make it harder (and slower) to move to your desired location.
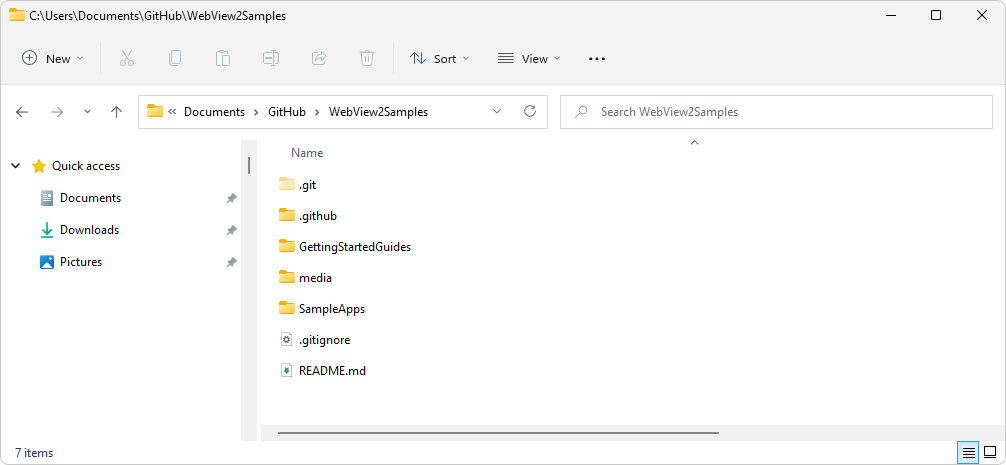
Copy or cut the
WebView2Samples-main.zipfile from your Downloads directory to a regular directory, such asDocuments.Unzip the
WebView2Samples-main.zipfile and note the location of the unzipped files.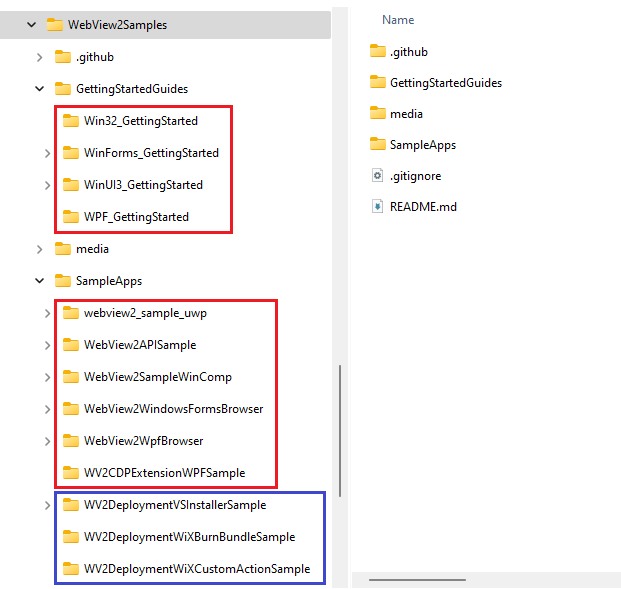
Study the breakout of main directories.
-mainis the name of the repo branch that this downloaded directory snapshot represents. It is possible to switch to a different branch at GitHub and then download, for example,WebView2Samples-smoketest-1.0.1054.27-prerelease-testing.zip. In that case, the downloaded.zipfile is a snapshot of thesmoketest-1.0.1054.27-prerelease-testingbranch of the repo. This documentation assumes that you downloaded themainbranch of the repo.Recommended: Rename the root directory from
WebView2Samples-maintoWebView2Samples, to match the repo name and path.
Clone the WebView2Samples repo
You can download the repo as a .zip file, or clone the repo.
If you download the repo (as a
.zipfile), you get a snapshot copy of the repo. You can then download another, updated copy of the repo later.If you clone the repo, you can update your local copy using git commands or features of various Dev apps.
To clone the WebView2Samples repo (or the WebView2Browser repo), you must first install git. You can download the repo, as described above, or clone it.
Install git
- If you want to clone the
WebView2Samplesrepo (instead of downloading it), and if git isn't not already installed, download git and install it.
Obtain the URL for cloning the WebView2Samples repo
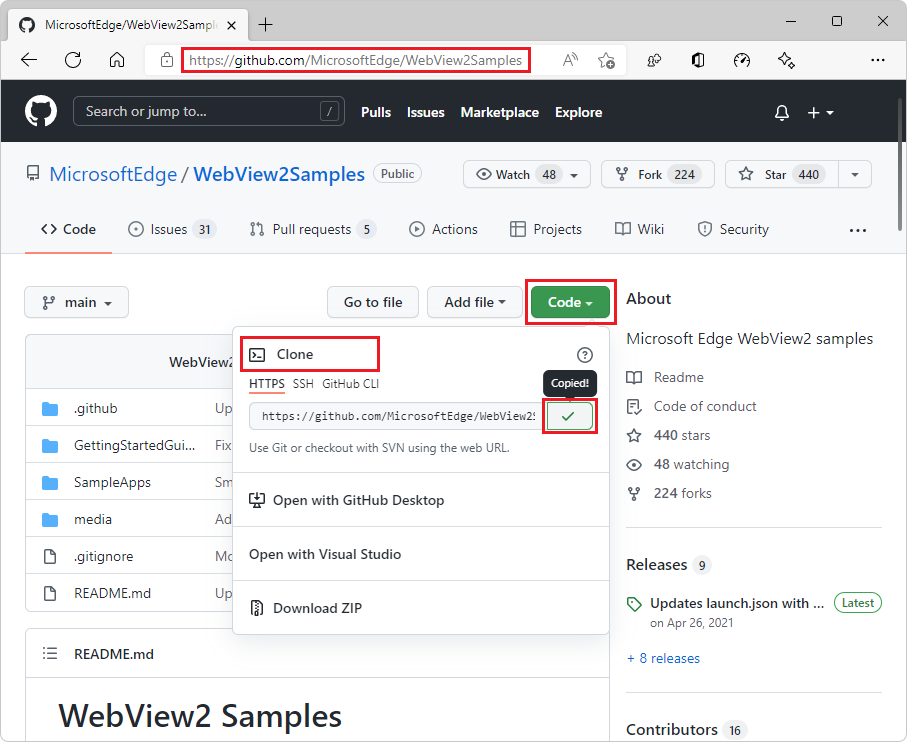
Open the WebView2Samples repo in a new window or tab.
Click the green Code button in the upper right of the GitHub repo, select Clone, and then click the Copy icon (or, select the HTTPS URL string in the text box and copy it).
Decide which tool you want to use to locally clone the repo:
- Visual Studio
- GitHub Desktop
- Git Bash shell or command prompt
Next, clone the GitHub repo to your local drive. To do that, follow the appropriate steps below, for the tool you want to use.
Cloning the repo by using Visual Studio
If you want to use Visual Studio to clone the GitHub repo to your local drive:
In Visual Studio, select File > Clone repository.
Enter the URL that you copied from the GitHub repo.
From within the same dialog, or in a file explorer utility, you can create a general-purpose root
gitorGitHubfolder in a writeable location, then select that directory, so that the repo will be cloned there, as a new directory.For example, you could create the repo in the parent folder:
C:\Users\myUserName\Documents\GitHub\, so that the cloning operation will create the new directoryC:\Users\myUserName\Documents\GitHub\WebView2Samples.
You've cloned the repo to your local drive. Skip to the next major section below.
Cloning the repo by using GitHub Desktop
If you want to use GitHub Desktop to clone the GitHub repo to your local drive:
Install GitHub Desktop.
In GitHub Desktop, select File > Clone repository.
In Visual Studio or GitHub Desktop, enter the URL that you copied from the GitHub repo.
From within the same dialog, or in a file explorer utility, you can create a general-purpose root
gitorGitHubfolder in a writeable location, then select that directory, so that the repo will be cloned there, as a new directory.For example, you could create the repo in the parent folder:
C:\Users\myUserName\Documents\GitHub\, so that the cloning operation will create the new directoryC:\Users\myUserName\Documents\GitHub\WebView2Samples.
You've cloned the repo to your local drive. Skip to the next major section below.
Cloning the repo by using Git Bash shell or a command prompt
If you instead want to clone the repo by using a Git Bash shell or command prompt:
Clone the repo to your local drive, entering the URL string that you copied from the GitHub repo:
# example location where the repo directory will be added:
cd c:/users/myusername/documents/github/
git clone https://github.com/MicrosoftEdge/WebView2Samples.git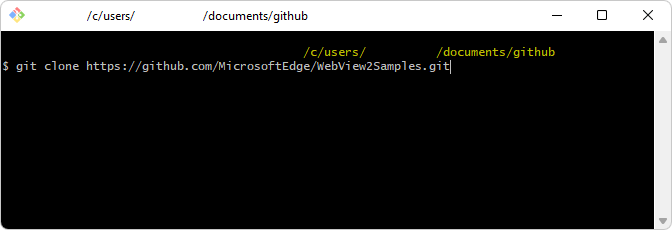
The directory is created on your local drive, in the path you specified, such as in the following figure:
You've cloned the repo to your local drive.
See also:
Cloning a repository - GitHub docs.
Clone the Edge Demos repo to your drive in Sample code for DevTools.
Step 6: Set up a localhost server in Installing the DevTools extension for Visual Studio Code.
Open a WebView2Samples .sln file in Visual Studio
After you clone or download the WebView2Samples repo, open a .sln file in Visual Studio.
In your local copy of the repo directory structure, locate a
.slnfile. The top-level README file in the WebView2Samples repo gives a similar overview.Open a
.slnfile in Visual Studio. For example, open your local copy of WebView2Samples.sln. This repo's solution files require Visual Studio, not Visual Studio Code.Open one of the
.slnfiles. For example, open your local copy of the main Win32 solution file WebView2Samples/SampleApps/WebView2Samples.sln (downloaded as pathWebView2Samples-main/SampleApps/WebView2Samples.sln) in Microsoft Visual Studio. When you open that solution file in Visual Studio, Solution Explorer contains the following projects: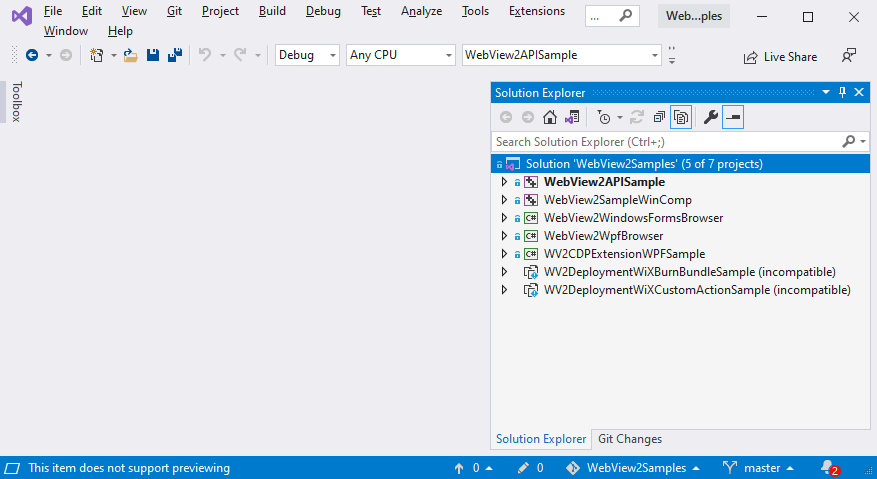
For general, initial Dev environment setup, you can open any type of .sln file from the WebView2Samples repo:
A platform-specific
.slnfile in a subdirectory of theGettingStartedGuidesdirectory. These match the Getting Started tutorials and are completed examples that demonstrate a couple API features.The Win32
.slnfile containing multiple platform projects, in theSampleAppsdirectory. This is a comprehensive API demonstration.A platform-specific
.slnfile in a subdirectory of theSampleAppsdirectory. These are comprehensive API demonstrations.
Install Visual Studio workloads
Install Visual Studio workloads if prompted. When you open a .sln file from the cloned or downloaded WebView2Samples repo in Microsoft Visual Studio 2019 or 2022, you might see a "cannot open" dialog.
Click the OK button. Then you might see a workload installer such as:
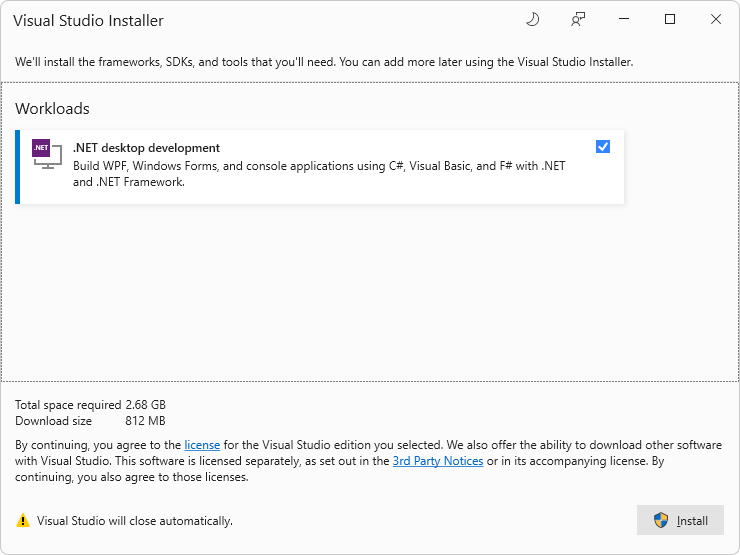 .
.Select the checkbox and then click the Install button.
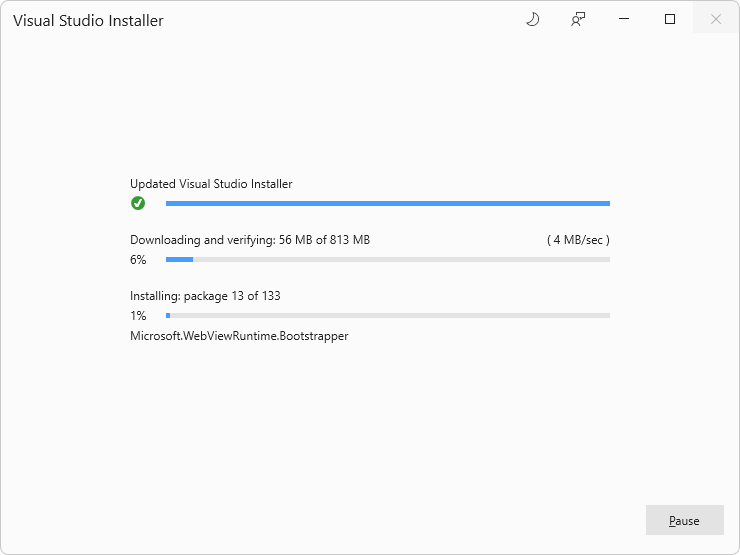
The Visual Studio installer runs, for the platform's workload:
 .
.A Migration Report log file page might open, such as at
file:///C:/Users/username/Documents/WebView2Samples-main/WebView2Samples-main/SampleApps/UpgradeLog.htm: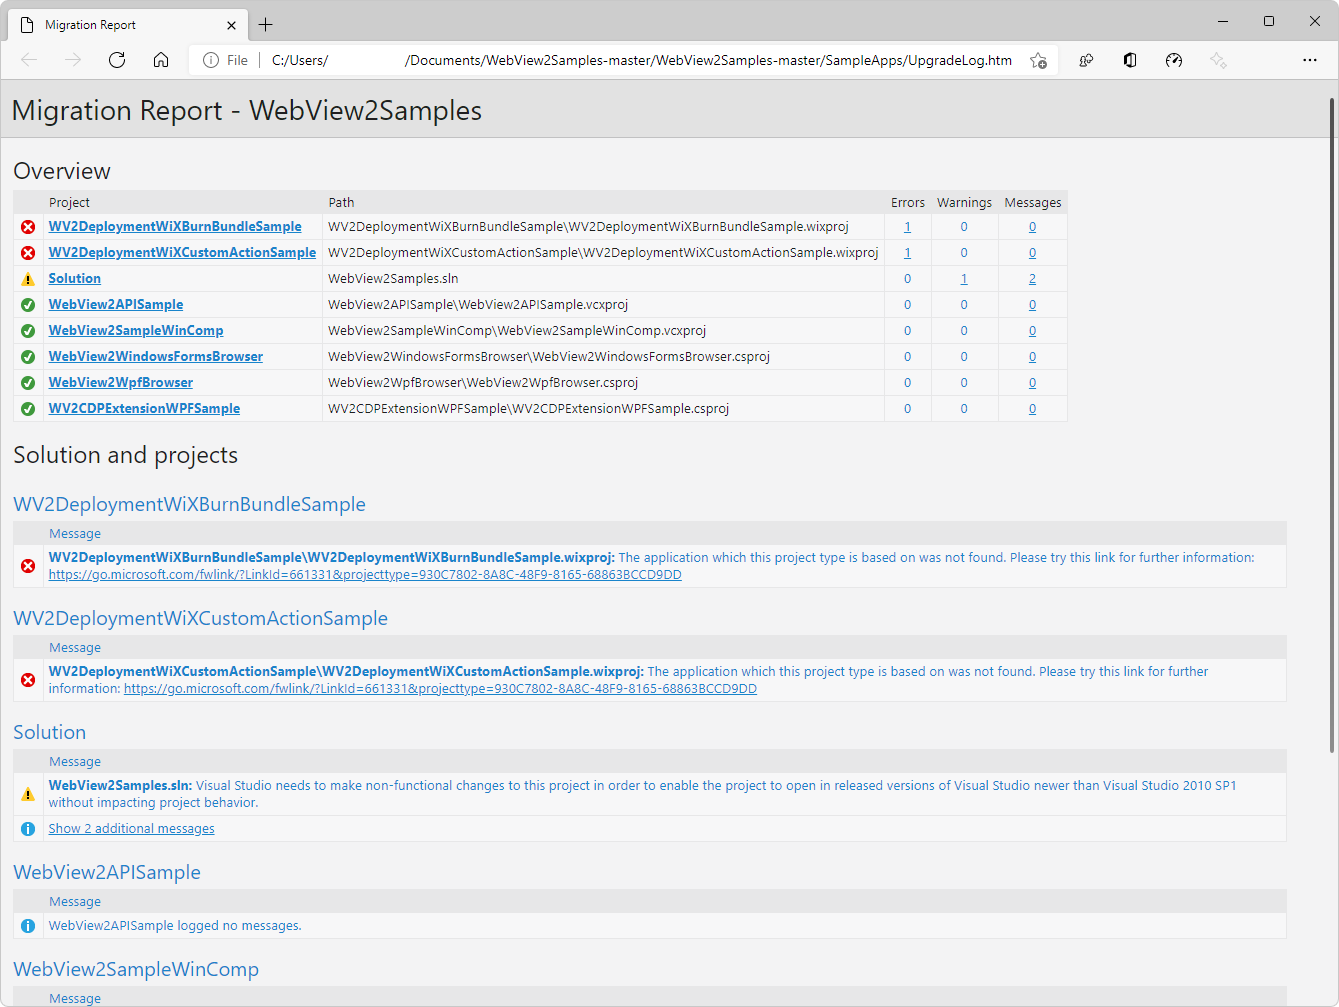
To zoom, right-click > Open image in new tab.
Above, the
-maindirectory suffix is present for the downloaded.zipfile of the repo, not if you cloned the repo.Visual Studio opens the selected
.slnfile in Solution Explorer: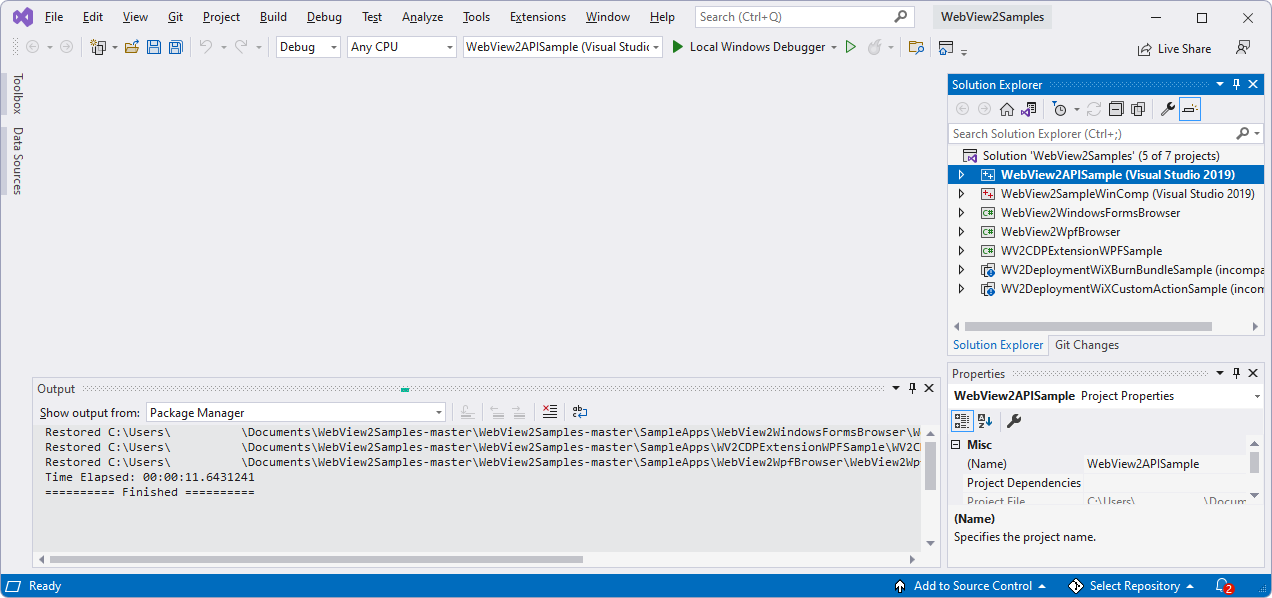
Install or update the WebView2 SDK
The WebView2 SDK includes the WebView2 control, which is powered by Microsoft Edge, and enables you to embed web technologies (HTML, CSS, and JavaScript) in your native applications.
You install the WebView2 SDK once per project node of each .sln file. The WebView2 SDK installation applies only to the project that it's installed on.
Instead of downloading the Microsoft.Web.WebView2 SDK NuGet package from nuget.org, you install the WebView2 SDK NuGet package through the NuGet Package Manager panel in Visual Studio. After you clone or download the WebView2Samples repo, you then open one of the repo's .sln files in Visual Studio, and right-click a project node within the solution. You use the NuGet Package Manager panel to install the Microsoft.Web.WebView2 SDK as a NuGet package.
The Microsoft.Web.WebView2 SDK is available in Release and Prerelease versions. To get started, a Release version is recommended.
Install or update the Release or Prerelease WebView2 SDK, as follows:
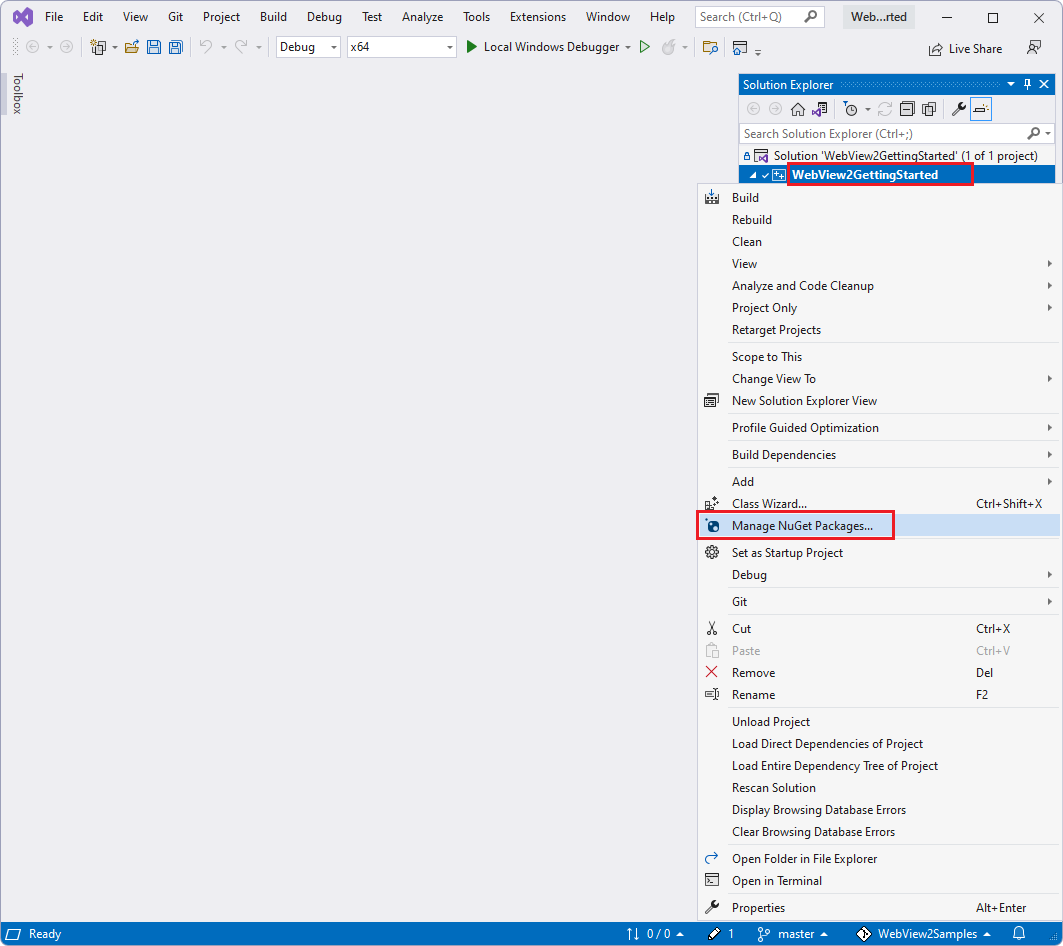
Open a
.slnfile in Visual Studio. For example, open your local copy of WebView2Samples.sln. This repo's solution files require Visual Studio, not Visual Studio Code.In Solution Explorer, right-click the solution's project nodes, such as the WebView2GettingStarted project node (not the solution node) and then select Manage NuGet Packages.
The following image shows a particular .sln file and project; use whichever project you want to install the SDK to:
The NuGet Package Manager tab opens in Visual Studio.
In the NuGet window, click the Browse tab.
On the right of the search bar, clear the Include prerelease checkbox, or set it if you want a prerelease version of the SDK, which includes experimental APIs.
In the search bar in the upper left, type Microsoft.Web.WebView2.
Below the search bar, click the Microsoft.Web.WebView2 card.
In the right-hand pane, click the Install (or Update) button. NuGet downloads the WebView2 SDK to your machine, for use by this project.
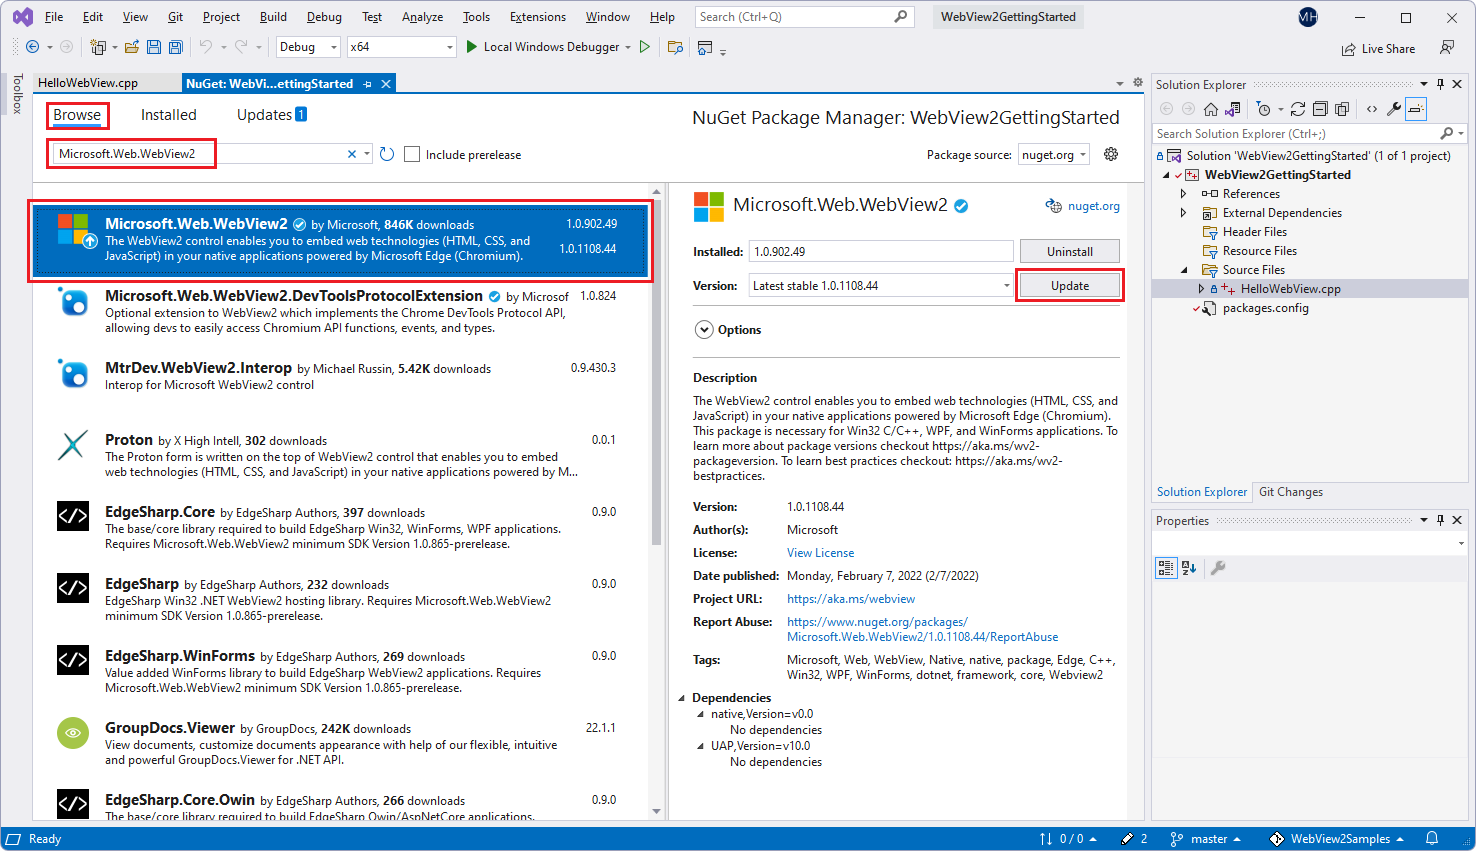
To zoom, right-click > Open image in new tab.
Close the NuGet Package Manager tab.
The WebView2 SDK is now installed, so your development environment is now set up to add WebView2 features to WebView2 apps.
See also:
Updating the WebView2 Runtime
To update the WebView2 Runtime on your development machine and on user machines, see Distribute your app and the WebView2 Runtime.
See also
- Cloning a repository - GitHub docs.
- Clone the Edge Demos repo to your drive in Sample code for DevTools.
- Step 6: Set up a localhost server in Installing the DevTools extension for Visual Studio Code.