Note
Access to this page requires authorization. You can try signing in or changing directories.
Access to this page requires authorization. You can try changing directories.
Your web-side JavaScript code can access native-side WinRT methods and properties, with the help of the wv2winrt tool (the WebView2 WinRT JS Projection tool). The wv2winrt tool generates needed code files for your JavaScript code, and enables using methods and properties of any WinRT APIs, including:
- Your WebView2 host app's WinRT APIs.
- Windows WinRT APIs.
- Third-party WinRT APIs.
For more information about why you'd want to have your web-side JavaScript code access the methods and properties of your WinRT host app, see the introduction of Call native-side code from web-side code.
Why WinRT and .NET use different approaches
This article is for WinRT WebView2 APIs, not for .NET WebView2 APIs. The C# code in this article will build, but not run, for .NET WebView2 APIs. Calling AddHostObjectToScript using this article's C# code for .NET WebView2 APIs would produce an error message.
The wv2winrt tool (the WebView2 WinRT JS Projection tool) is needed when projecting WinRT objects, because WinRT doesn't support IDispatch or any other mechanism to dynamically inspect and interact with WinRT objects, which WebView2's Win32 and .NET platforms support. For .NET use of AddHostObjectToScript, see Call native-side code from web-side code instead of this article.
Setup differences for WinUI 3 vs. WinUI 2
If your WinRT WebView2 app targets WinUI 3 (Windows App SDK) rather than WinUI 2 (UWP), here's an overview of the WinUI 3-specific steps that are provided further below:
In a non-packaged app, you have to do additional steps that are in the article "Enhancing Non-packaged Desktop Apps using Windows Runtime Components".
Add
WinRTAdaptertoCsWinRTIncludes.For WinUI 3 (Windows App SDK) apps, the main app project has a reference to WinAppSDK which directly includes its own copy of the WebView2 SDK files, so you cannot include a reference to the WebView2 SDK in the main app project without producing error messages.
The project adapter version doesn't have to match.
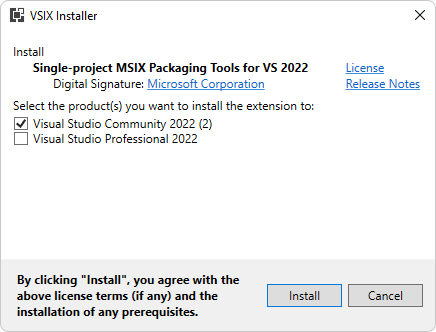
After installing "default" options for Visual Studio 2022 Community edition, in Visual Studio Installer, click the .NET card, then on the right, select the checkbox Windows App SDK C# Templates.
If the correct project template still doesn't appear: in the Visual Studio Installer, click the UWP card to select it, select the v143 C++ tools checkbox on the right, and then click the Modify button.
Strategy and end goal of this example
Strategy
This article walks you through the following main steps:
Create a WinRTAdapter project for the wv2winrt tool (the WebView2 WinRT JS Projection tool).
For this example, specify the following host-side APIs for projection:
Run the wv2winrt tool to generate C++/WinRT source code for the selected namespaces or classes.
Call AddHostObjectToScript, in your main WinUI project.
Call methods and properties on the host object from your web-side JavaScript code (or from the DevTools Console).
End goal
First, we'll pick some WinRT APIs that we're interested in calling from JavaScript code. For this example, we'll use the WinRT Language class, which is in the Windows.Globalization namespace, for Windows UWP applications. The Windows.Globalization.Language Class enables getting language information from the client's native OS.
In the WebView2 host app, the web-side JavaScript code can then access methods and properties on the Language object that's in the native-side code.
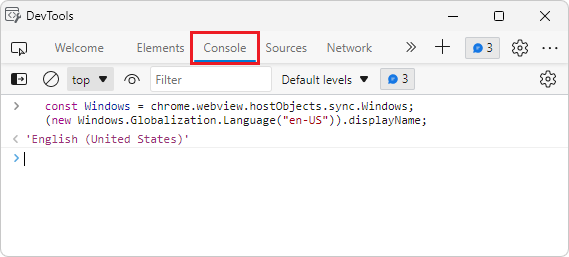
Access projected APIs via DevTools Console
At the end of this example walkthrough, you'll use the Console of Microsoft Edge DevTools to test reading the host's displayName property of the Language class:
const Windows = chrome.webview.hostObjects.sync.Windows;
(new Windows.Globalization.Language("en-US")).displayName;
The DevTools Console will then output English (United States), or another language display name, demonstrating that you've called native-side code from web-side JavaScript code:
You can similarly access Windows.System.UserProfile Namespace members.
Access projected APIs via source code files
Similarly, in source code files rather than in the DevTools Console, you can access the projected host object. First, you run setup code for the script:
// early in setup code:
const Windows = chrome.webview.hostObjects.sync.Windows;
Then in the main body of your code, you add calls to projected objects, like the following:
(new Windows.Globalization.Language("en-US")).displayName;
You can similarly access Windows.System.UserProfile Namespace members.
Let's get started!
Step 1: Create or obtain a basic WebView2 project
Install Visual Studio
- If Visual Studio 2015 or later isn't already installed, in a separate window or tab, see Install Visual Studio in Set up your Dev environment for WebView2. Follow the steps in that section, and then return to this page and continue the steps below. The present article shows screenshots for Visual Studio Community Edition 2022.
Install a preview channel of Microsoft Edge
- If a preview channel of Microsoft Edge (Beta, Dev, or Canary) isn't already installed, in a separate window or tab, see Install a preview channel of Microsoft Edge in Set up your Dev environment for WebView2. Follow the steps in that section, and then return to this page and continue the steps below.
Create or open a basic WebView2 project
Do any of the following approaches to obtain a baseline starter project that contains a couple lines of WebView2 code that embeds the WebView2 control:
Use the provided baseline sample solution: If not done already, clone or download the
WebView2Samplesrepo to your local drive. In a separate window or tab, see Download the WebView2Samples repo in Set up your Dev environment for WebView2. Follow the steps in that section, and then return to this page and continue below. This approach uses your local copy of https://github.com/MicrosoftEdge/WebView2Samples/tree/main/GettingStartedGuides/WinUI2_GettingStarted/MyUWPGetStartApp.sln.Use a project template in Visual Studio to create a basic UWP app and add a WebView2 control: Do the steps in Get started with WebView2 in WinUI 2 (UWP) apps to create a baseline starter project that contains a couple lines of WebView2 code that embeds the WebView2 control.
Use your existing code base: If you have your own app code base already, you can open that project in Visual Studio.
On your local drive, open the
.slnfile that you obtained above, such as the Samples repo solution:<your-repos-directory>/WebView2Samples-main/GettingStartedGuides/WinUI2_GettingStarted/MyUWPGetStartApp.sln<your-repos-directory>/WebView2Samples/GettingStartedGuides/WinUI2_GettingStarted/MyUWPGetStartApp.sln
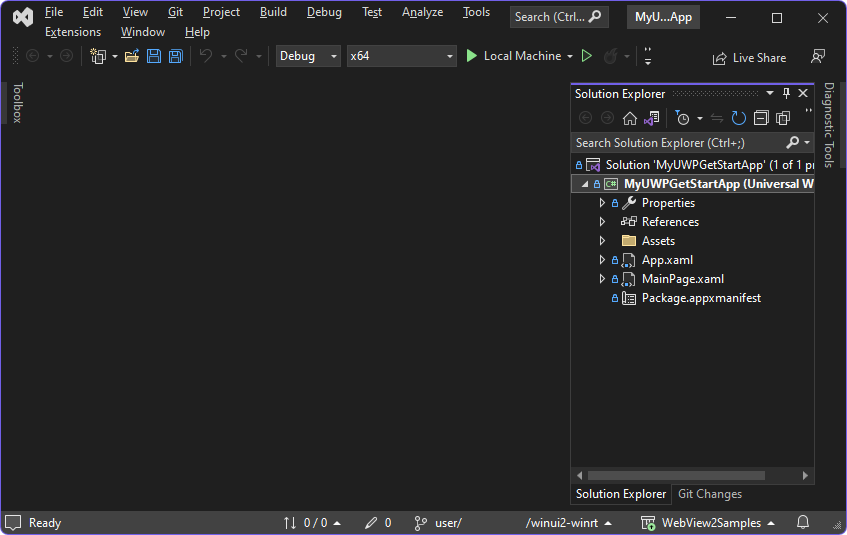
The sample solution opens in Visual Studio:
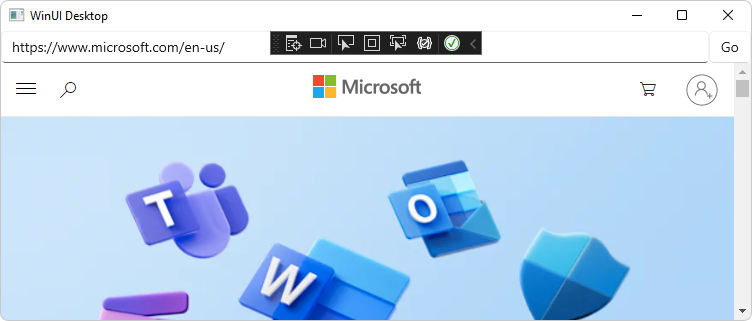
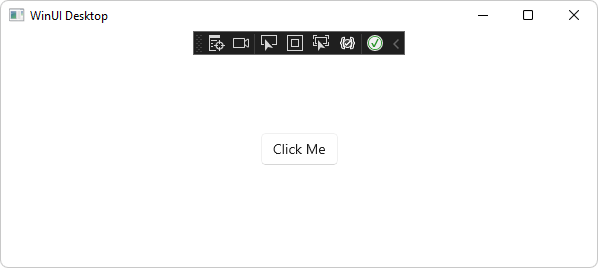
In Visual Studio, select Debug > Start Debugging. This builds the project, and then runs the baseline version of the project. The baseline app opens, such as the MyUWPGetStartApp window:
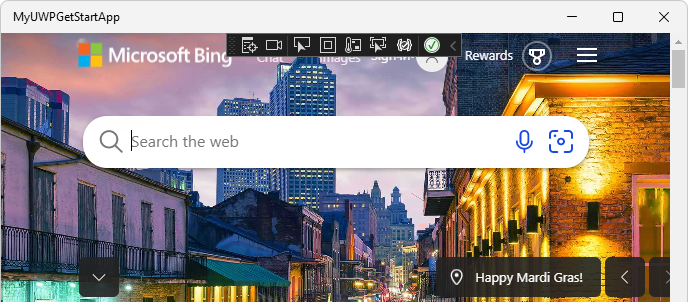
Shown is a WinUI 2 (UWP) app that has a WebView control added, set to initially navigate to Bing.com. This is the app that results from doing the steps in Get started with WebView2 in WinUI 2 (UWP) apps.
Close the app window.
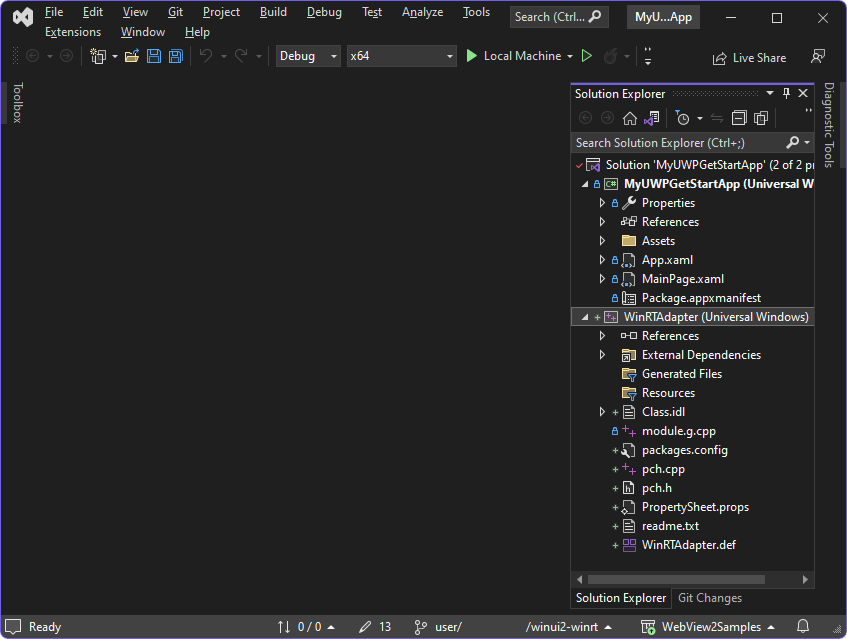
Step 2: Add a WinRTAdapter project for the wv2winrt tool
Next, create a WinRTAdapter project for the wv2winrt tool (the WebView2 WinRT JS Projection tool). This project builds a library out of code that's generated by running the tool. This generated code allows WinRT APIs to be exposed in the WebView2 control.
Add a project for the wv2winrt tool, as follows:
In Visual Studio, open your WinUI project, from the previous step.
In Solution Explorer, right-click the solution (not the project), and then select Add > New project. The Add a new project dialog opens.
In the Search textbox, enter Windows Runtime Component (C++/WinRT).
Alternative approach: If you don't add a project using the project template for Windows Runtime Component (C++/WinRT) as described in the numbered steps below, then you'll need to instead install the Universal Windows Platform development workload, by following the steps in UWP applications > Introduction to C++/WinRT.
Select the Windows Runtime Component (C++/WinRT) card, and then click the Next button:

Note: Make sure the template includes "C++/WinRT" in its name. If this template isn't listed, install the Universal Windows Platform development workload from within the Visual Studio Installer. If you are using Visual Studio 2019 and still can't find the template, install the C++/WinRT templates and visualizer for VS2019 extension from Visual Studio > Extensions > Manage Extensions.
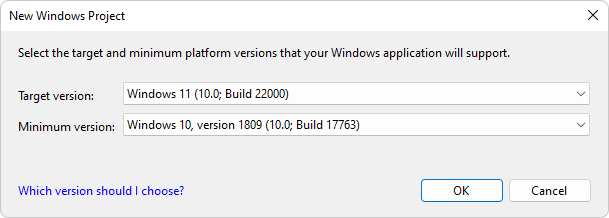
The Configure your new project window opens.
Configuring and creating the project
In the Project name textbox, name the Project, specifically, WinRTAdapter. Note: For now, you must use this specific project name.
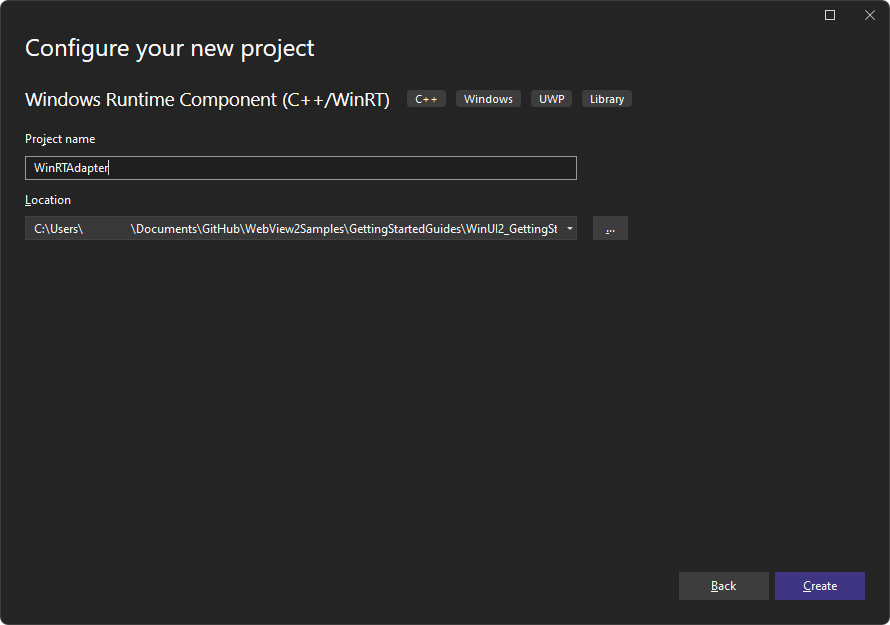
The path in the above screenshot reflects the approach of cloning the samples repo.
Click the Create button.
The New Windows Project dialog opens:
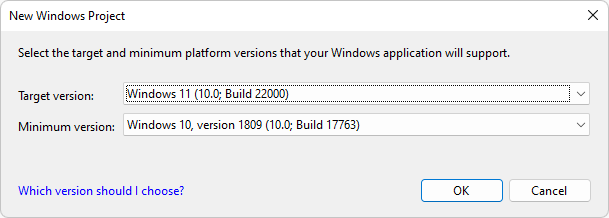
Click the OK button.
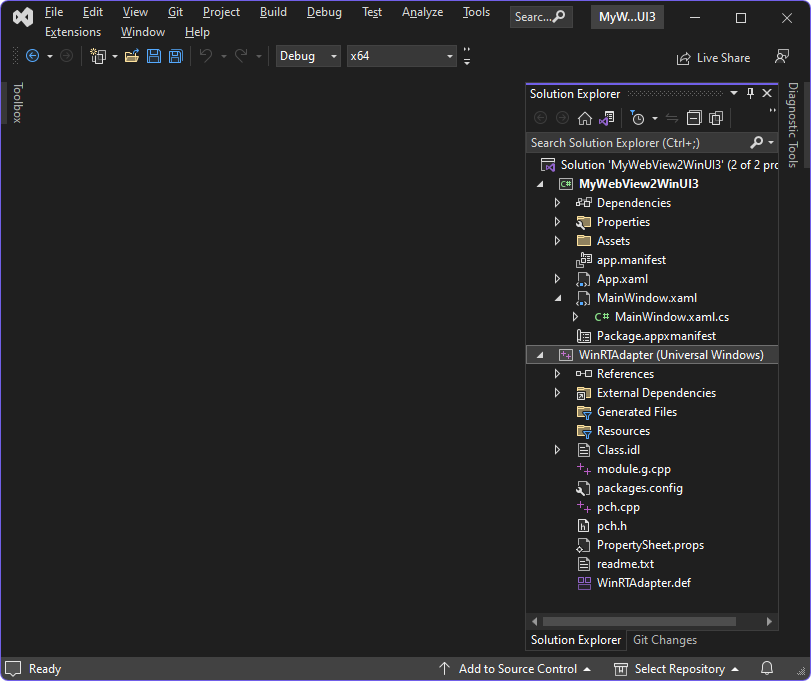
The WinRTAdapter project is created and is added in Solution Explorer next to the main project:
Select File > Save All (Ctrl+Shift+S).

The wv2winrt tool (the WebView2 WinRT JS Projection tool) will run in this WinRTAdapter project. In a below step, you'll generate code for selected classes in this project.
Step 3: Install Windows Implementation Library, for WinRTAdapter project
In the WinRTAdapter project, install the Windows Implementation Library (WIL), as follows:
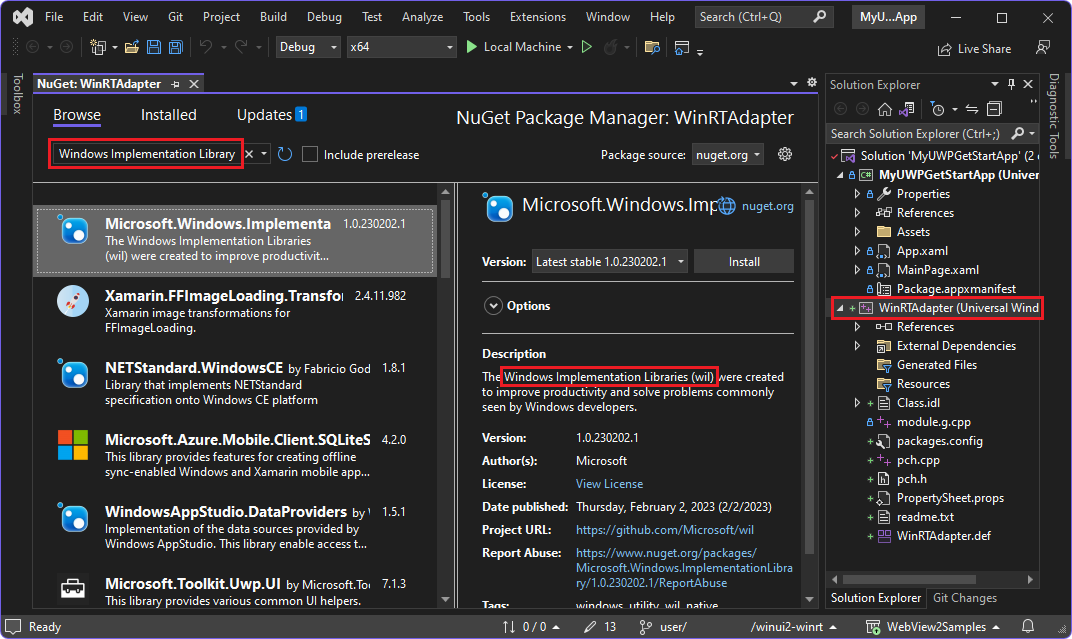
In Solution Explorer, right-click the WinRTAdapter project, and then select Manage NuGet Packages. The NuGet Package Manager window opens in Visual Studio.
In the NuGet Package Manager window, click the Browse tab.
In the NuGet Package Manager window, in the Search box, enter Windows Implementation Library, and then select the Windows Implementation Library card:
Click the Install button. The Preview Changes dialog opens:

Click the OK button.
Select File > Save All (Ctrl+Shift+S).
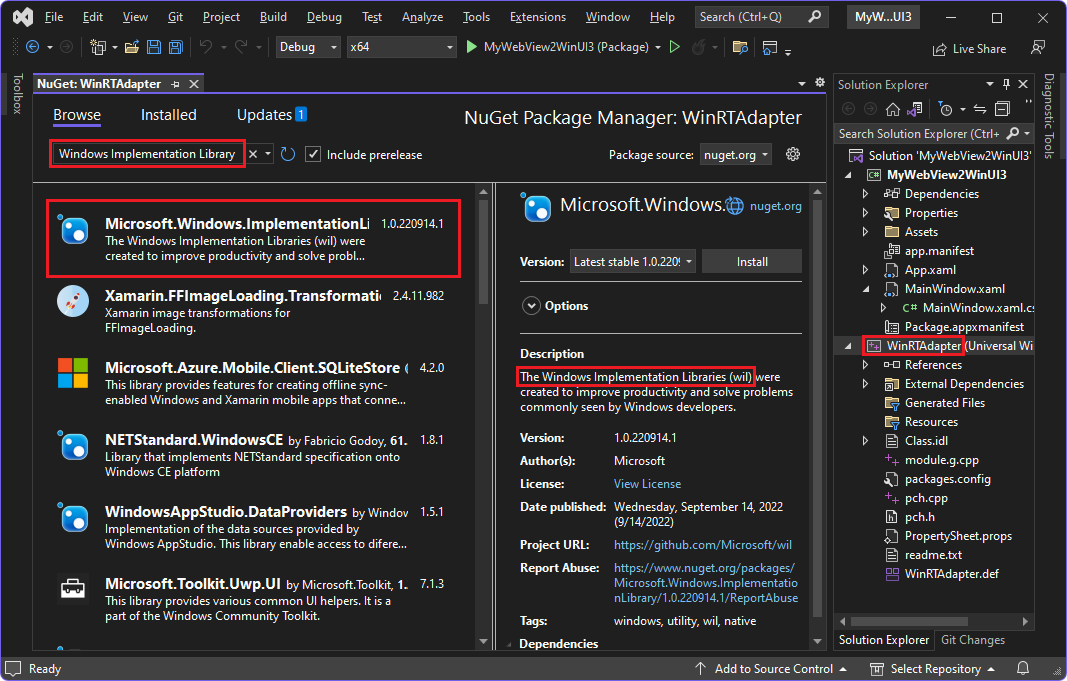
WIL is now installed for the WinRTAdapter project. Windows Implementation Library (WIL) is a header-only C++ library to make using COM coding for Windows easier. It provides readable, type-safe C++ interfaces for Windows COM coding patterns.
Step 4: Install WebView2 prerelease SDK, for WinRTAdapter project
In the WinRTAdapter project, also install a prerelease version of the WebView2 SDK, as follows:
In Solution Explorer, right-click the WinRTAdapter project, and then select Manage NuGet Packages. The NuGet Package Manager window opens.
In the NuGet Package Manager window, click the Browse tab.
Select the Include prerelease checkbox.
In the Search box, enter WebView2.
Click the Microsoft.Web.WebView2 card. Detailed info appears in the middle area of the window.
In the Version dropdown list, select a prerelease version of the WebView2 SDK, or make sure Latest prerelease is selected. The version must be 1.0.1243.0 or higher. Note which version number you select.
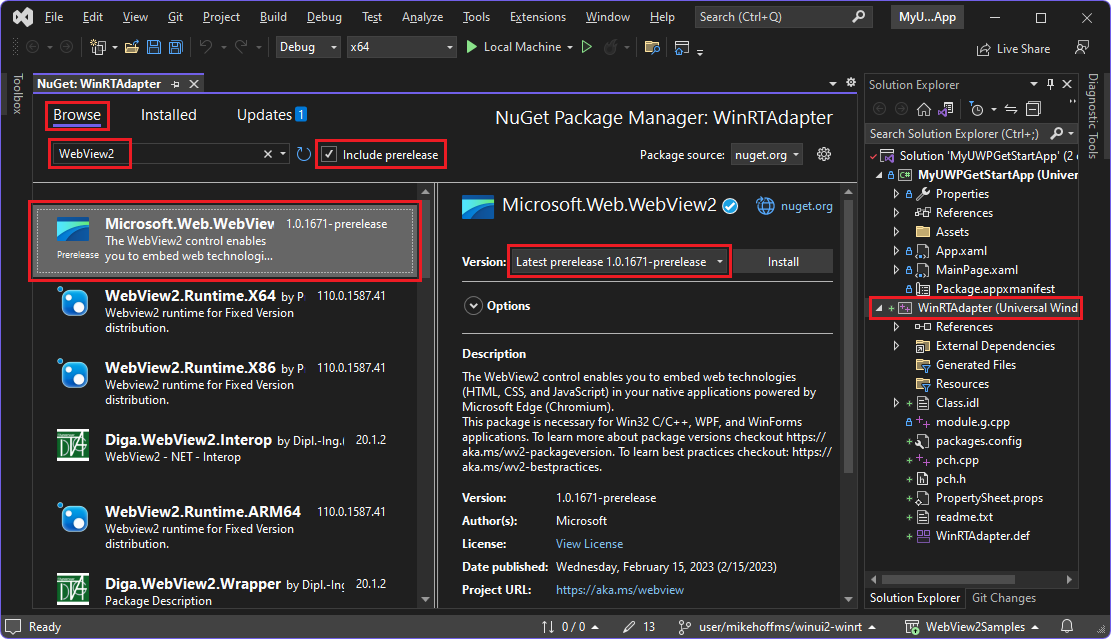
Click the Install button. The Preview Changes dialog opens:
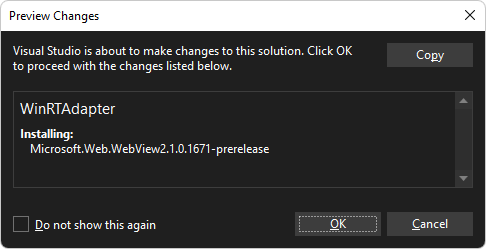
Click the OK button.
Select File > Save All (Ctrl+Shift+S).
The WebView2 prerelease SDK is now installed for the WinRTAdapter project.
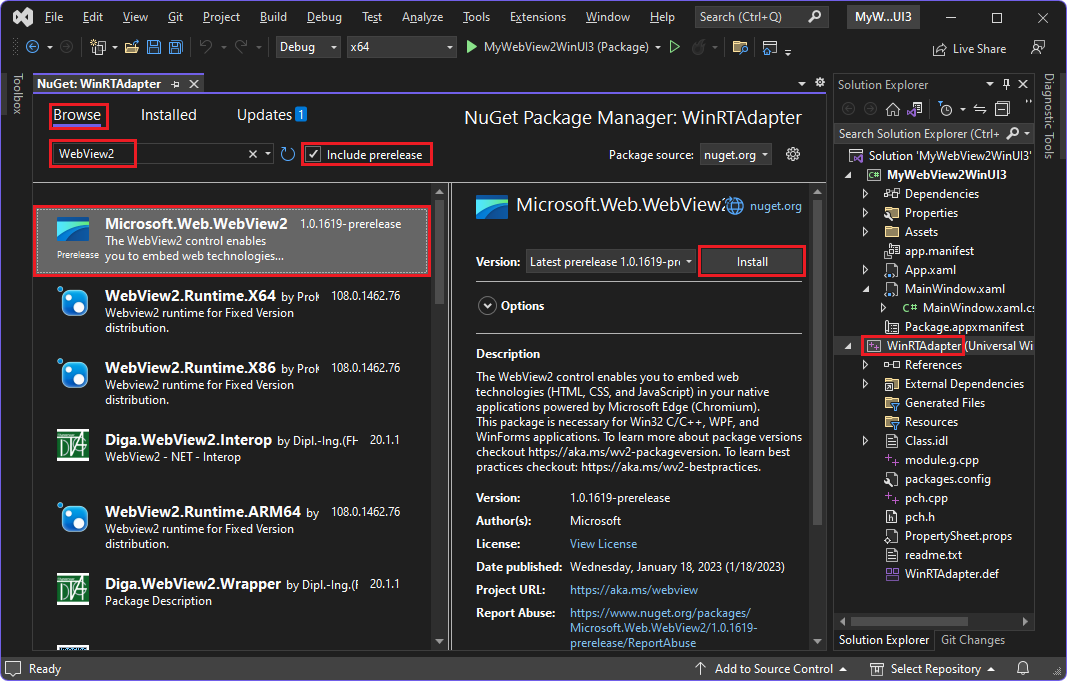
Step 5: Install WebView2 prerelease SDK (WinUI 2 only)
In the main project, such as MyUWPGetStartApp, install the same prerelease version of the WebView2 SDK as you installed for the WinRTAdapter project, as follows:
In Solution Explorer, right-click the main project, such as MyUWPGetStartApp, and then select Manage NuGet Packages. The NuGet Package Manager window opens.
Select the Include prerelease checkbox.
Select the Browse tab.
In the Search box, enter WebView2.
Click the Microsoft.Web.WebView2 card. Detailed information appears in the middle area of the window.
In the Version dropdown list, select a prerelease version of the WebView2 SDK, or make sure Latest prerelease is selected. Make sure to use the same version as used by the WinRTAdapter project; for WinRT WebView2 apps that target WinUI 2 (UWP), this needs to be the same version as for the WinRTAdapter project. The version must be 1.0.1243.0 or higher.
Click the Install button. The Preview Changes dialog opens, to add WebView2 to the main project.
Click the OK button.
Visual Studio should look similar to the above Step section, except that now, NuGet Package Manager is open for the main project instead of the WinRTAdapter project.
Select File > Save All (Ctrl+Shift+S).
The WebView2 prerelease SDK is now installed for the main project.
Step 6: Generate source code for selected host APIs
Next, configure the wv2winrt tool (the WebView2 WinRT JS Projection tool), to incorporate the WinRT classes that you want to use. This generates source files that will then be compiled. Generating code for these APIs enables your web-side JavaScript code to call these APIs.
In the example steps below, we'll specify two Windows namespaces, and the wv2winrt tool will generate source code for only APIs under those namespaces:
Later, when the sample app is running, you'll call these APIs from the DevTools Console, to demonstrate that these specified host-side APIs can be called from web-side code.
Specify the namespace and class as follows:
In Solution Explorer, right-click the WinRTAdapter project, and then select Properties. The WinRTAdapter Property Pages dialog opens.
On the left, expand and select Common Properties > WebView2.
Set Use WebView2 WinRT APIs to No. This is so the WebView2 SDK doesn't copy the WebView2 WinRT component to the project's output. This WinRTAdapter project isn't calling any WebView2 WinRT APIs, so it doesn't need the WinRT component.
Set Use the wv2winrt tool to Yes.
Set Use JavaScript case to Yes.
In the Include filters row, click the column on the right, click the dropdown menu in that cell, and then click Edit. The Include filters dialog opens.
In the topmost text box, paste the following strings on separate lines, without leading or trailing whitespace:
Windows.System.UserProfile
Windows.Globalization.Language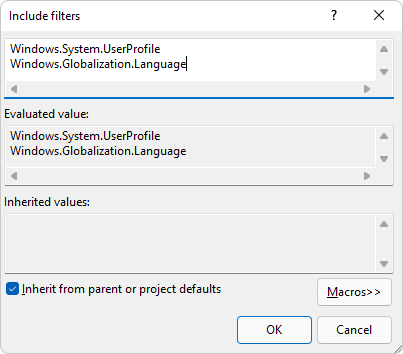
You need to specify the full name of the namespaces or classes, as shown above.
Click the OK button to close the Include filters dialog.
Make sure the WinRTAdapter Property Pages dialog looks like the following, for this walkthrough:

Click the OK button to close the Property Pages dialog.
Select File > Save All (Ctrl+Shift+S).
Adding a reference pointing to the adapter project
Next, add a reference in the main project, pointing to the adapter project.
In the main project, such as MyUWPGetStartApp, add a reference that points to the WinRTAdapter project, as follows:
In Solution Explorer, expand the main project, such as MyUWPGetStartApp, right-click References, and then select Add Reference. The Reference Manager dialog opens.
In the tree on the left, select Projects. Select the WinRTAdapter checkbox:
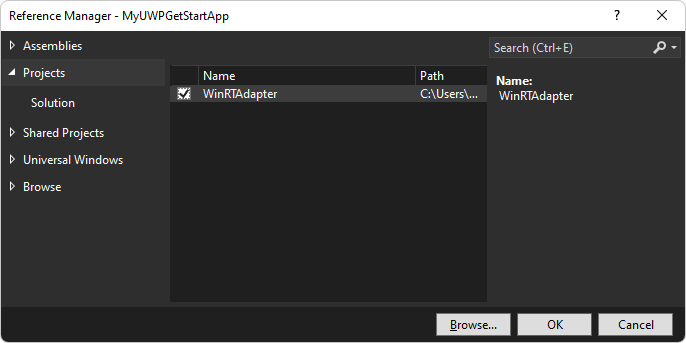
Click the OK button to close the Reference Manager dialog.
Select File > Save All (Ctrl+Shift+S).
Generate the API code
Next, generate the API code:
Right-click the WinRTAdapter project, and then select Build.
Source code is generated for namespaces or classes that you specified in the Include filters dialog of the wv2winrt tool (the WebView2 WinRT JS Projection tool):
Windows.System.UserProfilenamespaceWindows.Globalization.Languageclass
After building is complete, select File > Save All (Ctrl+Shift+S).
Important
If you installed a release version of the WebView2 SDK and your build fails with error MIDL2011: [msg]unresolved type declaration [context]: Microsoft.Web.WebView2.Core.ICoreWebView2DispatchAdapter [ RuntimeClass 'WinRTAdapter.DispatchAdapter' ], this is an issue in the release version of the WebView2 SDK and you will need to change Use WebView2 WinRT APIs to Yes in the steps above.
Alternatively, add the following after the last </ItemGroup> in the project file WinRTAdapter.vcxproj:
<ItemGroup Condition="'$(WebView2UseDispatchAdapter)' == 'true'">
 <Reference Include="$(WebView2SDKPath)lib\Microsoft.Web.WebView2.Core.winmd">
   <!-- wv2winrt needs Dispatch Adapter metadata to generate code -->
 </Reference>
</ItemGroup>
Replace $(WebView2SDKPath) with the directory where the WebView2 SDK was installed, with a \ at the end. For example: ..\<sample-directory>\packages\Microsoft.Web.WebView2.1.0.1264.42\.
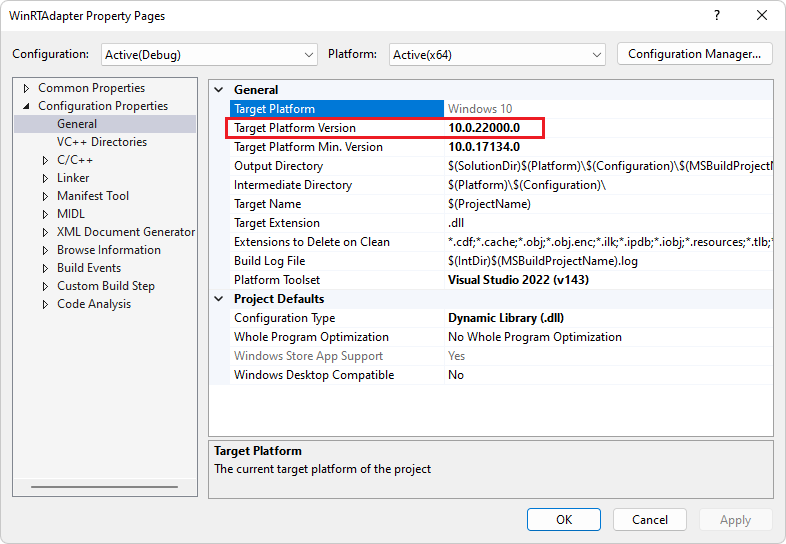
Step 7: Update Target Framework (WinUI 3 only)
If your app is for WinUI 2 (UWP), skip this step.


Step 8: Add the host object in the main project
Next, pass the WinRT object from the native side of the host app to the web side of the host app. To do this, add an InitializeWebView2Async method that calls AddHostObjectToScript, as follows:
In Solution Explorer, expand the main project, such as MyUWPGetStartApp, expand MainPage.xaml, and then select MainPage.xaml.cs.
Below the
MainPageconstructor, add the followingInitializeWebView2Asyncmethod:private async void InitializeWebView2Async() { await WebView2.EnsureCoreWebView2Async(); var dispatchAdapter = new WinRTAdapter.DispatchAdapter(); WebView2.CoreWebView2.AddHostObjectToScript("Windows", dispatchAdapter.WrapNamedObject("Windows", dispatchAdapter)); }This method calls
AddHostObjectToScript.In the line
AddHostObjectToScript("Windows", ...,Windowsis the top-level namespace. If you have other top-level namespaces, you can add additional calls toAddHostObjectToScript, like the following example:WebView2.CoreWebView2.AddHostObjectToScript("RuntimeComponent1", dispatchAdapter.WrapNamedObject("RuntimeComponent1", dispatchAdapter));The
WrapNamedObjectcall creates a wrapper object for theRuntimeComponent1namespace. TheAddHostObjectToScriptcall adds that wrapped object to script using the nameRuntimeComponent1.For full guidance on how to use custom WinRT components, see Custom (3rd-party) WinRT components, below.
In the
MainPageconstructor, belowthis.InitializeComponent();, add the following code:InitializeWebView2Async();Right-click the main project, such as MyUWPGetStartApp, and then select Set as startup project. Bold indicates startup project.
Select File > Save All (Ctrl+Shift+S).
Press F5 to run the sample app. The WebView2-enabled WinUI 2 (UWP) app opens:
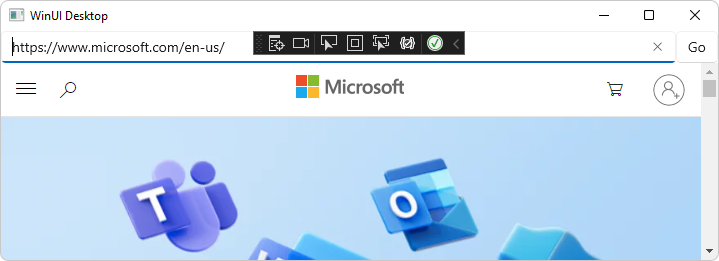
The host app's web-side code (and the DevTools Console) can now call methods and properties of the specified namespaces or classes of the host object.
Step 9: Call methods and properties on the host object from web-side JavaScript
Access projected APIs via DevTools Console
Next, use the DevTools Console to demonstrate that web-side code can call the host-side APIs that were specified in the wv2winrt tool (the WebView2 WinRT JS Projection tool):
If the app isn't running, in Visual Studio, press F5 to run the sample app.
Click in the main part of the WebView2 sample app window to give it focus, and then press Ctrl+Shift+I to open Microsoft Edge DevTools. Or, right-click the page, and then select Inspect.
The Microsoft Edge DevTools window opens.
If the Microsoft Edge DevTools window isn't displayed, press Alt+Tab to display it.
In the DevTools window, select the Console tab.
Click the Clear console (
 ) button, or right-click in the Console and then select Clear console. Messages might periodically appear in the Console.
In the DevTools Console, paste the following Windows.Globalization.Language Class code, and then press Enter:
const Windows = chrome.webview.hostObjects.sync.Windows;
(new Windows.Globalization.Language("en-US")).displayName;
The Console outputs a language name string, such as
English (United States), demonstrating that your app's host-side (native-side) code can be called from web-side JavaScript code:Try omitting the parentheses. In the DevTools Console, enter the following statement:
new Windows.Globalization.Language("en-US").displayName;The Console outputs a language name string, such as
English (United States).You can similarly access Windows.System.UserProfile Namespace members.
Close the DevTools window.
Close the app.
Congratulations! You've finished the sample demonstration of calling WinRT code from JavaScript code.
Access projected APIs via source code files
Above, we used the DevTools console to run JavaScript statements that access the projected host object. Similarly, you can access the projected host object from within source code files. To do this, first you run setup code for the script:
// early in setup code:
const Windows = chrome.webview.hostObjects.sync.Windows;
Then in the main body of your code, you add calls to projected objects, like the following:
(new Windows.Globalization.Language("en-US")).displayName;
You can similarly access Windows.System.UserProfile API members.
This is the end of the tutorial steps. The following sections are general information about WebView2 WinRT apps.
Custom (3rd-party) WinRT components
The wv2winrt tool (the WebView2 WinRT JS Projection tool) supports custom third-party WinRT components, in addition to first-party OS WinRT APIs.
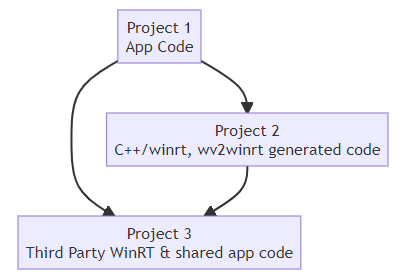
To use custom (3rd-party) WinRT components with the wv2winrt tool, in addition to the above steps, also do the following steps:
Add a third project (other than your main app and WinRTAdapter project) to your Visual Studio solution that implements your WinRT class.
Have the WinRTAdapter project 'Add a reference' to your new third project containing your WinRT class.
Update the WinRTAdapter project's Include filter in the properties to also include your new class.
Add an additional line to
InitializeWebView2Asyncto add your winrt class's namespace:WebView2.CoreWebView2.AddHostObjectToScript("MyCustomNamespace", dispatchAdapter.WrapNamedObject("MyCustomNamespace", dispatchAdapter));For easy method calling from the web, optionally add your namespace sync proxy as a global object in script. For example:
window.MyCustomNamespace = chrome.webview.hostObjects.sync.MyCustomNamespace;
For an example of this, see the following WebView2 sample:
- uwp-wv2winrt-custom-csharp-winrt - A sample, as a branch.
Asynchronous WinRT methods
Following the steps in the above guide, you should be able to use synchronous proxies. For async method calls, you will need to use chrome.webview.hostObjects.options.forceAsyncMethodMatches.
The forceAsyncMethodMatches property is an array of regexes, where if any regex matches a method name on a sync proxy, the method will be run asynchronously instead. Setting this to [/Async$/] will have it match any method ending with the suffix Async. Then matching method calls work just like a method on an async proxy and returns a promise that you can await.
Example:
const Windows = chrome.webview.hostObjects.sync.Windows;
chrome.webview.hostObjects.options.forceAsyncMethodMatches = [/Async$/];

let result = await Windows.System.Launcher.launchUriAsync(new Windows.Foundation.Uri('https://contoso.com/'));
For more information, see the forceAsyncMethodMatches row in CoreWebView2.AddHostObjectToScript Method.
Subscribing to WinRT events
WinRT events are also exposed via the script proxies. You can add and remove event handlers of instance WinRT events and static WinRT events by using the addEventListener(string eventName, function handler) and removeEventListener(string eventName, function handler) methods.
These methods work similarly to the DOM methods of the same name. Call addEventListener with a string name of the WinRT event you want to subscribe as the first parameter, and a function callback to be called whenever the event is raised. Calling removeEventListener with the same parameters unsubscribes from that event. For example:
const Windows = chrome.webview.hostObjects.sync.Windows;
const coreApplication = Windows.ApplicationModel.Core.CoreApplication;
const coreApplicationView = coreApplication.getCurrentView();
const titleBar = coreApplicationView.titleBar;
titleBar.addEventListener('IsVisibleChanged', () => {
    console.log('titlebar visibility changed to: ' + titleBar.isVisible);
});
For a WinRT event that provides event args, those are provided as the first parameter to the event handler function. For example, the Windows.Foundation.Collections.PropertySet.MapChanged event has IMapChangedEventArgs<string, object> event arg object and that object is provided as the parameter to the callback.
const Windows = chrome.webview.hostObjects.sync.Windows;
const propertySet = new Windows.Foundation.Collections.PropertySet();
propertySet.addEventListener('MapChanged', eventArgs => {
    const key = eventArgs.key;
    const collectionChange = eventArgs.collectionChange;
    // ...
});
The event args object will additionally have the following properties:
| Property Name | Description |
|---|---|
target |
The object that raised the event |
type |
The string name of the event |
detail |
An array of all parameters provided to the WinRT delegate |
Make AddHostObjectToScript JavaScript proxies act more like other JavaScript APIs
AddHostObjectToScript defaults to using asynchronous and verbose proxies, but you can make the AddHostObjectToScript JavaScript proxies act more like other JavaScript APIs. To read more about AddHostObjectToScript and its default behavior, see AddHostObjectToScript. Also, if you are migrating a host app from JavaScript WinRT projection in JavaScript UWP apps, or from the EdgeHTML-based WebView, you may want to use the following approach, to better match that previous behavior.
To make the AddHostObjectToScript JavaScript proxies act more like other JavaScript APIs, set the following properties:
chrome.webview.hostObjects.option.defaultSyncProxy- Proxies may either be asynchronous or synchronous. Normally we know, when calling a method on a synchronous proxy, that the result should also be a synchronous proxy. But in some cases, we lose that context, such as when providing a reference to a function to native code, and then native code later calling that function. In these cases, the proxy will be asynchronous, unless this property is set.chrome.webview.hostObjects.options.forceAsyncMethodMatches- This is an array of regular expressions. If you call a method on a synchronous proxy, the method call will actually be performed asynchronously if the method name matches a string or regular expression that's in this array. Setting this value to [/Async$/] will make any method that ends withAsyncbe an asynchronous method call. If an async method doesn't match here and isn't forced to be asynchronous, the method will be invoked synchronously, blocking execution of the calling JavaScript and then returning the resolution of the promise, rather than returning a promise.chrome.webview.hostObjects.options.ignoreMemberNotFoundError- If you attempt to get the value of a property of a proxy, and the property doesn't exist on the corresponding native class, you'll get an exception - unless you set this property totrue, in which case the behavior will match Chakra WinRT projection behavior (and general JavaScript behavior) and returnundefinedwith no error.
Chakra WinRT projection puts the WinRT namespaces directly on the root object. In contrast:
AddHostObjectToScriptplaces async root proxies onchrome.webview.hostObjects.AddHostObjectToScriptplaces sync root proxies onchrome.webview.hostObjects.sync.
To access root proxies where Chakra WinRT projection code would expect, you can assign the root proxy WinRT namespace locations over to the root object. For example:
window.Windows = chrome.webview.hostObjects.sync.Windows;
To ensure that the JavaScript that sets all this up is run before anything else, you can either add the above statement to your JavaScript, or you can tell WebView2 to inject the above statement for you before running any other script, by using the CoreWebView2.AddScriptToExecuteOnDocumentCreatedAsync method.
The following example demonstrates the above techniques:
webview.CoreWebView2.AddScriptToExecuteOnDocumentCreatedAsync(
            "(() => {" +
                    "if (chrome && chrome.webview) {" +
                        "console.log('Setting up WinRT projection options');" +
                        "chrome.webview.hostObjects.options.defaultSyncProxy = true;" +
                        "chrome.webview.hostObjects.options.forceAsyncMethodMatches = [/Async$/,/AsyncWithSpeller$/];" +
                        "chrome.webview.hostObjects.options.ignoreMemberNotFoundError = true;"  +
                        "window.Windows = chrome.webview.hostObjects.sync.Windows;" +
                    "}" +
                "})();");
Get information about WebView2 properties
Information about WebView2 properties is available in two places:
- The WinRTAdapter project's Property Pages.
wv2winrt.execommand-line help. This is the wv2winrt tool (the WebView2 WinRT JS Projection tool).
WinRTAdapter project's Property Pages
In the WinRTAdapter project's Property Pages, for help about a property, click a property row. Help is shown at the bottom of the dialog:
Command-line help for wv2winrt.exe properties
Command-line help for wv2winrt.exe gives information about the parameters of the wv2winrt tool (the WebView2 WinRT JS Projection tool). For example:
| Parameter | Description |
|---|---|
verbose |
List some content to standard out including which files have been created and information about the include and exclude rules. |
include |
List as above will exclude namespaces and runtimeclasses by default except those listed. The include declarations may be either namespaces which include everything in that namespace, or runtimeclass names to include just that runtimeclass. |
use-javascript-case |
Changes the generated code to produce methods names, property names, and so on, that use the same casing style as Chakra JavaScript WinRT projection. The default is to produce names that match the winrt. |
output-path |
Sets the path in which generated files will be written. |
output-namespace |
Sets the namespace to use for the generated WinRT class. |
winmd-paths |
A space-delimited list of all the winmd files that should be examined for code generation. |
See also
Tutorial and sample:
- Get started with WinUI 2 (UWP) apps - Tutorial: Steps to create an app with WebView2 using a project template.
- WinUI 2 (UWP) sample app - Sample: Steps to download, build, run, and update the sample.
API Reference:
- WinRT: CoreWebView2.AddHostObjectToScript Method
- Win32: ICoreWebView2::AddHostObjectToScript method
- .NET: CoreWebView2.AddHostObjectToScript Method
.NET equivalent article:
- Call native-side code from web-side code - covers Win32/C++, and also covers some aspects of .NET/C# within frames.