Note
Access to this page requires authorization. You can try signing in or changing directories.
Access to this page requires authorization. You can try changing directories.
This sample, WV2DeploymentWiXBurnBundleSample, demonstrates how to use a WiX Burn Bundle to deploy the WebView2 Runtime. Do the steps in this article to create a WiX installer that chain-installs the Evergreen WebView2 Runtime through Burn Bundle.
- Sample name: WV2DeploymentWiXBurnBundleSample
- Repo directory: WV2DeploymentWiXBurnBundleSample
- Project file:
WV2DeploymentWiXBurnBundleSample.wixproj
This sample creates a WiX installer for the Win32 sample app. This sample uses WiX Burn Bundle to chain-install the Evergreen WebView2 Runtime.
This sample demonstrates these two different distribution approaches to distribute the WebView2 Runtime for your app:
- Downloading the Evergreen WebView2 Runtime Bootstrapper through a link stored in your app.
- Packaging the Evergreen WebView2 Runtime Bootstrapper with your app.
The other approach, not demonstrated in this sample, is packaging the Evergreen WebView2 Runtime Standalone Installer with your app. That approach is very similar to packaging the Evergreen WebView2 Runtime Bootstrapper with your app.
For an overview of the approaches, see Deploying the Evergreen WebView2 Runtime in Distribute your app and the WebView2 Runtime.
Step 1 - Install Visual Studio
Microsoft Visual Studio is required. Microsoft Visual Studio Code is not supported for this sample.
If Visual Studio (minimum required version) is not already installed, with C++ support:
- In a separate window or tab, see Install Visual Studio in Set up your Dev environment for WebView2. Follow the steps in that section to install Visual Studio, including C++ support.
Then return to this page and continue the steps below.
Step 2 - Install WiX Toolset build tools
If not done yet, install WiX Toolset:
In a new window or tab, go to WiX Toolset and then download the WiX Toolset build tools.
Click the
wixnnn.exefile, and then click Open file.A dialog might open, Requires .NET Framework 3.5.1 to be enabled:
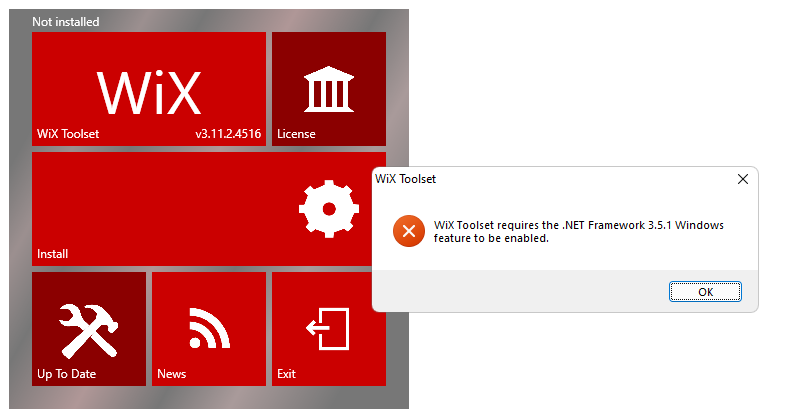
If .NET Framework 3.5.1 is already enabled on your machine, skip ahead to continue installing this WiX component.
Click the OK button. The WiX installer window closes.
Press the Windows logo key
 , type Windows features, and then press Enter. The Turn Windows features on or off dialog appears.
Select the .NET Framework 3.5 (includes .NET 2.0 and 3.0) check box:
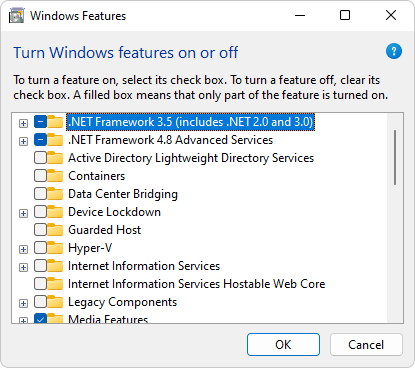
You don't need to select the child items.
Click OK. You might be prompted whether to let Windows Update download files.
For more information, see Install the .NET Framework 3.5 on Windows 11, Windows 10, Windows 8.1, and Windows 8.
After .NET Framework 3.5.1 is enabled, again run the
wixnnn.exefile. For example, in Microsoft Edge, click Settings and more, click Downloads, and then click Open file belowwix311.exe.Click the Install panel of the WiX installer.
In User Account Control, click the Yes button. The top of the WiX installer reads "Successfully installed".
Also install the WiX Visual Studio component, per the next section.
Step 3 - Install WiX Toolset Visual Studio Extension
If not done yet, install WiX Toolset Visual Studio 2019 Extension:
In a new window or tab, go to WiX Toolset and then download and install the extension:
- WiX Toolset Visual Studio 2019 Extension - downloaded installer file:
Votive2019.vsix
- WiX Toolset Visual Studio 2019 Extension - downloaded installer file:
In User Account Control, click the Yes button. VSIX Installer for WiX Visual Studio extension opens:
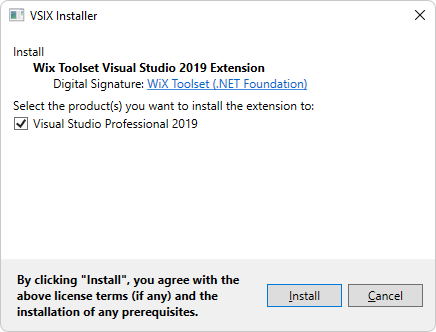
Click the Install button.
If a VSIX waiting for processes to shut down dialog opens, close Visual Studio. The VSIX Installer proceeds.
The VSIX Installer reads Install complete:

In VSIX Installer, click the Close button.
In the WiX installer, click the Exit panel.
Close Visual Studio, if it's open.
Step 4 - Clone or download the WebView2Samples repo
- If not done already, clone or download the
WebView2Samplesrepo to your local drive. In a separate window or tab, see Download the WebView2Samples repo in Set up your Dev environment for WebView2. Follow the steps in that section, and then return to this page and continue below.
Step 5 - Build the deployment project
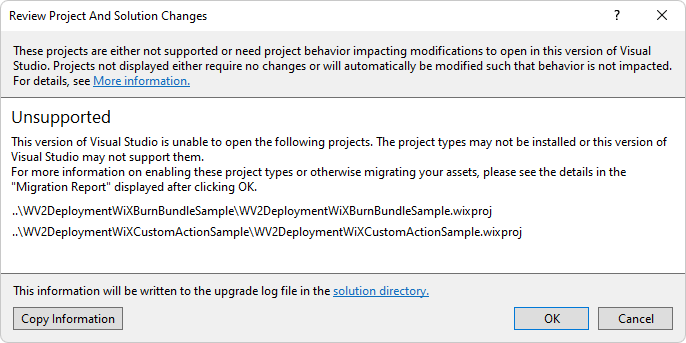
In your local copy of the WebView2Samples repo, open
<repo-location>\WebView2Samples\SampleApps\WebView2Samples.slnwith Visual Studio (not Visual Studio Code).If the Unsupported ... .wixproj dialog appears, install the WiX Toolset and the WiX Toolset Extension, above:
This sample is an extension to the WV2DeploymentWiXCustomActionSample sample. In Solution Explorer, expand WV2DeploymentWiXCustomActionSample and then double-click
Product.wxs.In
Product.wxs, comment out all the<Binary>,<CustomAction>, and<Custom>elements under<!-- Step 4: Config Custom Action to download/install Bootstrapper -->and<!-- Step 5: Config execute sequence of custom action -->so that Custom Action is not used.Open
Bundle.wxsunder theWV2DeploymentWiXBurnBundleSampleproject. EditBundle.wxsdepending on which workflow you want to use:To package the Evergreen WebView2 Runtime Bootstrapper with your app:
- Uncomment the
<ExePackage Id="InvokeBootstrapper" ...>element below<!-- [Package Bootstrapper] ... -->, and comment out other<ExePackage>elements.
To download the Evergreen WebView2 Runtime Bootstrapper through a link in your app:
- Uncomment the
<ExePackage Id="DownloadAndInvokeBootstrapper" ...>element below<!-- [Download Bootstrapper] ... -->, and comment out other<ExePackage>elements.
- Uncomment the
If you are packaging the Evergreen WebView2 Runtime Bootstrapper with your app, download the Bootstrapper and place it under the enclosing
SampleAppsfolder.Build the
WV2DeploymentWiXBurnBundleSampleproject.
See also
- Deploying the Evergreen WebView2 Runtime in Distribute your app and the WebView2 Runtime.