Step 4 – Install MIM components on PAM server and workstation
On PAMSRV, sign in as PRIV\Administrator to be able to install MIM Service.
Note
You must be a domain administrator; if you are not running the following commands as a user who does not have write access to the PRIV domain in AD, the install will not succeed. This is because the MIM installation creates a new AD OU “PAM objects”.
If you downloaded MIM, unpack the MIM installation archive to a new folder.
Run the Service and Portal install program
Follow the guidelines of the installer and complete the installation.
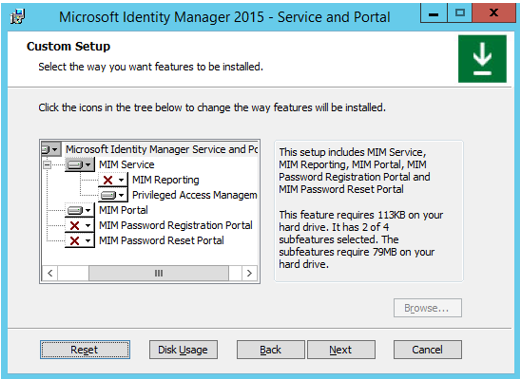
When selecting component features, include MIM Service (with Privileged Access Management, but not MIM Reporting). If you installed SharePoint in the previous step, then you can install the MIM Portal. If you didn't install SharePoint in the previous step, then don't install the MIM Portal.
When configuring common services and the MIM database connection, specify Create a new database.
Note
If you install MIM Service multiple times for high availability, specify Use an existing database for all subsequent installations.
When configuring a mail server connection, set the mail server to the hostname of an Exchange or SMTP server for the CORP environment (in a test environment, you might use corpdc.contoso.local if you don't have a mail server in the PRIV environment) and uncheck the Use SSL and Mail Server is Exchange Server 2007 or Exchange Server 2010 checkboxes.
Choose to generate a new self-signed certificate.
Set the following account credentials:
- Service Account Name: MIMService
- Service Account Password: Pass@word1 (or the password you created in Step 2)
- Service Account Domain: PRIV
- Service Email Account: MIMService@priv.contoso.local
Accept the defaults for the synchronization server hostname and specify the MIM Management Agent account as PRIV\MIMMA. A warning message will appear that the MIM synchronization service does not exist. This warning is OK, since the MIM synchronization service isn't used in this scenario.
Set PAMSRV as MIM Service server address.
Set
http://pamsrv.priv.contoso.local:82as the SharePoint site collection URL.Leave the registration portal URL blank.
Select the checkbox to open ports 5725 and 5726 in the firewall, and if MIM Portal is being installed, the checkbox to grant all authenticated users access to the MIM Portal site.
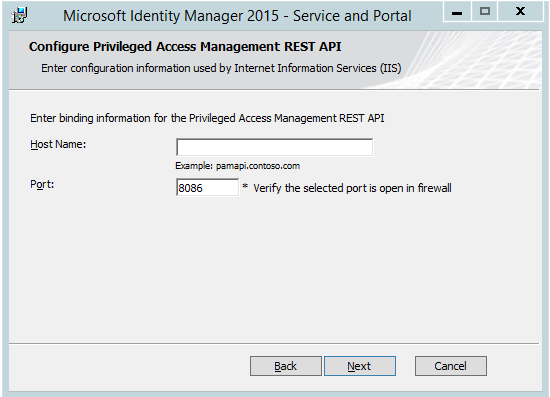
Leave the PAM REST API hostname empty, and set 8086 as the port number.
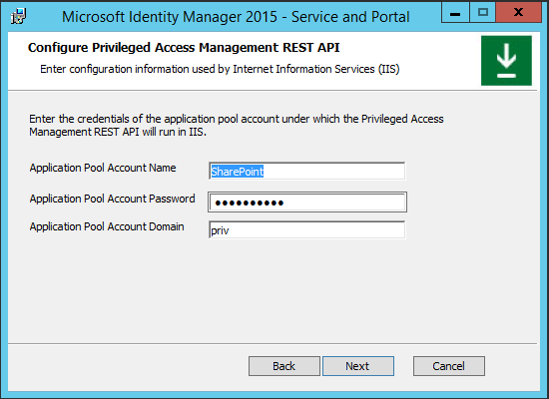
Configure the MIM PAM REST API account to use the same account as SharePoint (if the MIM Portal is to be installed co-located on this server):
- Application Pool Account Name: SharePoint
- Application Pool Account Password: Pass@word1 (or the password you created in Step 2)
- Application Pool Account Domain: PRIV
A warning may appear that the Service Account is not secure in its current configuration. That's OK.
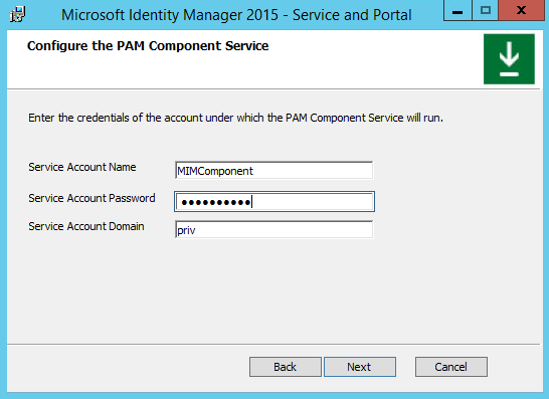
Configure the MIM PAM component service:
- Service Account Name: MIMComponent
- Service Account Password: Pass@word1 (or the password you created in Step 2)
- Service Account Domain: PRIV
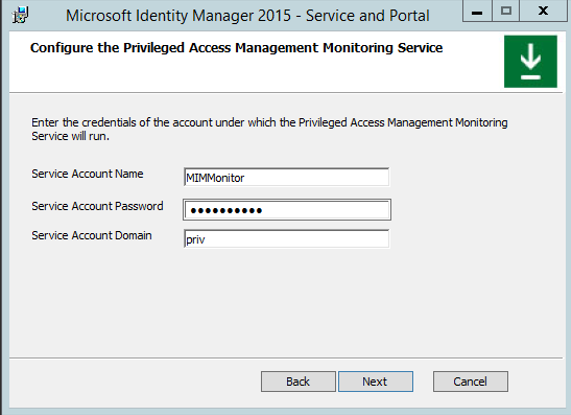
Configure the PAM Monitoring Service:
- Service Account Name: MIMMonitor
- Service Account Password: Pass@word1 (or the password you created in Step 2)
- Service Account Domain: PRIV
On the Enter Information for MIM Password Portals page, leave checkboxes empty and continue. Click Next to continue the installation.
After installation completes, the server will reboot.
Set up management policy rule from PowerShell
If you installed the MIM Portal, skip to the next section.
After PAMSRV reboots, sign in as PRIV\Administrator.
Launch PowerShell, and type
add-pssnapin fimautomationto load the MIM Service configuration PowerShell cmdlets.Download the script How to Use PowerShell to Enable an MPR and save it locally.
Use the script to enable the MPR named User management: Users can read attributes of their own. When complete, it will display the message MPR enabled successfully.
Skip to the section below, Verify the firewall connections.
Set up MIM Portal and management policy rules
If you chose to install SharePoint, then verify that the MIM Portal is active and enable users to view their own object resource in MIM.
After PAMSRV reboots, sign in as PRIV\Administrator.
Launch Internet Explorer and connect to the MIM Portal on
http://pamsrv.priv.contoso.local:82/identitymanagement. There may be a short delay the first time this page is located.If necessary, sign in as PRIV\Administrator for Internet Explorer.
In Internet Explorer, open the Internet Options, change to the Security tab, and add the site to the Local intranet zone if it isn't already there. Close the Internet Options dialog.
Using Internet Explorer to view MIM Portal, select Management Policy Rules.
Search for the management policy rule User management: Users can read attributes of their own.
Select this management policy rule, uncheck Policy is disabled, select OK, and then select Submit.
Verify the firewall connections
The firewall should allow incoming connections to TCP port 5725, 5726, 8086 and 8090.
Launch Windows Firewall with Advanced Security (located in Administrative Tools).
Click on Inbound Rules.
Verify that these two rules are listed:
- Forefront Identity Manager Service (STS)
- Forefront Identity Manager Service (Webservice)
Click New rule > Port > TCP, and type the specific local ports 8086 and 8090. Click through the wizard accepting the defaults, give the rule a name, and click Finish.
After completing the wizard, close the Windows Firewall application.
Launch Control Panel.
Under Network and Internet, select View network status and tasks.
Verify that there's an active network, which is listed as being priv.contoso.local, and a Domain network.
Close Control Panel.
Optional: Set up the sample web application
In this section, you'll install and configure the sample web application for the MIM PAM REST API. This component is only needed if you wish to learn how to use the MIM PAM REST API. If you intend to use PowerShell to request and approve access, continue with the next section to install the MIM PAM requestor cmdlets.
From the sample web application archive, download the Identity Management samples as a zip file.
Unpack the contents of the folder identity-management-samples-master\Privileged-Access-Management-Portal\src into a new folder C:\Program Files\Microsoft Forefront Identity Manager\2010\Privileged Access Management Portal.
Create new web site in IIS with:
- a site name of MIM Privileged Access Management Example Portal,
- physical path C:\Program Files\Microsoft Forefront Identity Manager\2010\Privileged Access Management Portal, and
- port 8090.
Use the following PowerShell command to create the site:
New-WebSite -Name "MIM Privileged Access Management Example Portal" -Port 8090 -PhysicalPath "C:\Program Files\Microsoft Forefront Identity Manager\2010\Privileged Access Management Portal\"Set up the sample web application to be able to redirect users to the MIM PAM REST API. Using a text editor such as Notepad, edit the file C:\Program Files\Microsoft Forefront Identity Manager\2010\Privileged Access Management REST API\web.config. In the
<system.webServer>section, add the following lines:<httpProtocol> <customHeaders> <add name="Access-Control-Allow-Credentials" value="true" /> <add name="Access-Control-Allow-Headers" value="content-type" /> <add name="Access-Control-Allow-Origin" value="http://pamsrv:8090" /> </customHeaders> </httpProtocol>Configure the sample web application. Using a text editor such as Notepad, edit the file C:\Program Files\Microsoft Forefront Identity Manager\2010\Privileged Access Management Portal\js\utils.js. Set the value of pamRespApiUrl to
http://pamsrv.priv.contoso.local:8086/api/pamresources/.Restart IIS with the following command for these changes to take effect.
iisreset(Optional) Verify that the user can authenticate to the REST API. Open a web browser as the administrator on PAMSRV. Navigate to the web site URL
http://pamsrv.priv.contoso.local:8086/api/pamresources/pamroles/, authenticate if needed, and ensure that a download occurs.
Install the MIM PAM requestor cmdlets
Install the MIM PAM requestor cmdlets on the workstation configured in Step 2.
Sign in to PRIVWKSTN as an administrator.
Download the Add-ins and extensions to the PRIVWKSTN computer, if not already present.
Unpack from the archive the folder Add-ins and extensions to a new folder.
Run the installer setup.exe.
On the custom setup, specify the PAM Client is to be installed, but not the MIM Add-in for Outlook or the MIM Password and Authentication Extensions.
On the PAM Server address, specify as the hostname of the PRIV MIM server
pamsrv.priv.contoso.local.
After the installation completes, restart PRIVWKSTN to complete the registration of the new PowerShell module.
In the next step, you'll establish trust between PRIV and CORP forests.