Note
Access to this page requires authorization. You can try signing in or changing directories.
Access to this page requires authorization. You can try changing directories.
The Salesforce CRM Microsoft 365 Copilot connector enables your organization to index contacts, opportunities, leads, cases, and accounts objects in your Salesforce instance. After you configure the connector and index content from Salesforce, end users can search for those items from any Microsoft Search and Microsoft 365 Copilot client.
Important
The Salesforce Copilot connector currently supports Summer 19 and later.
Capabilities
The connector has the following capabilities:
- Index contacts, opportunities, leads, cases, and accounts objects in your Salesforce instance
- Filter content based on what you want to index
- Access Salesforce CRM data by using the power of Semantic search
- Retain ACLs defined by your organization
- Customize your crawl frequency
- Create agents and workflows by using this connection and plugins from Microsoft Copilot Studio
Limitations
The connector has the following limitations:
- The connector doesn't honor visibility permissions applied through managed permission sets or permission set groups. This limitation can lead to fields not being indexed or included in search results.
- The Salesforce Copilot connector doesn't currently support Apex-based sharing, territory-based sharing, or sharing by using personal groups from Salesforce.
- There's a known bug in the Salesforce API that the connector uses, where the private org-wide defaults for leads aren't honored.
- If you set field-level security (FLS) for a profile, the connector doesn't ingest that field for any profiles in that Salesforce org. As a result, users can't search for values for those fields or see them in the results.
- In the Manage properties section, these common standard property names appear once. The options are Query, Search, Retrieve, and Refine, and they apply to all or none.
- Name
- Url
- Description
- Fax
- Phone
- MobilePhone
- Type
- Title
- AccountId
- AccountName
- AccountUrl
- AccountOwner
- AccountOwnerUrl
- Owner
- OwnerUrl
- CreatedBy
- CreatedByUrl
- LastModifiedBy
- LastModifiedByUrl
- LastModifiedDate
- ObjectName
Prerequisites
To connect to your Salesforce instance, you need your Salesforce instance URL, the client ID, and the client secret for OAuth authentication. The following steps explain how you or your Salesforce administrator can get this information from your Salesforce account:
Sign in to your Salesforce instance and go to Setup.
Go to Apps > App Manager.
Select New connected app.
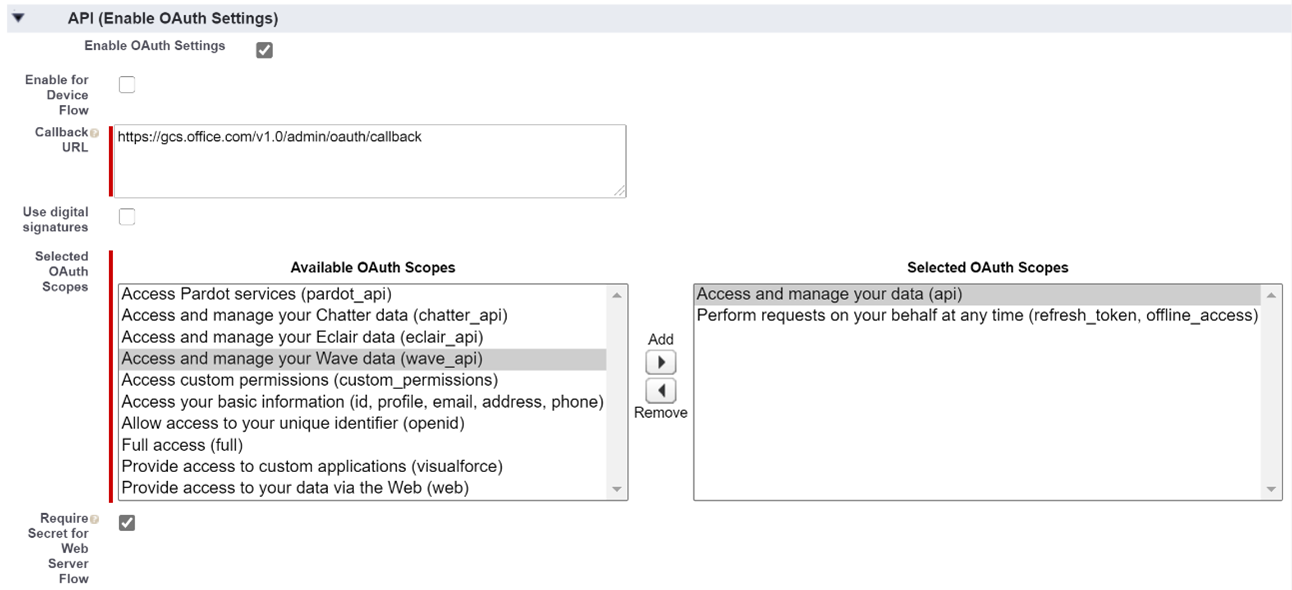
Complete the API section as follows:
Select the checkbox for Enable Oauth settings.
Specify the Callback URL as: For M365 Enterprise:
https://gcs.office.com/v1.0/admin/oauth/callback, for M365 Government:https://gcsgcc.office.com/v1.0/admin/oauth/callbackSelect these required OAuth scopes:
Access and manage your data (API).
Perform requests on your behalf at any time (refresh_token, offline_access).
Clear the Require PKCE Extension option.
Select the checkbox for Require secret for web server flow.
Save the app.
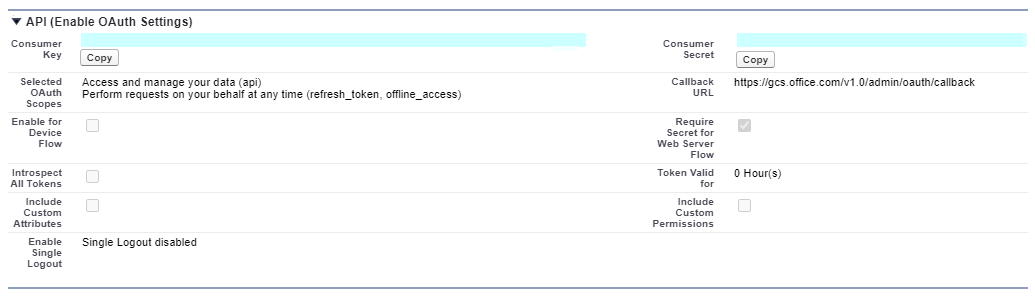
Use this consumer key and secret as the client ID and the client secret when you configure the connection settings for your Salesforce Copilot connector in the Microsoft 365 admin portal. Acquire this information as follows:
- Go to Setup and go to Apps > App Manager.
- Select the connected app you created in the previous step.
- Select Manage Consumer Details.
- Copy the consumer key and the consumer secret.
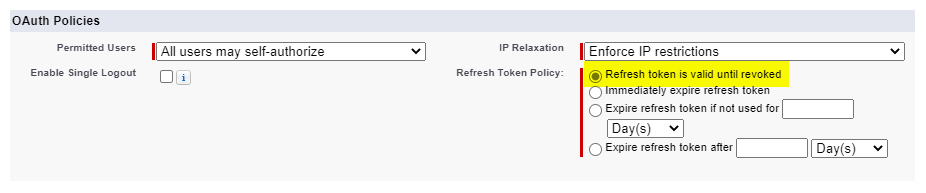
Before closing your Salesforce instance, follow these steps to ensure that refresh tokens don't expire:
- Go to Apps > App Manager.
- Find the app you created and select the drop-down on the right. Select Manage.
- Select edit policies.
- For the refresh token policy, select Refresh token is valid until revoked.
You can now use the Microsoft 365 Admin Center to complete the rest of the setup process for your Copilot connector.
Get started
1. Display name
The display name identifies each reference in Copilot, so users can easily recognize the associated file or item. The display name also signifies trusted content and is used as a content source filter. A default value is present for this field, but you can customize it to a name that users in your organization recognize.
2. Salesforce CRM URL
For the Instance URL, use https://[domain].my.salesforce.com where the domain is the Salesforce domain for your organization.
3. Authentication type
To authenticate and sync content from Salesforce CRM, select OAuth 2.0. Enter the client ID and client secret you got from your Salesforce instance, and select Authorize.
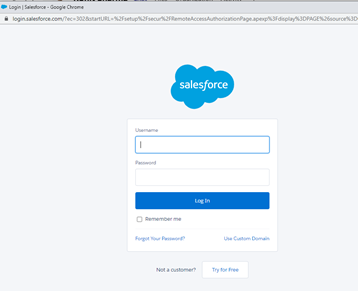
The first time you attempt to sign in with these settings, a pop-up prompts you to sign in to Salesforce by using your admin username and password. The following screenshot shows the pop-up. Enter your credentials and select Log In.
Note
- If the pop-up doesn't appear, your browser might block it. To fix this problem, allow pop-ups and redirects.
- Make sure that the Salesforce account you use to sign in for the connector is the same as the user already signed in to Salesforce.
- Make sure that the user signing in has all the necessary object permissions for the organization.
Verify that the connection was successful by looking for a green check mark that shows correct credentials.
4. Roll out to limited audience
Deploy this connection to a limited user base if you want to validate it in Copilot and other Search surfaces before expanding the rollout to a broader audience. To know more about limited rollout, see staged rollout.
At this point, you're ready to create the connection for Salesforce CRM. You can click Create to publish your connection and index content from your Salesforce instance.
For other settings, like Access Permissions, Data Inclusion Rules, Schema, Crawl frequency, we have defaults based on what works best with Salesforce data. You can see the default values below:
| Users | Description |
|---|---|
| Access permissions | Only people with access to content in Data source. |
| Map Identities | Data source identities mapped using Microsoft Entra IDs. |
| Content | Description |
|---|---|
| Salesforce objects | All objects are indexed. |
| Filter data | All objects are indexed. No time filter or SOQL criteria is applied. |
| Manage Properties | To check default properties and their schema, see content. |
| Sync | Description |
|---|---|
| Incremental Crawl | Frequency: Every 15 mins |
| Full Crawl | Frequency: Every Day |
If you want to change any of these values, select the Custom Setup option.
Custom setup
Custom setup is for admins who want to change the default values for the settings listed in the preceding table. When you select Custom Setup, you see three more tabs - Users, Content, and Sync.
Users

Access permissions
The Salesforce CRM connector supports search permissions visible to Everyone or Only people with access to this data source. If you choose Everyone, indexed data appears in the search results for all users. If you choose Only people with access to this data source, indexed data appears in the search results for users who have access to them. Choose the option that is most appropriate for your organization.
Map identities
You can choose to ingest access control lists (ACLs) from your Salesforce instance or allow everyone in your organization to see search results from this data source. ACLs can include Microsoft Entra identities (users who are federated from Entra ID to Salesforce), non-Entra ID identities (Salesforce users who have corresponding identities in Entra ID), or both.
Note
If you use a third-party Identity Provider like Ping ID or secureAuth, select non-Microsoft Entra as the identity type.
If you choose to ingest an ACL from your Salesforce instance and select non-ME ID for the identity type, see Map your non-Microsoft Entra Identities for instructions on mapping the identities.
If you choose to ingest an ACL from your Salesforce instance and select ME-ID for the identity type, see Map your Microsoft Entra Identities for instructions on mapping the identities. To learn how to set up Entra SSO for Salesforce, see this tutorial.
Note
Updates to groups governing access permissions sync in full crawls only. Incremental crawls don't support processing of updates to permissions.
Content
Choose Salesforce objects and filter data
Select the Salesforce objects that you want the connector to crawl and include in search results. If you select Contact, Account is automatically selected as well.
Note
If a field has field level security (FLS) set for a profile, the connector doesn't ingest that field for any profiles in that Salesforce org. As a result, users can't search for values for those fields or show up in the results.
Filter data
You can filter the Salesforce content that is indexed in two ways:
- Specify the item modified time period. This option only indexes the Salesforce content that is created or modified in the time period you select on a rolling basis based on current crawl.
- Enter the Salesforce query (SOQL) specifying what you want to index using the WHERE clause.
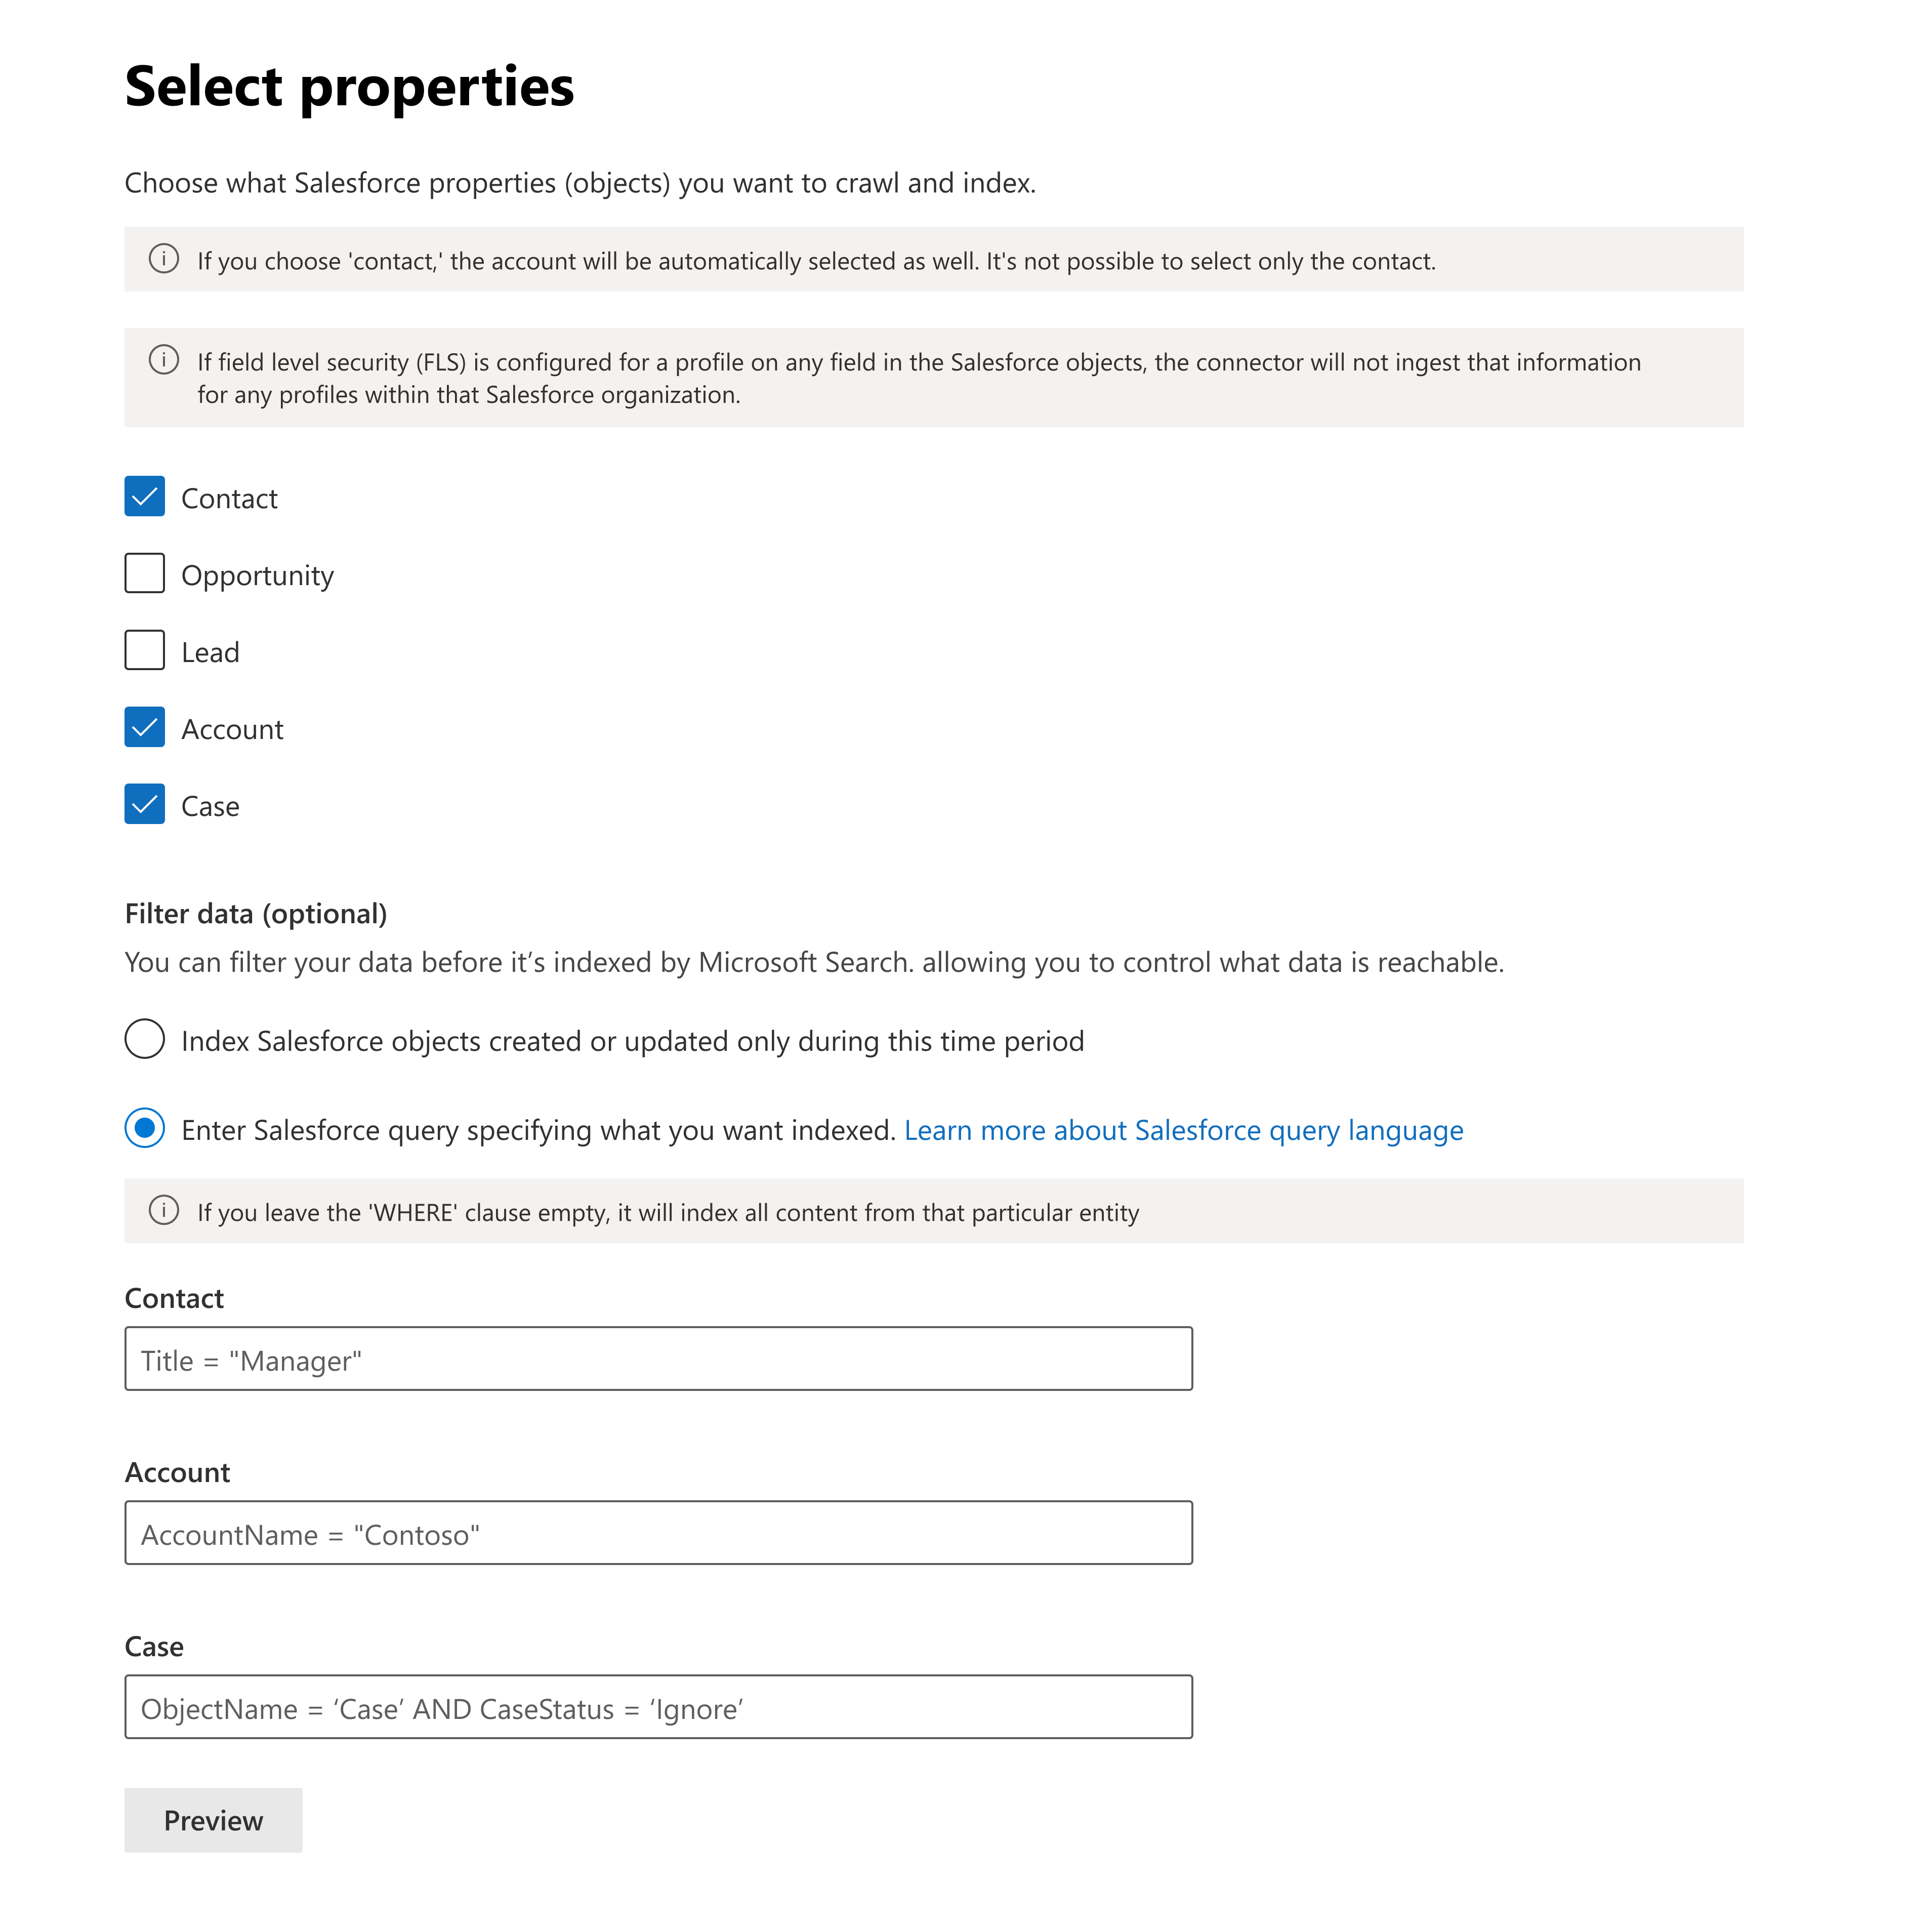
Tip
You can leave the WHERE clause empty if you want to index all the content of the particular entity
Manage properties
Add or remove available properties from your Salesforce CRM data source. Assign a schema to the property by defining whether a property is searchable, queryable, retrievable, or refinable. Change the semantic label and add an alias to the property. While this step isn't mandatory, having some property labels improves the relevance and ensures better results for end users. By default, the connector assigns source properties to some of the labels, such as Title, URL, CreatedBy, and LastModifiedBy. The following list shows the properties that are selected by default.
The list of properties that you select can impact how you filter, search, and view your results in Microsoft 365 Copilot.
| Source property | Label | Description |
|---|---|---|
| Authors | authors |
Name of people who participated or collaborated on the item in the data source. |
| CreatedBy | createdBy |
Name of the person who created the item in the data source. |
| CreatedDate | createdDateTime |
Date and time that the item was created in the data source. |
| Url | url |
The target URL of the item in the data source. |
| LastModifiedBy | lastModifiedBy |
Name of the person who most recently edited the item in the data source. |
| LastModifiedDateTime | lastModifiedDateTime |
Date and time the item was last modified in the data source. |
| Name | title |
The title of the item that you want to show in search and other experiences. |
Preview data
Use the preview results button to verify the sample values of the selected properties and query filter.
Sync
The refresh interval determines how often your data syncs between the data source and the connector index. Two types of refresh intervals are available - full crawl and incremental crawl. For more details, see refresh settings.
You can change the default values of the refresh interval.
Tip
Default result type
- The Salesforce connector automatically registers a result type when you publish the connector. The result type uses a dynamically generated result layout based on the fields you select in step 3.
- You can manage the result type by going to Result types in the Microsoft 365 admin center. The default result type is named "
ConnectionIdDefault". For example, if your connection ID isSalesforce, your result layout is named: "SalesforceDefault". - You can also choose to create your own result type if needed.
Troubleshooting
After publishing your connection, review the status in the Connectors section of the admin center. To learn how to make updates and deletions, see Manage your connector.
For troubleshooting steps, see Troubleshooting.