Live Share core capabilities
The Live Share SDK can be added to your meeting extension's sidePanel and meetingStage contexts with minimal effort. You can also use the SDK in chat and channel content contexts like configurable tabs, static tabs, and collaborative stageview.
Note
Live Share content contexts in chat and channels is only supported on Teams desktop and web clients.
This article focuses on how to integrate the Live Share SDK into your app and key capabilities of the SDK.
Prerequisites
Install the JavaScript SDK
The Live Share SDK is a JavaScript package published on npm, and you can download through npm or yarn. You must also install Live Share peer dependencies, which include fluid-framework and @fluidframework/azure-client. If you're using Live Share in your tab application, you must also install @microsoft/teams-js version 2.23.0 or later. If you want to use the TestLiveShareHost class for local browser development, you must install @fluidframework/test-client-utils and start-server-and-test packages in your devDependencies.
NPM
npm install @microsoft/live-share fluid-framework @fluidframework/azure-client --save
npm install @microsoft/teams-js --save
npm install @fluidframework/test-client-utils start-server-and-test --save-dev
Yarn
yarn add @microsoft/live-share fluid-framework @fluidframework/azure-client
yarn add @microsoft/teams-js
yarn add @fluidframework/test-client-utils -dev
Register RSC permissions
To enable the Live Share SDK for your tab extension, you must first add the following RSC permissions into your app manifest:
{
// ...rest of your manifest here
"configurableTabs": [
{
"configurationUrl": "<<YOUR_CONFIGURATION_URL>>",
"canUpdateConfiguration": true,
"scopes": [
"groupchat",
"team"
],
"context": [
// meeting contexts
"meetingSidePanel",
"meetingStage",
// content contexts
"privateChatTab",
"channelTab",
"meetingChatTab"
]
}
],
"validDomains": [
"<<BASE_URI_ORIGIN>>"
],
"authorization": {
"permissions": {
"resourceSpecific": [
// ...other permissions here
{
"name": "LiveShareSession.ReadWrite.Chat",
"type": "Delegated"
},
{
"name": "LiveShareSession.ReadWrite.Group",
"type": "Delegated"
},
{
"name": "MeetingStage.Write.Chat",
"type": "Delegated"
},
{
"name": "ChannelMeetingStage.Write.Group",
"type": "Delegated"
}
]
}
}
}
Join a session
Follow the steps to join a session that's associated with a user's meeting, chat, or channel:
- Initialize
LiveShareClient. - Define the data structures you want to synchronize. For example,
LiveStateorSharedMap. - Join the container.
Example:
import { LiveShareClient, LiveState } from "@microsoft/live-share";
import { LiveShareHost } from "@microsoft/teams-js";
import { SharedMap } from "fluid-framework";

// Join the Fluid container
const host = LiveShareHost.create();
const liveShare = new LiveShareClient(host);
const schema = {
  initialObjects: {
    liveState: LiveState,
    sharedMap: SharedMap,
  },
};
const { container } = await liveShare.joinContainer(schema);

// ... ready to start app sync logic
That's all it took to set up your container and join the session mapped to the meeting, chat, or channel. Now, let's review the different types of distributed data structures that you can use with the Live Share SDK.
Tip
Ensure that the Teams Client SDK is initialized before calling LiveShareHost.create().
Live Share data structures
The Live Share SDK includes a set of new distributed-data structures that extend Fluid's DataObject class, providing new types of stateful and stateless objects. Unlike Fluid data structures, Live Share's LiveDataObject classes don’t write changes to the Fluid container, enabling faster synchronization. Further, these classes were designed from the ground up for common scenarios in Teams meetings, chats, and channels. Common scenarios include synchronizing what content the presenter is viewing, displaying metadata for each user in the session, or displaying a countdown timer.
| Live Object | Description |
|---|---|
| LivePresence | See which users are online, set custom properties for each user, and broadcast changes to their presence. |
| LiveState | Synchronize any JSON serializable state value. |
| LiveTimer | Synchronize a countdown timer for a given interval. |
| LiveEvent | Broadcast individual events with any custom data attributes in the payload. |
| LiveFollowMode | Follow specific users, present to everyone in the session, and start or end suspensions. |
LivePresence example
The LivePresence class makes tracking who is in the session easier than ever. When calling the .initialize() or .updatePresence() methods, you can assign custom metadata for that user, such as profile picture, the identifier for content they're viewing, and more. By listening to presenceChanged events, each client receives the latest LivePresenceUser object, collapsing all presence updates into a single record for each unique userId.
The following are a few examples in which LivePresence can be used in your application:
- Getting the Microsoft Teams
userId,displayName, androlesof each user in the session. - Displaying custom information about each user connected to the session, such as a profile picture URL.
- Synchronizing the coordinates in a 3D scene where each user's avatar is located.
- Reporting each user's cursor position in a text document.
- Posting each user's answer to an ice-breaker question during a group activity.
import {
  LiveShareClient,
  LivePresence,
  PresenceState,
} from "@microsoft/live-share";
import { LiveShareHost } from "@microsoft/teams-js";

// Join the Fluid container
const host = LiveShareHost.create();
const liveShare = new LiveShareClient(host);
const schema = {
  initialObjects: {
    presence: LivePresence,
  },
};
const { container } = await liveShare.joinContainer(schema);
const presence = container.initialObjects.presence;

// Register listener for changes to each user's presence.
// This should be done before calling `.initialize()`.
presence.on("presenceChanged", (user, local) => {
  console.log("A user presence changed:");
  console.log("- display name:", user.displayName);
  console.log("- state:", user.state);
  console.log("- custom data:", user.data);
  console.log("- change from local client", local);
  console.log("- change impacts local user", user.isLocalUser);
});

// Define the initial custom data for the local user (optional).
const customUserData = {
  picture: "DEFAULT_PROFILE_PICTURE_URL",
  readyToStart: false,
};
// Start receiving incoming presence updates from the session.
// This will also broadcast the user's `customUserData` to others in the session.
await presence.initialize(customUserData);

// Send a presence update, in this case once a user is ready to start an activity.
// If using role verification, this will throw an error if the user doesn't have the required role.
await presence.update({
  ...customUserData,
  readyToStart: true,
});
Users joining a session from a single device have a single LivePresenceUser record that is shared to all their devices. To access the latest data and state for each of their active connections, you can use the getConnections() API from the LivePresenceUser class. This returns a list of LivePresenceConnection objects. You can see if a given LivePresenceConnection instance is from the local device using the isLocalConnection property.
Each LivePresenceUser and LivePresenceConnection instance has a state property, which can be either online, offline, or away. An presenceChanged event is emitted when a user's state changes. For example, if a user disconnects from the session or closes the application, their state changes to offline.
Note
It can take up to 20 seconds for an LivePresenceUser's state to update to offline after a user disconnects from the session.
LiveState example
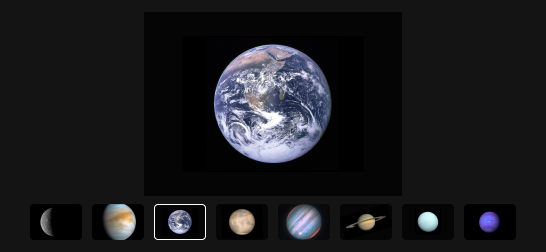
The LiveState class enables synchronizing simple application state for connected participants. LiveState synchronizes a single state value, allowing you to synchronize any JSON serializable value, such as a string, number, or object.
The following are a few examples in which LiveState can be used in your application:
- Setting the user identifier of the current presenter to build a take control feature.
- Synchronizing the current route path for your application to ensure everyone is on the same page. For example,
/whiteboard/:whiteboardId. - Maintaining the content identifier that the current presenter is viewing. For example, an
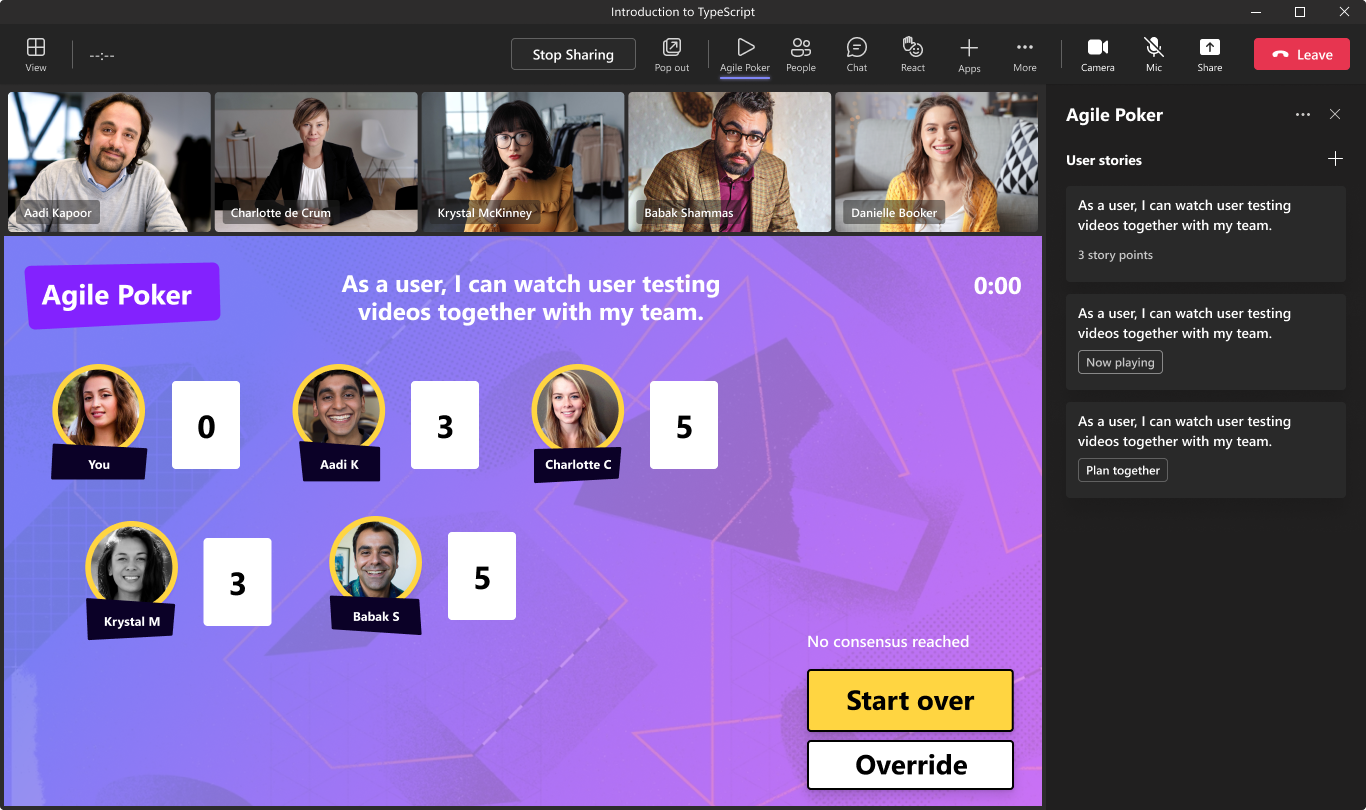
taskIdon a task board. - Synchronizing the current step in a multi-round group activity. For example, the guessing phase during the Agile Poker game.
- Keeping a scroll position in sync for a follow me feature.
Note
Unlike SharedMap, the state value in LiveState is reset after all the users disconnect from a session.
Example:
import { LiveShareClient, LiveState } from "@microsoft/live-share";
import { LiveShareHost } from "@microsoft/teams-js";

// Join the Fluid container
const host = LiveShareHost.create();
const liveShare = new LiveShareClient(host);
const schema = {
  initialObjects: { appState: LiveState },
};
const { container } = await liveShare.joinContainer(schema);
const { appState } = container.initialObjects;

// Register listener for changes to the state.
// This should be done before calling `.initialize()`.
appState.on("stateChanged", (planetName, local, clientId) => {
  // Update app with newly selected planet.
  // See which user made the change (optional)
  const clientInfo = await appState.getClientInfo(clientId);
});

// Set a default value and start listening for changes.
// This default value will not override existing for others in the session.
const defaultState = "Mercury";
await appState.initialize(defaultState);

// `.set()` will change the state for everyone in the session.
// If using role verification, this will throw an error if the user doesn't have the required role.
await appState.set("Earth");
LiveEvent example
LiveEvent is a great way to send simple events to other connected clients that are only needed at the time of delivery. It's useful for scenarios like sending session notifications or implementing custom reactions.
import { LiveEvent, LiveShareClient } from "@microsoft/live-share";
import { LiveShareHost } from "@microsoft/teams-js";

// Join the Fluid container
const host = LiveShareHost.create();
const liveShare = new LiveShareClient(host);
const schema = {
  initialObjects: { customReactionEvent: LiveEvent },
};
const { container } = await liveShare.joinContainer(schema);
const { customReactionEvent } = container.initialObjects;

// Register listener to receive events sent through this object.
// This should be done before calling `.initialize()`.
customReactionEvent.on("received", async (kudosReaction, local, clientId) => {
  console.log("Received reaction:", kudosReaction, "from clientId", clientId);
  // See which user made the change (optional)
  const clientInfo = await customReactionEvent.getClientInfo(clientId);
  // Display notification in your UI
});

// Start listening for incoming events
await customReactionEvent.initialize();

// `.send()` will send your event value to everyone in the session.
// If using role verification, this will throw an error if the user doesn't have the required role.
const kudosReaction = {
  emoji: "❤️",
  forUserId: "SOME_OTHER_USER_ID",
};
await customReactionEvent.send(kudosReaction);
LiveTimer example
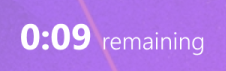
LiveTimer provides a simple countdown timer that is synchronized for all connected participants. It’s useful for scenarios that have a time limit, such as a group meditation timer or a round timer for a game. You can also use it to schedule tasks for everyone in the session, such as displaying a reminder prompt.
import { LiveShareClient, LiveTimer } from "@microsoft/live-share";
import { LiveShareHost } from "@microsoft/teams-js";

// Join the Fluid container
const host = LiveShareHost.create();
const liveShare = new LiveShareClient(host);
const schema = {
  initialObjects: { timer: LiveTimer },
};
const { container } = await liveShare.joinContainer(schema);
const { timer } = container.initialObjects;

// Register listeners for timer changes
// This should be done before calling `.initialize()`.

// Register listener for when the timer starts its countdown
timer.on("started", (config, local) => {
  // Update UI to show timer has started
});

// Register listener for when a paused timer has resumed
timer.on("played", (config, local) => {
  // Update UI to show timer has resumed
});

// Register listener for when a playing timer has paused
timer.on("paused", (config, local) => {
  // Update UI to show timer has paused
});

// Register listener for when a playing timer has finished
timer.on("finished", (config) => {
  // Update UI to show timer is finished
});

// Register listener for the timer progressed by 20 milliseconds
timer.on("onTick", (milliRemaining) => {
  // Update UI to show remaining time
});

// Start synchronizing timer events for users in session
await timer.initialize();

// Start a 60 second timer for users in the session.
// If using role verification, this will throw an error if the user doesn't have the required role.
const durationInMilliseconds = 1000 * 60;
await timer.start(durationInMilliseconds);

// Pause the timer for users in session
// If using role verification, this will throw an error if the user doesn't have the required role.
await timer.pause();

// Resume the timer for users in session
// If using role verification, this will throw an error if the user doesn't have the required role.
await timer.play();
LiveFollowMode example
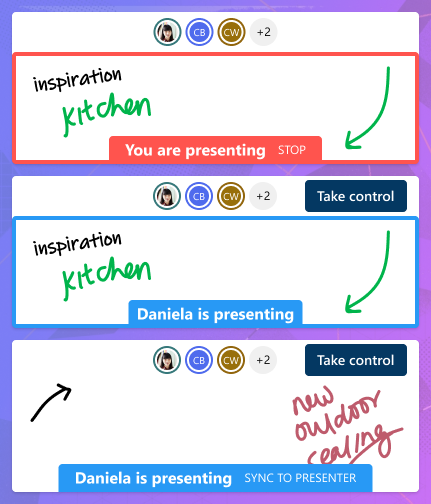
The LiveFollowMode class combines LivePresence and LiveState into a single class, enabling you to easily implement follower and presenter modes into your application. This allows you to implement familiar patterns from popular collaborative apps such as PowerPoint Live, Excel Live, and Whiteboard. Unlike screen sharing, LiveFollowMode allows you to render content with high quality, improved accessibility, and enhanced performance. Users can easily switch between their private views and follow other users.
You can use the startPresenting() function to take control of the application for all other users in the session. Alternatively, you can allow users to individually select specific users they want to follow using the followUser() function. In both scenarios, users can temporarily enter a private view with the beginSuspension() function or synchronize back to the presenter with the endSuspension() function. Meanwhile, the update() function allows the local user to inform other clients in the session of their own personal stateValue. Similar to LivePresence, you can listen to changes to each user's stateValue through a presenceChanged event listener.
LiveFollowMode also exposes a state object, which dynamically updates depending on the user the local user is following. For example, if the local user isn't following anyone, the state.value property matches the local user's most recent stateValue broadcasted through update(). However, if the local user is following a presenter, the state.value property matches the presenting user's most recent stateValue. Similar to LiveState, you can listen to changes to the state value using a stateChanged event listener. For more information on the state object, see IFollowModeState interface reference.
The following are a few examples in which you can use LiveFollowMode in your application:
- Synchronize camera positions in a 3D scene to cobrowse during a design review.
- Update the
slideIdto open in a carousel for productive presentations and discussions. - Broadcast the
pathto open in your application's router.
Example:
import {
  LiveShareClient,
  LiveFollowMode,
  FollowModeType,
} from "@microsoft/live-share";
import { LiveShareHost } from "@microsoft/teams-js";

// Join the Fluid container
const host = LiveShareHost.create();
const liveShare = new LiveShareClient(host);
const schema = {
  initialObjects: {
    followMode: LiveFollowMode,
  },
};
const { container } = await liveShare.joinContainer(schema);
const followMode = container.initialObjects.followMode;

// As an example, we will assume there is a button in the application document
const button = document.getElementById("action-button");
// As an example, we will assume there is a div with text showing the follow state
const infoText = document.getElementById("info-text");

// Register listener for changes to the `state` value to use in your app.
// This should be done before calling `.initialize()`.
followMode.on("stateChanged", (state, local, clientId) => {
  console.log("The state changed:");
  console.log("- state value:", state.value);
  console.log("- follow mode type:", state.type);
  console.log("- following user id:", state.followingUserId);
  console.log(
    "- count of other users also following user",
    state.otherUsersCount
  );
  console.log(
    "- state.value references local user's stateValue",
    state.isLocalValue
  );
  // Can optionally get the relevant user's presence object
  const followingUser = followMode.getUserForClient(clientId);
  switch (state.type) {
    case FollowModeType.local: {
      // Update app to reflect that the user isn't following anyone and there is no presenter.
      infoText.innerHTML = "";
      // Show a "Start presenting" button in your app.
      button.innerHTML = "Start presenting";
      button.onclick = followMode.startPresenting;
      // Note: state.isLocalValue will be true.
      break;
    }
    case FollowModeType.activeFollowers: {
      // Update app to reflect that the local user is being followed by other users.
      infoText.innerHTML = `${state.otherUsersCount} users are following you`;
      // Does not mean that the local user is presenting to everyone, so you can still show the "Start presenting" button.
      button.innerHTML = "Present to all";
      button.onclick = followMode.startPresenting;
      // Note: state.isLocalValue will be true.
      break;
    }
    case FollowModeType.activePresenter: {
      // Update app to reflect that the local user is actively presenting to everyone.
      infoText.innerHTML = `You are actively presenting to everyone`;
      // Show a "Stop presenting" button in your app.
      button.innerHTML = "Stop presenting";
      button.onclick = followMode.stopPresenting;
      // Note: state.isLocalValue will be true.
      break;
    }
    case FollowModeType.followPresenter: {
      // The local user is following a remote presenter.
      infoText.innerHTML = `${followingUser?.displayName} is presenting to everyone`;
      // Show a "Take control" button in your app.
      button.innerHTML = "Take control";
      button.onclick = followMode.startPresenting;
      // Note: state.isLocalValue will be false.
      break;
    }
    case FollowModeType.suspendFollowPresenter: {
      // The local user is following a remote presenter but has an active suspension.
      infoText.innerHTML = `${followingUser?.displayName} is presenting to everyone`;
      // Show a "Sync to presenter" button in your app.
      button.innerHTML = "Sync to presenter";
      button.onclick = followMode.endSuspension;
      // Note: state.isLocalValue will be true.
      break;
    }
    case FollowModeType.followUser: {
      // The local user is following a specific remote user.
      infoText.innerHTML = `You are following ${followingUser?.displayName}`;
      // Show a "Stop following" button in your app.
      button.innerHTML = "Stop following";
      button.onclick = followMode.stopFollowing;
      // Note: state.isLocalValue will be false.
      break;
    }
    case FollowModeType.suspendFollowUser: {
      // The local user is following a specific remote user but has an active suspension.
      infoText.innerHTML = `You were following ${followingUser?.displayName}`;
      // Show a "Resume following" button in your app.
      button.innerHTML = "Resume following";
      button.onclick = followMode.endSuspension;
      // Note: state.isLocalValue will be true.
      break;
    }
    default: {
      break;
    }
  }
  const newCameraPosition = state.value;
  // TODO: apply new camera position
});

// Register listener for changes to each user's personal state updates.
// This should be done before calling `.initialize()`.
followMode.on("presenceChanged", (user, local) => {
  console.log("A user presence changed:");
  console.log("- display name:", user.displayName);
  console.log("- state value:", user.data?.stateValue);
  console.log("- user id user is following:", user.data?.followingUserId);
  console.log("- change from local client", local);
  console.log("- change impacts local user", user.isLocalUser);
  // As an example, we will assume there is a button for each user in the session.
  document.getElementById(`follow-user-${user.userId}-button`).onclick = () => {
    followMode.followUser(user.userId);
  };
  // Update 3D scene to reflect this user's camera position (e.g., orb + display name)
  const userCameraPosition = user.data?.stateValue;
});

// Define the initial stateValue for the local user (optional).
const startingCameraPosition = {
  x: 0,
  y: 0,
  z: 0,
};
// Start receiving incoming presence updates from the session.
// This will also broadcast the user's `startingCameraPosition` to others in the session.
await followMode.initialize(startingCameraPosition);

// Example of an event listener for a camera position changed event.
// For something like a camera change event, you should use a debounce function to prevent sending updates too frequently.
// Note: it helps to distinguish changes initiated by the local user (e.g., drag mouse) separately from other change events.
function onCameraPositionChanged(position, isUserAction) {
  // Broadcast change to other users so that they have their latest camera position
  followMode.update(position);
  // If the local user changed the position while following another user, we want to suspend.
  // Note: helps to distinguish changes initiated by the local user (e.g., drag mouse) separately from other change events.
  if (!isUserAction) return;
  switch (state.type) {
    case FollowModeType.followPresenter:
    case FollowModeType.followUser: {
      // This will trigger a "stateChanged" event update for the local user only.
      followMode.beginSuspension();
      break;
    }
    default: {
      // No need to suspend for other types
      break;
    }
  }
}
In meetingStage contexts, your users are collaborating and presenting synchronously to facilitate more productive discussions. When a user presents content to the meeting stage, you should call the startPresenting() API for the initial presenter. In content contexts like collaborative stageview, content is most commonly consumed asynchronously. In this case, it's best to let users opt into real-time collaboration, such as through a "Follow" button. Using the teamsJs.app.getContext() API in the Teams JavaScript SDK, you can easily adjust your functionality accordingly.
Example:
import {
  LiveShareClient,
  LiveFollowMode,
  FollowModeType,
} from "@microsoft/live-share";
import {
  app,
  meeting,
  FrameContexts,
  LiveShareHost,
} from "@microsoft/teams-js";

// Join the Fluid container
const host = LiveShareHost.create();
const liveShare = new LiveShareClient(host);
const schema = {
  initialObjects: {
    followMode: LiveFollowMode,
  },
};
const { container } = await liveShare.joinContainer(schema);
const followMode = container.initialObjects.followMode;

// Get teamsJs context
const context = await app.getContext();
// Take control if in meetingStage context and local user is initial presenter
if (context.page?.frameContext === FrameContexts.meetingStage) {
  // Take control if in meetingStage context and local user is initial presenter
  meeting.getAppContentStageSharingState((error, state) => {
    const isShareInitiator = state?.isShareInitiator;
    if (!isShareInitiator) return;
    // The user is the initial presenter, so we "take control"
    await followMode.startPresenting();
  });
}
// TODO: rest of app logic
Role verification for live data structures
Meetings in Teams include calls, all-hands meetings, and online classrooms. Meeting participants might span across organizations, have different privileges, or have different goals. Hence, it’s important to respect the privileges of different user roles during meetings. Live objects are designed to support role verification, allowing you to define the roles that are allowed to send messages for each individual live object. For example, you've selected the option that permits only meeting presenters and organizers to control video playback. However, guests and attendees can still request the next videos to watch.
Note
When accessing Live Share from a content chat or channel context, all users will have the Organizer and Presenter roles.
In the following example where only presenters and organizers can take control, LiveState is used to synchronize which user is the active presenter:
import {
  LiveShareClient,
  LiveState,
  UserMeetingRole,
} from "@microsoft/live-share";
import { LiveShareHost } from "@microsoft/teams-js";

// Join the Fluid container
const host = LiveShareHost.create();
const liveShare = new LiveShareClient(host);
const schema = {
  initialObjects: { appState: LiveState },
};
const { container } = await liveShare.joinContainer(schema);
const { appState } = container.initialObjects;

// Register listener for changes to state
appState.on("stateChanged", (state, local) => {
  // Update local app state
});

// Set roles who can change state and start listening for changes
const initialState = {
  documentId: "INITIAL_DOCUMENT_ID",
};
const allowedRoles = [UserMeetingRole.organizer, UserMeetingRole.presenter];
await appState.initialize(initialState, allowedRoles);

async function onSelectEditMode(documentId) {
  try {
    await appState.set({
      documentId,
    });
  } catch (error) {
    console.error(error);
  }
}

async function onSelectPresentMode(documentId) {
  try {
    await appState.set({
      documentId,
      presentingUserId: "LOCAL_USER_ID",
    });
  } catch (error) {
    console.error(error);
  }
}
Listen to your customers to understand their scenarios before implementing role verification into your app, particularly for the Organizer role. There's no guarantee that a meeting organizer will be present in the meeting. As a general rule of thumb, all users are either Organizer or Presenter when collaborating within an organization. If a user is an Attendee, it's usually an intentional decision on behalf of a meeting organizer.
In some cases, a user might have multiple roles. For example, an Organizer is also an Presenter. In addition, meeting participants that are external to the tenant hosting the meeting have the Guest role, but might also have Presenter privileges. This provides more flexibility in how you use role verification in your application.
Note
The Live Share SDK isn't supported for Guest users in channel meetings.
Fluid distributed data structures
The Live Share SDK supports any distributed data structure included in Fluid Framework. These features serve as a set of primitives you can use to build robust collaborative scenarios, such as real-time updates of a task list or co-authoring text within an HTML <textarea>.
Unlike the LiveDataObject classes mentioned in this article, Fluid data structures don't reset after your application is closed. This is ideal for scenarios such as the meeting sidePanel and content contexts, where users frequently close and reopen your app.
Fluid Framework officially supports the following types of distributed data structures:
| Shared Object | Description |
|---|---|
| SharedMap | A distributed key-value store. Set any JSON-serializable object for a given key to synchronize that object for everyone in the session. |
| SharedSegmentSequence | A list-like data structure for storing a set of items (called segments) at set positions. |
| SharedString | A distributed-string sequence optimized for editing the text of documents or text areas. |
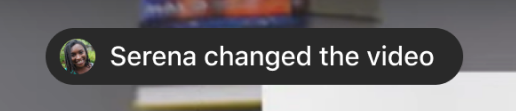
Let's see how SharedMap works. In this example, we've used SharedMap to build a playlist feature.
import { LiveShareClient } from "@microsoft/live-share";
import { LiveShareHost } from "@microsoft/teams-js";
import { SharedMap } from "fluid-framework";

// Join the Fluid container
const host = LiveShareHost.create();
const liveShare = new LiveShareClient(host);
const schema = {
  initialObjects: { playlistMap: SharedMap },
};
const { container } = await liveShare.joinContainer(schema);
const playlistMap = container.initialObjects.playlistMap;

// Register listener for changes to values in the map
playlistMap.on("valueChanged", (changed, local) => {
  const video = playlistMap.get(changed.key);
  // Update UI with added video
});

function onClickAddToPlaylist(video) {
  // Add video to map
  playlistMap.set(video.id, video);
}
Note
Core Fluid Framework DDS objects don't support meeting role verification. Everyone in the meeting can change the data stored through these objects.
Local browser testing
You can locally test the Live Share SDK in your browser using the TestLiveShareHost class without installing your app in Teams. This is useful for testing the core collaborative capabilities of your application within a familiar localhost environment.
Example:
import {
  LiveShareClient,
  TestLiveShareHost,
  LiveState,
} from "@microsoft/live-share";
import { LiveShareHost } from "@microsoft/teams-js";
import { SharedMap } from "fluid-framework";

/**
 * Detect whether you are in Teams or local environment using your preferred method.
 * Options for this include: environment variables, URL params, Teams FX, etc.
 */
const inTeams = process.env.IN_TEAMS;
// Join the Fluid container
const host = inTeams ? LiveShareHost.create() : TestLiveShareHost.create();
const liveShare = new LiveShareClient(host);
const schema = {
  initialObjects: {
    liveState: LiveState,
    sharedMap: SharedMap,
  },
};
const { container } = await liveShare.joinContainer(schema);

// ... ready to start app sync logic
The TestLiveShareHost class utilizes tinylicious test server from Fluid Framework, rather than our production Azure Fluid Relay service. To do this, you must add a few scripts to your package.json to start the test server. You must also add the @fluidframework/test-client-utils and start-server-and-test packages to the devDependencies in your package.json.
{
  "scripts": {
    "start": "start-server-and-test start:server 7070 start:client",
    "start:client": "{YOUR START CLIENT COMMAND HERE}",
    "start:server": "npx tinylicious@latest"
  },
  "devDependencies": {
    "@fluidframework/test-client-utils": "^1.3.6",
    "start-server-and-test": "^2.0.0"
  }
}
When you start your application this way, the LiveShareClient adds #{containerId} to your URL, if it doesn't exist. You can then copy and paste the URL into a new browser window to connect to the same Fluid container.
Note
By default, all clients connected through TestLiveShareHost will have presenter and organizer roles.
Code samples
| Sample name | Description | JavaScript | TypeScript |
|---|---|---|---|
| Dice Roller | Enable all connected clients to roll a die and view the result. | View | View |
| Agile Poker | Enable all connected clients to play Agile Poker. | View | NA |
| 3D Model | Enable all connected clients to view a 3D model together. | NA | View |
| Timer | Enable all connected clients to view a countdown timer. | NA | View |
| Presence avatars | Display presence avatars for all connected clients. | NA | View |
Next step
See also
Platform Docs