Dice Roller code tutorial
In the Dice Roller sample app, users are shown a dice with a button to roll it. When the dice is rolled, the Live Share SDK uses the Fluid Framework to sync the data across clients, so everyone sees the same result. To sync data, perform the following steps in the app.js file:
- Set up the application
- Join a Fluid container
- Write the meeting Stageview
- Connect meeting Stageview to Live Share
- Write the side panel view
- Write the settings view
Set up the application
You can start by importing the required modules. The sample uses the LiveState DDS and LiveShareClient from the Live Share SDK. The sample supports Teams Meeting Extensibility so you must include the Microsoft Teams JavaScript client library (TeamsJS). Finally, the sample is designed to run both locally and in a Teams meeting so you need to include more Fluid Framework pieces to test the sample locally.
Applications create Fluid containers using a schema that defines a set of initial objects that are available to the container. The sample uses a LiveState to store the current dice value that was rolled.
Teams meeting apps require multiple views, such as content, configuration, and stage. You can create a start() function to help identify the view. This helps to render and perform any initialization that's required. The app supports running both locally in a web browser and from within a Teams meeting. The start() function looks for an inTeams=true query parameter to determine if it's running in Teams.
Note
When running in Teams, your application needs to call app.initialize() prior to calling any other teams-js methods.
In addition to the inTeams=true query parameter, you can use a view=content|config|stage query parameter to determine the view that needs to be rendered.
import { app, pages, LiveShareHost } from "@microsoft/teams-js";
import { LiveShareClient, TestLiveShareHost, LiveState } from "@microsoft/live-share";

const searchParams = new URL(window.location).searchParams;
const root = document.getElementById("content");

// Define container schema

const containerSchema = {
  initialObjects: { diceState: LiveState },
};

// STARTUP LOGIC

async function start() {
  // Check for page to display
  let view = searchParams.get("view") || "stage";

  // Check if we are running on stage.
  if (!!searchParams.get("inTeams")) {
    // Initialize teams app
    await app.initialize();
  }

  // Load the requested view
  switch (view) {
    case "content":
      renderSidePanel(root);
      break;
    case "config":
      renderSettings(root);
      break;
    case "stage":
    default:
      const { container } = await joinContainer();
      renderStage(container.initialObjects.diceState, root);
      break;
  }
}

start().catch((error) => console.error(error));
Join a Fluid container
Not all of your app's views need to be collaborative. The stage view always needs collaborative features, the content view may need collaborative features, and the config view should never need collaborative features. For the views that do need collaborative features you'll need to join a Fluid container associated with the current meeting.
Joining the container for the meeting is as simple as initializing the LiveShareClient with a LiveShareHost instance from the Teams Client SDK, and then calling its joinContainer() method.
When running locally, you can initialize LiveShareClient with a TestLiveShareHost instance instead.
async function joinContainer() {
  // Are we running in teams? If so, use LiveShareHost, otherwise use TestLiveShareHost
  const host = !!searchParams.get("inTeams")
    ? LiveShareHost.create()
    : TestLiveShareHost.create();
  // Create client
  const client = new LiveShareClient(host);
  // Join container
  return await client.joinContainer(containerSchema, onContainerFirstCreated);
}
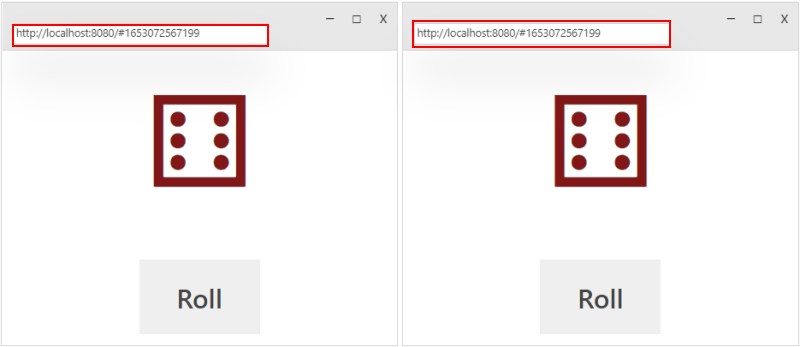
When testing locally, TestLiveShareHost updates the browser URL to contain the ID of the test container that was created. Copying that link to other browser tabs causes the LiveShareClient to join the test container that was created. If the modification of the applications URL interferes with the operation of the application, the strategy used to store the test containers ID can be customized using the setLocalTestContainerId and getLocalTestContainerId options passed to LiveShareClient.
Write the Stageview
Many Teams Meeting Extensibility applications are designed to use React for their view framework, but this isn't required. For example, this sample uses standard HTML/DOM methods to render a view.
Start with a static view
It's easy to create the view using local data without any Fluid functionality, then add Fluid by changing some key pieces of the app.
The renderStage function appends the stageTemplate to the passed HTML element and creates a working dice roller with a random dice value each time the Roll button is selected. The diceState is used in the next few steps.
const stageTemplate = document.createElement("template");

stageTemplate["innerHTML"] = `
  <div class="wrapper">
    <div class="dice"></div>
    <button class="roll"> Roll </button>
  </div>
`;
function renderStage(diceState, elem) {
  elem.appendChild(stageTemplate.content.cloneNode(true));
  const rollButton = elem.querySelector(".roll");
  const dice = elem.querySelector(".dice");

  const updateDice = () => {
    // Get a random value between 1 and 6
    const diceValue = Math.floor(Math.random() * 6) + 1;
    // Unicode 0x2680-0x2685 are the sides of a die (⚀⚁⚂⚃⚄⚅).
    dice.textContent = String.fromCodePoint(0x267f + value);
  };
  rollButton.onclick = () => updateDice();
  updateDice(1);
}
Connect meeting Stageview to Live Share
Modify LiveState
To begin using Live Share in the application, the first thing to change is what happens when the user selects the rollButton. Instead of updating the local state directly, the button updates the number stored as a state value in diceState. Whenever you call .set() with a new state, that value is distributed to all clients. Any changes to the diceState can cause a stateChanged event to be emitted, and an event handler can trigger an update of the view.
This pattern is common in Fluid and Live Share distributed data structures because it enables the view to behave the same way for both local and remote changes.
rollButton.onclick = () =>
  diceState.set(Math.floor(Math.random() * 6) + 1);
Rely on Fluid data
The next change that needs to be made is to change the updateDice function to retrieve the latest dice value from the LiveState each time updateDice is called.
const updateDice = () => {
  const diceValue = diceState.state;
  dice.textContent = String.fromCodePoint(0x267f + diceValue);
};
Handle remote changes
The values returned from diceState are only a snapshot in time. To keep the data up-to-date as it changes, an event handler must be registered with diceState to call updateDice each time that the stateChanged event is sent.
diceState.on("stateChanged", updateDice);
Initialize LiveState
Before you can begin receiving the Live Share changes in the application, you must first call initialize() on your LiveState object with an initial value. This initial value doesn't overwrite any existing state that was sent by other users.
After you've initialized LiveState, the stateChanged event you registered earlier starts to trigger whenever a change is made. However, to update the UI within the initial value, call updateDice().
await diceState.initialize(1);
updateDice();
Write the side panel view
The side panel view, loaded through the tab contentUrl with the sidePanel frame context, is displayed to the user in a side panel when they open your app within a meeting. The goal of side panel view is to let a user select content for the app prior to sharing the app to the meeting stage. For the Live Share SDK apps, the side panel view can also be used as a companion experience for the app. Calling joinContainer() from the side panel view connects to the same Fluid container the Stageview is connected to. This container can then be used to communicate with the Stageview. Ensure that you're communicating with everyone's Stageview and side panel view.
The sample's side panel view prompts the user to select the share to stage button.
const sidePanelTemplate = document.createElement("template");

sidePanelTemplate["innerHTML"] = `
  <style>
    .wrapper { text-align: center }
    .title { font-size: large; font-weight: bolder; }
    .text { font-size: medium; }
  </style>
  <div class="wrapper">
    <p class="title">Lets get started</p>
    <p class="text">Press the share to stage button to share Dice Roller to the meeting stage.</p>
  </div>
`;

function renderSidePanel(elem) {
  elem.appendChild(sidePanelTemplate.content.cloneNode(true));
}
Write the settings view
The settings view, loaded through configurationUrl in your app manifest, is shown to a user when they first add your app to a Teams meeting. This view lets the developer configure the contentUrl for the tab that is pinned to the meeting based on user input. This page is currently required even if no user input is required to set the contentUrl.
Note
The Live Share's' joinContainer() is not supported in the tab settings context.
The sample's settings view prompts the user to select the save button.
const settingsTemplate = document.createElement("template");

settingsTemplate["innerHTML"] = `
  <style>
    .wrapper { text-align: center }
    .title { font-size: large; font-weight: bolder; }
    .text { font-size: medium; }
  </style>
  <div class="wrapper">
    <p class="title">Welcome to Dice Roller!</p>
    <p class="text">Press the save button to continue.</p>
  </div>
`;

function renderSettings(elem) {
  elem.appendChild(settingsTemplate.content.cloneNode(true));

  // Save the configurable tab
  pages.config.registerOnSaveHandler((saveEvent) => {
    pages.config.setConfig({
      websiteUrl: window.location.origin,
      contentUrl: window.location.origin + "?inTeams=1&view=content",
      entityId: "DiceRollerFluidLiveShare",
      suggestedDisplayName: "DiceRollerFluidLiveShare",
    });
    saveEvent.notifySuccess();
  });

  // Enable the Save button in config dialog
  pages.config.setValidityState(true);
}
Test locally
You can test your app locally, using npm run start. For more information, see quick start guide.
Test in Teams
After you've started running your app locally with npm run start, you can then test your app on Teams. If you want to test your app without deployment, download and use the ngrok tunneling service.
Create a ngrok tunnel to allow Teams to reach your app
Download ngrok.
Use ngrok to create a tunnel with port 8080. Run the following command:
ngrok http 8080 --host-header=localhostA new ngrok terminal opens with a new url, for example
https:...ngrok.io. The new URL is the tunnel that points to your app, which needs to be updated in your appmanifest.json.
Create the app package to upload into Teams
Go to the Dice Roller sample folder
live-share-sdk\samples\javascript\01.dice-rolleron your computer. You can also check the manifest.json from the Dice Roller sample on GitHub.Open manifest.json and update the configuration URL.
Replace
https://<<BASE_URI_DOMAIN>>with your http endpoint from ngrok.You can update the following fields:
- Set
developer.nameto your name. - Update
developer.websiteUrlwith your website. - Update
developer.privacyUrlwith your privacy policy. - Update
developer.termsOfUseUrlwith your terms of use.
- Set
Zip the contents of the manifest folder to create
manifest.zip. Ensure that themanifest.zipcontains only themanifest.jsonsource file,coloricon, and theoutlineicon.- On Windows, select all files in
.\manifestdirectory and compress them.
Note
- Don't zip the containing folder.
- Give your zip file a descriptive name. For example,
DiceRollerLiveShare.
For more information on manifest, visit the Teams manifest documentation
- On Windows, select all files in
Upload your custom app into a meeting
Open Teams.
Schedule a meeting from the calendar in Teams. Ensure you invite at least one attendee to the meeting.
Join the meeting.
In the meeting window at the top, select + Apps > Manage apps.
In the Manage apps pane, select Upload a custom app.
- If you don't see the option to Upload a custom app, follow instructions to enable custom apps in your tenant.
Select and upload the
manifest.zipfile from your computer.Select Add to add your sample app into the meeting.
Select + Apps, type Dice Roller in the Find an app search box.
Select the app to activate it in the meeting.
Select Save.
The Dice Roller app is added to the Teams meeting panel.
In the side panel, select the share to stage icon. Teams starts a live sync with the users on the meeting stage in the meeting.

You should now see dice-roller on the meeting stage.
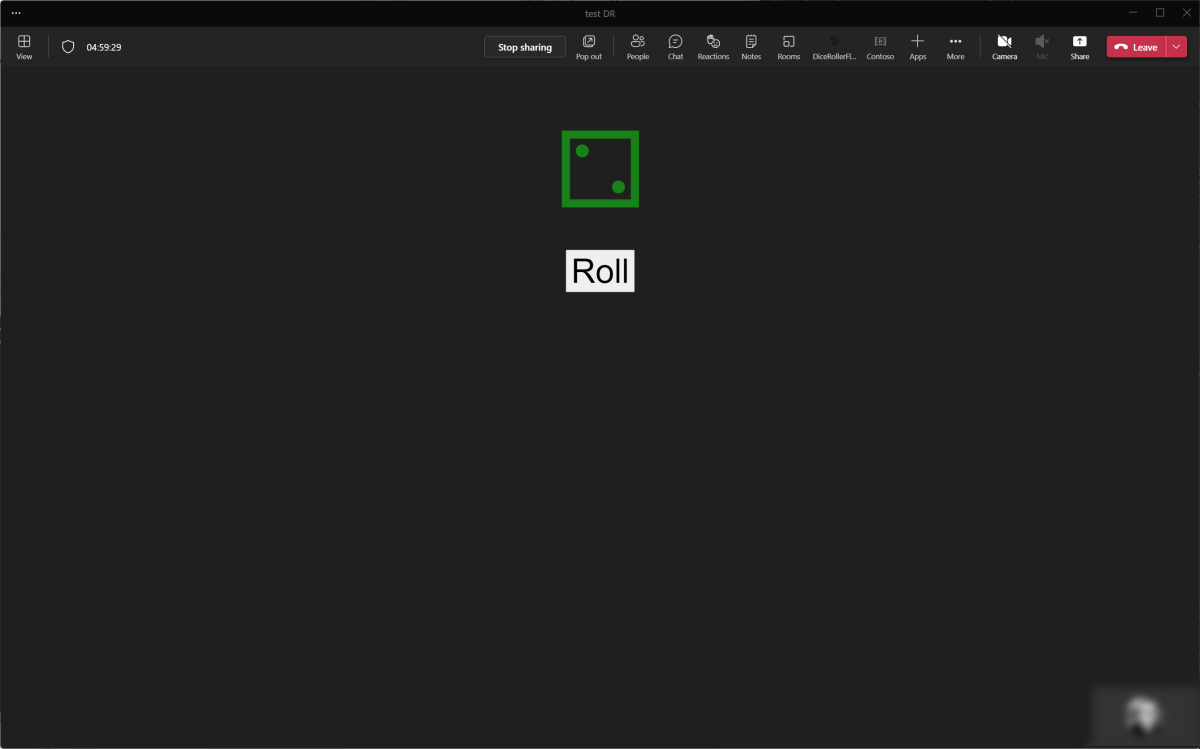
Users invited to the meeting can see your app on stage when they join the meeting.
Deployment
After you're ready to deploy your code, you can use Teams Toolkit or the Teams Developer Portal to provision and upload your app's zip file.
Note
You need to add your provisioned appId to the manifest.json before uploading or distributing the app.
Code samples
| Sample name | Description | JavaScript |
|---|---|---|
| Dice Roller | Enable all connected clients to roll a die and view the result. | View |
Next step
See also
Platform Docs
Feedback
Coming soon: Throughout 2024 we will be phasing out GitHub Issues as the feedback mechanism for content and replacing it with a new feedback system. For more information see: https://aka.ms/ContentUserFeedback.
Submit and view feedback for