Note
Access to this page requires authorization. You can try signing in or changing directories.
Access to this page requires authorization. You can try changing directories.
Multiple developers can work together to debug, provision, and deploy the same Microsoft 365 Agents Toolkit (previously known as Teams Toolkit) project. However, it requires manually setting the right permissions for Teams App and Microsoft Entra ID. The collaboration feature of Agents Toolkit simplifies this process between developers and project owners.
Collaborate with other developers
The following sections guide us to understand the collaboration process as project owner or collaborator:
As project owner
Note
Before adding collaborators for an environment, the project owner needs to provision the project first.
Select Microsoft 365 Agents Toolkit in the activity bar.
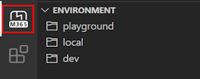
In the ENVIRONMENT section, select the Manage Collaborators button as shown in the following image:
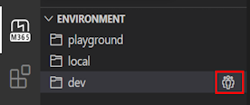
Select Add App Owners to add another Microsoft 365 account email address as a collaborator:
- Select the apps you want to add app owners for.

- (Optional) Select and confirm the Teams
manifest.jsonfile.
- (Optional) Select and confirm the Microsoft Entra app
aad.manifest.jsonfile.
- Input the M365 account email address you want to add as an app owner. The account to be added must be on the same tenant as the project owner for remote debug as shown in the image.

- Select the apps you want to add app owners for.
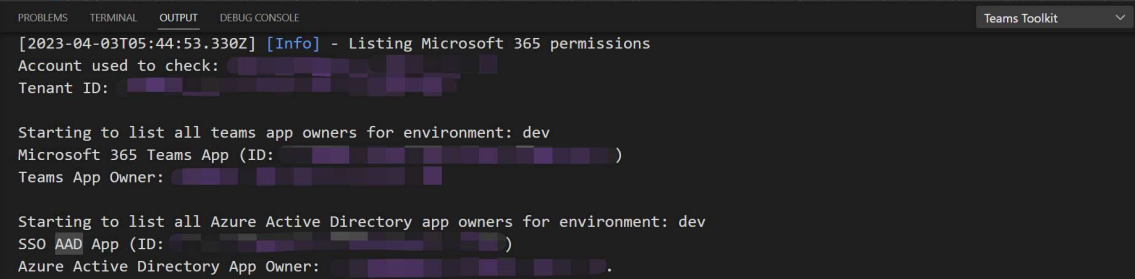
Select List App Owners to view collaborators in the current environment:
- Select the apps you want to add app owners for.
- (Optional) Select and confirm the Teams
manifest.jsonfile.
- (Optional) Select and confirm the Microsoft Entra app
aad.manifest.jsonfile.
- Input the M365 account email address you want to add as an app owner. The account to be added must be on the same tenant as the project owner for remote debug as shown in the image.
- Then you can see collaborators listed in the output channel as shown in the following image:
- Select the apps you want to add app owners for.
Push the project to GitHub.
Note
The newly added collaborators don't receive any notification. The project owner needs to notify the collaborator.
As project collaborator
Clone the project from GitHub.
Log in to your Microsoft 365 account.
Log in to your Azure account. It has contributor permission required by the project for all Azure resources.
To preview your Teams app, deploy the project to remote.
Launch remote to have a preview of the Teams app.
Note
Collaborators must log in using the account that the project owner adds under the same tenant with the project owner. For more information, see build and run your Teams app in a remote environment.
Remove Collaborator
To manually remove collaborators, do one of the following procedures:
Using Developer Portal
- Go to Teams Developer Portal and select your Teams app by name or app ID.
- Select Owners from the left panel.
- Select Delete to remove other app owners.
Using Microsoft Entra ID
Go to Microsoft Entra ID, select App registrations from the left panel, and find your app.
Select Owners from the left panel in the Microsoft Entra app management page.
Select and remove the owner.
Note
- Collaborators added to your project don't receive any notification. The project owner needs to notify the collaborator offline.
- Azure-related permissions must be set manually by the Azure subscription administrator on the Azure portal. To manually remove the permissions, see revoke granted consent to permissions.
- The Azure account must have the contributor role for the subscription so that developers can work together to provision and deploy the TeamsFx project.
See also
Collaborate with us on GitHub
The source for this content can be found on GitHub, where you can also create and review issues and pull requests. For more information, see our contributor guide.
Platform Docs