Note
Access to this page requires authorization. You can try signing in or changing directories.
Access to this page requires authorization. You can try changing directories.
In this tutorial, you will learn more about custom block components, including:
- Using Blockbench to design custom geometries and textures.
- Adding block geometries that are different shapes/sizes than 16x16x16.
- Using the
minecraft:geometrycomponent to reference your custom geometry. - Using the
minecraft:material_instancescomponent to set the texture(s) for your custom geometry.
If you haven't completed the How to Add a Simple Custom Block tutorial yet, it's recommended you do that before starting this one.
We've already created a cool die block that you can make with the fewest number of files and JSON, so let's explore the exciting possibilities that are offered by the behavior pack JSON components: geometry and material_instances!
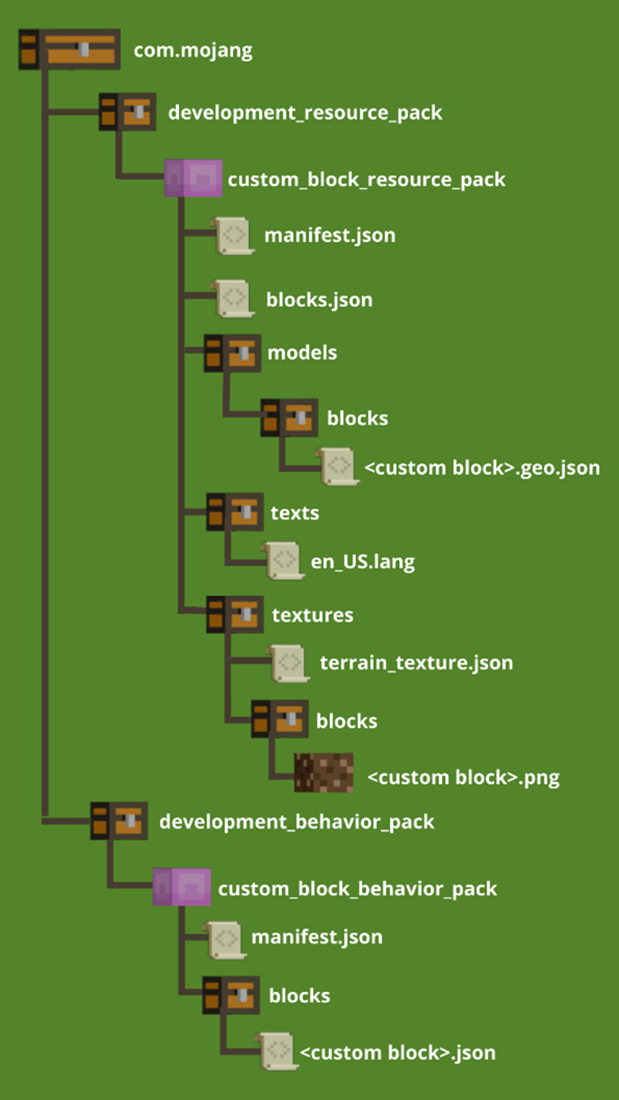
Creating custom blocks with resource and behavior packs
For extra help, follow along with this video!
This tutorial builds from the Simple Custom Block lesson and uses the same file structure, with one major difference: for these blocks, we will be using custom geometry models, so we'll be adding a models folder to the custom_block_resource_pack. Here is the updated file structure we'll follow for this tutorial:
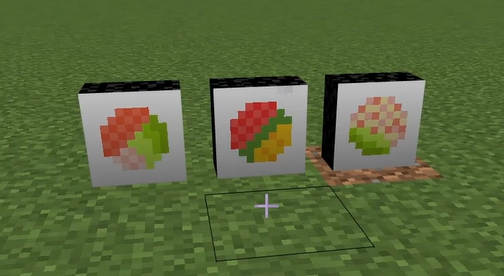
Sushi blocks
We're going to create custom blocks with geometry and material instances: sushi!
Let's use Blockbench
For this tutorial, we're going to be doing some work in Blockbench. Blockbench is a free entity-modeling application for creating entity models in Minecraft: Bedrock Edition. Additionally, users have the ability to create textures, and the ability to animate them for Bedrock Edition maps. Blockbench has external plugin support, enabling developers to create additional tools to use within the program. It also has the ability to export models into a standard OBJ format, Java Edition block model, and more.
We will use Blockbench in these tutorials to create custom geometries for the more advanced blocks we'll create for sushi, fish in a bubble, and a giant umbrella. If this is your first time using Blockbench, we recommend taking a look at the Entity Wizard tutorial.
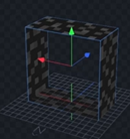
Geometry in Blockbench
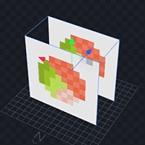
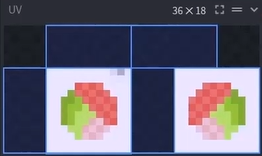
Each custom block has a different unit vector (UV) for the various textures of the sushi sides. The UV defines how the geometry maps to each texture. For this tutorial, we are sharing the texture for the sushi wrap.
As a bonus, the seaweed will be the same for all three rolls, so you can reuse the same geometries!
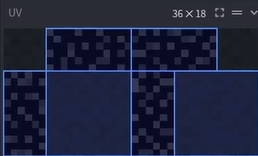
The textures for the individual rolls, however, will be different depending on the type of roll. Here is the salmon roll:
We highly recommend learning the ins and outs of Blockbench as you begin to create more complex and personalized custom entities. For this tutorial, however, we will be creating a blank file and exporting it to our PC, where we can copy our sushi block data.
Export the file from Blockbench
Navigate to File > Export > Export Bedrock Geometry to save the geometry file to your computer.
{
  "format_version": "1.12.0",
  "minecraft:geometry": [
    {
      "description": {
        "identifier": "geometry.sushi",
        "texture_width": 36,
        "texture_height": 18,
        "visible_bounds_width": 2,
        "visible_bounds_height": 2.5,
        "visible_bounds_offset": [0, 0.75, 0]
      },
      "bones": [
        {
          "name": "bb_main",
          "pivot": [0, 0, 0],
          "cubes": [
            {"origin": [-6, 0, -3], "size": [12, 12, 6], "uv": [0, 0]}
          ]
        }
      ]
    }
  ]
}
Now you can create textures in Blockbench, or create textures in a separate paint or photo editing application (assuring that it matches the size and UV of the geometry).
Resource pack
Add the geometry
Let's start by adding files for the sushi blocks to the resource pack.
- In File Explorer, navigate to the folder custom_block_resource_pack, located in the development_resource_packs folder.
- Inside the custom_block_resource_pack folder, create a folder and name it models.
- Open the models folder.
- Inside the models folder, create a folder and name it blocks.
- Open the blocks folder.
- Inside the blocks folder, copy the downloaded geometry files from Blockbench.
Create custom block localization
Just like we did for the die block, we'll add custom block localization. In texts/en_US.lang, you'll add the following for the sushi blocks:
tile.demo:salmon_roll.name=Salmon Roll
tile.demo:tuna_roll.name=Tuna Roll
tile.demo:california_roll.name=California Roll
These lines set the name of the sushi blocks in the game. Make sure not to add extra spaces after the equal sign because they will display in Minecraft.
Add textures for blocks
Place the following images in the textures/blocks folder:


As always, feel free to create your own textures!
Add friendly names in terrain_texture.json
The next step is to associate the texture names with a texture file path. This is done in a terrain_texture.json file.
- In File Explorer, navigate to the custom_block_resource_pack folder and open the textures folder.
- Open terrain_texture.json in a text editor.
- Copy and paste the following code into terrain_texture.json in the
texture_datasection:
{
  "texture_data": {
    "die_1": {
      "textures": "textures/blocks/die_1"
    },
    "sushi_wrap": {
      "textures": "textures/blocks/sushi_wrap"
    },
    "salmon_roll": {
      "textures": "textures/blocks/salmon_roll"
    },
    "tuna_roll": {
     "textures": "textures/blocks/tuna_roll"
    },
    "california_roll": {
     "textures": "textures/blocks/california_roll"
    }
  }
}
Optional: include sounds in blocks.json
Adding a sound in blocks.json is optional, but you can include it here for fun.
Important! Because you'll be using advanced geometry and material instances, any rendering information will be overridden by the custom block file in the behavior pack. So we will only be adding the sound here. We'll give the sushi blocks the same sound as mud because they are squishy!
- In the resource pack, navigate to blocks.json.
- Add the following sound information below the demo:die section.
{
  "format_version": "1.19.30",
  "demo:die": {
  },
  "demo:salmon_roll": {
    "sound": "mud"
  },
  "demo:tuna_roll": {
    "sound": "mud"
  },
  "demo:california_roll": {
    "sound": "mud"
  }
}
Behavior pack
Create individual custom block files for each roll
Let's bring all those resource pieces together into one beautiful combination in the behavior pack individual custom block file.
Although the sushi blocks share the same geometry.sushi geometry, create separate files for each of these rolls so they become their own blocks that display their own unique textures.
- In File Explorer, navigate to the folder custom_block_behavior_pack, located in the development_behavior_packs folder.
- Open the blocks folder and create a text document named salmon_roll.json.
- Double-click salmon_roll.json to open it in a text editor.
Create the behavior custom block JSON file
In the file, you will need to define what each of the blocks is.
Copy and paste the following code into your salmon_roll.json file:
{
  "format_version": "1.19.40",
  "minecraft:block": {
    "description": {
      "identifier": "demo:salmon_roll"
    },
    "components": {
      "minecraft:geometry": "geometry.sushi",
      "minecraft:material_instances":{
        "north": {
          "texture": "salmon_roll"
        },
        "south": {
          "texture": "salmon_roll"
        },
        "*": {
          "texture": "sushi_wrap"
        }
      }
    }
  }
}
Using custom block components
All of this has been a set up to the moment you've been waiting for: custom block components!
minecraft:geometrydefines the model that will be used in the resource pack for this custom block. You will use the identifier inside the geo.json file that was created in Blockbench.minecraft:material_instanceshas a ton of goodies. It's an object that defines the various textures (a single texture, or per-face) and allows you to specify some information about rendering and lighting. We'll talk more about the specific render methods and lighting options offered by this component later, in the Exploring the Material Instances Render and Lighting Options Tutorial.
Just like in blocks.json, we can define the various sides of the block that we want to use here. For now, we're going to define north and south for the salmon roll sides.
The rest of the sides are defined with *. This special key defines the default texture that will be used when a texture isn't given for a named side. If north and south weren't defined, the * key would give all the sides of our new block the sushi_wrap texture. You must specify a * key when you're defining material_instances.
Optional: Name custom instances of materials
There is another cool part of material_instances to show off: we can actually create defined variables within the material instances component. Let's see an example using salmon_roll:
{
  "format_version": "1.19.40",
  "minecraft:block": {
    "description": {
      "identifier": "demo:salmon_roll"
    },
    "components": {
      "minecraft:geometry": "geometry.sushi",
      "minecraft:material_instances": {
        "north": "sushi_side",
        "south": "sushi_side",
        "*": {
          "texture": "sushi_wrap"
        },
        "sushi_side": {
          "texture": "salmon_roll"
        }
      }
    }
  }
}
Here, we've defined sushi_side as having the salmon_roll texture.
Then, for north and south, we can use sushi_side as a string rather than a whole object specifying the texture as salmon_roll.
Now it's your turn to create the Tuna and California rolls. Feel free to copy this salmon_roll file to start from, making sure to change the identifier and the salmon_roll texture name to match the corresponding roll.
Test the block
Let's head back to the test world.
With the sushi blocks defined in both the behavior pack and resource pack, you can test them in-game.
- Open up the chat dialogue box.
- Type the following command:
/give @s demo:california_roll
Now you can place the sushi blocks all over! Note that the smaller geometry means they don't sit exactly side-by-side.
Make sure to test all three sushi blocks to truly appreciate how cute these new blocks really are!