Todo App
Important
This project is an experimental release. We hope you try out Experimental Mobile Blazor Bindings and provide feedback at https://github.com/xamarin/MobileBlazorBindings.
The completed Todo app sample is available here. The sample uses dependency injection, platform-specific services, a SQLite database for storage, modal dialogs, custom images, and many more features. This sample shows how to render a dynamically growing list of Todo items.
To build a simple Todo app, start with the project you've already created in the Build your first app section. All the changes will be in the FirstMobileBlazorBindingsApp project.
Delete the
HelloWorld.razorandCounter.razorfiles.Add a new class file to the project named
TodoItem.cs. In this file, define a new class to represent a Todo Item. Change the code in this class to the following code:namespace FirstMobileBlazorBindingsApp { public class TodoItem { public string Text { get; set; } public bool IsDone { get; set; } } }Add a new Razor component to the project by right-clicking on the project, selecting
Add/New Item, selectRazor component, and naming itTodoApp.razor. Replace the code in the file with the following code:<ContentView> <StackLayout Margin="new Thickness(20)"> @* Entry area *@ <StackLayout Margin="new Thickness(20)" Orientation="StackOrientation.Horizontal"> <Entry @bind-Text="newItemText" HorizontalOptions="LayoutOptions.FillAndExpand" /> <Button Text="Add" OnClick="OnAddItem" /> </StackLayout> @* TodoItem area *@ @* TODO: This! *@ </StackLayout> </ContentView> @code { string newItemText; List<TodoItem> items = new List<TodoItem>(); void OnAddItem() { var newTodoItem = new TodoItem { Text = newItemText, }; items.Add(newTodoItem); // Clear out the text in the Entry textbox newItemText = null; } }Change the code in
App.csto reference the newTodoAppcomponent instead ofHelloWorld:host.AddComponent<TodoApp>(parent: MainPage);If you run the app, you'll see an Entry textbox and an Add button. If you type in text and tap the Add button the text will simply disappear. The
Entrycomponent has a two-way binding to thenewItemTextfield by using the Blazor syntax@bind-Text="newItemText". When theTextproperty of theEntrychanges, thenewItemTextfield will be updated, and when thenewItemTextfield is updated theEntrycomponent'sTextproperty will be updated for the next re-render. However, this app is still not useful: you can add items to a todo list but you can't see the todo list itself!To show individual todo items, add a Razor Component to the project named
TodoItemDisplay.razorwith the following code:<StackLayout Margin="new Thickness(20)" Orientation="StackOrientation.Horizontal"> <Switch @bind-IsToggled="Item.IsDone" /> <Label Text="@Item.Text" TextDecorations="(Item.IsDone ? TextDecorations.Strikethrough : TextDecorations.None)" HorizontalOptions="LayoutOptions.FillAndExpand" /> </StackLayout> @code { [Parameter] public TodoItem Item { get; set; } }This component defines UI to show an individual
TodoItemobject. It accepts aTodoItemobject via a Blazor component parameter, denoted by the[Parameter]attribute. This enables a calling component to pass in a value. This component uses a two-way binding@bind-IsToggled="Item.IsDone"to change the value of theItem.IsDoneproperty when theSwitchcomponent's switch is toggled. When this binding takes place, it will cause theTextDecorations.Strikethroughstyle to be applied to theLabelcomponent when the item is marked as done.To render the todo list, go to the
TodoApp.razorfile and replace the text@* TODO: This! *@with the following code:<ScrollView> <StackLayout> @foreach (var item in items) { <TodoItemDisplay Item="item" /> } </StackLayout> </ScrollView>This code uses a C#
foreachloop to iterate over the list of todo items and render aTodoItemDisplaycomponent for each one, passing in the current item to the component'sItemproperty:Item="item".You can now run the app and add todo items and see them rendered in the list below. If you toggle the switch on a given item, the text of that item will have the strikethrough decoration applied:
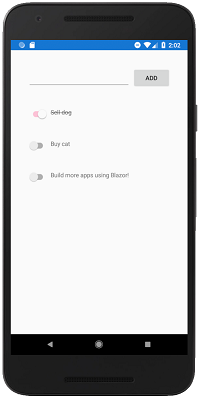

Congratulations, you've built a todo app using Experimental Mobile Blazor Bindings that demonstrates how to build custom components with parameters, how to use two-way bindings, and how to loop over items to render a dynamic UI.