Work with worksheets using the Excel JavaScript API
This article provides code samples that show how to perform common tasks with worksheets using the Excel JavaScript API. For the complete list of properties and methods that the Worksheet and WorksheetCollection objects support, see Worksheet Object (JavaScript API for Excel) and WorksheetCollection Object (JavaScript API for Excel).
Note
The information in this article applies only to regular worksheets; it does not apply to "chart" sheets or "macro" sheets.
Get worksheets
The following code sample gets the collection of worksheets, loads the name property of each worksheet, and writes a message to the console.
await Excel.run(async (context) => {
    let sheets = context.workbook.worksheets;
    sheets.load("items/name");

    await context.sync();

    if (sheets.items.length > 1) {
        console.log(`There are ${sheets.items.length} worksheets in the workbook:`);
    } else {
        console.log(`There is one worksheet in the workbook:`);
    }

    sheets.items.forEach(function (sheet) {
        console.log(sheet.name);
    });
});
Note
The id property of a worksheet uniquely identifies the worksheet in a given workbook and its value will remain the same even when the worksheet is renamed or moved. When a worksheet is deleted from a workbook in Excel on Mac, the id of the deleted worksheet may be reassigned to a new worksheet that is subsequently created.
Get the active worksheet
The following code sample gets the active worksheet, loads its name property, and writes a message to the console.
await Excel.run(async (context) => {
    let sheet = context.workbook.worksheets.getActiveWorksheet();
    sheet.load("name");

    await context.sync();
    console.log(`The active worksheet is "${sheet.name}"`);
});
Set the active worksheet
The following code sample sets the active worksheet to the worksheet named Sample, loads its name property, and writes a message to the console. If there is no worksheet with that name, the activate() method throws an ItemNotFound error.
await Excel.run(async (context) => {
    let sheet = context.workbook.worksheets.getItem("Sample");
    sheet.activate();
    sheet.load("name");

    await context.sync();
    console.log(`The active worksheet is "${sheet.name}"`);
});
Reference worksheets by relative position
These examples show how to reference a worksheet by its relative position.
Get the first worksheet
The following code sample gets the first worksheet in the workbook, loads its name property, and writes a message to the console.
await Excel.run(async (context) => {
    let firstSheet = context.workbook.worksheets.getFirst();
    firstSheet.load("name");

    await context.sync();
    console.log(`The name of the first worksheet is "${firstSheet.name}"`);
});
Get the last worksheet
The following code sample gets the last worksheet in the workbook, loads its name property, and writes a message to the console.
await Excel.run(async (context) => {
    let lastSheet = context.workbook.worksheets.getLast();
    lastSheet.load("name");

    await context.sync();
    console.log(`The name of the last worksheet is "${lastSheet.name}"`);
});
Get the next worksheet
The following code sample gets the worksheet that follows the active worksheet in the workbook, loads its name property, and writes a message to the console. If there is no worksheet after the active worksheet, the getNext() method throws an ItemNotFound error.
await Excel.run(async (context) => {
    let currentSheet = context.workbook.worksheets.getActiveWorksheet();
    let nextSheet = currentSheet.getNext();
    nextSheet.load("name");

    await context.sync();
    console.log(`The name of the sheet that follows the active worksheet is "${nextSheet.name}"`);
});
Get the previous worksheet
The following code sample gets the worksheet that precedes the active worksheet in the workbook, loads its name property, and writes a message to the console. If there is no worksheet before the active worksheet, the getPrevious() method throws an ItemNotFound error.
await Excel.run(async (context) => {
    let currentSheet = context.workbook.worksheets.getActiveWorksheet();
    let previousSheet = currentSheet.getPrevious();
    previousSheet.load("name");

    await context.sync();
    console.log(`The name of the sheet that precedes the active worksheet is "${previousSheet.name}"`);
});
Add a worksheet
The following code sample adds a new worksheet named Sample to the workbook, loads its name and position properties, and writes a message to the console. The new worksheet is added after all existing worksheets.
await Excel.run(async (context) => {
    let sheets = context.workbook.worksheets;

    let sheet = sheets.add("Sample");
    sheet.load("name, position");

    await context.sync();
    console.log(`Added worksheet named "${sheet.name}" in position ${sheet.position}`);
});
Copy an existing worksheet
Worksheet.copy adds a new worksheet that is a copy of an existing worksheet. The new worksheet's name will have a number appended to the end, in a manner consistent with copying a worksheet through the Excel UI (for example, MySheet (2)). Worksheet.copy can take two parameters, both of which are optional:
positionType- A WorksheetPositionType enum specifying where in the workbook the new worksheet is to be added.relativeTo- If thepositionTypeisBeforeorAfter, you need to specify a worksheet relative to which the new sheet is to be added (this parameter answers the question "Before or after what?").
The following code sample copies the current worksheet and inserts the new sheet directly after the current worksheet.
await Excel.run(async (context) => {
    let myWorkbook = context.workbook;
    let sampleSheet = myWorkbook.worksheets.getActiveWorksheet();
    let copiedSheet = sampleSheet.copy(Excel.WorksheetPositionType.after, sampleSheet);
    await context.sync();
});
Delete a worksheet
The following code sample deletes the final worksheet in the workbook (as long as it's not the only sheet in the workbook) and writes a message to the console.
await Excel.run(async (context) => {
    let sheets = context.workbook.worksheets;
    sheets.load("items/name");

    await context.sync();
    if (sheets.items.length === 1) {
        console.log("Unable to delete the only worksheet in the workbook");
    } else {
        let lastSheet = sheets.items[sheets.items.length - 1];

        console.log(`Deleting worksheet named "${lastSheet.name}"`);
        lastSheet.delete();

        await context.sync();
    }
});
Note
A worksheet with a visibility of "Very Hidden" cannot be deleted with the delete method. If you wish to delete the worksheet anyway, you must first change the visibility.
Rename a worksheet
The following code sample changes the name of the active worksheet to New Name.
await Excel.run(async (context) => {
    let currentSheet = context.workbook.worksheets.getActiveWorksheet();
    currentSheet.name = "New Name";

    await context.sync();
});
Move a worksheet
The following code sample moves a worksheet from the last position in the workbook to the first position in the workbook.
await Excel.run(async (context) => {
    let sheets = context.workbook.worksheets;
    sheets.load("items");
    await context.sync();

    let lastSheet = sheets.items[sheets.items.length - 1];
    lastSheet.position = 0;
    await context.sync();
});
Set worksheet visibility
These examples show how to set the visibility of a worksheet.
Hide a worksheet
The following code sample sets the visibility of worksheet named Sample to hidden, loads its name property, and writes a message to the console.
await Excel.run(async (context) => {
    let sheet = context.workbook.worksheets.getItem("Sample");
    sheet.visibility = Excel.SheetVisibility.hidden;
    sheet.load("name");

    await context.sync();
    console.log(`Worksheet with name "${sheet.name}" is hidden`);
});
Unhide a worksheet
The following code sample sets the visibility of worksheet named Sample to visible, loads its name property, and writes a message to the console.
await Excel.run(async (context) => {
    let sheet = context.workbook.worksheets.getItem("Sample");
    sheet.visibility = Excel.SheetVisibility.visible;
    sheet.load("name");

    await context.sync();
    console.log(`Worksheet with name "${sheet.name}" is visible`);
});
Get a single cell within a worksheet
The following code sample gets the cell that is located in row 2, column 5 of the worksheet named Sample, loads its address and values properties, and writes a message to the console. The values that are passed into the getCell(row: number, column:number) method are the zero-indexed row number and column number for the cell that is being retrieved.
await Excel.run(async (context) => {
    let sheet = context.workbook.worksheets.getItem("Sample");
    let cell = sheet.getCell(1, 4);
    cell.load("address, values");

    await context.sync();
    console.log(`The value of the cell in row 2, column 5 is "${cell.values[0][0]}" and the address of that cell is "${cell.address}"`);
});
Detect data changes
Your add-in may need to react to users changing the data in a worksheet. To detect these changes, you can register an event handler for the onChanged event of a worksheet. Event handlers for the onChanged event receive a WorksheetChangedEventArgs object when the event fires.
The WorksheetChangedEventArgs object provides information about the changes and the source. Since onChanged fires when either the format or value of the data changes, it can be useful to have your add-in check if the values have actually changed. The details property encapsulates this information as a ChangedEventDetail. The following code sample shows how to display the before and after values and types of a cell that has been changed.
// This function would be used as an event handler for the Worksheet.onChanged event.
function onWorksheetChanged(eventArgs) {
    Excel.run(function (context) {
        let details = eventArgs.details;
        let address = eventArgs.address;

        // Print the before and after types and values to the console.
        console.log(`Change at ${address}: was ${details.valueBefore}(${details.valueTypeBefore}),`
            + ` now is ${details.valueAfter}(${details.valueTypeAfter})`);
        return context.sync();
    });
}
Detect formula changes
Your add-in can track changes to formulas in a worksheet. This is useful when a worksheet is connected to an external database. When the formula changes in the worksheet, the event in this scenario triggers corresponding updates in the external database.
To detect changes to formulas, register an event handler for the onFormulaChanged event of a worksheet. Event handlers for the onFormulaChanged event receive a WorksheetFormulaChangedEventArgs object when the event fires.
Important
The onFormulaChanged event detects when a formula itself changes, not the data value resulting from the formula's calculation.
The following code sample shows how to register the onFormulaChanged event handler, use the WorksheetFormulaChangedEventArgs object to retrieve the formulaDetails array of the changed formula, and then print out details about the changed formula with the FormulaChangedEventDetail properties.
Note
This code sample only works when a single formula is changed.
async function run() {
    await Excel.run(async (context) => {
        // Retrieve the worksheet named "Sample".
        let sheet = context.workbook.worksheets.getItem("Sample");

        // Register the formula changed event handler for this worksheet.
        sheet.onFormulaChanged.add(formulaChangeHandler);

        await context.sync();
    });
}

async function formulaChangeHandler(event) {
    await Excel.run(async (context) => {
        // Retrieve details about the formula change event.
        // Note: This method assumes only a single formula is changed at a time.
        let cellAddress = event.formulaDetails[0].cellAddress;
        let previousFormula = event.formulaDetails[0].previousFormula;
        let source = event.source;

        // Print out the change event details.
        console.log(
          `The formula in cell ${cellAddress} changed.
          The previous formula was: ${previousFormula}.
          The source of the change was: ${source}.`
        );
    });
}
Handle sorting events
The onColumnSorted and onRowSorted events indicate when any worksheet data is sorted. These events are connected to individual Worksheet objects and to the workbook's WorkbookCollection. They fire whether the sorting is done programmatically or manually through the Excel user interface.
Note
onColumnSorted fires when columns are sorted as the result of a left-to-right sort operation. onRowSorted fires when rows are sorted as the result of a top-to-bottom sort operation. Sorting a table using the drop-down menu on a column header results in an onRowSorted event. The event corresponds with what is moving, not what is being considered as the sorting criteria.
The onColumnSorted and onRowSorted events provide their callbacks with WorksheetColumnSortedEventArgs or WorksheetRowSortedEventArgs, respectively. These give more details about the event. In particular, both EventArgs have an address property that represents the rows or columns moved as a result of the sort operation. Any cell with sorted content is included, even if that cell's value was not part of the sorting criteria.
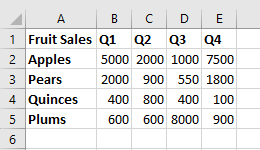
The following images show the ranges returned by the address property for sort events. First, here is the sample data before sorting:
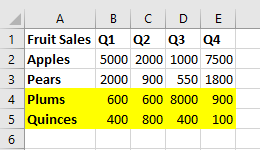
If a top-to-bottom sort is performed on "Q1" (the values in "B"), the following highlighted rows are returned by WorksheetRowSortedEventArgs.address.
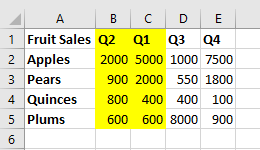
If a left-to-right sort is performed on "Quinces" (the values in "4") on the original data, the following highlighted columns are returned by WorksheetColumnsSortedEventArgs.address.
The following code sample shows how to register an event handler for the Worksheet.onRowSorted event. The handler's callback clears the fill color for the range, then fills the cells of the moved rows.
await Excel.run(async (context) => {
    let sheet = context.workbook.worksheets.getActiveWorksheet();

    // This will fire whenever a row has been moved as the result of a sort action.
    sheet.onRowSorted.add(async (event) => {
        await Excel.run(async (context) => {
            console.log("Row sorted: " + event.address);
            let sheet = context.workbook.worksheets.getActiveWorksheet();

            // Clear formatting for section, then highlight the sorted area.
            sheet.getRange("A1:E5").format.fill.clear();
            if (event.address !== "") {
                sheet.getRanges(event.address).format.fill.color = "yellow";
            }

            await context.sync();
        });
    });

    await context.sync();
});
Find all cells with matching text
The Worksheet object has a findAll method to search for a specified string within the worksheet. It returns a RangeAreas object, which is a collection of Range objects that can be edited all at once.
The following code sample finds all cells with values equal to the string Complete and colors them green. Note that findAll throws an ItemNotFound error if the specified string doesn't exist in the worksheet. If you're uncertain whether the specified string exists in the worksheet, use the findAllOrNullObject method to gracefully handle that scenario.
await Excel.run(async (context) => {
    let sheet = context.workbook.worksheets.getItem("Sample");
    let foundRanges = sheet.findAll("Complete", {
        completeMatch: true, /* Match the whole cell value, not any part of the text. */
        matchCase: false /* Make the search case-insensitive. */
    });

    await context.sync();
    foundRanges.format.fill.color = "green";
});
Note
This section describes how to find cells and ranges using the Worksheet object's methods. More range retrieval information can be found in object-specific articles.
- For examples that show how to get a range within a worksheet using the
Rangeobject, see Get a range using the Excel JavaScript API. - For examples that show how to get ranges from a
Tableobject, see Work with tables using the Excel JavaScript API. - For examples that show how to search a large range for multiple sub-ranges based on cell characteristics, see Work with multiple ranges simultaneously in Excel add-ins.
Filter data
An AutoFilter applies data filters across a range within the worksheet. This is created with Worksheet.autoFilter.apply, which has the following parameters.
range: The range to which the filter is applied, specified as either aRangeobject or a string.columnIndex: The zero-based column index against which the filter criteria is evaluated.criteria: A FilterCriteria object determining which rows should be filtered based on the column's cell.
The first code sample shows how to add a filter to the worksheet's used range. This filter will hide entries that are not in the top 25%, based on the values in column 3.
// This method adds a custom AutoFilter to the active worksheet
// and applies the filter to a column of the used range.
await Excel.run(async (context) => {
    let sheet = context.workbook.worksheets.getActiveWorksheet();
    let farmData = sheet.getUsedRange();

    // This filter will only show the rows with the top 25% of values in column 3.
    sheet.autoFilter.apply(farmData, 3, { criterion1: "25", filterOn: Excel.FilterOn.topPercent });
    await context.sync();
});
The next code sample shows how to refresh the auto-filter using the reapply method. This should be done when the data in the range changes.
// This method refreshes the AutoFilter to ensure that changes are captured.
await Excel.run(async (context) => {
    let sheet = context.workbook.worksheets.getActiveWorksheet();
    sheet.autoFilter.reapply();
    await context.sync();
});
The following code sample shows how to use the clearColumnCriteria method to clear the auto-filter from only one column, while leaving the filter active on other columns.
// This method clears the AutoFilter setting from one column.
await Excel.run(async (context) => {
    // Retrieve the active worksheet.
    let sheet = context.workbook.worksheets.getActiveWorksheet();

    // Clear the filter from only column 3.
    sheet.autoFilter.clearColumnCriteria(3);
    await context.sync();
});
The final auto-filter code sample shows how to remove the auto-filter from the worksheet with the remove method.
// This method removes all AutoFilters from the active worksheet.
await Excel.run(async (context) => {
    let sheet = context.workbook.worksheets.getActiveWorksheet();
    sheet.autoFilter.remove();
    await context.sync();
});
An AutoFilter can also be applied to individual tables. See Work with tables using the Excel JavaScript API for more information.
Data protection
Your add-in can control a user's ability to edit data in a worksheet. The worksheet's protection property is a WorksheetProtection object with a protect() method. The following example shows a basic scenario toggling the complete protection of the active worksheet.
await Excel.run(async (context) => {
    let activeSheet = context.workbook.worksheets.getActiveWorksheet();
    activeSheet.load("protection/protected");
    await context.sync();

    if (!activeSheet.protection.protected) {
        activeSheet.protection.protect();
    }
});
The protect method has two optional parameters:
options: A WorksheetProtectionOptions object defining specific editing restrictions.password: A string representing the password needed for a user to bypass protection and edit the worksheet.
The article Protect a worksheet has more information about worksheet protection and how to change it through the Excel UI.
Detect changes to the worksheet protection state
The protection state of a worksheet can be changed by an add-in or through the Excel UI. To detect changes to the protection state, register an event handler for the onProtectionChanged event of a worksheet. Event handlers for the onProtectionChanged event receive a WorksheetProtectionChangedEventArgs object when the event fires.
The following code sample shows how to register the onProtectionChanged event handler and use the WorksheetProtectionChangedEventArgs object to retrieve the isProtected, worksheetId, and source properties of the event.
// This function registers an event handler for the onProtectionChanged event of a worksheet.
async function run() {
    await Excel.run(async (context) => {
        // Retrieve the worksheet named "Sample".
        let sheet = context.workbook.worksheets.getItem("Sample");

        // Register the onProtectionChanged event handler.
        sheet.onProtectionChanged.add(checkProtection);
        await context.sync();
    });
}

// This function is an event handler that returns the protection state of a worksheet
// and information about the changed worksheet.
async function checkProtection(event) {
    await Excel.run(async (context) => {
        // Retrieve the protection, worksheet ID, and source properties of the event.
        let protectionStatus = event.isProtected;
        let worksheetId = event.worksheetId;
        let source = event.source;

        // Print the event properties to the console.
        console.log("Protection status changed. Protection status is now: " + protectionStatus);
        console.log("    ID of changed worksheet: " + worksheetId);
        console.log("    Source of change event: " + source);
    });
}
Page layout and print settings
Add-ins have access to page layout settings at a worksheet level. These control how the sheet is printed. A Worksheet object has three layout-related properties: horizontalPageBreaks, verticalPageBreaks, pageLayout.
Worksheet.horizontalPageBreaks and Worksheet.verticalPageBreaks are PageBreakCollections. These are collections of PageBreaks, which specify ranges where manual page breaks are inserted. The following code sample adds a horizontal page break above row 21.
await Excel.run(async (context) => {
    let sheet = context.workbook.worksheets.getActiveWorksheet();
    sheet.horizontalPageBreaks.add("A21:E21"); // The page break is added above this range.
    await context.sync();
});
Worksheet.pageLayout is a PageLayout object. This object contains layout and print settings that are not dependent any printer-specific implementation. These settings include margins, orientation, page numbering, title rows, and print area.
The following code sample centers the page (both vertically and horizontally), sets a title row that will be printed at the top of every page, and sets the printed area to a subsection of the worksheet.
await Excel.run(async (context) => {
    let sheet = context.workbook.worksheets.getActiveWorksheet();

    // Center the page in both directions.
    sheet.pageLayout.centerHorizontally = true;
    sheet.pageLayout.centerVertically = true;

    // Set the first row as the title row for every page.
    sheet.pageLayout.setPrintTitleRows("$1:$1");

    // Limit the area to be printed to the range "A1:D100".
    sheet.pageLayout.setPrintArea("A1:D100");

    await context.sync();
});
See also
Office Add-ins
Feedback
Coming soon: Throughout 2024 we will be phasing out GitHub Issues as the feedback mechanism for content and replacing it with a new feedback system. For more information see: https://aka.ms/ContentUserFeedback.
Submit and view feedback for