Note
Access to this page requires authorization. You can try signing in or changing directories.
Access to this page requires authorization. You can try changing directories.
This tutorial teaches you how to return information from an Office Script for Excel as part of an automated Power Automate workflow. You'll make a script that looks through a schedule and works with a flow to send reminder emails. This flow will run on a regular schedule, providing these reminders on your behalf.
Tip
If you're new to Office Scripts, we recommend starting with Tutorial: Create and format an Excel table.
If you're new to Power Automate, we recommend starting with Tutorial: Update a spreadsheet from a Power Automate flow and Tutorial: Automatically save content from emails in a workbook.
Office Scripts use TypeScript and this tutorial is intended for people with beginner to intermediate-level knowledge of JavaScript or TypeScript. If you're new to JavaScript, we recommend starting with the Mozilla JavaScript tutorial.
Prerequisites
You'll need access to Office Scripts and Power Automate for this tutorial. Please review the Platform support if the Automate tab doesn't appear. The Power Automate sign-up FAQ has information on getting started with Power Automate.
Prepare the workbook
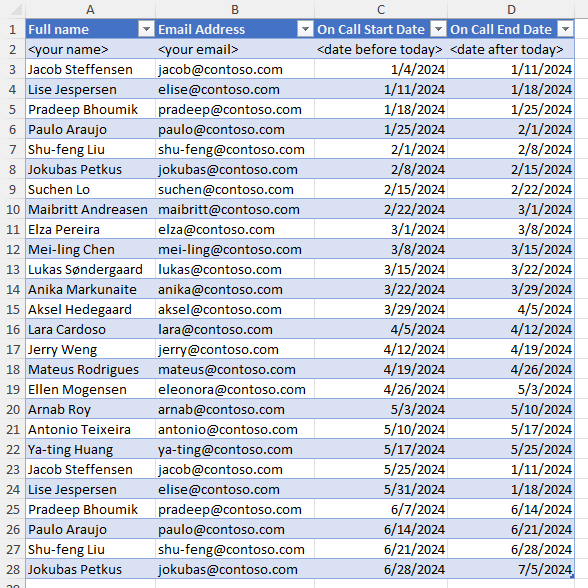
Download the workbook on-call-rotation.xlsx to your OneDrive.
Open on-call-rotation.xlsx in Excel.
Add a row to the table with your name, email address, and start and end dates that overlap with the current date.
Important
The script you'll write uses the first matching entry in the table, so make sure your name is above any row with the current week.
Create an Office Script
Go to the Automate tab and select New Script > Create in Code Editor.
Name the script Get On-Call Person.
You should now have an empty script. You want a script that gets an email address from the spreadsheet. Change
mainto return a string, like this:function main(workbook: ExcelScript.Workbook) : string { }Next, you need to get all the data from the table. That lets the script look at each row. Add the following code inside the
mainfunction.// Get the H1 worksheet. let worksheet = workbook.getWorksheet("H1"); // Get the first (and only) table in the worksheet. let table = worksheet.getTables()[0]; // Get the data from the table. let tableValues = table.getRangeBetweenHeaderAndTotal().getValues();The dates in the table are stored using Excel's date serial number. You need to convert those dates to JavaScript dates in order to compare them. Add the following helper function outside of the
mainfunction.// Convert the Excel date to a JavaScript Date object. function convertDate(excelDateValue: number) { let javaScriptDate = new Date(Math.round((excelDateValue - 25569) * 86400 * 1000)); return javaScriptDate; }Now, you need to figure out which person is on call right now. Their row will have a start and end date surrounding the current date. The script will assume only one person is on call at a time. Scripts can return arrays to handle multiple values, but you can return the first matching email address for this tutorial. Add the following code to the end of the
mainfunction.// Look for the first row where today's date is between the row's start and end dates. let currentDate = new Date(); for (let row = 0; row < tableValues.length; row++) { let startDate = convertDate(tableValues[row][2] as number); let endDate = convertDate(tableValues[row][3] as number); if (startDate <= currentDate && endDate >= currentDate) { // Return the first matching email address. return tableValues[row][1].toString(); } }The final script should look like this:
function main(workbook: ExcelScript.Workbook) : string {
    // Get the H1 worksheet.
    let worksheet = workbook.getWorksheet("H1");

    // Get the first (and only) table in the worksheet.
    let table = worksheet.getTables()[0];

    // Get the data from the table.
    let tableValues = table.getRangeBetweenHeaderAndTotal().getValues();

    // Look for the first row where today's date is between the row's start and end dates.
    let currentDate = new Date();
    for (let row = 0; row < tableValues.length; row++) {
        let startDate = convertDate(tableValues[row][2] as number);
        let endDate = convertDate(tableValues[row][3] as number);
        if (startDate <= currentDate && endDate >= currentDate) {
            // Return the first matching email address.
            return tableValues[row][1].toString();
        }
    }
}

// Convert the Excel date to a JavaScript Date object.
function convertDate(excelDateValue: number) {
    let javaScriptDate = new Date(Math.round((excelDateValue - 25569) * 86400 * 1000));
    return javaScriptDate;
}
Create an automated workflow with Power Automate
Sign in to the Power Automate site.
In the menu that's displayed on the left side of the screen, select Create. This brings you to list of ways to create new workflows.

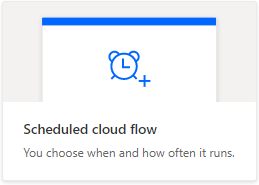
Under the Start from blank section, select Scheduled cloud flow.
Next, set the schedule for this flow. Your spreadsheet has a new on-call assignment starting every Monday in the first half of 2024. Set the flow to run first thing Monday mornings. Use the following options to configure the flow to run on Monday each week.
- Flow name: Notify On-Call Person
- Starting: 11/27/23 at 1:00am
- Repeat every: 1 Week
- On these days: M

Select Create.
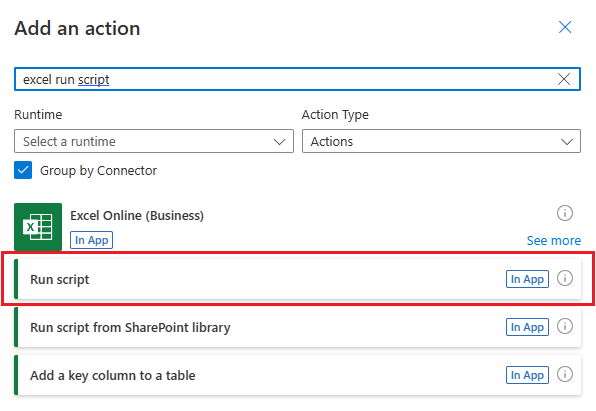
In the flow builder, select the + button and Add an action.
In the Add an action task pane, search for "Excel run script". Choose the Excel Online (Business) connector's Run script action. This action runs a script from your OneDrive on a workbook. If you want to use a script stored in your team's SharePoint library, you should use the Run script from a SharePoint library action.
You may be asked to sign in to your Microsoft 365 account. Do so to continue the tutorial.
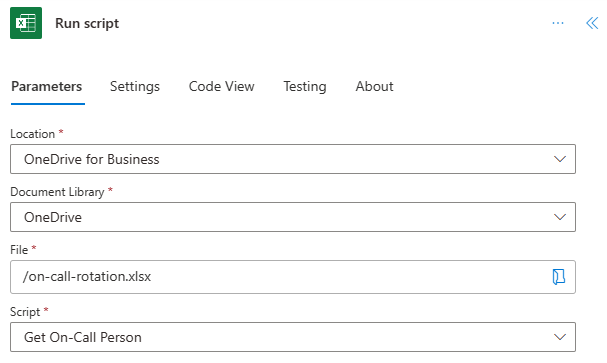
Next, you'll select the workbook and script to use in the flow step. For the tutorial, you'll use the workbook you created in your OneDrive, but you could use any workbook in a OneDrive or SharePoint site. Specify the following parameters for the Run script action:
- Location: OneDrive for Business
- Document Library: OneDrive
- File: on-call-rotation.xlsx (Chosen through the file browser)
- Script: Get On-Call Person
In the flow builder, select the + button and Add an action.
End the flow by sending the reminder email. In the Add an action task pane, search for "send an email". Choose the Office 365 Outlook connector's Send an email (V2) action.

Note
This tutorial uses Outlook. Feel free to use your preferred email service instead, though some options may be different.
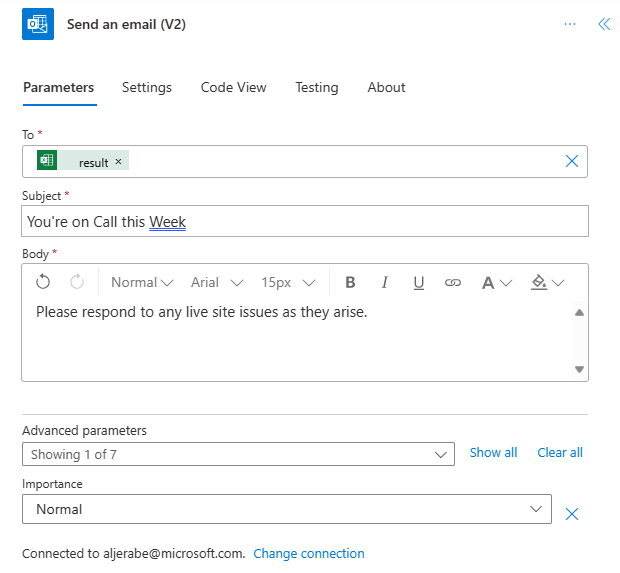
For the To parameter, select the text box and select Enter custom value. Use the dynamic content control to add the email address returned by the script. This will be labelled result with the Excel icon next to it. You can provide whatever subject and body text you'd like.
Select Save.
Test the script in Power Automate
Your flow will run every Monday morning. You can test the script now by selecting the Test button in the upper-right corner of the screen. Select Manually, then select Run Test to run the flow now and test the behavior. You may need to grant permissions to Excel and Outlook to continue.
Tip
If your flow fails to send an email, double-check in the spreadsheet that a valid email is listed for the current date range at the top of the table.
Next steps
Visit Run Office Scripts with Power Automate to learn more about connecting Office Scripts with Power Automate.
You can also check out the Automated task reminders sample scenario to learn how to combine Office Scripts and Power Automate with Teams Adaptive Cards.
Collaborate with us on GitHub
The source for this content can be found on GitHub, where you can also create and review issues and pull requests. For more information, see our contributor guide.
Office Scripts