Note
Access to this page requires authorization. You can try signing in or changing directories.
Access to this page requires authorization. You can try changing directories.
This tutorial teaches you how to use an Office Script for Excel with an automated Power Automate workflow. Your script automatically runs each time you receive an email, recording information from the email in an Excel workbook. Being able to pass data from other applications into an Office Script gives you a great deal of flexibility and freedom in your automated processes.
Tip
If you're new to Office Scripts, start with Tutorial: Create and format an Excel table. If you're new to Power Automate, start with Tutorial: Update a spreadsheet from a Power Automate flow. Office Scripts use TypeScript and this tutorial is intended for people with beginner to intermediate-level knowledge of JavaScript or TypeScript. If you're new to JavaScript, start with the Mozilla JavaScript tutorial.
Prerequisites
You'll need access to Office Scripts and Power Automate for this tutorial. Please review the Platform support if the Automate tab doesn't appear. The Power Automate sign-up FAQ has information on getting started with Power Automate.
Prepare the workbook
Power Automate shouldn't use relative references like Workbook.getActiveWorksheet to access workbook components. So, you need a workbook and worksheet with consistent names for Power Automate to reference.
Create a new workbook named MyWorkbook.
Go to the Automate tab and select New Script > Create in Code Editor.
Replace the existing code with the following script and select Run. This step sets up the workbook with consistent worksheet, table, and PivotTable names.
function main(workbook: ExcelScript.Workbook) {
  // Add a new worksheet to store the email table.
  let emailsSheet = workbook.addWorksheet("Emails");

  // Add data and create a table
  emailsSheet.getRange("A1:D1").setValues([
    ["Date", "Day of the week", "Email address", "Subject"]
  ]);
  let newTable = workbook.addTable(emailsSheet.getRange("A1:D2"), true);
  newTable.setName("EmailTable");

  // Add a new PivotTable to a new worksheet
  let pivotWorksheet = workbook.addWorksheet("Subjects");
  let newPivotTable = workbook.addPivotTable("Pivot", "EmailTable", pivotWorksheet.getRange("A3:C20"));

  // Setup the pivot hierarchies
  newPivotTable.addRowHierarchy(newPivotTable.getHierarchy("Day of the week"));
  newPivotTable.addRowHierarchy(newPivotTable.getHierarchy("Email address"));
  newPivotTable.addDataHierarchy(newPivotTable.getHierarchy("Subject"));
}
Create an Office Script
Create a script that logs information from an email. You want to track which days of the week you receive the most mail and how many unique senders send that mail. Your workbook has a table with Date, Day of the week, Email address, and Subject columns. Your worksheet also has a PivotTable that pivots on the Day of the week and Email address (those are the row hierarchies). The count of unique Subjects is the aggregated information being displayed (the data hierarchy). The script refreshes that PivotTable after it updates the email table.
From within the Code Editor task pane, select New Script > Create in Code Editor.
The flow that you create later in the tutorial sends the script information about each email that's received. The script needs to accept that input through parameters in the
mainfunction. Replace the default script with the following script.function main( workbook: ExcelScript.Workbook, from: string, dateReceived: string, subject: string) { }The script needs access to the workbook's table and PivotTable. Add the following code to the body of the script, after the opening
{.// Get the email table. let emailWorksheet = workbook.getWorksheet("Emails"); let table = emailWorksheet.getTable("EmailTable"); // Get the PivotTable. let pivotTableWorksheet = workbook.getWorksheet("Subjects"); let pivotTable = pivotTableWorksheet.getPivotTable("Pivot");The
dateReceivedparameter is of typestring. Convert that to aDateobject so you can easily get the day of the week. After doing that, you need to map the day's number value to a more readable version. Add the following code to the end of your script, before the closing}.// Parse the received date string to determine the day of the week. let emailDate = new Date(dateReceived); let dayName = emailDate.toLocaleDateString("en-US", { weekday: 'long' });The
subjectstring might include the "RE:" reply tag. Remove that tag from the string so that emails in the same thread have the same subject for the table. Add the following code to the end of your script, before the closing}.// Remove the reply tag from the email subject to group emails on the same thread. let subjectText = subject.replace("Re: ", ""); subjectText = subjectText.replace("RE: ", "");Now that the email data is formatted, add a row to the email table. Add the following code to the end of your script, before the closing
}.// Add the parsed text to the table. table.addRow(-1, [dateReceived, dayName, from, subjectText]);Finally, make sure the PivotTable is refreshed. Add the following code to the end of your script, before the closing
}:// Refresh the PivotTable to include the new row. pivotTable.refresh();Rename your script Record Email and select Save script.
Your script is now ready for a Power Automate workflow. It should look like the following script.
function main(
workbook: ExcelScript.Workbook,
from: string,
dateReceived: string,
subject: string) {
// Get the email table.
let emailWorksheet = workbook.getWorksheet("Emails");
let table = emailWorksheet.getTable("EmailTable");

// Get the PivotTable.
let pivotTableWorksheet = workbook.getWorksheet("Subjects");
let pivotTable = pivotTableWorksheet.getPivotTable("Pivot");
  // Parse the received date string to determine the day of the week.
  let emailDate = new Date(dateReceived);
  let dayName = emailDate.toLocaleDateString("en-US", { weekday: 'long' });
// Remove the reply tag from the email subject to group emails on the same thread.
let subjectText = subject.replace("Re: ", "");
subjectText = subjectText.replace("RE: ", "");
// Add the parsed text to the table.
table.addRow(-1, [dateReceived, dayName, from, subjectText]);
// Refresh the PivotTable to include the new row.
pivotTable.refresh();
}
Create an automated workflow with Power Automate
Sign in to the Power Automate site.
In the menu on the left side of the screen, select Create. This selection brings you to a list of ways to create new workflows.

In the Start from blank section, select Automated flow. This selection creates a workflow triggered by an event, such as receiving an email.

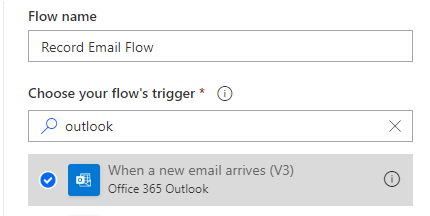
In the dialog window that appears, enter a name for your flow in the Flow name text box. Under Choose your flow's trigger, select When a new email arrives from the list of options. You might need to search for the option by using the search box. Finally, select Create.
Note
This tutorial uses Outlook. You can use your preferred email service instead, but some options might be different.
In the flow builder, select the + button and Add an action.
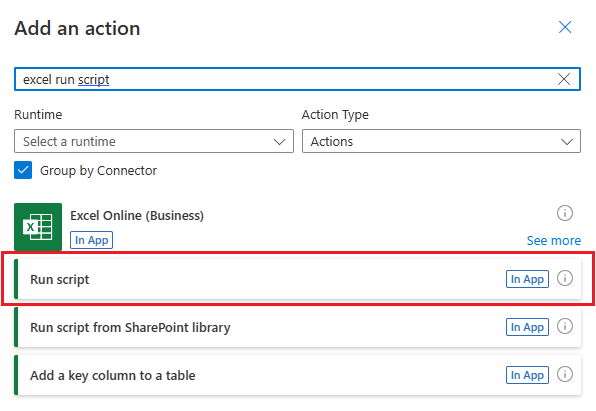
In the Add an action task pane, search for "Excel run script". Choose the Excel Online (Business) connector's Run script action. This action runs a script from your OneDrive on a workbook. If you want to use a script stored in your team's SharePoint library, use the Run script from a SharePoint library action.
You might be asked to sign in to your Microsoft 365 account. Sign in to continue the tutorial.
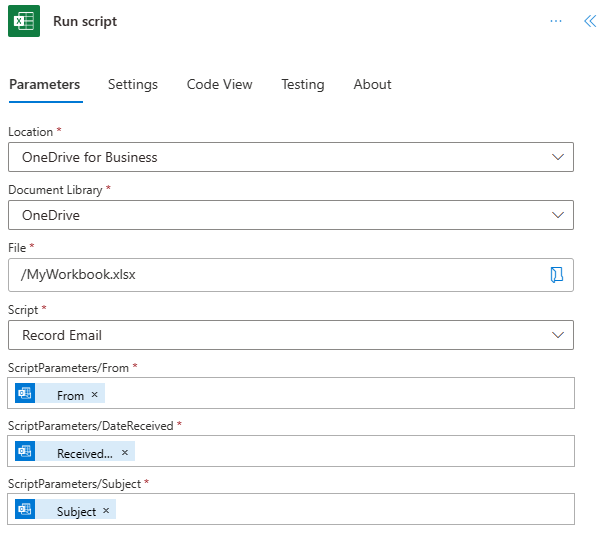
Next, select the workbook and script to use in the flow step. For the tutorial, use the workbook you created in your OneDrive, but you can use any workbook in a OneDrive or SharePoint site. Specify the following parameters for the Run script action:
- Location: OneDrive for Business
- Document Library: OneDrive
- File: MyWorkbook.xlsx (Chosen through the file browser)
- Script: Record Email
- ScriptParameters/from: From (dynamic content from Outlook)
- ScriptParameters/dateReceived: Received Time (dynamic content from Outlook)
- ScriptParameters/subject: Subject (dynamic content from Outlook)
Note that the parameters for the script appear only after you select the script.
Select Save.

Your flow is now enabled. It automatically runs your script each time you receive an email through Outlook.
Manage the script in Power Automate
From the main Power Automate page, select My flows.

Select your flow. Here you can see the run history. You can refresh the page or select the refresh All runs button to update the history. The flow triggers shortly after an email is received. Test the flow by sending yourself mail.
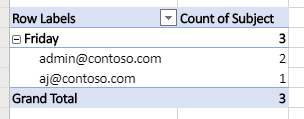
When the flow triggers and successfully runs your script, you see the workbook's table and PivotTable update.

Troubleshooting
Receiving multiple emails at the same time can cause merge conflicts in Excel. This risk is mitigated by setting the email connector to only act on one email at a time. To do this step:
Select the "email arrives" action, then select Settings.
In the Settings options that pop up, set Concurrency Control to On. Then, set the Degree of Parallelism to 1.

Next steps
Complete Tutorial: Send weekly email reminders based on spreadsheet data. It teaches you how to return data from a script to the flow.
You can also check out the Automated task reminders sample scenario to learn how to combine Office Scripts and Power Automate with Teams Adaptive Cards.
Collaborate with us on GitHub
The source for this content can be found on GitHub, where you can also create and review issues and pull requests. For more information, see our contributor guide.
Office Scripts