Note
Access to this page requires authorization. You can try signing in or changing directories.
Access to this page requires authorization. You can try changing directories.
You can use the Measuring Camera control in your app to let users measure distance, area, and volume. During the measurement, you create two-dimensional and three-dimensional polygons that can be used to confirm how a certain-sized object would fit within a space.
The control creates a button in your app. When app users select the button, it shows a live camera feed of the device. App users can then specify a starting point, and one or multiple sequential endpoints to measure between. The instances of measured segments are shown directly on the live camera feed.
When the user exits the control, the measurements that were taken are captured in the Measurements property so they can be saved or stored.
Screenshots taken during the mixed reality experience are stored in the Photos property for viewing within the app.
In this article, we'll create a screen in an app to use the Measuring camera control to measure the area of a user-defined space as well as view a photo of the space that was measured.
Watch this video to learn how to build mobile apps with Measuring Camera control:
Prerequisites
See prerequisites for mixed-reality capable devices.
Create the app with Measuring Camera control
Open an app in Power Apps Studio.
Select the Insert tab.
Expand Media.
Select the Measuring camera control to insert it on the screen.
Position the control near the bottom of the screen.
Change the following properties for the control using the property pane on the right-side of the screen.
Property Value Text Measure Area Unit of measurement Feet Measurement type Area 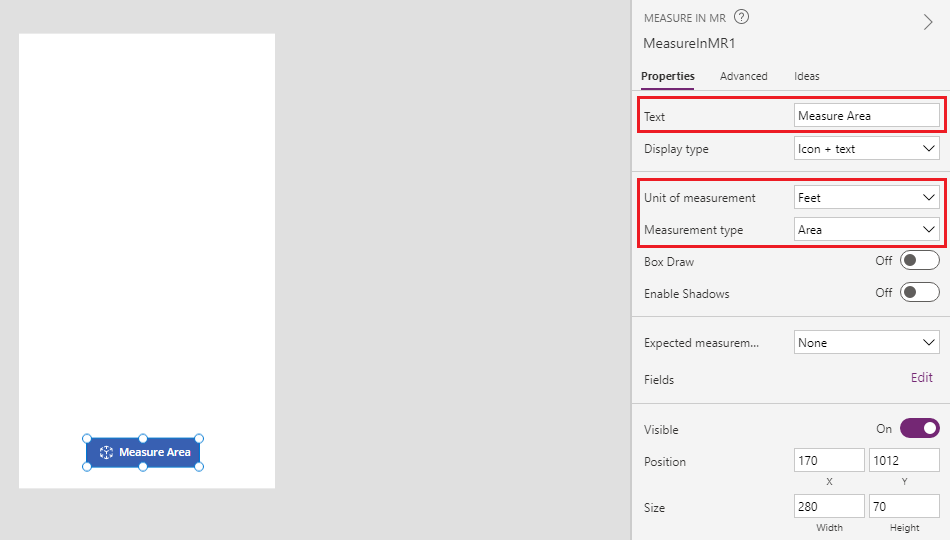
Select the Advanced tab and change the OnMixedRealitySelect property to the following formula:
ClearCollect(colMRMeasurements, Self.Measurements);
ClearCollect(colMRPhotos, Self.Photos)
This formula will allow the user to define areas to be measured in square feet and store the most recent results of the measurements in a collection named colMRMeasurements, and the most recent photos in a collection named colMRPhotos.
Add a text label to the screen and move it to the top-left corner of the screen.
Change the following properties of the added text label:
Property Value Text Measure Area Font size 24 Font weight Semibold Text alignment Center Width Parent.Width Color RGBA(255, 255, 255, 1)Fill RGBA(56, 96, 178, 1)
This label provides a header for the screen.
Add an image control, and move it just below the header label.
Change the following properties for the image control:
Property Value Image First(colMRPhotos).ImageURIBorder Thickness 2 The image control will display the first image taken from the Measuring camera control.
Add another label to the screen, positioning it below the image control.
Change the Text property of the label to the following formula:
"Area: " & If(IsEmpty(colMRMeasurements), "no area measured", First(colMRMeasurements).Area & " sq. " & First(colMRMeasurements).Unit)
This label will display the first area measurement and unit type that is collected from the Measuring camera control. If there's no measurement to be returned, the text will show Area: no area measured to let the user know that no value is present.
Test the app
Tip
Watch the video embedded at the top of this article to see how the app works.
Now that all the controls have been added, save and publish the app. On a mixed-reality capable device (as defined in the Prerequisites section), open the app, and press the Measure Area button. This action will open the Measuring camera experience, allowing the user to define an area to be measured.
Follow the on-screen instructions to calibrate the device by slowly moving it left and right while pointing the camera at a surface to be measured. Once the calibration is complete, you'll see an array of dots on the surface as well as a circle and dot reticle in the center of the screen. This reticle is used to define lengths, areas, and volumes by using the + button to add points and line segments.
Photos can be captured using the camera button. These photos will show the lengths, areas, and volumes defined by the user.
There's an undo button to undo any placed points.
Begin by placing a point using the + button. You'll notice that an orange line and measurement now appear connected to the point you placed. Place a second point and notice how a line with measurement appears between the two points you place. Continue placing points until the desired shape has been fully defined. To close a shape, place the reticle on the first point made and use the + button. You'll notice that the center point of the reticle changes color from white to green, indicating that the shape can be closed. If two of the sides of the shape intersect, or you try to close a shape using any other point than the first one. You'll notice that the center point of the reticle changes from white to red, indicating that a point cannot be placed there.
Once an area has been fully defined, position the device so that a picture can be taken of the area you defined and use the camera button to do so. The select the Submit button. A confirmation dialog will appear, asking if you've finished with your measurements. If you have more measurements to enter, select Cancel to return to the MR environment. If you're finished, select Submit to be taken back to the app screen.
You'll see the first picture taken as well as the calculated area of the shape you defined as well as the units, in this case square-feet.
The measurement and photo can then be used like any other photo or text field in Power Apps, for instance to be sent in an email or stored in a table in Microsoft Dataverse.