Deploy the Hospital Emergency Response app
The Hospital Emergency Response app requires a small amount of setup to adapt to your needs. This article provides step-by-step instructions for hospital IT admins to deploy and configure the application for their organization.
Estimated time to complete these steps: 35–40 minutes.
Service URLs for US Government customers
The Hospital Emergency Response solution is also available for US Government customers. There is a different set of URLs to access Power Apps US Government environments and Power BI than the commercial version.
The commercial version of the service URL is used throughout this article. If you're a US Government customer, use the respective US Government URL for your deployment as mentioned here:
| Commercial version URL | US Government version URL |
|---|---|
| https://make.powerapps.com | https://make.gov.powerapps.us (GCC) https://make.high.powerapps.us (GCC High) |
| https://admin.powerplatform.microsoft.com | https://gcc.admin.powerplatform.microsoft.us (GCC) https://high.admin.powerplatform.microsoft.us (GCC High) |
| https://app.powerbi.com/ | https://app.powerbigov.us (GCC) https://app.high.powerbigov.us (GCC High) |
For detailed information about the US Government plans for Power Apps and Power BI, see:
Step 1: Download the deployment package
Important
If you are a commercial version user, you can skip this step and use the AppSource option instead to install the app and Power BI dashboard.
Download the latest deployment package (.zip) from https://aka.ms/emergency-response-solution.
Before extracting the .zip file, ensure that you unblock it.
Right click the .zip file, select Properties.
In the properties dialog box, select Unblock, and then select Apply followed by OK.
On extracting the .zip file, you will see the following in the extracted folder:
| Folder | Description |
|---|---|
| Package | Contains the Package Deployer tool and the package that you will deploy later to set up the solution in your environment. More information: Option C: Install the app from the deployment package |
| Power BI Template | Contains the Power BI Report template file (.pbit) that you will use to configure reporting. More information: Step 10: Publish the Power BI dashboard |
Step 2: Sign up for Power Apps and create an environment
If you don't already have Power Apps, sign up for Power Apps and purchase an appropriate license.
More information:
After you have purchased Power Apps, create an environment with a Microsoft Dataverse database.
Sign in to Power Platform admin center.
Create a Dataverse environment with the database. More information: Create and manage environments
Important
While creating the database, if you select a security group for the database, the apps can be shared only with users that are members of the security group.
Create appropriate users in your environment. More information: Create users and assign security roles
Step 3: Install the app
Follow the steps below to install Hospital Emergency Response app along with the configuration and sample data.
Note
The configuration and sample data is installed only for new installation. If you have a prior installation of this app in your environment, the configuration and sample data won't be installed during the installation to ensure that your existing data isn't overwritten.
If you intend to transfer data from the hospital to regional solution, make sure you create the connections in your environment as described in Create connections before installing the solution. The out-of-box solution to transfer data from hospital to regional solution uses the Secure File Transfer Protocol (SFTP) as the data transmission mechanism.
You can install the app by using one of the following 3 options:
Power Platform admin center (for Power Apps US Govt customers only). See Option A: Install the app from Power Platform admin center (US Govt customers)
Microsoft AppSource (for Power Apps commercial version customers). See Option B: Install the app from Microsoft AppSource
Deployment package that you downloaded earlier. See Option C: Install the app from the deployment package
Option A: Install the app from Power Platform admin center (US Govt customers)
Sign in to Power Platform admin center. Use the appropriate URL to sign in:
In the left pane, select Environments, and then select the name of the environment you created in the previous step.
In the environment details page, select Dynamics 365 apps under Resources.

On the Dynamics 365 apps page, select Install app. Next select Power Platform Emergency Response App in the right pane, and select Next.

On the next page, agree to the terms, and select Install.
The installation will start, and you can monitor the progress of your app installation on the Dynamics 365 apps page.

Important
It might take a while for the app to install.
After the app is installed, navigate to Power Apps, and select your environment from the top-right corner. You will see new apps under Apps:

The installation also adds the configuration and sample data for the Hospital Emergency Response app.
Option B: Install the app from Microsoft AppSource
Navigate to AppSource, and search for "Hospital Emergency Response App".
Alternatively, navigate directly to the app on AppSource using this link: https://appsource.microsoft.com/product/dynamics-365/mscrm.pphersappOn the Hospital Emergency Response App page, select Get It Now.

You are prompted to review the AppSource agreement terms. The dialog also shows the account that is being used to sign in. Select Continue. You might be prompted to verify your credentials.
On the next page, select your environment where you want to install the app. Select the legal terms and privacy statements check boxes, and select Agree.

You'll be taken to Power Platform admin center where you can monitor the progress of your app installation.

Important
It might take a while for the app to install.
After the app is installed, navigate to Power Apps, and select your environment from the top-right corner. You will see new apps under Apps:
The installation also adds the configuration and sample data for the Hospital Emergency Response app.
Option C: Install the app from the deployment package
Navigate to the location where you extracted the deployment package (.zip); you'll find a Package folder. Under the Package folder, run the PackageDeployer.exe file to run the tool to deploy the package.
On the next screen, select Continue.
You’ll be prompted to connect to your environment. Select Office 365 as the Deployment Type, select Show Advanced, and then type your credentials to connect to your environment.

Select Login to continue.
If you have access to more than one Dataverse environment, the next screen will prompt you to select the environment where you want to install the package. Select an environment and select Login.

On the next screen, select Next.
The next screen displays you the environment name where the package will be installed. Review the information and select Next.
The next screen validates if the package can be installed on your environment. Select Next to continue with the installation.

The next screen displays the installation status of the package. After the installation is complete, select Next.

Note
It might take a while for the package installation to complete.
On the next screen, select Finish to complete and close the setup.
After the app is installed, navigate to Power Apps, and select your environment from the top-right corner. You will see new apps under Apps:
The installation also adds the configuration and sample data for the Hospital Emergency Response app.
Select the Admin App to open the model-driven app that lets you configure the rest of the deployment settings. The admin app has a number of entities where you can add and manage data for your hospital system. You can use the area picker in the lower part of the left navigation pane to select a different area.

Step 4: Update the mobile app branding and tracking level
You can change the app icon, color scheme, or display name of the mobile apps to match the branding of your organization. You can also specify whether frontline workers can track information by location or facility using the mobile apps. You use App and App Config entities in the Administration area for these.
Open the Admin App, and in the left navigation pane of the admin app, select Administration from the area picker, and then select Apps.

Open one of the app records by selecting it.

In the app details page:
To select a custom image for the app icon as per your organization branding, double-click the app icon, and select an icon file of your choice.
If necessary, update the Description or Display Name of the app.
Tip
You might want to choose a different display name to identify apps in your test environment. For example: Test - Bed capacity.
If necessary, update the Hide App from Menu value to set if the app should be displayed in the app list. As Emergency Response App is a container app, the value is set to No by default.
If necessary, update the App Display Rank value to set the display position of app in the app list.
If necessary, select a value in the Tracking Level field to specify if you want to track data in this mobile app at a Location or Facility level. More information: Manage tracking level for mobile apps
Select Save.
Repeat steps 2 and 3 for each canvas app record under Apps.
In the left pane, select App Config.
Select the Emergency Response App record to open it for editing.
If necessary, update the colors for your mobile app.
Tip
You might want to specify a different primary color to identify apps in your test environment.
Select Yes or No in the Device Sharing Enabled field to specify whether a Sign Out option will be available in mobile apps or not. Selecting Yes will make the Sign Out option available. More information: End shift - sign out in the user guide.

Select Save in the lower-right corner to save your changes.
Step 5: Bypass consent for mobile apps (optional)
Optionally, you can configure to bypass user consent for your mobile apps so that users are not permitted for location permissions. You must be a Tenant Admin to complete this step. Also, before you perform this step, you will need app ID of each mobile app (canvas app).
To get the app ID for your app, in the left navigation pane of the admin app, select Administration from the area picker and then select Apps. This displays all the mobile apps (canvas apps). Select a mobile app to view its app ID. Copy the app Id for each app to a notepad file.

Next do the following:
Open Notepad, and copy this PowerShell script:
# MUST BE A TENANT ADMIN TO RUN THIS
Install-Module -Name Microsoft.PowerApps.Administration.PowerShell
Install-Module -Name Microsoft.PowerApps.PowerShell -AllowClobber
Import-Module -Name Microsoft.PowerApps.Administration.PowerShell
Import-Module -Name Microsoft.PowerApps.PowerShell

# This call opens prompt to collect credentials
# (Azure Active Directory account and password)
# used by the commands
Add-PowerAppsAccount

# Change the App ID for each new app (APPGUIDHERE)
Set-AdminPowerAppApisToBypassConsent -AppName APPGUIDHERE
Replace the
APPGUIDHEREvalue with the actual app ID of a canvas app.Save the file as .ps1 file.
Run PowerShell as an administrator and execute the .ps1 file you just created.
Repeat steps 2 - 4 for each canvas app.
Step 6: Add Azure Application Insights key to mobile apps for telemetry (optional)
Optionally, you can use Azure Application Insights to collect detailed telemetry for your mobile apps (canvas apps) to get insights on the app usage. For detailed information about this, see Analyze app telemetry using Application Insights
Step 7: Share canvas apps with users in your organization
For your frontline users to use and consume data using the canvas apps in their mobile devices, the apps must be shared with them. It's easier to use Azure AD groups to easily share apps with groups of users.
Important
Make sure the user or group you plan to share the apps with already have access to your environment. Typically, you would have already added users or group while setting up your environment. Alternatively, you can follow the steps here to add users to your environment and provide appropriate access before sharing apps with them: Create users and assign security roles.
Sign in to Power Apps
In the left navigation pane, select Apps to view a list of all your apps.
Select a mobile app (canvas app) and select Share in the banner.

Specify the Azure AD group or users that you want to share this app with. As the app connects to Dataverse data, you will also need to provide permissions to the entities. The sharing panel prompts you to manage security for the entities. Assign the Emergency Response User and Common Data Service User security roles to the entities used by this app and select Share.

Repeat steps 3 and 4 for each mobile app.
Detailed information about sharing your apps: Share a canvas app
Step 8: Set your mobile app as hero and featured app (optional)
Optionally, you can set your mobile app as the hero and featured app within the Power Apps mobile app. You must be a Tenant Admin to complete this step.
Before you perform this step, you will need app ID of each mobile app (canvas app) that you want to set as hero and featured app. For info about getting app ID for a canvas app, see
Next, do the following:
Open Notepad, and copy this PowerShell script:
# MUST BE A TENANT ADMIN TO RUN THIS
Install-Module -Name Microsoft.PowerApps.Administration.PowerShell
Install-Module -Name Microsoft.PowerApps.PowerShell -AllowClobber
Import-Module -Name Microsoft.PowerApps.Administration.PowerShell
Import-Module -Name Microsoft.PowerApps.PowerShell

# This call opens prompt to collect credentials
# (Azure Active Directory account and password)
# used by the commands
Add-PowerAppsAccount

# Use the "Emergency Response App" App ID
# To clear a featured app use Clear-AdminPowerAppAsFeatured

#Change the App ID for each new app (APPGUIDHERE)
Set-AdminPowerAppAsFeatured -AppName APPGUIDHERE

# To clear a hero app use Clear-AdminPowerAppAsHero
# Change the App ID for each new app (APPGUIDHERE)
Set-AdminPowerAppAsHero -AppName APPGUIDHERE
Replace the
APPGUIDHEREvalue in the script with the actual app ID for the app you want to set as featured and hero respectively.Save the file as .ps file.
Run PowerShell as an administrator and execute the .ps file you just created.
Step 9: Share model-driven app with admins in your organization
For your admin users to use the admin app (model-driven app), it must be shared with them. It's easier to use Azure AD groups to easily share apps with a group of admin users.
Important
Make sure the user or group you plan to share the app with already have access to your environment. Typically, you would have already added users or group while setting up your environment. Alternatively, you can follow the steps here to add users to your environment and provide appropriate access before sharing app with them: Create users and assign security roles.
Sign in to Power Apps.
In the left navigation pane, select Apps to view a list of all your apps.
Select the model-driven app (Admin App – Emergency Response App) and select Share in the banner.
Specify the Azure AD group or admin users that you want to share this app with, assign the Emergency Response Admin security role, and select Share.
Step 10: Publish the Power BI dashboard
Publish the Power BI dashboard and share it with users in your organization so that they can use the dashboard for insights and decision making.
You can publish the Power BI dashboard using either of the following options: using the template app from the AppSource or using the .pbit file available in the deployment package.
Option A: Publish using the template app from AppSource (Preferred Option)
Detailed information about using the template app from the AppSource is available here: Connect to the Hospital Emergency Response Decision Support Dashboard
Important
This is an easier way to publish the Power BI dashboard than using the .pbit file option to publish. We recommend customers use this option instead of publishing using the .pbit file option.
Option B: Publish using the .pbit file in the deployment package
This section provides information on how you can use the Emergency Response App.pbit file available in the deployment package to publish the dashboard.
Prerequisites
Download the deployment package (.zip file) from https://aka.ms/emergency-response-solution. After downloading, extract the .zip file to your computer. The .pbit file will be available in the Power BI Template folder
Power BI Premium Capacity or Power BI Pro licenses assigned to users accessing the report.
Create a workspace in Power BI where you publish the report. Sign into Power BI and create a workspace. More information: Create the new workspaces in Power BI
Install Power BI Desktop from the Windows app store: https://aka.ms/pbidesktop
Note
If you have installed Power BI Desktop by downloading directly from the Download Center page as an executable in the past, remove it and use the one from the Microsoft Store. The Microsoft Store version will be updated automatically as new releases are available.
If you can't install from Microsoft Store, install the latest non-Microsoft Store version from the Download Center page.
After installing Power BI Desktop from app store, run it, sign in using an account that has permission to publish Power BI apps in your organization.
Publish the dashboard using the .pbit file
Navigate to the location where you extracted the deployment package. You will find the Emergency Response App.pbit file under the Power BI Template folder.
Open the Emergency Response App.pbit file in Power BI Desktop. You'll will be prompted to type the following values:
Organization_name: Type your organization name that will be populated on the top-left corner of each report page.
Tip
You might want to specify a different value for Organization_name to identify Power BI dashboard in your test environment. For example, Contoso Test System.
CDS_base_solution_URL: Type the URL of your Dataverse environment instance. For example: https://[myenv].crm.dynamics.com

Select Load.
You will be prompted to enter credentials to connect to your Dataverse environment. Select Organizational account > Sign in to specify your Dataverse credentials.

After signing in, select Connect to connect to your data in Dataverse.
On successful connection, your data will be displayed in the Power BI report. You'll be prompted to apply pending changes to your query; select Apply changes.
Select Publish to publish data to your Power BI workspace. You'll be prompted to save your changes; select Save.
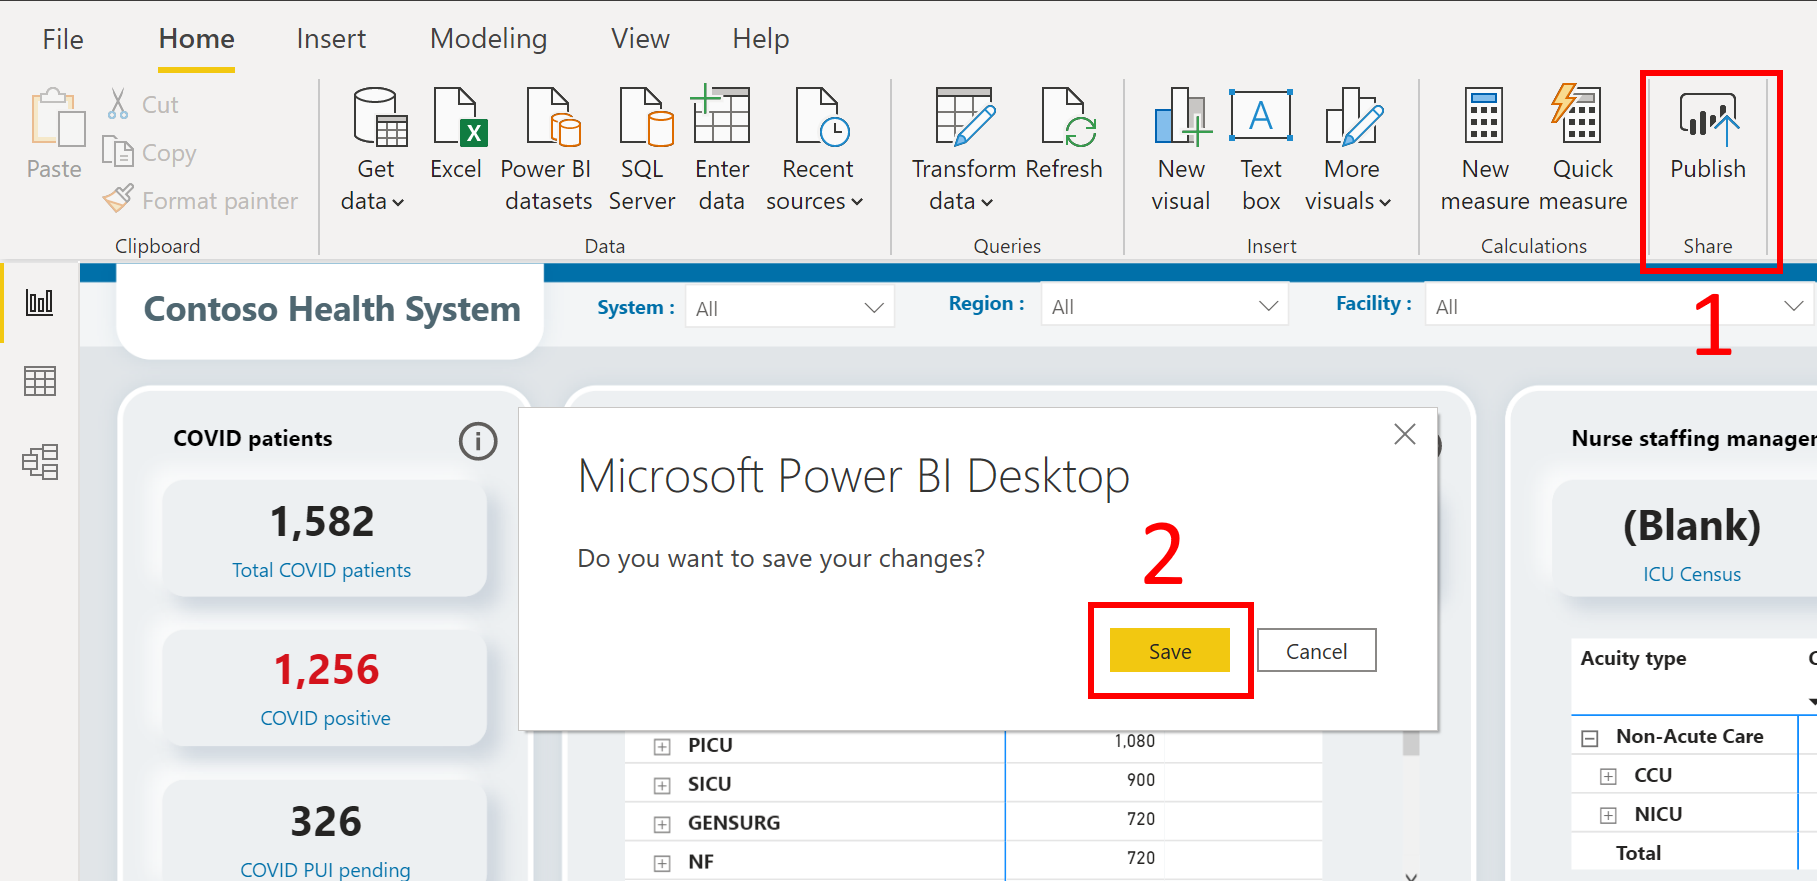
You'll be prompted to save the file as a .pbix file along with your Dataverse environment information. Provide a name and save it on your computer.
After saving the .pbix file, you'll be prompted to publish the report. In the Publish to Power BI page, select the workspace where you want to publish, and then click Select.
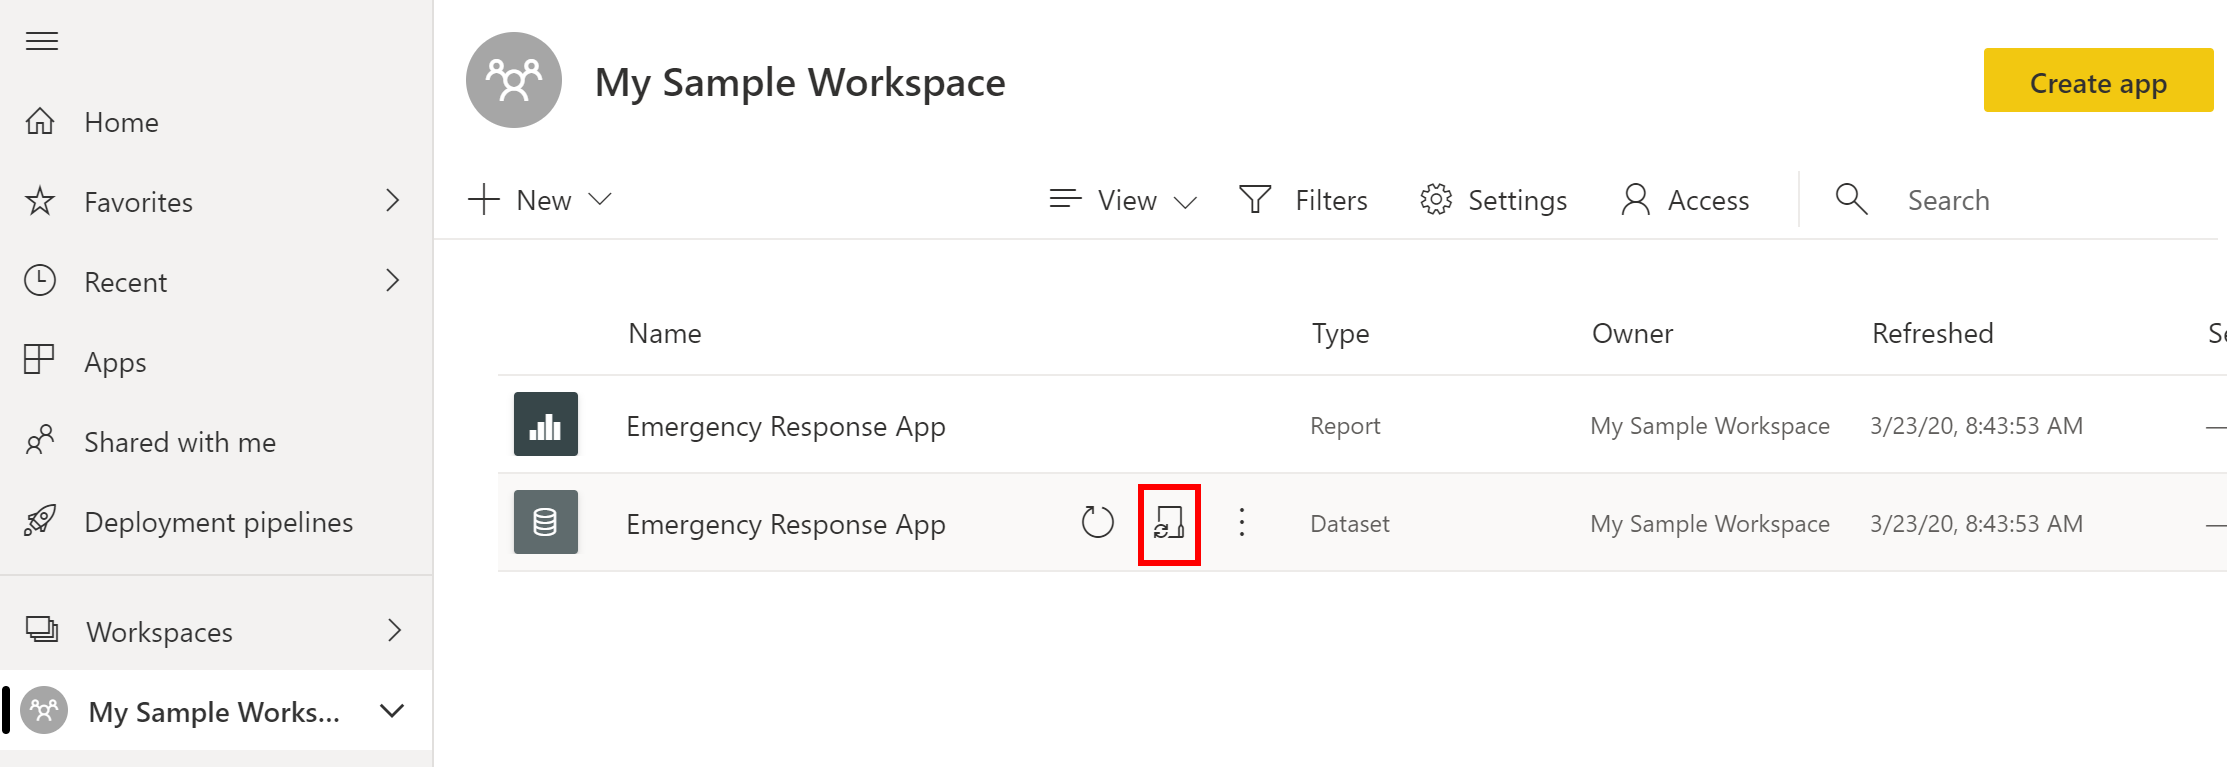
The report becomes available in your workspace. Now, we will configure the data refresh settings for the dataset. Select the dataset in your workspace and select the Schedule refresh icon.
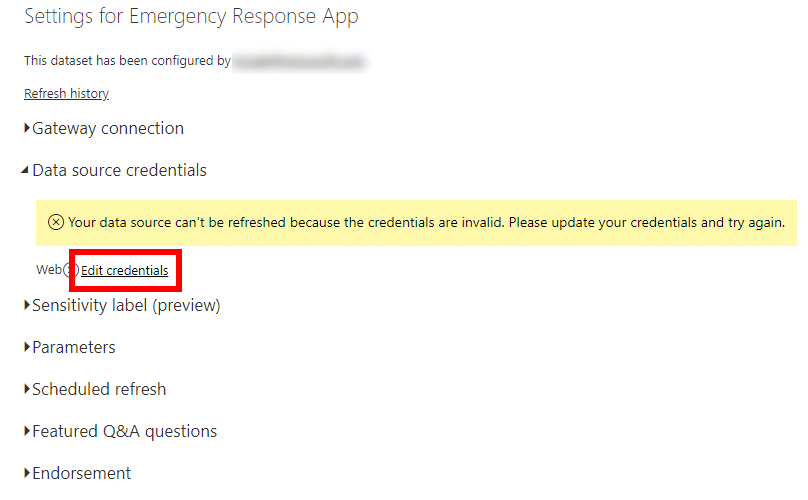
The first time you try to set the data refresh setting, you'll see the Settings page with a message stating that your credentials aren't valid. Under Data source credentials, select Edit credentials to specify your credentials.
In the next screen:
- Select Authentication method as OAuth2.
- Select Privacy level setting for this data source as Organizational.
- Select Sign in.
You'll be prompted to specify your credentials and sign in. Upon successful sign in, you'll return to the Settings page.
In the Settings page, expand Scheduled refresh and specify the required details for refreshing data based on a schedule. Select Apply.
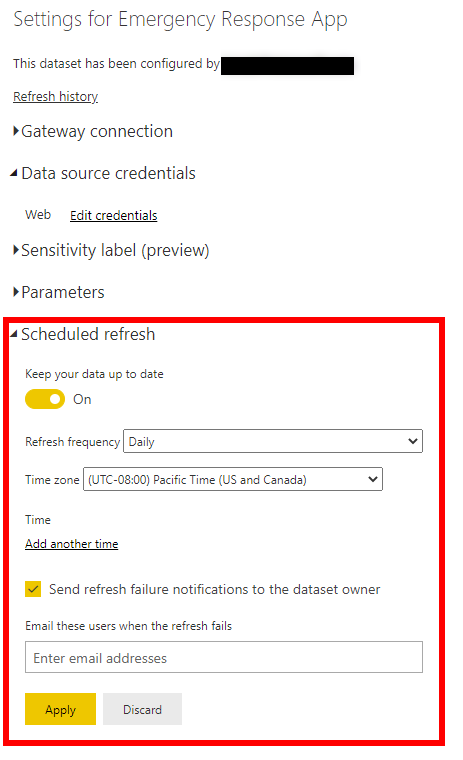
Note
There are limits to how many times data can refresh. Power BI limits datasets on shared capacity to eight daily refreshes. If the dataset resides on a Premium capacity, you can schedule up to 48 refreshes per day in the dataset settings. More information: Refresh data
Select your workspace name in the left pane, and then select Create app in the top-right corner.

On the app publishing page:
On the Setup tab, specify the name and description of your app.
On the Navigation tab, specify the location of the dashboard where you will publish it.
On the Permissions tab, specify users or group who will be able to view this app. Make sure you select the Install this app automatically check box to install this app automatically for end users. More information: Automatically install apps for end users

Select Publish app. For detailed information on publishing apps in Power BI, see Publish your app.
After publishing the dashboard
To view the published Power BI dashboard, see View Power BI dashboard
Step 11: Enable flows for populating CDC data
You must enable the following flows that help in collating the data from various sources in the solution in the format that Centers for Disease Control and Prevention (CDC) expects each hospital to report:
- Populate CDC Data - Healthcare Staff
- Populate CDC Data - Healthcare Supply
- Populate CDC Data - Patients and Hospitals Capacities
Sign into Power Automate.
In the left pane, select Solutions. From the solution list, select Hospital Emergency Response Solution to open the solution.
In the solution, filter on Flow to find all the flows.
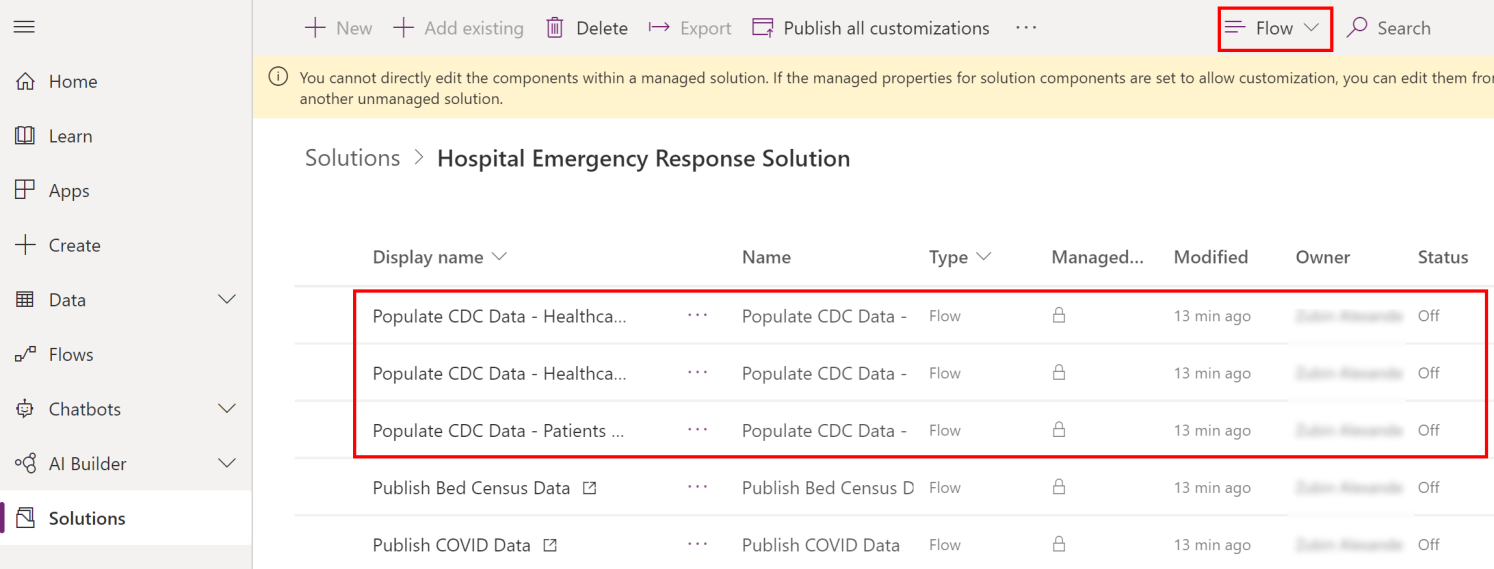
Select the flow name to open the flow definition. For example, Populate CDC Data - Healthcare Staff.
Select Edit on the toolbar, and verify the connection information.
Select Save to save the changes, and then select Turn On.
Perform steps 4-6 with each of the following flows to verify the connection, and then enable the flow:
- Populate CDC Data - Healthcare Supply
- Populate CDC Data - Patients and Hospitals Capacities
Issues and feedback
To report an issue with the Hospital Emergency Response sample app, visit https://aka.ms/emergency-response-issues.
For feedback about the Hospital Emergency Response sample app, visit https://aka.ms/emergency-response-feedback.