Note
Access to this page requires authorization. You can try signing in or changing directories.
Access to this page requires authorization. You can try changing directories.
Dataverse can give you a way to build flows that have information stored in a database independent of a cloud flow. The best example of this is with approvals. If you store the status of the approval in a table, your flow can work on top of it.
In this example, you'll create an approval process that starts when a user adds a file to Dropbox. When the file is added, information about it appears in an app, where a reviewer can approve or reject the change. When the reviewer approves or rejects the change, notification mail is sent, and rejected files are deleted from Dropbox.
By following the steps in this section, you'll build:
- a custom table that will contain information about each file added to Dropbox and whether the file's status is approved, rejected, or pending.
- a flow that adds information to the custom table when a file is added to Dropbox, sends mail when the file is approved or rejected, and deletes rejected files. These steps demonstrate how to build such a cloud flow from scratch, but you can create a similar flow from a template.
- an app in which a reviewer can approve or reject files added to Dropbox. You'll use Power Apps to generate this app automatically based on the columns in the custom table.
Prerequisites
Sign up for Power Automate and Power Apps.
Create connections to Dropbox and Office 365 Outlook, as Manage your connections.
Build the table
Sign in to Power Apps.
On the left navigation bar, select Tables.
Select New table and then New table.
Specify a display name and a plural name for the new table. In this example, both names are ReviewDropboxFiles. Optionally, you can add a description.
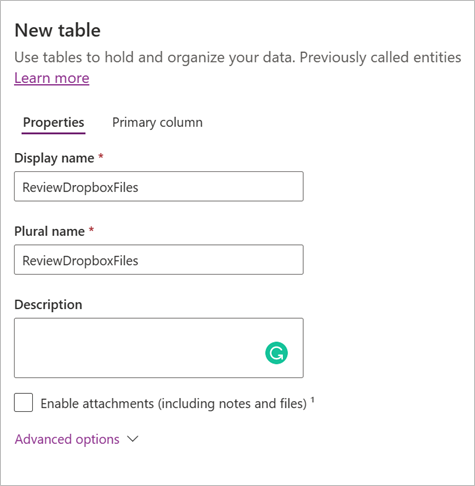
Select Save to save the table.
Add columns to the table
Select the ReviewDropboxFiles table in the Tables page, and then select New > Column.

Create a new column named Approver with the following properties:
- Set Display Name to Approver.
- Set Data type to Single line of text.
- Set Format to Email.
- Set Required to Business required.
Create a new column named Status with the following properties:
- Set Display Name to Status.
- Set Data type to Single line of text.
- Set Format to Text.
- Set Required to Business required.
Create a new column named File identifier with the following properties:
- Set Display Name to File identifier.
- Set Data type to Single line of text.
- Set Format to Text.
- Set Required to Business required.
Sign in and create a cloud flow
Sign in to Power Automate.
On the top right menu, select the environment in which you created the database. If you don't select the same environment, you won't see your table.
Go to My flows and select New flow > Automated cloud flow.
Start when a file is added
In the Build an automated cloud flow dialog, enter a name for the flow and search for the When a file is created Dropbox trigger.
Under Folder, select the folder icon, and then browse to the folder where files will be added.
Add data to the table
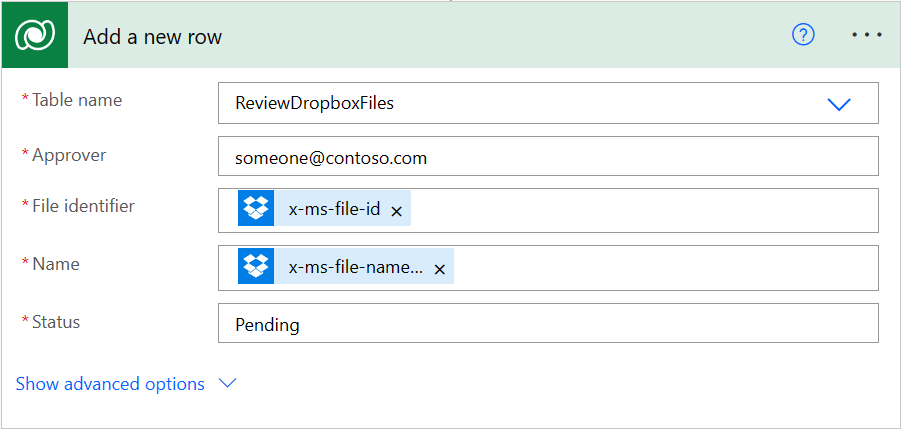
In the designer, select New step and search for the Add a new row Dataverse action.
Configure the action as presented in the following screenshot:
In the Table name drop-down menu, select the ReviewDropboxFiles table.
In the Approver field, enter the email address of the person who will review the files.
In the File identifier field, select File identifier from the Dynamic content list.
In the Name field, select File name from the Dynamic content list.
In the Status field, enter Pending.
Check whether the file has been reviewed
Under the Add a new row action, select New step and search for the Do until action.
Configure the Do until action as presented in the following screenshot:
Select the left box in the action and select Status from the Dynamic content list.
In the middle drop-down menu, select is not equal to.
In the right box, enter Pending.
Inside the Do until action, select Add an action and search for the Get a row by ID Dataverse action.
Configure the Get a row by ID action as presented in the following screenshot:
In the Table name drop-down menu, select the ReviewDropboxFiles table.
In the Row ID field, select File identifier from the Dynamic content list.
Check whether the item has been approved
Under the Do until action, select New step and search for the Condition action.
Configure the Condition action as presented in the following screenshot:
Select the left box in the action and select Status from the Dynamic content list.
In the middle drop-down menu, select is equal to.
In the box on the right, enter Approved.
Send notification mail
Under the If yes action, select Add an action and search for the Send an email (V2) Office 365 Outlook action.
Configure the Send an email (V2) action as presented in the following screenshot:
In the To field, enter the email address of the person whom you want to notify when an item is accepted.
Tip
To make testing the flow easier, specify your own address. You can change it when the flow is ready for actual use.
In the Subject field, select File name from the Dynamic content list.
In the Body field, enter The item has been approved..
Under the If no action, repeat the step 2, but specify the body of the email message as The item has been rejected.
Delete rejected files
Under the Send an email (V2) action for the rejection mail, select Add an action and search for the Delete file Dropbox action.
In the File field, select File identifier from the Dynamic content list.
Save the flow
At the top of the screen, enter a name for the created cloud flow, and select Save.
In Dropbox, add at least two files to the folder that you specified: one to test approval and one to test rejection.
Build the app
Sign in to Power Apps.
Go to the Create page and then select Dataverse.
Select your Dataverse connection, and then the ReviewDropboxFiles table.
If this is your first time, you're prompted to create a connection to Dataverse.
If the Welcome to Power Apps Studio dialog box appears, you can follow it or skip it.
Customize the app
At this step, the app should contain three screens to browse, see the details and edit the entries, respectively.
To add or remove fields from a screen:
Select the desired screen on the Tree view.
Select the root element of the screen.
Select Edit in the right pane.
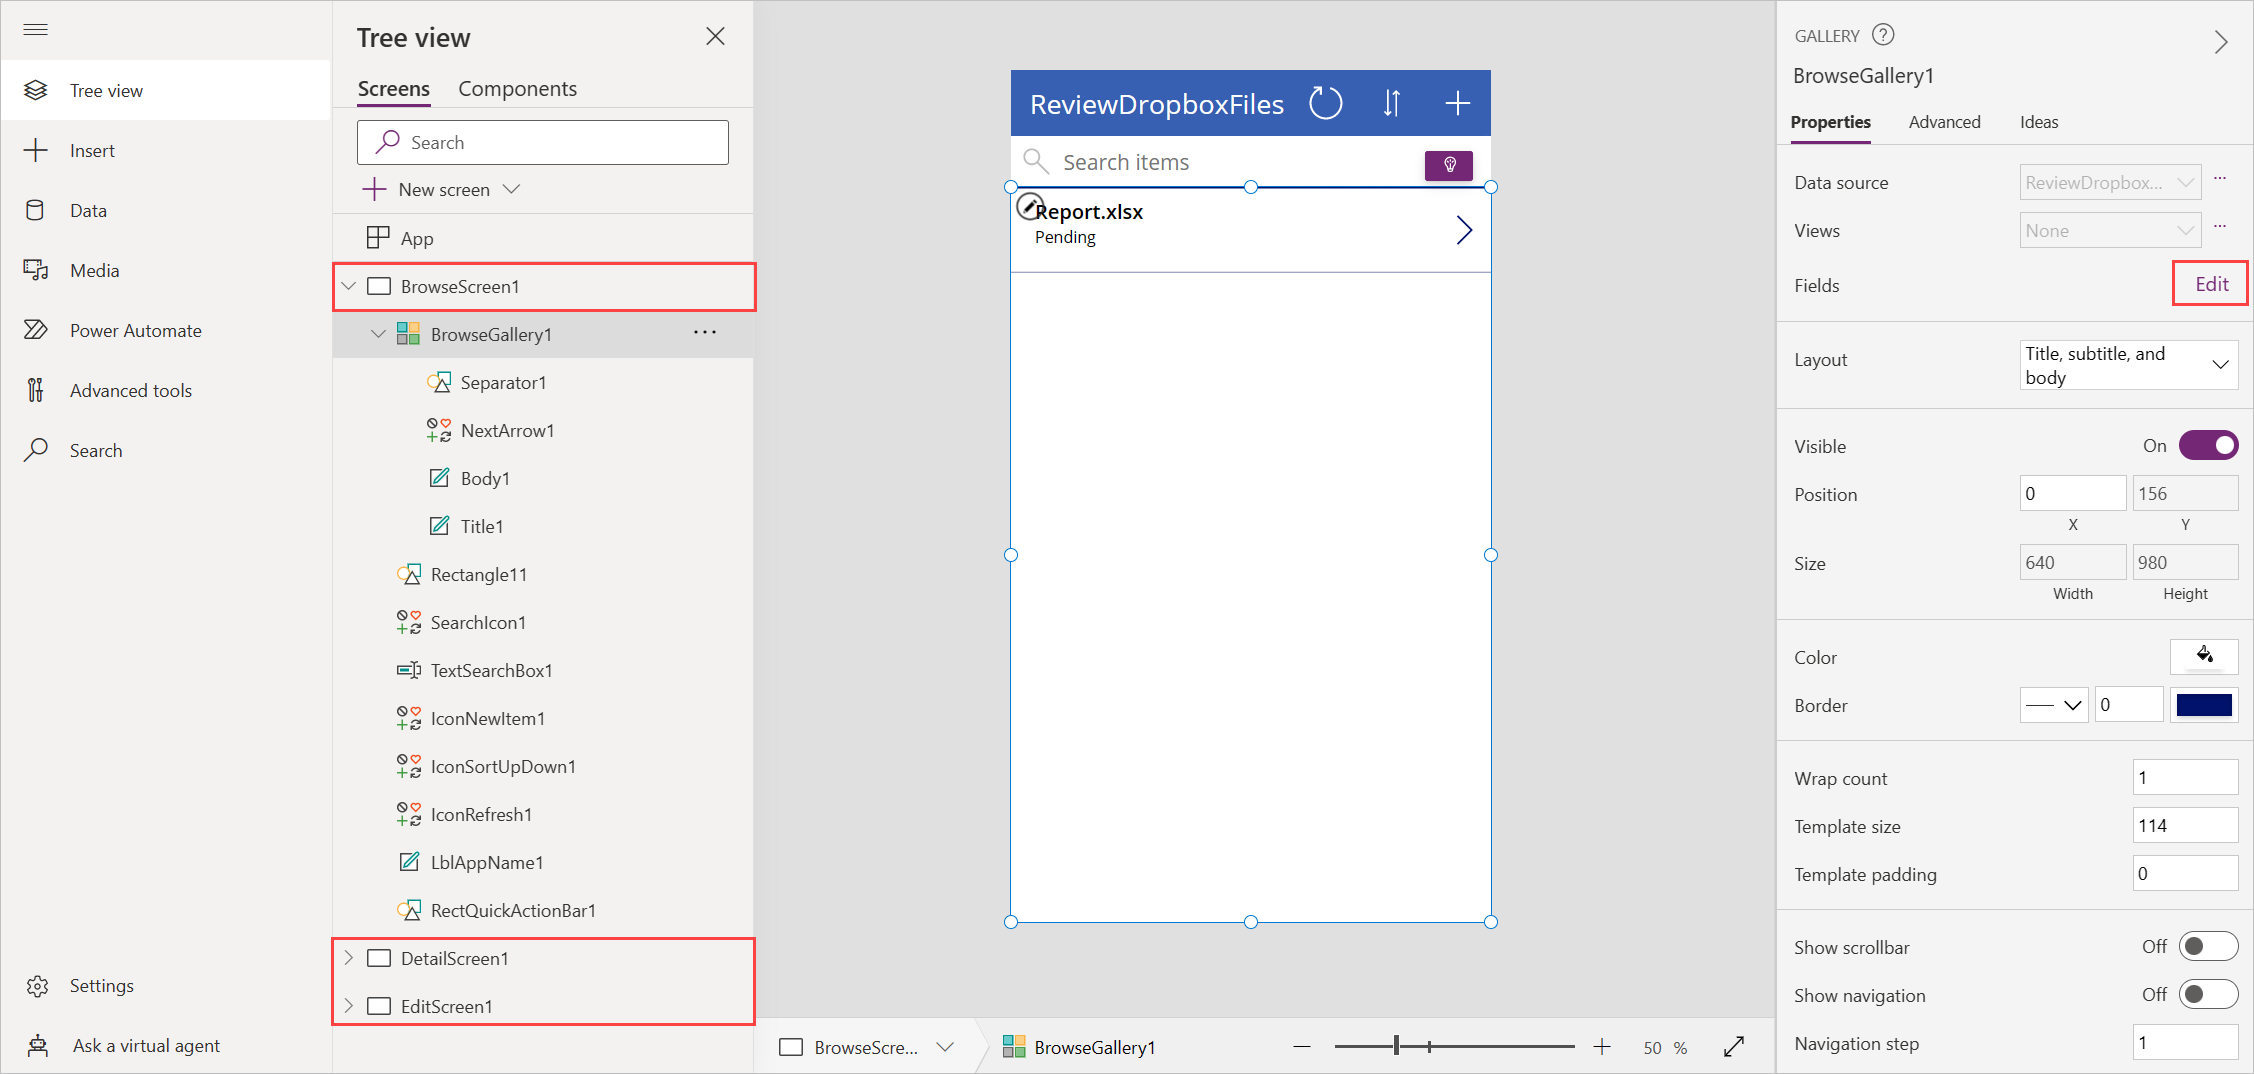
The current example contains the following fields for each screen:
- In the browse screen, there are fields for the Name and Status columns of the Dataverse table.
- In the details screen, there are fields for the Name, Status, File identifier, and Approver columns of the Dataverse table.
- In the edit screen, there's a field for the Name column and an edit text field for the Status column of the Dataverse table.
Test the overall solution
In Power Apps, open the preview mode selecting the play button on the toolbar.

Select the arrow next to the first file in the list to see the details about it.
Select the pencil icon to change the details of the file.
In the Status box, enter Approved and select the checkmark icon to save your changes. In a few minutes, you'll receive an email stating that the file was approved.
Repeat the previous steps but enter Rejected (or anything except Approved) in the Status field. In a few minutes, you'll receive an email stating that the file was rejected, and the file will be deleted from Dropbox.