Note
Access to this page requires authorization. You can try signing in or changing directories.
Access to this page requires authorization. You can try changing directories.
This article describes how to create custom actions in Power Automate for desktop.
Creating custom actions
Important
Reserved keywords can't be used as action names and/or action properties. Use of reserved keywords as action names and/or action properties result in erroneous behavior. More information: Reserved keywords in desktop flows
Begin by creating a new Class Library (.NET Framework) project. Select .NET framework version 4.7.2.
To form an action in the custom module created:
- Delete the autogenerated Class1.cs file.
- Create a new class inside your project to represent the custom action give it a distinct name.
- Include the Microsoft.PowerPlatform.PowerAutomate.Desktop.Actions.SDK and Microsoft.PowerPlatform.PowerAutomate.Desktop.Actions.SDK.Attributes namespaces.
- All classes representing actions should have an [Action] attribute above your class.
- The class should have public access and inherit from ActionBase class.
using System;
using Microsoft.PowerPlatform.PowerAutomate.Desktop.Actions.SDK;
using Microsoft.PowerPlatform.PowerAutomate.Desktop.Actions.SDK.Attributes;

namespace Modules.MyCustomModule
{
    [Action(Id = "CustomAction")]
    public class CustomAction : ActionBase
    {
        public override void Execute(ActionContext context)
        {
            throw new NotImplementedException();
        }
    }
}
Most actions have parameters (Input or Output). Input and Output parameters are represented by classic C# properties.
Each property should have an appropriate C# attribute, either [InputArgument] or [OutputArgument] to dictate its type and how they're presented in Power Automate for desktop.
Input arguments can also have default values.
using System.ComponentModel;
using Microsoft.PowerPlatform.PowerAutomate.Desktop.Actions.SDK;
using Microsoft.PowerPlatform.PowerAutomate.Desktop.Actions.SDK.Attributes;

namespace Modules.MyCustomModule
{
    [Action(Id = "CustomAction")]
    public class CustomAction : ActionBase
    {
        [InputArgument, DefaultValue("Developer")]
        public string InputName { get; set; }

        [OutputArgument]
        public string DisplayedMessage { get; set; }

        public override void Execute(ActionContext context)
        {
            DisplayedMessage = $"Hello, {InputName}";
        }
    }
}
Adding descriptions to custom actions
Add a description and a friendly name for the modules and actions so that RPA developers know how to best utilize them.
Power Automate for desktop designer shows friendly names and descriptions.
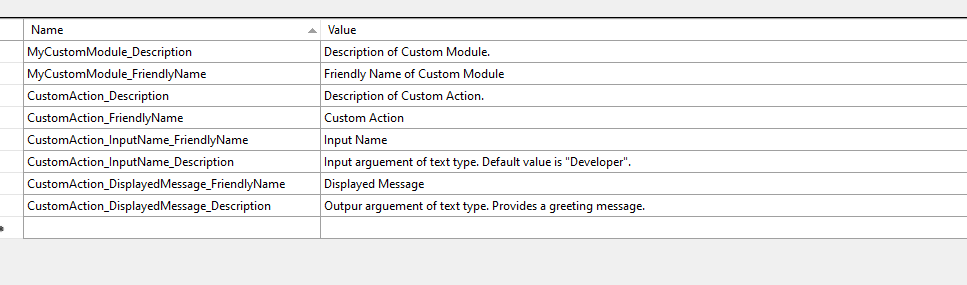
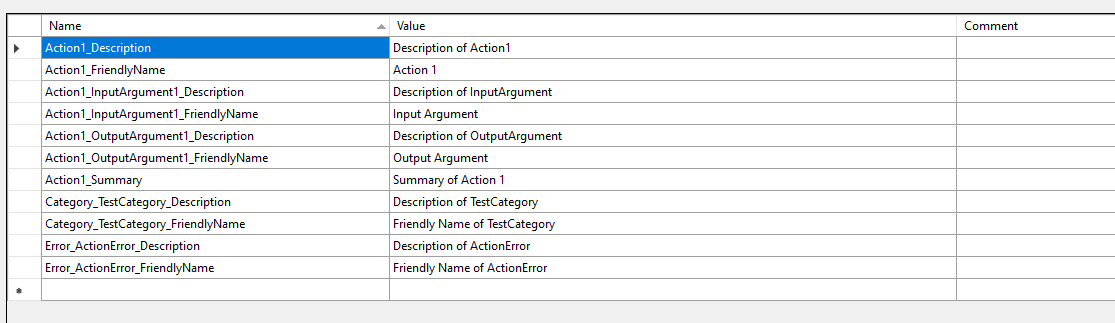
You can create a "Resources.resx" file inside the Properties folder of the module project. The new ".resx" file should be named "Resources.resx".
The format of the descriptions for Modules and Actions should be as follows:
"Module_Description" or "Action_Description" and "Module_FriendlyName" or "Action_FriendlyName" respectively in the name field. The description in the value field.
We also recommend that you provide descriptions and friendly names for parameters. Their format should be as follows: "Action_Parameter_Description", "Action_Parameter_FriendlyName".
Tip
It is recommended to denote what it is you are describing in the comment field (e.g. Module, Action etc.)
These can also be set with the FriendlyName and Description properties of the [InputArgument], [OutputArgument] and [Action] attributes.
Here's an example of a Resources.resx file for a custom module.
Another way to quickly add friendly names and descriptions to actions and parameters is with the FriendlyName and Description properties in the [Action], [InputArguement] and [OutputArguement] attributes.
Note
To add a friendly name and description to a module, you must modify the respective .resx file or add the respective C# attributes.
Adding error handling to custom actions
To define custom exceptions in your action, use the [Throws("ActionError")] attribute above the custom action class. Each exception case you want to define should have its own attribute.
In the catch block, use the following code:
throw new ActionException("ActionError", e.Message, e.InnerException);
Ensure that the ActionException name matches the name you provided in the Throws attribute. Use throw new ActionException for each exception case and match it with the corresponding Throws attribute name. All exceptions defined with the Throws attribute are visible in the designer's action error handling tab.
An example of this can be found in the Conditional actions section.
Resources localization
The default language for modules in Power Automate for desktop is assumed to be English.
The Resources.resx file should be in English.
Any other languages can be added with extra Resources.{locale}.resx files for localization. For example, Resources.fr.resx.
Custom module categories
Modules can include categories and subcategories for better action organization.
In order to separate custom actions in categories, subcategories, modify the [Action] attribute that precedes the class that represents the custom action in the following manner:
[Action(Category = "category.subcategory")]
Note
A Module can have multiple categories. Similarly, categories can be comprised by subcategories. This structure can be indefinite.
The Order property dictates the order by which actions are previewed in the designer.
Action1 belongs in the category "TestCategory" and it's the first action of the module (this way you explain Order and category with an example).
[Action(Id = "Action1", Order = 1, Category = "TestCategory")]
Conditional actions
Conditional actions are actions that return either "True" or "False". 'If file exists' Power Automate for desktop action of the standard library is a good example of a conditional action.
Conditional action example:
using Microsoft.PowerPlatform.PowerAutomate.Desktop.Actions.SDK;
using Microsoft.PowerPlatform.PowerAutomate.Desktop.Actions.SDK.Attributes;
using System;
using System.ComponentModel;

namespace Modules.CustomModule
{
    [ConditionAction(Id = "ConditionalAction1", ResultPropertyName = nameof(Result))]
    [Throws("ActionError")] // TODO: change error name (or delete if not needed)
    public class ConditionalAction1 : ActionBase
    {
        #region Properties

        public bool Result { get; private set; }

        [InputArgument]
        public string InputArgument1 { get; set; }

        #endregion

        #region Methods Overrides

        public override void Execute(ActionContext context)
        {
            try
            {
                //TODO: add action execution code here
            }
            catch (Exception e)
            {
                if (e is ActionException) throw;

                throw new ActionException("ActionError", e.Message, e.InnerException);
            }
        }

        #endregion
    }
}
Notice the Result boolean variable.
The If file exists action doesn't have an output argument. What it returns is either true or false, depending on what the boolean variable Result holds.
Custom action selectors
There are particular cases, in which a custom action might be required to have more than one variation.
An example is the "Launch Excel" action, from the standard library of actions.
Using the "with a blank document" selector, the flow launches a blank Excel document, whereas using the "and open the following document" selection requires the file path of the file to open.
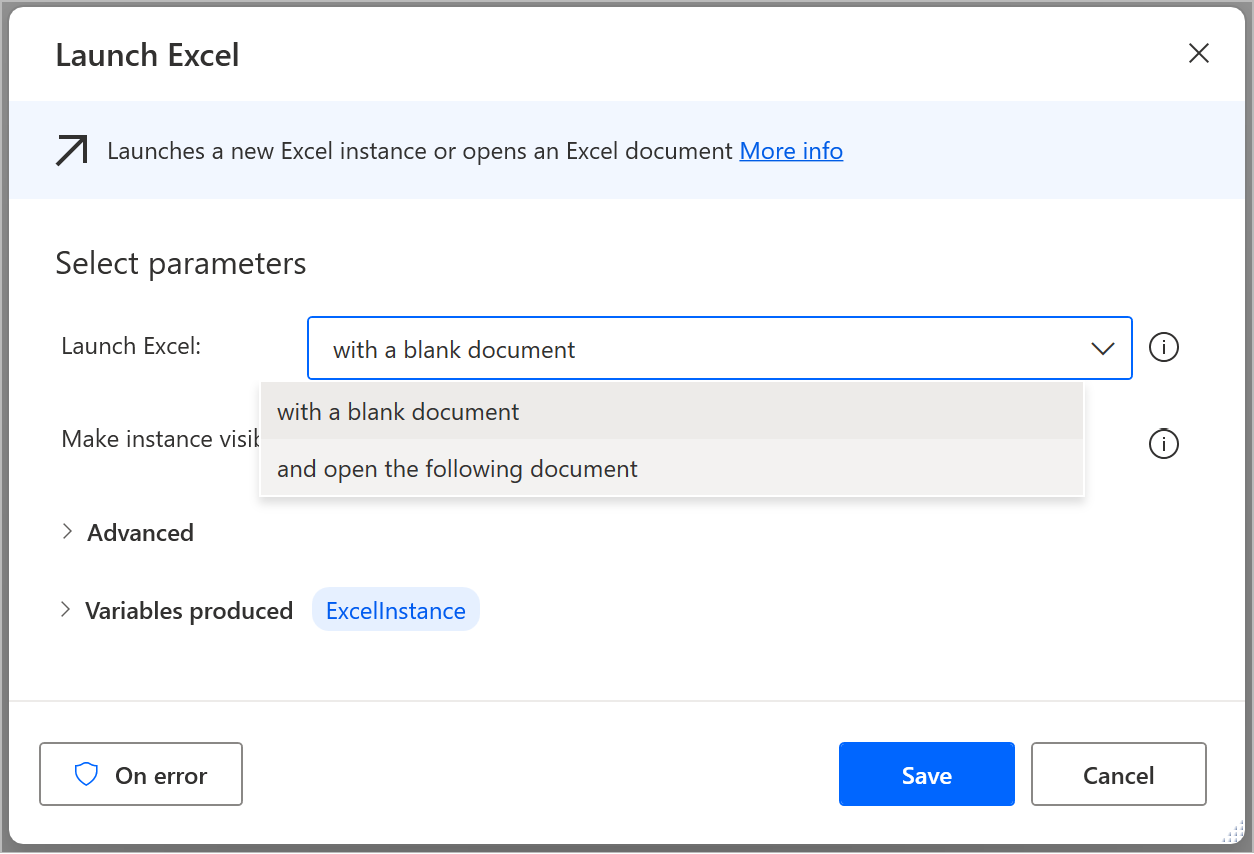
The two actions mentioned above are two selectors of the "Launch Excel" base action.
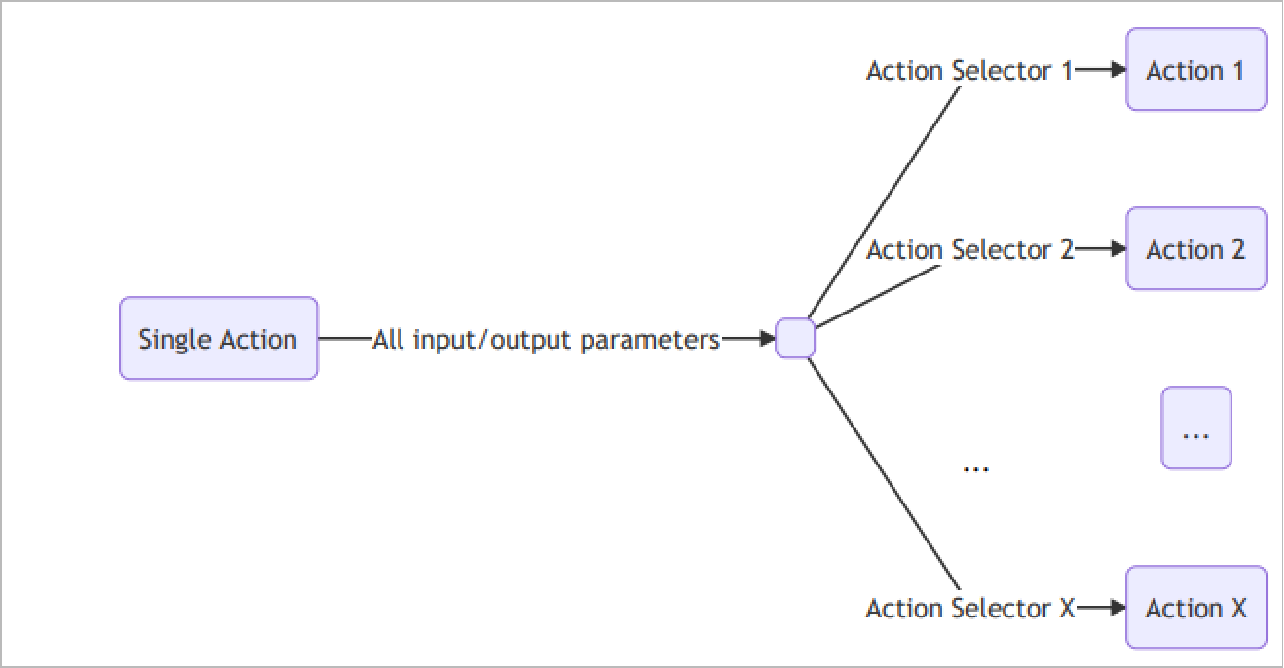
When creating custom actions, you don't have to rewrite functionality.
You can create a single "base" Action, setting its input and output parameters and then choose what would be visible in each flavor by utilizing action selectors.
Through action selectors a level of abstraction can be added over a single action, allowing for the retrieval of specific functionality from the single "base" action without having to rewrite code to form a new variation of the same action every time.
Think of selectors as choices, filtering a single action and presenting only the information required according to the respective selectors.
To form a new action selector, first create a base action to be utilized by the selectors.
The central action requires either a boolean or an enum property as an input C# argument.
The value of this property determines which selector is utilized.
The most common way is using an enum. Especially when more than two selectors are needed, enums is the only option.
For two selector cases, booleans can be used.
This property, also known as a constraint argument, must have a default value.
The central action is declared as a classic action.
Notice the first property (input argument) is an enum. Based on that property's value, the appropriate selector becomes active.
Note
To have the arguments ordered in your desired manner, you set the Order value next to the InputArgument attribute.
using System.ComponentModel;
using Microsoft.PowerPlatform.PowerAutomate.Desktop.Desktop.Actions.SDK;
using Microsoft.PowerPlatform.PowerAutomate.Desktop.Desktop.Actions.SDK.Attributes;

namespace Modules.CustomModule
{
    [Action(Id = "CentralCustomAction")]
    public  class CentralCustomAction : ActionBase
    {
        #region Properties

        [InputArgument, DefaultValue(SelectorChoice.Selector1)]
        public SelectorChoice Selector { get; set; }

        [InputArgument(Order = 1)]
        public string FirstName { get; set; }

        [InputArgument(Order = 2)]
        public string LastName { get; set; }

        [InputArgument(Order = 3)]
        public int Age { get; set; }

        [OutputArgument]
        public string DisplayedMessage { get; set; }

        #endregion

        #region Methods Overrides

        public override void Execute(ActionContext context)
        {
            if (Selector == SelectorChoice.Selector1)
            {
                DisplayedMessage = $"Hello, {FirstName}!";
            }
            else if (Selector == SelectorChoice.Selector2)
            {
                DisplayedMessage = $"Hello, {FirstName} {LastName}!";
            }
            else // The 3rd Selector was chosen
            {
                DisplayedMessage = $"Hello, {FirstName} {LastName}!\nYour age is: {Age}";
            }
        }

        #endregion
    } // you can see below how to implement an action selector
}
Custom action selectors using enums
In this example, you create three selectors. A simple enum dictates the appropriate selector each time:
public enum SelectorChoice
{
    Selector1,
    Selector2,
    Selector3
}
Selectors are represented by classes.
Those classes must inherit the ActionSelector<TBaseActionClass> class.
Note
TBaseActionClass is the base action class name.
In the UseName() method, the name of the action selector is declared. This is used as a name of the action to resolve the resources.
public class Selector1 : ActionSelector<CentralCustomAction>
{
    public Selector1()
    {
        UseName("DisplayOnlyFirstName");
        Prop(p => p.Selector).ShouldBe(SelectorChoice.Selector1);
        ShowAll();
        Hide(p => p.LastName);
        Hide(p => p.Age);
        // or
        // Show(p => p.FirstName);
        // Show(p => p.DisplayedMessage);
    }
}
Note
The Selector classes should not be declared as actions. The only action is the central one. Selectors act as filters.
In this specific example we want to display only one of the arguments, thus the others are filtered out. Similarly for Selector2:
public class Selector2 : ActionSelector<CentralCustomAction>
{
    public Selector2()
    {
        UseName("DisplayFullName");
        Prop(p => p.Selector).ShouldBe(SelectorChoice.Selector2);
        ShowAll();
        Hide(p => p.Age);
    }
}
And Selector3 classes:
public class Selector3 : ActionSelector<CentralCustomAction>
{
    public Selector3()
    {
        UseName("DisplayFullDetails");
        Prop(p => p.Selector).ShouldBe(SelectorChoice.Selector3);
        ShowAll();
    }
}
The final execution is achieved through the Execute(ActionContext context) method that resides in the central action. Based on the selector, the respective values filtered are displayed.
public override void Execute(ActionContext context)
{
    if (Selector == SelectorChoice.Selector1)
    {
        DisplayedMessage = $"Hello, {FirstName}!";
    }
    else if (Selector == SelectorChoice.Selector2)
    {
        DisplayedMessage = $"Hello, {FirstName} {LastName}!";
    }
    else // The 3rd Selector was chosen
    {
        DisplayedMessage = $"Hello, {FirstName} {LastName}!\nYour age is: {Age}";
    }
}
Custom action selectors using boolean
The following is an example utilizing Boolean instead of enums.
using System.ComponentModel;
using Microsoft.PowerPlatform.PowerAutomate.Desktop.Actions.SDK;
using Microsoft.PowerPlatform.PowerAutomate.Desktop.Actions.SDK.ActionSelectors;
using Microsoft.PowerPlatform.PowerAutomate.Desktop.Actions.SDK.Attributes;

namespace Modules.CustomModule
{
    [Action]
    public class CentralCustomActionWithBoolean : ActionBase
    {
        #region Properties

        [InputArgument, DefaultValue(true)]
        public bool TimeExpired { get; set; }

        [InputArgument]
        public string ElapsedTime { get; set; }

        [InputArgument]
        public string RemainingTime { get; set; }

        [OutputArgument]
        public string DisplayedMessage { get; set; }

        #endregion

        #region Methods Overrides

        public override void Execute(ActionContext context)
        {
            DisplayedMessage = TimeExpired ? $"The timer has expired. Elapsed time: {ElapsedTime}" : $"Remaining time: {RemainingTime}";
        }

        #endregion
    }

    public class NoTime : ActionSelector<CentralCustomActionWithBoolean>
    {
        public NoTime()
        {
            UseName("TimeHasExpired");
            Prop(p => p.TimeExpired).ShouldBe(true);
            ShowAll();
            Hide(p => p.RemainingTime);
        }
    }

    public class ThereIsTime : ActionSelector<CentralCustomActionWithBoolean>
    {
        public ThereIsTime()
        {
            UseName("TimeHasNotExpired");
            Prop(p => p.TimeExpired).ShouldBe(false);
            ShowAll();
            Hide(p => p.RemainingTime);
        }
    }
}
Setting descriptions for custom action selectors
To create a description and a summary for selectors, use the following format in the .resx file of your custom module.
SelectorName_Description
SelectorName_Summary
This can also be done in the selector with the WithDescription and WithSummary methods.
Important
.dll files describing the custom actions, their .dll dependencies and the .cab file containing everything should be properly signed with a digital certificate trusted by your organization. The certificate should also be installed on each machine on which a desktop flow with custom action dependencies is authored/ modified/ executed, present under the Trusted Root Certification Authorities.
Custom module IDs
Each module has its own ID (assembly name). When creating custom modules make sure you set unique module IDs. To set the assembly name of your module, modify the Assembly name property under the General section of the C# project's properties.
Warning
Including modules with the same ID in a flow will result in conflicts
Custom module name conventions
For the custom modules to be readable through Power Automate for desktop, the AssemblyName must have a filename that follows the below pattern:
?*.Modules.?*
Modules.?*
For example, Modules.ContosoActions.dll
The AssemblyTitle in the project settings specifies the module ID. It can only have alphanumeric characters and underscores and must begin with a letter.
Sign all DLLs inside the custom module
Important
It is mandatory to have all of the .dll files tha comprise a custom module (generated assembly and all its dependencies) signed with a trusted certificate
To finalize the creation of the custom module, all generated .dll files, which can be found under the bin/release or bin/Debug folder of the project, must be signed.
Sign all the .dll files using a trusted certificate by running the following command (for each .dll file) in a Developer Command Prompt for Visual Studio:
Sign the .dlls files using a trusted certificate by running the following command (for each dll) in a Developer Command Prompt for Visual Studio:
Signtool sign /f {your certificate name}.pfx /p {your password for exporting the certificate} /fd
SHA256 {path to the .dll you want to sign}.dll
or by running the following command (by creating a Windows PowerShell Script .ps1) that iterates through all .dll files and sign each one with the provided certificate:
Get-ChildItem {the folder where dll files of custom module exist} -Filter *.dll |
Foreach-Object {
	Signtool sign /f {your certificate name}.pfx /p {your password for exporting the certificate} /fd SHA256 $_.FullName
}
Note
The digital certificate must have an exportable private key and code sign capabilities
Packaging everything in a cabinet file
The .dll containing the custom actions and all its dependencies (.dll files) must be packaged in a cabinet file (.cab).
Note
When naming the .cab file, follow the file and folder naming convention for Windows operating system. Don't use blank spaces or special characters such as < > : " / \ | ? * .
Create a Windows PowerShell Script (.ps1) containing the following lines:
param(

    [ValidateScript({Test-Path $_ -PathType Container})]
	[string]
	$sourceDir,

	[ValidateScript({Test-Path $_ -PathType Container})]
    [string]
    $cabOutputDir,

    [string]
    $cabFilename
)

$ddf = ".OPTION EXPLICIT
.Set CabinetName1=$cabFilename
.Set DiskDirectory1=$cabOutputDir
.Set CompressionType=LZX
.Set Cabinet=on
.Set Compress=on
.Set CabinetFileCountThreshold=0
.Set FolderFileCountThreshold=0
.Set FolderSizeThreshold=0
.Set MaxCabinetSize=0
.Set MaxDiskFileCount=0
.Set MaxDiskSize=0
"
$ddfpath = ($env:TEMP + "\customModule.ddf")
$sourceDirLength = $sourceDir.Length;
$ddf += (Get-ChildItem $sourceDir -Filter "*.dll" | Where-Object { (!$_.PSIsContainer) -and ($_.Name -ne "Microsoft.PowerPlatform.PowerAutomate.Desktop.Actions.SDK.dll") } | Select-Object -ExpandProperty FullName | ForEach-Object { '"' + $_ + '" "' + ($_.Substring($sourceDirLength)) + '"' }) -join "`r`n"
$ddf | Out-File -Encoding UTF8 $ddfpath
makecab.exe /F $ddfpath
Remove-Item $ddfpath
This Windows PowerShell Script can then be used for creating the .cab file by invoking it in Windows PowerShell and providing:
- The directory to the .dll files to be compressed.
- The target directory to place the generated .cab file.
Invoke the script using the following syntax:
.\{name of script containing the .cab compression directions}.ps1 "{absolute path to the source directory containing the .dll files}" "{target dir to save cab}" {cabName}.cab
Example:
.\makeCabFile.ps1 "C:\Users\Username\source\repos\MyCustomModule\bin\Release\net472" "C:\Users\Username\MyCustomActions" MyCustomActions.cab
Note
- Make sure that the the actual custom actions .dll file is in the root level of the targetted path when creating the .cab file and not in a subfolder.
- The .cab file must also be signed. Unsigned .cab files and/or unsigned .dlls contained in them will not be usable in desktop flows and will result in error during inclusion.