Note
Access to this page requires authorization. You can try signing in or changing directories.
Access to this page requires authorization. You can try changing directories.
Although Excel actions can handle most Excel automation scenarios, SQL queries can retrieve and manipulate significant amounts of Excel data more efficiently.
Suppose a flow has to modify only the Excel registries that contain a particular value. To achieve this functionality without SQL queries, you need loops, conditionals, and multiple Excel actions.
Alternatively, you can implement this functionality with SQL queries using only two actions, Open SQL connection and Execute SQL statements.
Open a SQL connection to an Excel file
Before running a SQL query, you have to open a connection with the Excel file you want to access.
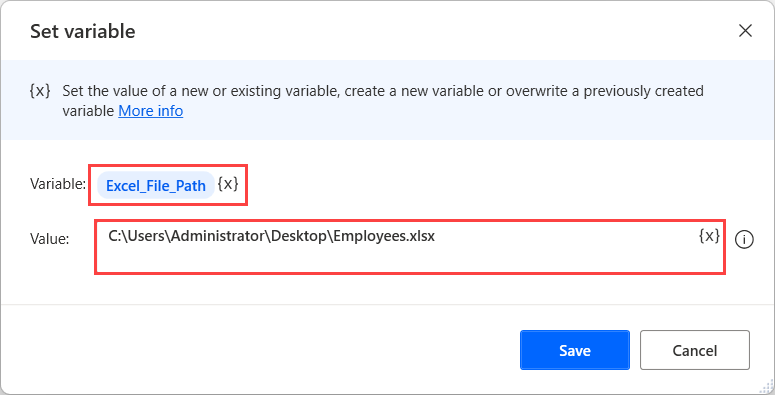
To establish the connection, create a new variable named %Excel_File_Path% and initialize it with the Excel file path. Optionally, you can skip this step and use the hard-coded path of the file later in the flow.
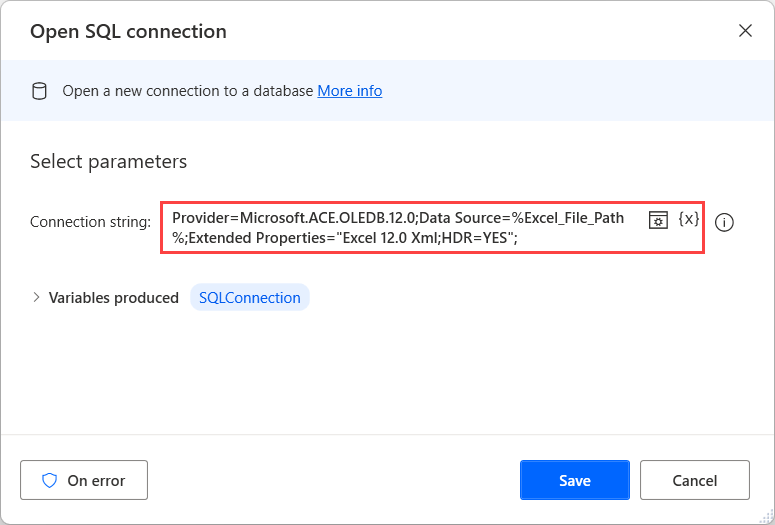
Now, deploy the Open SQL connection action and populate the following connection string in its properties.
Provider=Microsoft.ACE.OLEDB.12.0;Data Source=%Excel_File_Path%;Extended Properties="Excel 12.0 Xml;HDR=YES";
Note
To use the presented connection string successfully, you have to download and install Microsoft Access Database Engine 2010 Redistributable.
Open a SQL connection to a password-protected Excel file
A different approach is required in scenarios where you run SQL queries on password-protected Excel files. The Open SQL connection action can't connect to password-protected Excel files, so you have to remove the protection.
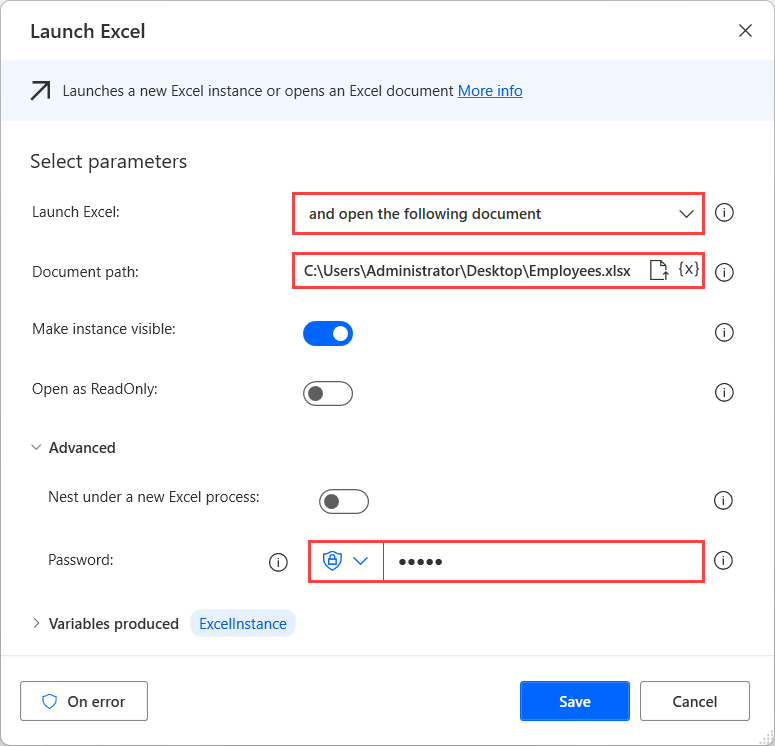
To achieve that, launch the Excel file using the Launch Excel action. The file is password-protected, so enter the appropriate password in the Password field.
Next, deploy the appropriate UI automation actions and navigate to File > Info > Protect Workbook > Encrypt with Password. You can find more information about UI automation and how to use the respective actions in Automate desktop applications.

After selecting Encrypt with Password, populate an empty string in the pop-up dialog using the Populate text field in window action. To populate an empty string, use the following expression: %""%.

To press the OK button in the dialog and apply the changes, deploy the Press button in window action.

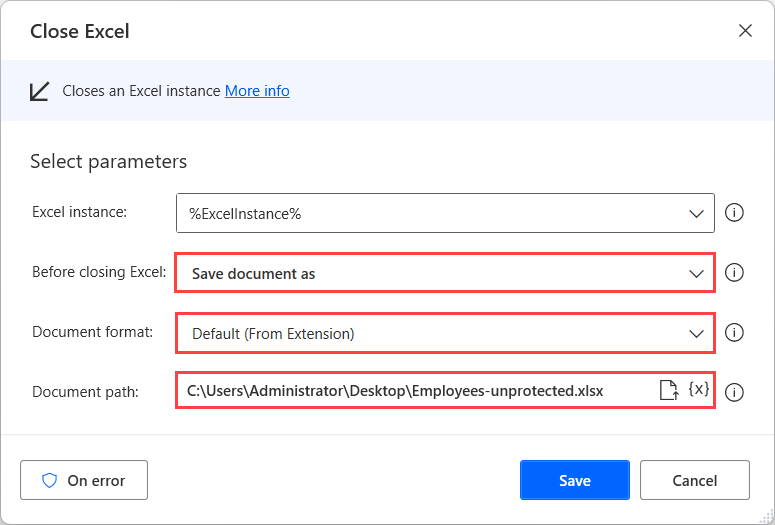
Lastly, deploy the Close Excel action to save the nonprotected workbook as a new Excel file.
After saving the file, follow the instructions in Open a SQL connection to an Excel file to open a connection to it.
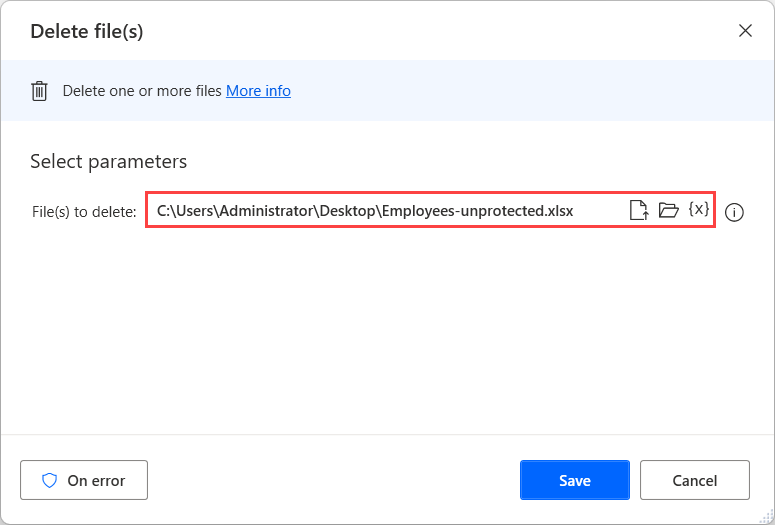
When the manipulation of the Excel file is complete, use the Delete file(s) action to delete the nonprotected copy of the Excel file.
Read contents of an Excel spreadsheet
Although the Read from Excel worksheet action can read the contents of an Excel worksheet, loops can take a significant time to iterate through the retrieved data.
A more efficient way to retrieve specific values from spreadsheets is to treat Excel files as databases and execute SQL queries on them. This approach is faster and increases the performance of the flow.
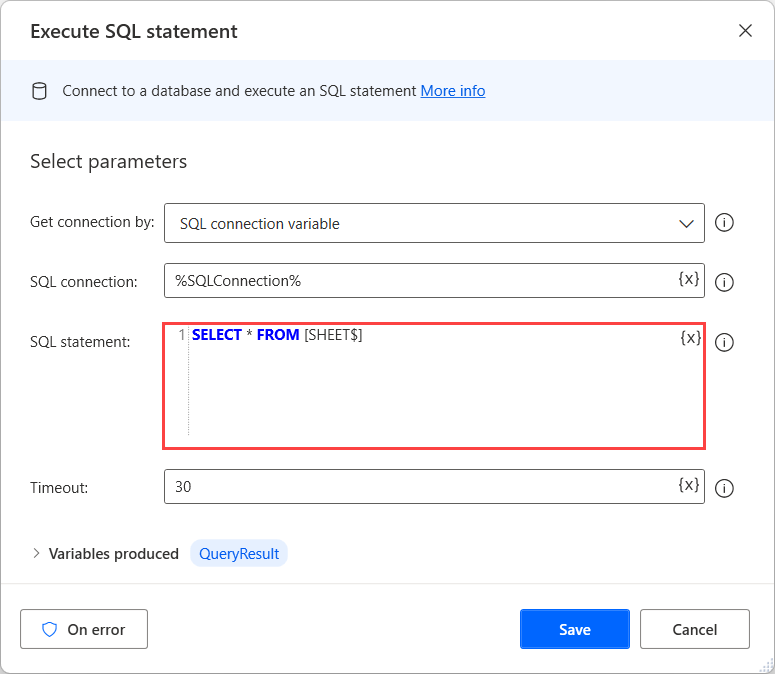
To retrieve all the contents of a spreadsheet, you can use the following SQL query in the Execute SQL statement action.
SELECT * FROM [SHEET$]
Note
To apply this SQL query in your flows, replace the SHEET placeholder with the name of the spreadsheet you want to access.
To retrieve the rows that contain a particular value in a specific column, use the following SQL query:
SELECT * FROM [SHEET$] WHERE [COLUMN NAME] = 'VALUE'
Note
To apply this SQL query in your flows, replace:
- SHEET with the name of the spreadsheet you want to access.
- COLUMN NAME with the column that contains the value you want to find. The columns in the first row of the Excel worksheet are identified as the table's column names.
- VALUE with the value you want to find.
Delete data from an Excel row
Although Excel doesn't support the DELETE SQL query, you can use the UPDATE query to set all the cells of a specific row to null.
More precisely, you can use the following SQL query:
UPDATE [SHEET$] SET [COLUMN1]=NULL, [COLUMN2]=NULL WHERE [COLUMN1]='VALUE'
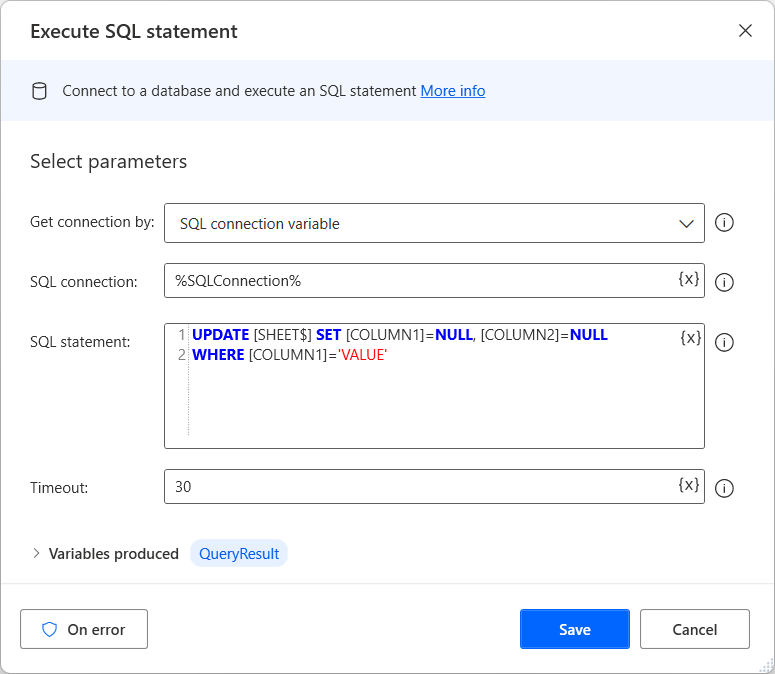
While developing your flow, you have to replace the SHEET placeholder with the name of the spreadsheet you want to access.
The COLUMN1 and COLUMN2 placeholders represent the names of the columns to handle. This example has two columns, but in a real scenario, the number of the columns may differ. The columns in the first row of the Excel worksheet are identified as the table's column names.
The [COLUMN1]='VALUE' part of the query defines the row you want to update. In your flow, use the column name and the value based on which combination describes the rows uniquely.
Retrieve Excel data except for a specific row
In some scenarios, you may need to retrieve all the contents of an Excel spreadsheet except for a specific row.
A convenient way to achieve this is to set the values of the unwanted row to null and then retrieve all the values except for the null ones.
To change the values of a specific row in the spreadsheet, you can use an UPDATE SQL query, as presented in Delete data from an Excel row:
UPDATE [SHEET$] SET [COLUMN1]=NULL, [COLUMN2]=NULL WHERE [COLUMN1]='VALUE'
Next, run the following SQL query to retrieve all the rows of the spreadsheet that don't contain null values:
SELECT * FROM [SHEET$] WHERE [COLUMN1] IS NOT NULL OR [COLUMN2] IS NOT NULL
The COLUMN1 and COLUMN2 placeholders represent the names of the columns to handle. This example has two columns, but in a real table, the number of the columns may differ. All the columns in the first row of the Excel worksheet are identified as the table's column names.