Note
Access to this page requires authorization. You can try signing in or changing directories.
Access to this page requires authorization. You can try changing directories.
Power Automate Process Mining gives you the option to store and read event log data directly from Azure Data Lake Storage Gen2. This feature simplifies extract, transform, load (ETL) management by connecting directly to your storage account.
This feature currently supports the ingestion of the following:
- CSV
- Single CSV file.
- Folder with multiple CSV files that have the same structure. All files are ingested.
- Parquet
- Single parquet file.
- Folder with multiple parquet files that have the same structure. All files are ingested.
- Delta-parquet
- Folder that contains a delta-parquet structure.
Prerequisites
The Data Lake Storage account must be Gen2. You can check this out from the Azure portal. Azure Data Lake Gen1 storage accounts aren't supported.
The Data Lake Storage account must have hierarchical namespace enabled.
The Owner role (on a storage account level) must be attributed to the user performing the initial container setup for the environment for the following users in the same environment. These users are connecting to the same container and must have these assignments:
- Storage Blob Data Reader or Storage Blob Data Contributor role assigned
- Azure Resource Manager Reader role assigned, at minimum.
Resource Sharing (CORS) rule to your storage account should be established to share with Power Automate Process Mining.
Allowed origins must be set to
https://make.powerautomate.comandhttps://make.powerapps.com.Allowed methods must include:
get,options,put,post.Allowed headers should be as flexible as possible. We recommend defining them as
*.Exposed headers should be as flexible as possible. We recommend defining them as
*.The maximum age should be as flexible as possible. We recommend using
86400.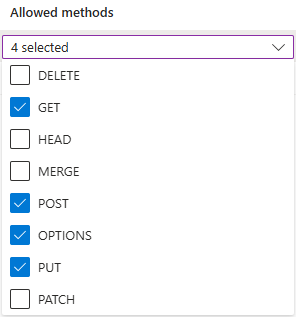
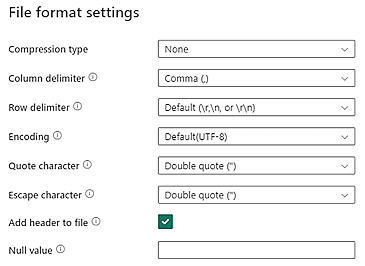
CSV data in your Data Lake Storage should meet the following CSV file format requirements:
- Compression type: None
- Column delimiter: Comma (,)
- Row delimiter: Default and encoding. For example, Default (\r,\n, or \r\n)
All data must be in final event log format and meet the requirements listed in Data requirements. Data should be ready to be mapped to the process mining schema. No data transformation is available post ingestion.
The size (width) of the header row is currently limited to 1 MB.
Important
Ensure that time stamp represented in your CSV file follows the ISO 8601 standard format (for example, YYYY-MM-DD HH:MM:SS.sss or YYYY-MM-DDTHH:MM:SS.sss).
Connect to Azure Data Lake Storage
On the navigation pane to the left, select Process mining > Start here.
In the Process name field, enter a name for your process.
Under the Data source heading, select Import data > Azure Data Lake > Continue.

On the Connection setup screen, select your Subscription ID, Resource Group, Storage account, and Container from the dropdown menus.
Select the file or folder containing the event log data.
You can either select a single file or a folder with multiple files. All files must have the same headers and format.
Select Next.
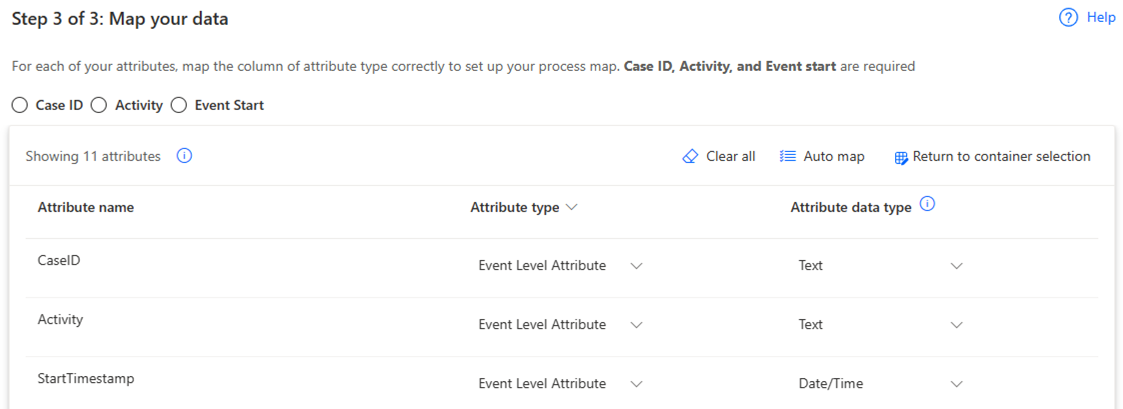
On the Map your data screen, map your data to the required schema.
Complete the connection by selecting Save and Analyze.
Define incremental data refresh settings
You can refresh a process ingested from Azure Data Lake on a schedule, either through a full or incremental refresh. Though there are no retention policies, you can ingest data incrementally using one of the following methods:
If you selected a single file in the previous section, append more data to the selected file.
If you selected a folder in the previous section, add incremental files to the selected folder.
Important
When you add incremental files to a selected folder or subfolder, make sure you indicate the increment order by naming files with dates such as YYYMMDD.csv or YYYYMMDDHHMMSS.csv.
To refresh a process:
Go to the Details page of the process.
Select Refresh Settings.
On the Schedule refresh screen, complete the following steps:
- Turn on the Keep data up to date toggle switch.
- In the Refresh data every dropdown lists, select the frequency of the refresh.
- In the Start at fields, select the date and time of the refresh.
- Turn on the Incremental refresh toggle switch.