Note
Access to this page requires authorization. You can try signing in or changing directories.
Access to this page requires authorization. You can try changing directories.
When you create a cloud flow, you can use the Condition action to quickly compare a single value with another value. However, there are times when you need to compare multiple values. For example, you might want to check the value of a few columns in a spreadsheet or database table.
In this tutorial, you create a cloud flow and use the or condition. In the Scenarios for other common expressions section, you learn how to use other expressions such as and, empty, greater, and less in conditions.
Prerequisites
Here's what you need to complete this tutorial.
- Access to Power Automate.
- Your own spreadsheet with the tables described later in this tutorial. Be sure to save your spreadsheet in a location such as Dropbox or Microsoft OneDrive so that Power Automate can access it.
- Microsoft 365 Outlook (While we use Outlook in this tutorial, you can use any supported email service in your flows.)
Create a cloud flow
You can create a cloud flow using natural language in Copilot, or create it from scratch. If you have access to Copilot, select the Using copilot tab to create your flow. If you don't have access to Copilot, select the Without copilot tab.
Sign in to Power Automate.
Ask Copilot to create a flow for you. Copy the following prompt and paste it the in Copilot field:
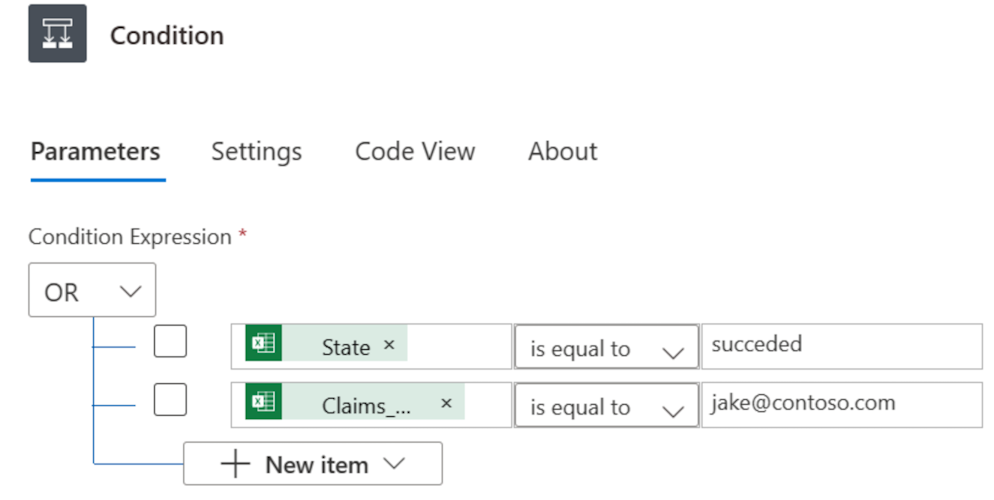
Every week, list rows in an Excel table, and if the Status column equals Succeeded or claim manager's email is jake@contoso.com, delete Excel row.Select Generate.
Select Keep it and continue.
Review the connections. If your data sources are connected properly, a green checkmark appears next to the app or service. If a green checkmark doesn't appear, select the app or service and follow the instructions.
After your connections are set, select Create flow. The designer screen opens. This is where you can configure your cloud flow, if necessary.
Select the spreadsheet and get all rows
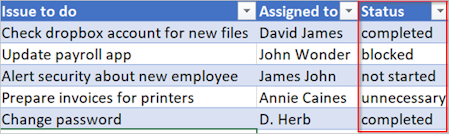
After you create a cloud flow, get a spreadsheet table that has a Status column. The possible values in the Status column are:
Sometimes your workflow needs to take an action if the value of an item is valueA or valueB. For example, you might be tracking the status of tasks in a spreadsheet table. Assume that the table has a column named Status and the possible values in this column are:
completedblockedunnecessarynot started
Here's an example of what the spreadsheet might look like:
To work with your spreadsheet, begin in the designer. Do this in either the new designer or the classic designer. The steps are similar in both designers. Learn more (with examples) in Identify differences between the new designer and the classic designer.
Create a cloud flow or select one from the list of your existing cloud flows by selecting My flows on the left navigation pane > Edit.
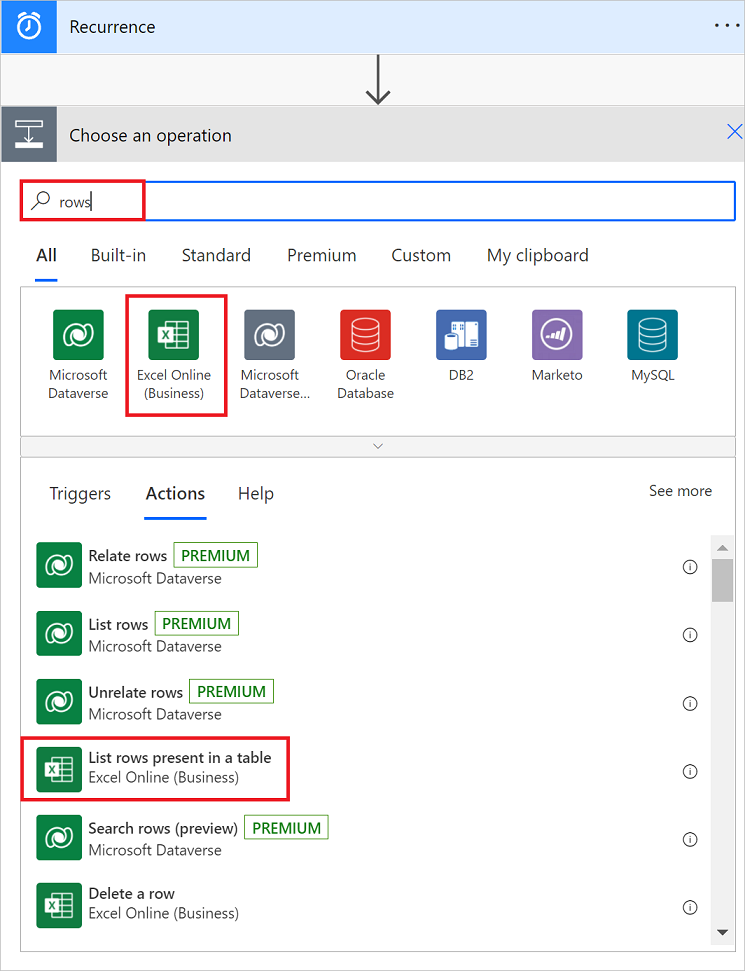
In the designer, select the List rows present in a table action card.
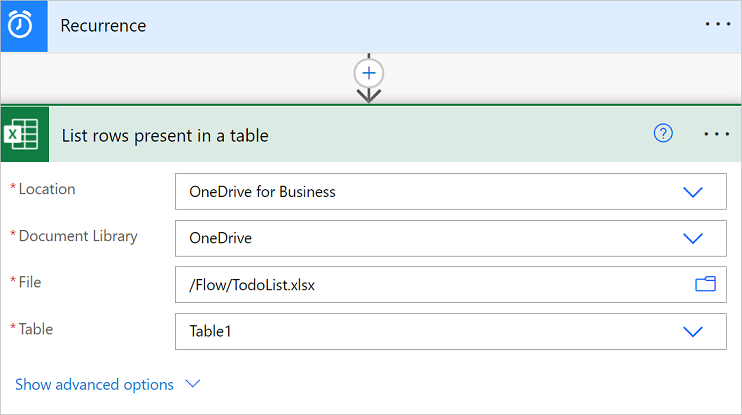
In the Parameters tab, select the Location, Document Library, File, and Table.

Collapse the configuration pane by selecting (<<) in the upper-right corner of the configuration pane.
Go to Add a condition.
Add a condition
Before you can add a condition to check the value of the Status column in each row of the spreadsheet table, make sure you performed the following procedures in this tutorial:
- Create a cloud flow
- Alternatively, select one from the list of your existing cloud flows by selecting My flows on the left navigation pane > Edit.
- Select the spreadsheet and get all rows
In the designer, add a new step by selecting the plus sign (+) > Add an action.
On the Add an action screen, search for apply to each, and then select the Apply to each under Control.
Add the value token to the Select an output from previous steps box by selecting inside the field and then selecting the lightning bolt icon.
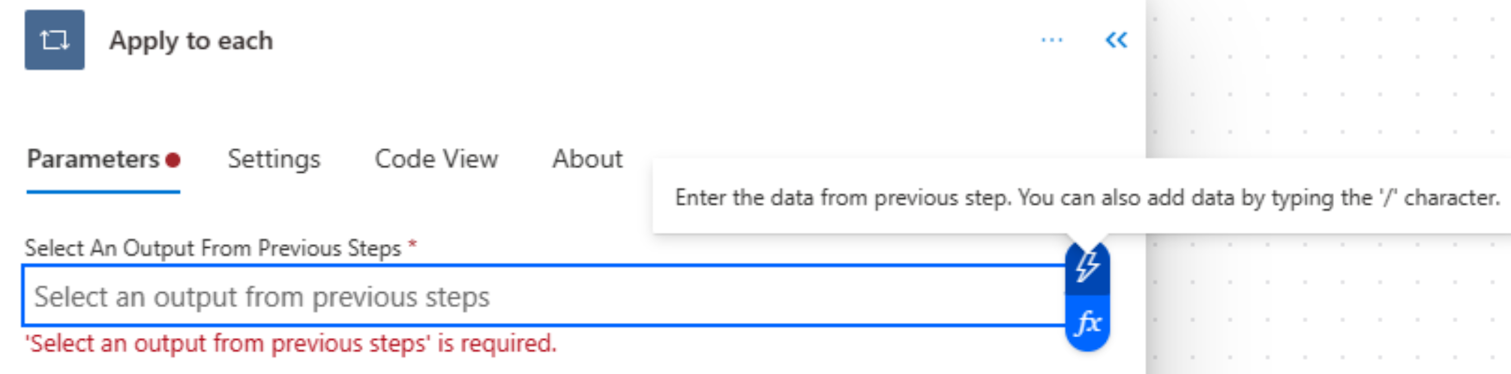
This value token represents the spreadsheet table and all of its data.
On the Apply to each card, add a new step by selecting the plus sign (+) > Add an action.
Search for condition, and then select the Condition control.
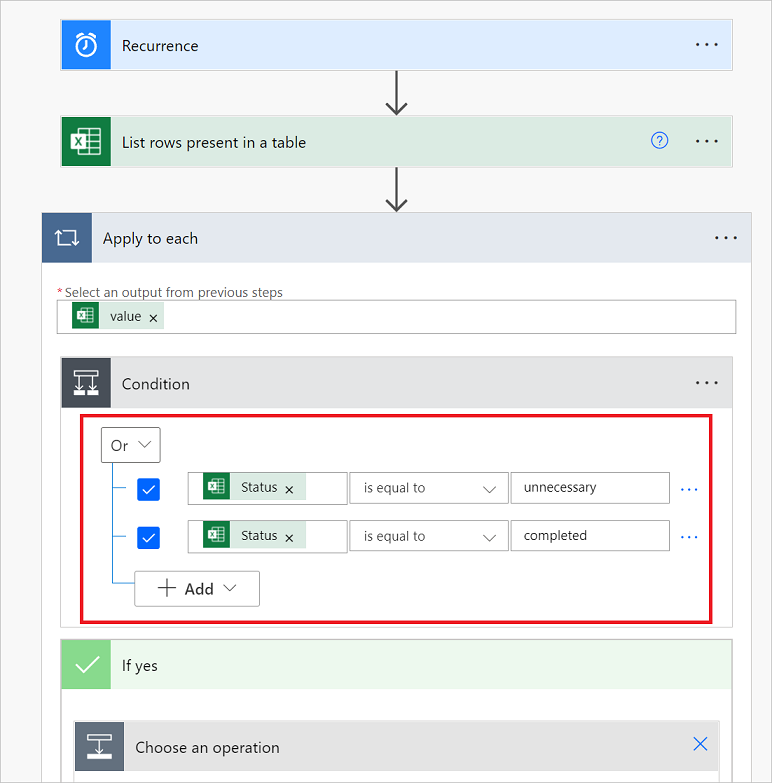
Add the following OR expression. This OR expression checks the value of each row in the table.
If the value of the Status column is completed Or unnecessary, the OR expression evaluates to true.
Here's an example of a Condition card.
Delete matching rows from the spreadsheet
In this tutorial, you use the Or condition to delete rows with a value of completed or unnecessary from the spreadsheet. Before you can add the Delete a row action, make sure you performed the following procedures:
- Create a cloud flow
- Alternatively, select one from the list of your existing cloud flows by selecting My flows on the left navigation pane > Edit.
- Select the spreadsheet and get all rows
- Add a condition
In the designer, select the plus sign (+) to add an action on the True branch of the condition.
The True branch runs if the Or condition evaluates to true.
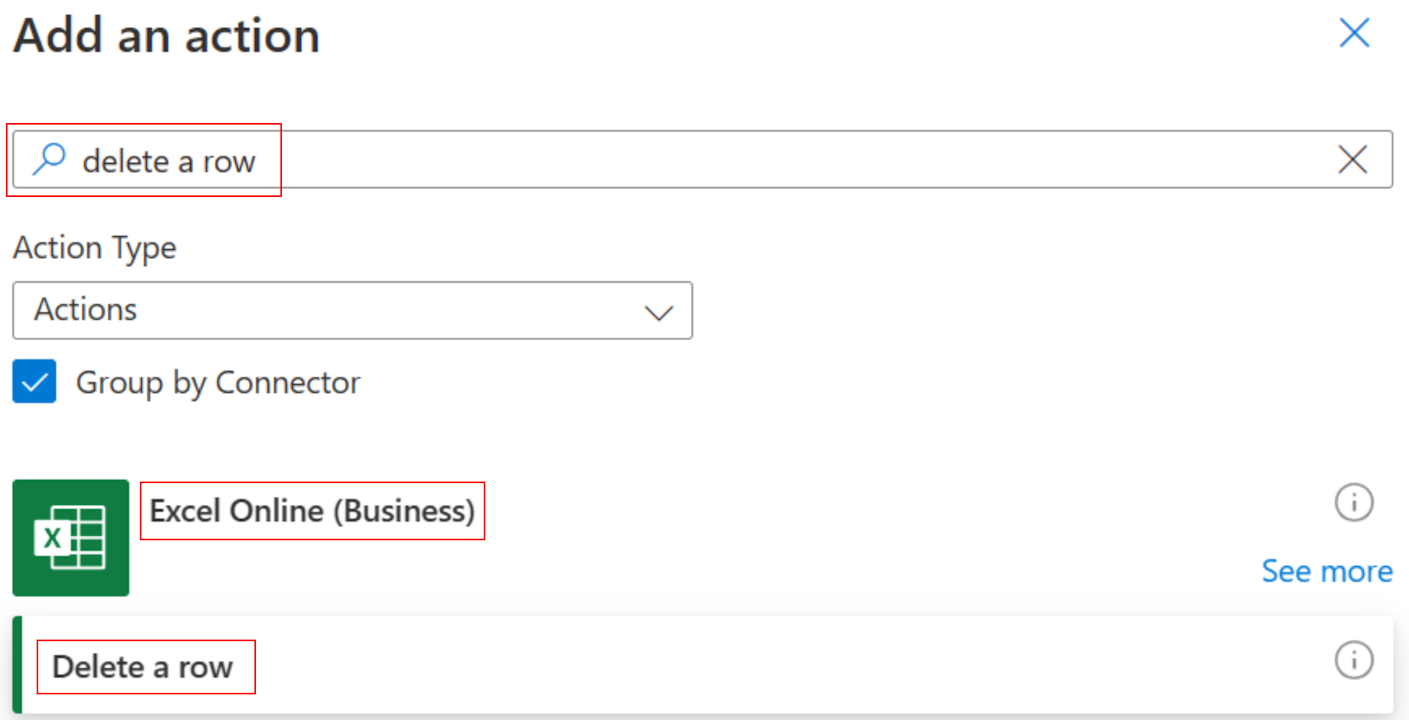
Search for Excel Online (Business) and then select Delete a row.
On the Delete a row panel, set the Location, Document Library, File, and Table boxes exactly as you set these boxes on the List rows present in a table card earlier in this tutorial.
In the Key Column dropdown list, select _PowerAppsId_.
In the Key Value field, insert the _PowerAppsId_ dynamic value.

Save and test your cloud flow
- In the designer, select Save. A green message appears that says Your flow is ready to go. We recommend you test it.
- Select Test to run the flow.
- In the Test flow panel, select Manually > Test.
- In the Run flow panel, select Run flow. If your flow is set up correctly, a message appears that says Your flow run successfully started. To monitor it, go to the Flow Runs Page.
- To close the Run flow panel, select Done.
Congratulations! You created a cloud flow that deletes rows from a spreadsheet table if the Status column's value is either completed or unnecessary. Here's what your spreadsheet should look like after the run completes.

Notice all data from rows that had completed or unnecessary in the Status column were deleted.
Scenarios for other common expressions
In this section, you learn how to use other expressions in conditions. In each scenario, make sure you performed the following procedures in the tutorial:
- Create a cloud flow
- Alternatively, select one from the list of your existing cloud flows by selecting My flows on the left navigation pane > Edit.
- Select the spreadsheet and get all rows
- Add a condition
- In the Add a condition procedure, apply the expression from this section that you want to use in the Condition card.
You can use any combination of the following logical expressions in your conditions.
| Expression | Description | Example |
|---|---|---|
| and | Takes two arguments and returns true if both values are true. Note: Both arguments must be Booleans. |
This expression returns false: and(greater(1,10),equals(0,0)) |
| or | Takes two arguments and returns true if either argument is true. Note: Both arguments must be Booleans. |
This expression returns true:or(greater(1,10),equals(0,0)) |
| equals | Returns true if two values are equal. | For example, if parameter1 is someValue, this expression returns true:equals(parameters('parameter1'), 'someValue') |
| less | Takes two arguments and returns true if the first argument is less than the second argument. Note: The supported types are integer, float, and string. |
This expression returns true:less(10,100) |
| lessOrEquals | Takes two arguments and returns true if the first argument is less than or equal to the second argument. Note: The supported types are integer, float, and string. |
This expression returns true:lessOrEquals(10,10) |
| greater | Takes two arguments and returns true if the first argument is greater than the second argument. Note: The supported types are integer, float, and string. |
This expression returns false:greater(10,10) |
| greaterOrEquals | Takes two arguments and returns true if the first argument is greater than or equal to the second argument. Note: The supported types are integer, float, and string. |
This expression returns false:greaterOrEquals(10,100) |
| empty | Returns true if the object, array, or string is empty. | This expression returns true:empty('') |
| not | Returns the opposite of a boolean value. | This expression returns true:not(contains('200 Success','Fail')) |
| if | Returns a specific value if the expression results in true or false. | This expression returns "yes":if(equals(1, 1), 'yes', 'no') |
Use the 'and' expression
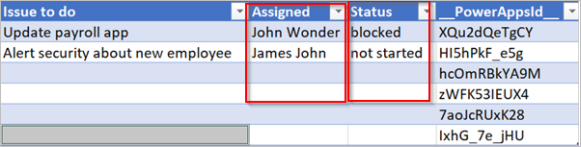
Assume you have a spreadsheet table with two columns. The column names are Status and Assigned. Assume also that you want to delete all rows if the Status column's value is blocked and the Assigned column's value is John Wonder. To accomplish this task, when you edit the Condition card in Add a condition, use the and expression shown here.
@and(equals(item()?['Status'], 'blocked'), equals(item()?['Assigned'], 'John Wonder'))
Here's an example of a Condition card.

Run the flow with the 'and' expression
If you followed the steps in this section, your spreadsheet should look similar to the following screenshot.
After your flow runs, your spreadsheet should look similar to the following screenshot.

Use the 'empty' expression
Notice that there are several empty rows in the spreadsheet now. To remove them, use the empty expression to identify all rows that don't have text in the Assigned and Status columns.
To accomplish this task, follow all steps listed in the Use the 'and' expression section in this tutorial. When you edit the Condition card in advanced mode, use the following empty expression.
@and(empty(item()?['Status']), empty(item()?['Assigned']))
Your Condition card should look similar to the following screenshot.

After your flow runs, the spreadsheet should look similar to the following screenshot.

Notice extra lines are removed from the table.
Use the 'greater' expression
Imagine you bought baseball tickets for your coworkers and you use a spreadsheet to ensure you get reimbursed by each person. You can quickly create a cloud flow that sends a daily email to each person who didn't pay the full amount.
Use the greater expression to identify the employees who didn't pay the full amount. You can then automatically send a reminder email to them.
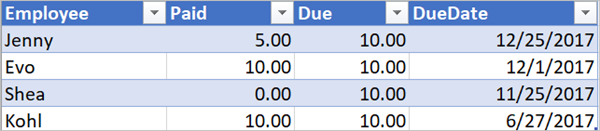
Here's a view of the spreadsheet.

Here's the implementation of the greater expression that identifies all persons who paid less than the amount due from them.
@greater(item()?['Due'], item()?['Paid'])
Use the 'less' expression
Imagine you bought baseball tickets for your coworkers, and you use a spreadsheet to ensure you get reimbursed by each person by the date to which everyone agreed. You can create a cloud flow that sends a reminder email to each person who didn't pay the full amount if the current date is less than one day before the due date.
Use the and expression with the less expression since there are two conditions being validated.
| Condition to validate | Expression to use | Example |
|---|---|---|
| Has the full amount due been paid? | greater | @greater(item()?['Due'], item()?['Paid']) |
| Is the due date less than one day away? | less | @less(item()?['DueDate'], addDays(utcNow(),1)) |
Combine the 'greater' and 'less' expressions in an 'and' expression
Use the greater expression to identify the employees who paid less than the full amount due and use the less expression to determine if the payment due date is less than one day away from the current date. You can then use the Send an email action to send reminder emails to those employees who didn't pay in full and the due date is less than one day away.
Here's a view of the spreadsheet table.
Here's the implementation of the and expression that identifies all employees who paid less than the amount due from them and the due date is less than one day away from the current date.
@and(greater(item()?['Due'], item()?['Paid']), less(item()?['dueDate'], addDays(utcNow(),1)))
Use functions in expressions
Some expressions get their values from runtime actions that might not yet exist when a cloud flow starts to run. To reference or work with these values in expressions, you can use functions that the Workflow Definition Language provides.
Learn more in Reference guide to workflow expression functions in Azure Logic Apps and Power Automate.
Related information
Training: Introduction to expressions in Power Automate (module)