Note
Access to this page requires authorization. You can try signing in or changing directories.
Access to this page requires authorization. You can try changing directories.
Before you can load your custom visual into Power BI Desktop or share it with the community in the Power BI Visual Gallery, you need to package it. Using this tutorial, you will:
- Provide property values and metadata for the visual.
- Update the icon.
- Package the custom visual.
Enter property values
In PowerShell, stop the visual if it's running.
In VS Code, navigate to the root folder of your visual project and open the pbiviz.json file.
In the
visualobject, set thedisplayNamevalue to what you want to be your visual's display name.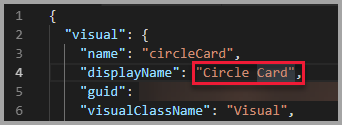
The visual's display name appears in the Visualizations pane of Power BI when you hover the cursor over the visual icon.
Fill in or modify the following fields in the pbiviz.json file:
visualClassNamedescription
visualClassNameis optional, butdescriptionmust be filled in for the package command to run.Fill in
supportUrlandgitHubUrlwith the URLs that a user can visit to get support and view your visual's GitHub project.The following code shows
supportUrlandgitHubUrlexamples:{ "supportUrl": "https://community.powerbi.com", "gitHubUrl": "https://github.com/microsoft/PowerBI-visuals-circlecard" }Enter your name and email in the
authorobject.Save the pbiviz.json file.
Update the icon (optional)
In the pbiviz.json file, notice that the document defines a path to an icon in the
assetsobject. The icon is the image that appears in the Visualizations pane in Power BI. It must be a PNG format file and 20 x 20 pixels.In Windows Explorer, copy the icon.png file you want to use, and then paste it to replace the default icon.png file located in the assets folder.
In VS Code, in the Explorer pane, expand the assets folder, and then select the icon.png file.
Review the icon.

Package the visual
In VS Code, ensure that all files are saved.
In PowerShell, enter the following command to generate a pbiviz file:
pbiviz packageThis command creates a pbiviz file in the /dist/ directory of your visual project, and overwrites any previous pbiviz file that might exist.
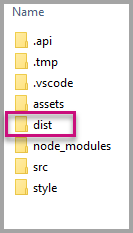
The package outputs to the /dist/ folder of the project. The package contains everything required to import the custom visual into either the Power BI service or a Power BI Desktop report. You packaged the custom visual, and it's ready for use.