Note
Access to this page requires authorization. You can try signing in or changing directories.
Access to this page requires authorization. You can try changing directories.
By default, Power BI uses Microsoft-managed keys to encrypt your data. In Power BI Premium, you can also use your own keys for data at-rest that's imported into a semantic model. This approach is often described as bring your own key (BYOK). For more information, see Data source and storage considerations. Power BI BYOK supports double encryption, ensuring layered security and compliance with enterprise encryption standards. This includes storage-level encryption using Server-Side Encryption (SSE) and client-side encryption with a Microsoft-managed Data Encryption Key (DEK). This DEK is wrapped using a CMK before data is stored at rest.
Why use BYOK?
BYOK makes it easier to meet compliance requirements that specify key arrangements with the cloud service provider, in this case Microsoft. With BYOK, you provide and control the encryption keys for your Power BI data at-rest at the application level. As a result, you can exercise control and revoke your organization's keys, should you decide to exit the service. By revoking the keys, the data becomes unreadable to the service within 30 minutes.
Data source and storage considerations
To use BYOK, you must upload data to the Power BI service from a Power BI Desktop (PBIX) file. You can't use BYOK in the following scenarios:
Analysis Services Live Connection
Excel workbooks, unless data is first imported into Power BI Desktop.
Note
For Excel workbooks stored in SharePoint and OneDrive, you can use Customer Key.
Power BI metrics don't currently support BYOK
BYOK applies only to semantic models. Push semantic models, Excel files, and CSV files that users can upload to the service aren't encrypted using your own key. To identify which items are stored in your workspaces, use the following PowerShell command:
PS C:\> Get-PowerBIWorkspace -Scope Organization -Include All
Note
This cmdlet requires Power BI management module v1.0.840. You can see which version you have by running Get-InstalledModule -Name MicrosoftPowerBIMgmt. Install the latest version by running Install-Module -Name MicrosoftPowerBIMgmt. You can get more information about the Power BI cmdlet and its parameters in Power BI PowerShell cmdlet module.
Configure Azure Key Vault
This section explains how to configure Azure Key Vault, a tool for securely storing and accessing secrets, like encryption keys. You can use an existing key vault to store encryption keys, or you can create a new one specifically for use with Power BI.
The following instructions assume basic knowledge of Azure Key Vault. For more information, see What is Azure Key Vault?
Configure your key vault in the following way:
Add the Power BI service as a service principal for the key vault, with wrap and unwrap permissions.
Create an RSA key with a 4096-bit length, or use an existing key of this type, with wrap and unwrap permissions.
Important
Power BI BYOK supports RSA and RSA-HSM keys with a 4096-bit length.
Recommended: Check that the key vault has the soft delete option enabled.
Add the service principal
Log into the Azure portal and search for Key Vaults.
In your key vault, select Access policies, and then choose Create.

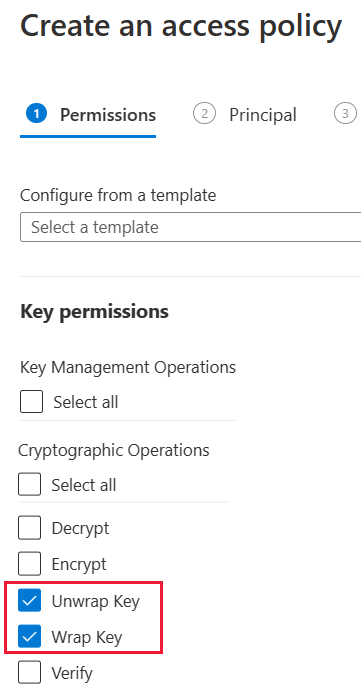
On the Permissions screen, under Key permissions, select Unwrap Key and Wrap Key, then choose Next.
On the Principal screen, search for and select Microsoft.Azure.AnalysisServices.
Note
If you can't find Microsoft.Azure.AnalysisServices, it's likely that the Azure subscription associated with your Azure Key Vault never had a Power BI resource associated with it. Try searching for the following string instead: 00000009-0000-0000-c000-000000000000.
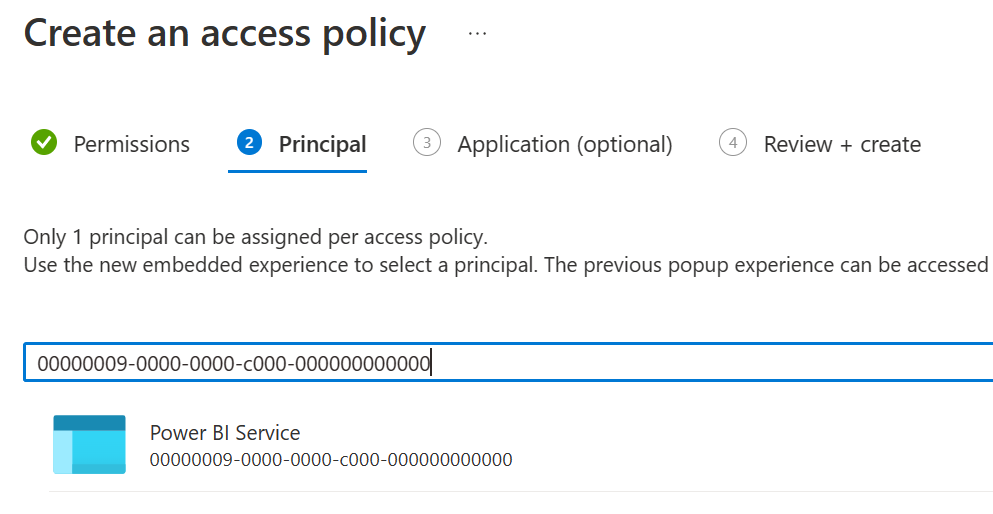
Select Next, then Review + create > Create.
Azure role-based access control can also be used to grant permissions by selecting a role that includes Unwrap Key and Wrap Key permissions.
Note
To revoke Power BI access to your data, remove access rights to this service principal from your Azure Key Vault.
Create an RSA key
In your key vault, under Keys, select Generate/Import.
Select a Key type of RSA and an RSA key size of 4096.

Select Create.
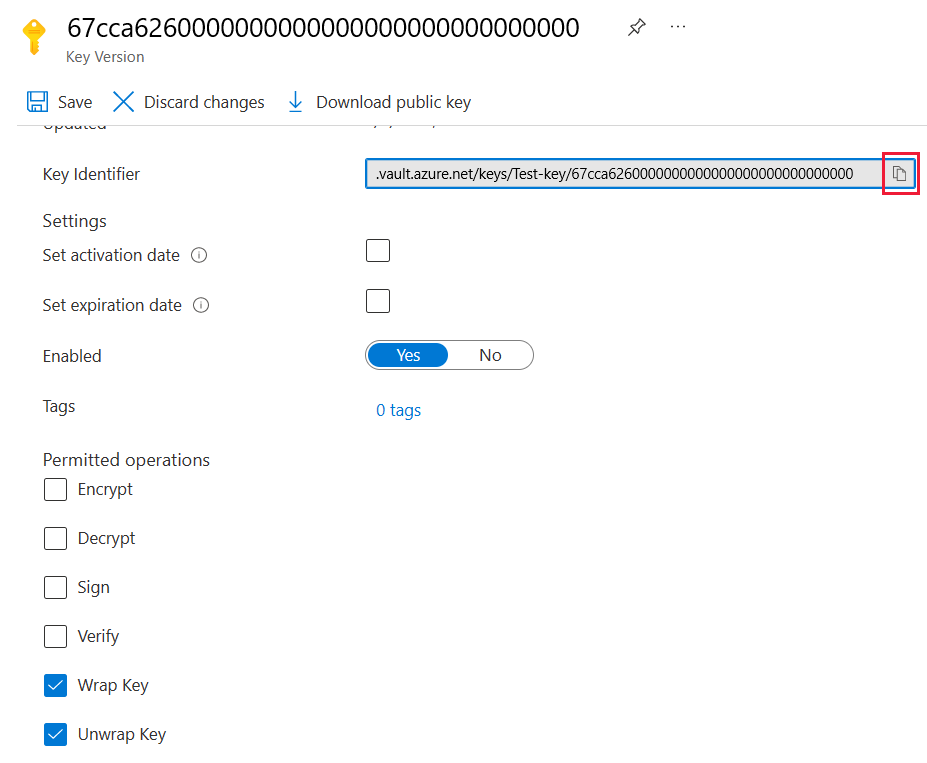
Under Keys, select the key you created.
Select the GUID for the Current Version of the key.
Check that Wrap Key and Unwrap Key are both selected. Copy the Key Identifier to use when you enable BYOK in Power BI.
Soft delete option
You should you enable soft-delete on your key vault to protect from data loss in case of accidental key, or key vault, deletion. To enable the soft-delete property, you must use PowerShell because this option isn't available yet in the Azure portal.
With Azure Key Vault properly configured, you're ready to enable BYOK on your tenant.
Configure the Azure Key Vault firewall
This section describes using the trusted Microsoft service firewall bypass, to configure a firewall around your Azure Key Vault.
Note
You can choose to enable firewall rules on your key vault. You can also choose to leave the firewall disabled on your key vault as per the default setting.
Power BI is a trusted Microsoft service. You can instruct the key vault firewall to allow access to all trusted Microsoft services, a setting that allows Power BI to access your key vault without specifying endpoint connections.
To configure Azure Key Vault to allow access to trusted Microsoft services, follow these steps:
Search for Key Vaults in the Azure portal, then select the key vault you want to allow access from Power BI and all other trusted Microsoft services.
Select Networking from the left-side navigation panel.
Under Public Access - Allow access from:, choose Selected networks.
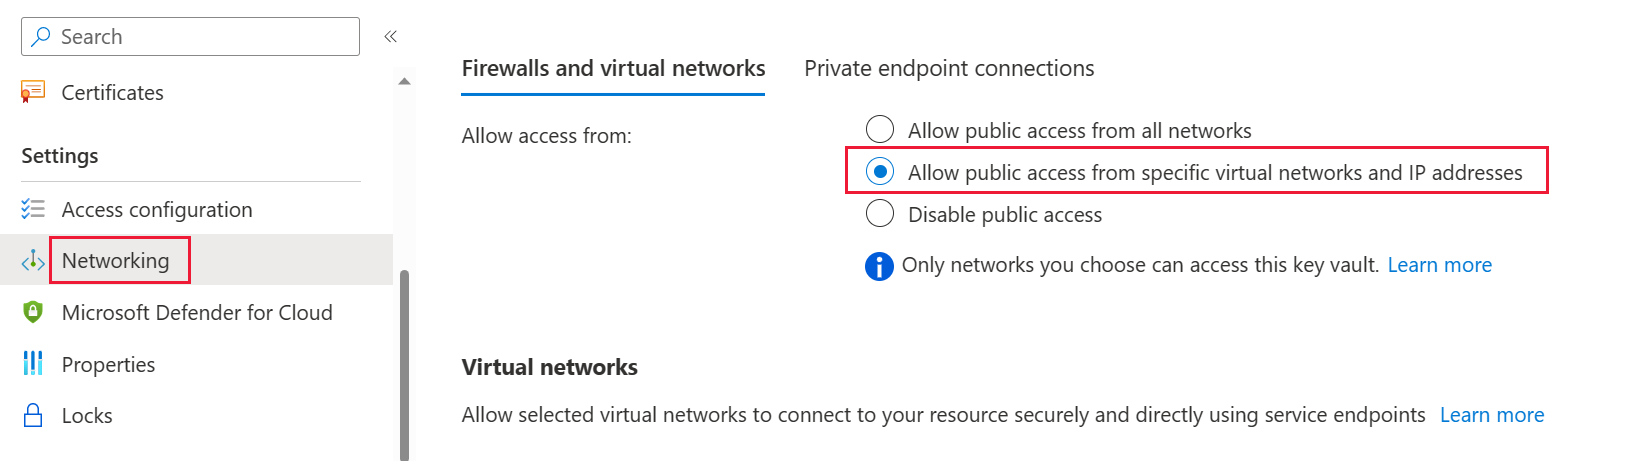
Scroll down to the Exception section and select Allow trusted Microsoft services to bypass this firewall.

Select Apply.
Enable BYOK on your tenant
You enable BYOK at the tenant level by using PowerShell. First, install the Power BI administration package for PowerShell and introduce the encryption keys you created and stored in Azure Key Vault to your Power BI tenant. You then assign these encryption keys per Premium capacity for encrypting content in the capacity.
Important considerations
Before you enable BYOK, keep the following considerations in mind:
- At this time, you can't disable BYOK after you enable it. Depending on how you specify parameters for
Add-PowerBIEncryptionKey, you can control how you use BYOK for one or more of your capacities. However, you can't undo the introduction of keys to your tenant. For more information, see Enable BYOK. - You can't directly move a workspace that uses BYOK from a capacity in Power BI Premium to a shared capacity. You must first move the workspace to a capacity that doesn't have BYOK enabled.
- If you move a workspace that uses BYOK from a capacity in Power BI Premium to a shared capacity, reports and semantic models become inaccessible since they're encrypted with the Key. To avoid this situation, you must first move the workspace to a capacity that doesn’t have BYOK enabled.
Enable BYOK
To enable BYOK, you must be a Power BI admin, signed in using the Connect-PowerBIServiceAccount cmdlet. Then use Add-PowerBIEncryptionKey to enable BYOK, as shown in the following example:
Add-PowerBIEncryptionKey -Name'Contoso Sales' -KeyVaultKeyUri'https://contoso-vault2.vault.azure.net/keys/ContosoKeyVault/b2ab4ba1c7b341eea5ecaaa2wb54c4d2'
To add multiple keys, run Add-PowerBIEncryptionKey with different values for -Name and -KeyVaultKeyUri.
The cmdlet accepts two switch parameters that affect encryption for current and future capacities. By default, neither of the switches are set:
-Activate: Indicates that this key is used for all existing capacities in the tenant that aren't already encrypted.-Default: Indicates that this key is now the default for the entire tenant. When you create a new capacity, the capacity inherits this key.
Important
If you specify -Default, all of the capacities created on your tenant from this point are encrypted using the key you specify, or an updated default key. You can't undo the default operation, so you lose the ability to create a premium capacity in your tenant that doesn't use BYOK.
After you enable BYOK on your tenant, set the encryption key for one or more Power BI capacities:
Use Get-PowerBICapacity to get the capacity ID that's required for the next step.
Get-PowerBICapacity -Scope IndividualThe cmdlet returns output similar to the following output:
Id              : xxxxxxxx-xxxx-xxxx-xxxx-xxxxxxxxxxxx
DisplayName     : Test Capacity
Admins          : adam@sometestdomain.com
Sku             : P1
State           : Active
UserAccessRight : Admin
Region          : North Central US
Use Set-PowerBICapacityEncryptionKey to set the encryption key:
Set-PowerBICapacityEncryptionKey -CapacityId xxxxxxxx-xxxx-xxxx-xxxx-xxxxxxxxxxxx -KeyName 'Contoso Sales'
You have control over how you use BYOK across your tenant. For example, to encrypt a single capacity, call Add-PowerBIEncryptionKey without -Activate or -Default. Then call Set-PowerBICapacityEncryptionKey for the capacity where you want to enable BYOK.
Manage BYOK
Power BI provides additional cmdlets to help manage BYOK in your tenant:
Use Get-PowerBICapacity to get the key that a capacity currently uses:
Get-PowerBICapacity -Scope Organization -ShowEncryptionKeyUse Get-PowerBIEncryptionKey to get the key that your tenant currently uses:
Get-PowerBIEncryptionKeyUse Get-PowerBIWorkspaceEncryptionStatus to see whether the semantic models in a workspace are encrypted and whether their encryption status is in sync with the workspace:
Get-PowerBIWorkspaceEncryptionStatus -Name'Contoso Sales'Note that encryption is enabled at the capacity level, but you get encryption status at the semantic model level for the specified workspace.
Use Switch-PowerBIEncryptionKey to switch (or rotate) the version of the key being used for encryption. The cmdlet simply updates the
-KeyVaultKeyUrifor a key-Name:Switch-PowerBIEncryptionKey -Name'Contoso Sales' -KeyVaultKeyUri'https://contoso-vault2.vault.azure.net/keys/ContosoKeyVault/b2ab4ba1c7b341eea5ecaaa2wb54c4d2'Note that the current key should be enabled.