Note
Access to this page requires authorization. You can try signing in or changing directories.
Access to this page requires authorization. You can try changing directories.
APPLIES TO: ![]() Power BI Report Builder
Power BI Report Builder ![]() Power BI Desktop
Power BI Desktop
Important
Following the announcement that Bing Maps will be deprecated by June 2028, we have migrated map visuals in paginated reports from Bing Maps to Azure Maps. With the September release of PBIRB, paginated report authors will, by default, create map visuals using Azure Maps. Additionally, all map visuals published to the service will use Azure Maps.
A map is a collection of layers. When you add a map to a Power BI paginated report, you define the first layer. You can create additional layers by using the map layer wizard.
The easiest way to add, remove, or change options for a layer is to use the map layer wizard. You can also change options manually from the Map pane. To display the Map pane, select in the map on the report design surface. The following figure displays the parts of the pane:
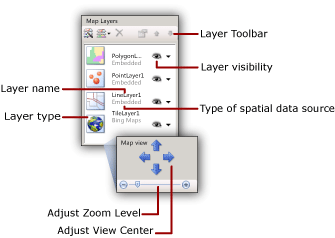
Map layers are drawn from bottom to top in the order that they appear in the Map pane. In the previous figure, the tile layer is drawn first and the polygon layer is drawn last. Layers that are drawn later might hide map elements on layers that are drawn earlier. You can change the order of layers by using the arrow keys on the Map pane toolbar. To show or hide layers, toggle the visibility icon. You can change the transparency of a layer on the Visibility page of the Layer Data properties dialog box.
The following table displays the toolbar icons for the Map pane.
| Symbol | Description | When to use |
|---|---|---|
 |
Map Layer Wizard | To add a layer by using a wizard, select New layer wizard. |
 |
Add Layer | To manually add a layer, select Add Layer, and then select the type of map layer to add. |
 |
Polygon Layer | Add a map layer that displays areas or shapes that are based sets of polygon coordinates. |
 |
Line Layer | Add a map layer that displays paths or routes that are based on sets of line coordinates. |
 |
Point Layer | Add a map layer that displays locations that are based on sets of point coordinates. |
 |
Tile Layer | Add a map layer that displays Azure Map tiles that correspond to the current map view area that is defined by the viewport. |
At the bottom of the Map pane is the Map view area. To change the center or zoom options for the map, use the arrow keys to adjust the view center and the slider to adjust the zoom level.
For more information about layers, see Maps (Power BI Report Builder).
Add a layer from the map layer wizard
From the Ribbon, on the Insert menu, select Map, and then select Map Wizard. The wizard enables you to add a layer to the existing map. Most wizard pages are identical between the map wizard and the map layer wizard.
For more information, see Map Wizard and Map Layer Wizard (Power BI Report Builder).
Change options for a layer by using the map layer wizard
Run the map layer wizard. This wizard enables you to change options for a layer that you created by using the map layer wizard. In the Map pane, right-click the layer, and on the toolbar, select the layer wizard button (
).For more information, see Map Wizard and Map Layer Wizard (Report Builder).
Add a point, line, or polygon layer from the Map pane toolbar
Select the map until the Map pane appears.
On the toolbar, select the Add Layer button, and from the drop-down list, select the type of layer that you want to add: Point, Line, or Polygon.
Note
Although you can add a map layer and configure it manually, we recommend that you use the map layer wizard to add new layers. To launch the wizard from the Map pane toolbar, select the layer wizard button
 .
.Right-click the layer, and then select Layer Data.
In Use spatial data from, select the source of spatial data. Options vary based on your selection.
If you want to visualize analytical from your report on this layer, do the following:
Select Analytical data.
In Analytical dataset, select the name of the dataset that contains analytical data and the match fields to build a relationship between analytical and spatial data.
Select Add.
Type the name of the match field from the spatial dataset.
Type the name of the match field from the analytical dataset.
For more information about linking spatial and analytical data, see Customize the Data and Display of a Map or Map Layer (Power BI Report Builder).
Select OK.
Filter analytical data for the layer
Select the map until the Map pane appears.
Right-click the layer in the Map pane, and then select Layer Data.
Select Filters.
Define a filter equation to limit the analytical data that is used in the map display. For more information, see Filter Equation Examples (Power BI Report Builder).
Control point properties for a point layer or for polygon center points
Select General on the Map Point Properties dialog box to change label, tooltip, and marker type options for the following map elements:
All dynamic or embedded points on a point layer. Color rules, size rules, and marker type rules for points override these options. To override options for a specific embedded point, use the Map Embedded Point Properties Dialog Box, Marker page.
The center point for all dynamic or embedded polygons on a polygon layer. Color rules, size rules, and marker type rules for center points override these options. To override options for a specific center point, use the Map Embedded Point Properties Dialog Box, Marker page.
Specify embedded data as a source of spatial data
Select the map until the Map pane appears.
Right-click the layer, and then select Layer Data.
In Use spatial data from, select Data embedded in report.
To load map elements from an existing report, select Browse, point to the file, and then select Open. The map elements are embedded in this report definition. The spatial data that you point to must match the layer type. For example, for a point layer, you must point to spatial data that specifies sets of point coordinates.
In Spatial field, specify the name of the field that contains spatial data. You might need to determine this name from the source of spatial data.
Select OK.
Specify a report dataset field as a source of spatial data
Select the map until the Map pane appears.
Right-click the layer, and then select Layer Data.
In Use spatial data from, select Spatial field in a dataset.
In Dataset name, select the name of a dataset in the report that contains that spatial data that you want.
In Spatial field name, select the name of the field in the dataset that contains spatial data.
Select OK.
Add a tile layer
Select the map until the Map pane appears.
On the toolbar, select the Add Layer button, and from the drop-down list, select Tile Layer.
Note
For more information about the use of Azure Maps tiles in your report, see Additional Terms of Use.
Right-click the tile layer in the Map pane, and then select Tile Properties.
In Tile options, select a tile style. If the Azure Maps tiles are available, the layer on the design surface updates with the style that you select.
Note
A tile layer can also be added when you add a polygon, line, or point layer in the Map or Map Layer wizard. On the Choose spatial data and map view options page, select the option Add an Azure Maps background for this map view.
Change the drawing order of a layer
Select the map until the Map pane appears.
Select the layer in the Map pane to select it.
On the Map pane toolbar, select the up or down arrow to change the drawing order of each layer.
Change the transparency of a polygon, line, or point layer
Select the map until the Map pane appears.
Right-click the layer, and then select Layer Data.
Select Visibility.
In Transparency options, type a value that represents the percentage transparency, for example, 40. Zero (0) % transparency means that the layer is opaque. 100% transparency means that you will not see the layer in the report.
Select OK.
Change the transparency of a tile layer
Select the map until the Map pane appears.
Right-click the layer, and then select Tile Properties.
Select Visibility.
In Transparency options, type a value that represents the percentage transparency, for example, 40.
Select OK.
Specify a secure connection for a tile layer
Select the map until the Map pane appears.
In the Map pane, select the tile layer to select it. The Properties pane displays the tile layer properties.
In the Properties pane, set UseSecureConnection to True.
The connection for the Azure Maps Web service will use the HTTP SSL service to retrieve Azure map tiles for this layer. Transport Layer Security (TLS) was previously known as Secure Sockets Layer (SSL).
Specify the language for tile labels
By default, for tile styles that display labels, the language is determined from the default locale for Report Builder. You can customize the language setting for tile labels in the following ways.
- Select the map outside the viewport to select the map. In the Properties pane, for the TileLanguage property, select a culture value from the drop-down list.
- Select the report background to select the report. In the Properties pane, from for the Language property, select a culture value from the drop-down list.
The order of precedence for setting the tile label language is: report property Language, default locale for Report Builder, and map property TileLanguage.
Conditionally hide a layer based on viewport zoom level
Set Visibility options to control the display for a map layer.
In the Map Layers pane, right-click a layer to select it, and on the Map Layers toolbar, select Properties to open Map Layer Properties.
Select Visibility.
In Layer visibility, select Show or hide based on zoom value.
Enter minimum and maximum zoom values for when you display the layer.
Optional. Enter a value for transparency.
You can also conditionally hide the layer. For more information, see Hide an Item (Power BI Report Builder).