Note
Access to this page requires authorization. You can try signing in or changing directories.
Access to this page requires authorization. You can try changing directories.
This article discusses how to use Microsoft Entra application proxy to connect to Power BI Report Server and SQL Server Reporting Services (SSRS) 2016 and later. Through this integration, users who are away from the corporate network can access their Power BI Report Server and Reporting Services reports from their client browsers and be protected by Microsoft Entra ID. Read more about remote access to on-premises applications through Microsoft Entra application proxy.
Environment details
We used these values in the example we created.
- Domain: umacontoso.com
- Power BI Report Server: PBIRSAZUREAPP.umacontoso.com
- SQL Server Data Source: SQLSERVERAZURE.umacontoso.com
Configure Power BI Report Server
After installing Power BI Report Server (assuming on an Azure VM), configure the Power BI Report Server web service and web portal URLs using the following steps:
Create inbound and outbound rules on the VM firewall for Port 80 (Port 443 if you have https URLs configured). Also, create inbound and outbound rules for Azure VM from the Azure portal for TCP protocol – Port 80.
The DNS name configured for the VM in our environment is
pbirsazureapp.eastus.cloudapp.azure.com.Configure the Power BI Report Server external web service and web portal URL by selecting the Advanced tab > Add button > Choose Host Header Name and adding the host name (DNS name) as shown here.
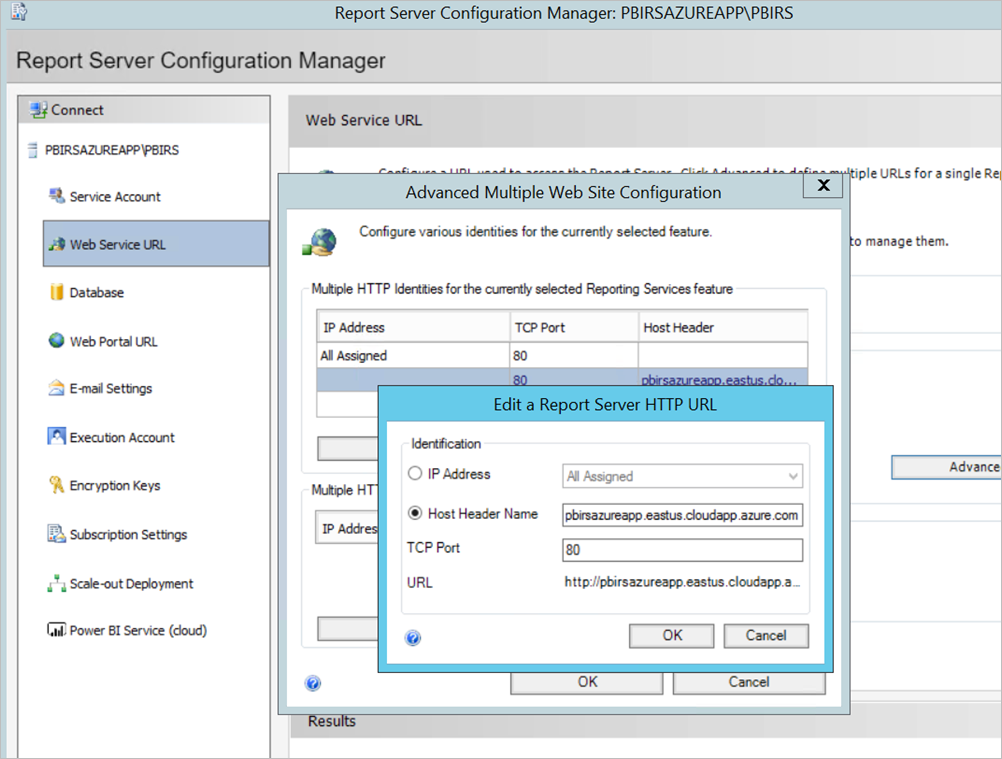
We performed the previous step for both Web service and Web portal section and got the URLs registered on the report server Configuration Manager:
https://pbirsazureapp.eastus.cloudapp.azure.com/ReportServerhttps://pbirsazureapp.eastus.cloudapp.azure.com/Reports
In Azure portal we see two IP addresses for the VM in the networking section
- Public IP.
- Private IP. The Public IP address is used for access from outside the virtual machine.
Hence, we added the host file entry on the VM (Power BI Report Server) to include the Public IP address and the host name
pbirsazureapp.eastus.cloudapp.azure.com.On restarting the VM, the dynamic IP address might change, and you might have to add the right IP address again in the host file. To avoid this, you can set the Public IP address to static in the Azure portal.
The Web service and Web portal URLs should be accessible successfully after making the above-mentioned changes.
On accessing the URL
https://pbirsazureapp.eastus.cloudapp.azure.com/ReportServeron the server, we're prompted three times for credentials, and see a blank screen.Add the following registry entry:
HKEY\_LOCAL\_MACHINE \SYSTEM\CurrentControlset\Control \Lsa\ MSV1\_0registry keyAdd a new value
BackConnectionHostNames, a multi-string value, and provide the host namepbirsazureapp.eastus.cloudapp.azure.com.
After that, we can access the URLs on the server as well.
Configure Power BI Report Server to work with Kerberos
1. Configure the authentication type
We need to configure the authentication type for the report server to allow for Kerberos constrained delegation. This configuring is done within the rsreportserver.config file.
Within the rsreportserver.config file, find the Authentication/AuthenticationTypes section.
We want to make sure that RSWindowsNegotiate is listed and is first in the list of authentication types. It should look similar to the following.
<AuthenticationTypes>

    <RSWindowsNegotiate/>

</AuthenticationTypes>
If you have to change the configuration file, stop and restart the report server service from Report Server Configuration Manager to make sure the changes take effect.
2. Register service principal names (SPNs)
Open the command prompt as an administrator and perform the following steps.
Register the following SPNs under the account Power BI Report Server service account using the following commands
setspn -s http/Netbios name\_of\_Power BI Report Server\_server<space> Power BI Report Server\_ServiceAccount

setspn -s http/FQDN\_of Power BI Report Server\_server<space> Power BI Report Server\_ServiceAccount
Sample:
setspn -s http/pbirs contoso\pbirssvcacc
setspn -s http/pbirs.contoso.com contoso\pbirssvcacc
Register the following SPNs under the SQL Server service account using the following commands (for a default instance of SQL Server):
setspn -s MSSQLSVC/FQDN\_of\_SQL\_Server: 1433 (PortNumber) <SQL service service account>

setspn -s MSSQLSVC/FQDN\_of\_SQL\_Server<SQL service service account>
Sample:
setspn -s MSSQLSVC/sqlserver.contoso.com:1433 contoso\sqlsvcacc
setspn -s MSSQLSVC/sqlserver.contoso.com contoso\sqlsvcacc
3. Configure delegation settings
We have to configure the delegation settings on the report server service account.
Open Active Directory Users and Computers.
Open the Properties of the report server service account within Active Directory Users and Computers.
We want to configure constrained delegation with protocol transiting. With constrained delegation, we need to be explicit about which services we want to delegate to.
Right-click the report server service account and select Properties.
Select the Delegation tab.
Select Trust this user for delegation to specified services only.
Select Use any authentication protocol.
Under the Services to which this account can present delegated credentials : select Add.
In the new dialog, select Users or Computers.
Enter the service account for the SQL server service and select OK.
It begins with MSSQLSVC.
Add the SPNs.
Select OK. You should see the SPN in the list now.
These steps help configure Power BI Report Server to work with Kerberos authentication mechanism and get the test connection to data source working on your local machine.
Configure Microsoft Entra application proxy connector
Refer to the article for configuration related to the application proxy connector
We installed the application proxy connector on Power BI Report Server, but you can configure it on a separate server and make sure that delegation is set up properly.
Ensure the connector is trusted for delegation
Ensure the connector is trusted for delegation to the SPN added to the report server application pool account.
Configure Kerberos Constrained Delegation (KCD) so that the Microsoft Entra application proxy service can delegate user identities to the report server application pool account. Configure KCD by enabling the application proxy connector to retrieve Kerberos tickets for your users who are authenticated in Microsoft Entra ID. Then that server passes the context to the target application, or Power BI Report Server in this case.
To configure KCD, repeat the following steps for each connector machine.
- Sign into a domain controller as a domain administrator, and then open Active Directory Users and Computers.
- Find the computer that the connector is running on.
- Double-click the computer, and then select the Delegation tab.
- Set the delegation settings to Trust this computer for delegation to the specified services only. Then select Use any authentication protocol.
- Select Add, and then select Users or Computers.
- Enter the service account that you're using for Power BI Report Server. This account is the one you added the SPN to within the report server configuration.
- Select OK.
- To save the changes, select OK again.
Publish through Microsoft Entra application proxy
Now you're ready to configure Microsoft Entra application proxy.
Publish Power BI Report Server through application proxy with the following settings. For step-by-step instructions on how to publish an application through application proxy, see Add an on-premises app to Microsoft Entra ID.
Internal URL : Enter the URL to the report server that the connector can reach in the corporate network. Make sure this URL is reachable from the server the connector is installed on. A best practice is using a top-level domain such as
https://servername/to avoid issues with subpaths published through application proxy. For example, usehttps://servername/and nothttps://servername/reports/orhttps://servername/reportserver/. We configured our environment withhttps://pbirsazureapp.eastus.cloudapp.azure.com/.Note
We recommend using a secure HTTPS connection to the report server. See Configure SSL connections on a native mode report server for how-to information.
External URL : Enter the public URL the Power BI mobile app connects to. For example, it might look like
https://reports.contoso.comif a custom domain is used. To use a custom domain, upload a certificate for the domain, and point a DNS record to the default msappproxy.net domain for your application. For detailed steps, see Working with custom domains in Microsoft Entra application proxy.
We configured the external URL to be https://pbirsazureapp-umacontoso2410.msappproxy.net/ for our environment.
- Pre-authentication Method: Microsoft Entra ID.
- Connector Group: Default.
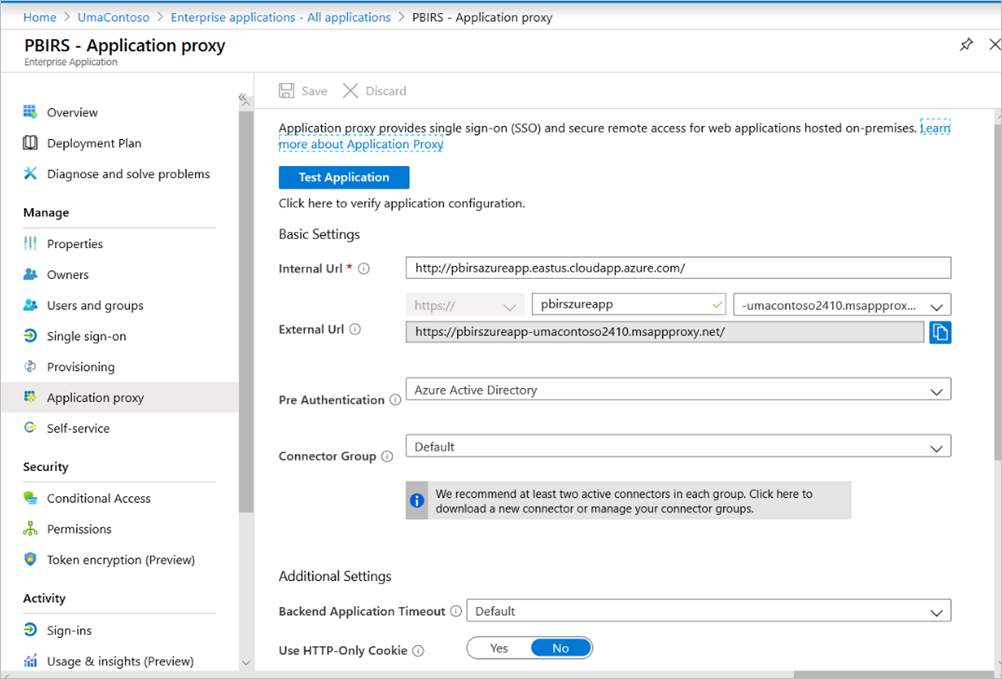
We didn't make any changes in the Additional Settings section. It's configured to work with the default options.
Important
When configuring the application proxy, the Backend Application Timeout property is set to Default (85 seconds). If you have reports that take longer than 85 seconds to execute, set this property to Long (180 seconds), which is the highest possible timeout value. When configured for Long, all reports need to complete within 180 seconds, or they time out and result in an error.
Configure single sign-on
Once your app is published, configure the single sign-on settings with the following steps:
On the application page in the portal, select Single sign-on.
For Single Sign-on Mode, select Integrated Windows Authentication.
Set Internal Application SPN to the value that you set earlier. You can identify this value by using the following steps:
- Try running a report or perform test connection to data source so that a Kerberos ticket gets created.
- After successful execution of the report/ test connection, open command prompt and run the command:
klist. In the result section, you should see a ticket withhttp/SPN. If it's same as the SPN you configured with Power BI Report Server, use that SPN in this section.
Choose the Delegated Login Identity for the connector to use on behalf of your users. For more information, see Working with different on-premises and cloud identities.
We recommend using User Principal name. In our sample, we configured it to work with User Principal name option:
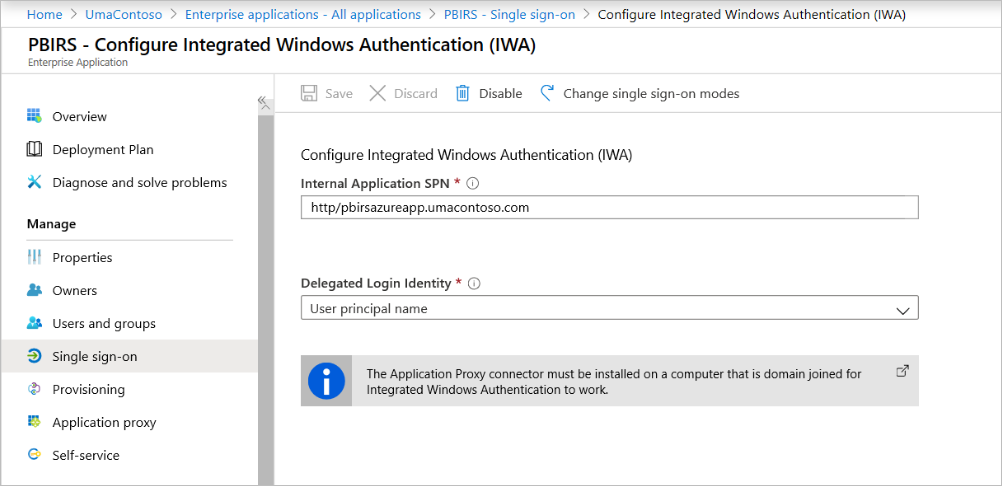
Select Save to save your changes.
Finish setting up your application
To finish setting up your application, go to the Users and groups section and assign users to access this application.
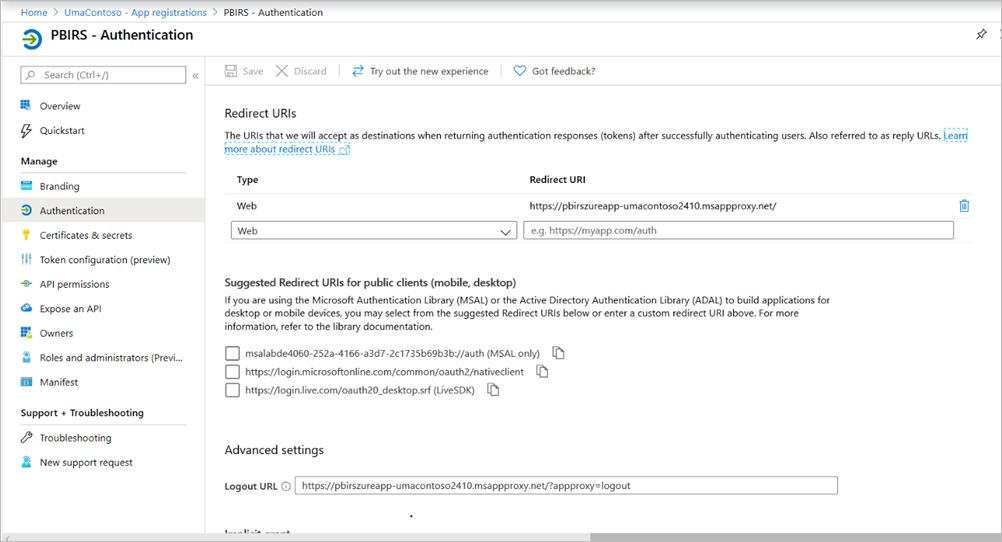
Configure the Authentication section of App registration for the Power BI Report Server application as follows for Redirect URLs and Advanced settings:
- Create a new Redirect URL and configure it with Type = Web and Redirect URI =
https://pbirsazureapp-umacontoso2410.msappproxy.net/ - In the Advanced Settings section, configure the Logout URL to
https://pbirsazureapp-umacontoso2410.msappproxy.net/?Appproxy=logout
- Create a new Redirect URL and configure it with Type = Web and Redirect URI =
Continue configuring the Authentication section of App registration for the Power BI Report Server application as follows for Implicit grant, Default client type, and Supported account types:
- Set Implicit grant to ID tokens.
- Set Default client type to No.
- Set Supported account types to Accounts in this organizational directory only (UmaContoso only – Single tenant).
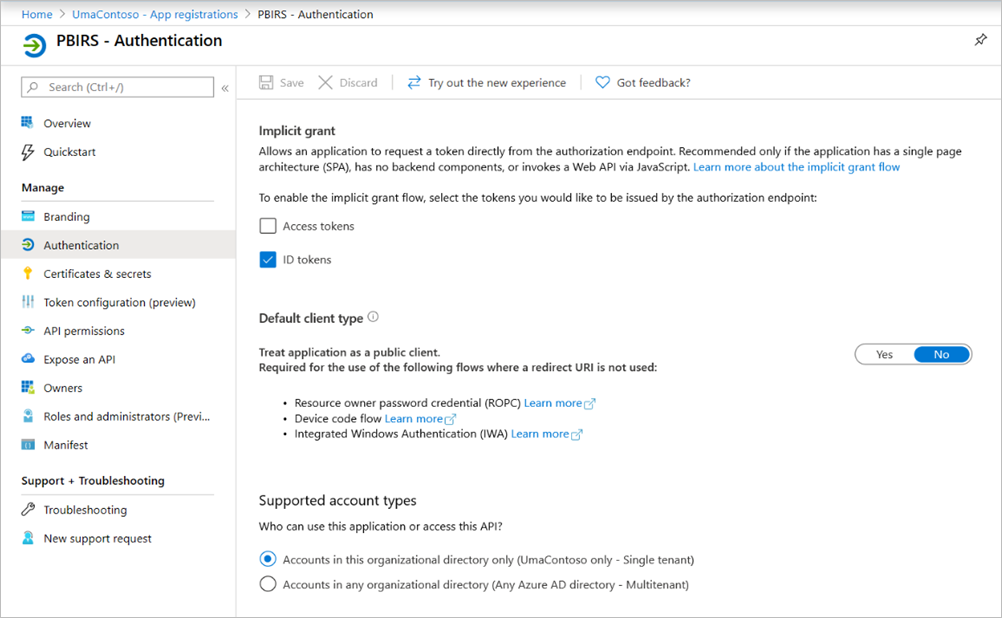
Warning
Microsoft recommends you don't use the implicit grant flow. In most scenarios, more secure alternatives are available and recommended. Certain configurations of this flow require a high degree of trust in the application, and carries risks that aren't present in other flows. You should only use this flow when other more secure flows aren't viable. For more information, see the security concerns with implicit grant flow.
Once the single sign-on is set up and the URL
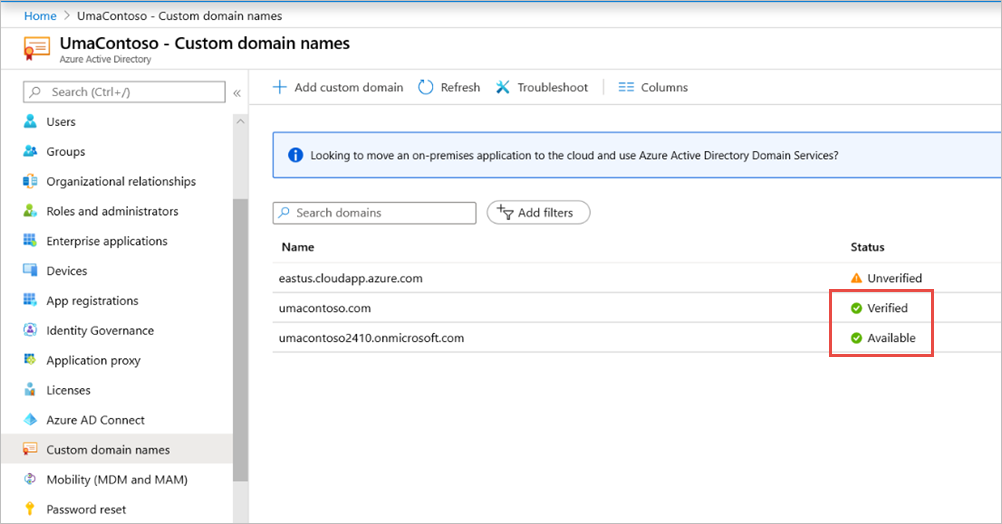
https://pbirsazureapp-umacontoso2410.msappproxy.netis working, we have to make sure that the account that we sign in with is synced with the account to which the permissions are provided in Power BI Report Server.We first have to configure the custom domain that we're planning to use in the sign-in, then make sure it's verified
In this case, we purchased a domain called umacontoso.com and configured the DNS zone with the entries. You can also try using the
onmicrosoft.comdomain and sync it with on-premises AD.See the article Tutorial: Map an existing custom DNS name to Azure App Service for reference.
After successfully verifying the DNS entry for the custom domain, you should be able to see the status as Verified corresponding to the domain from the portal.
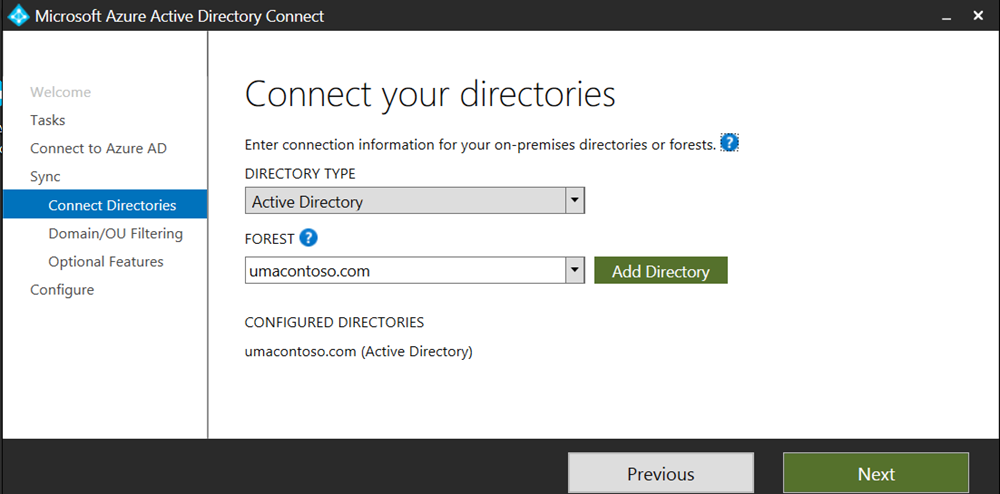
Install Microsoft Entra Connect on the domain controller server and configure it to sync with Microsoft Entra ID.
Once the Microsoft Entra ID syncs with on-premises AD, we see the following status from the Azure portal:
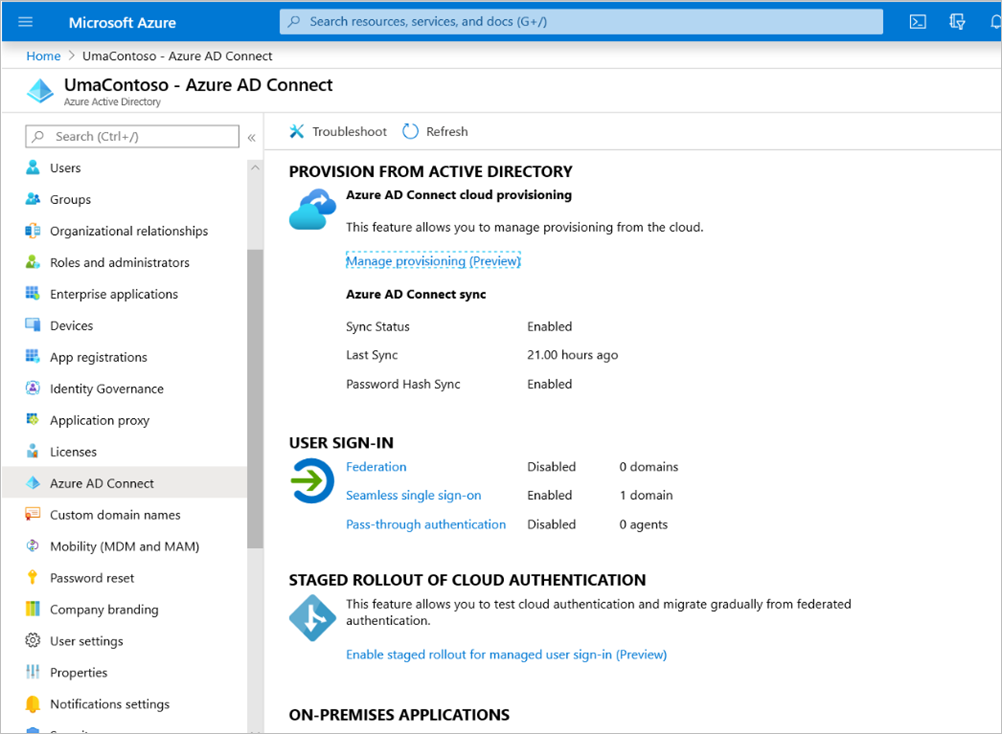
Also, once the sync is successful, open the AD domains and trusts on the Domain controller. Right-click Active Directory Domains and Trusts > Properties and add the UPN. In our environment,
umacontoso.comis the custom domain we purchased.After adding the UPN, you should be able to configure the user accounts with the UPN so that the Microsoft Entra account and the on-premises AD account are connected and that the token is recognized during authentication.
The AD domain name gets listed in the drop-down list of the User logon name section after you do the previous step. Configure the user name, and select the domain from the drop-down list in the User logon name section of the AD user properties.
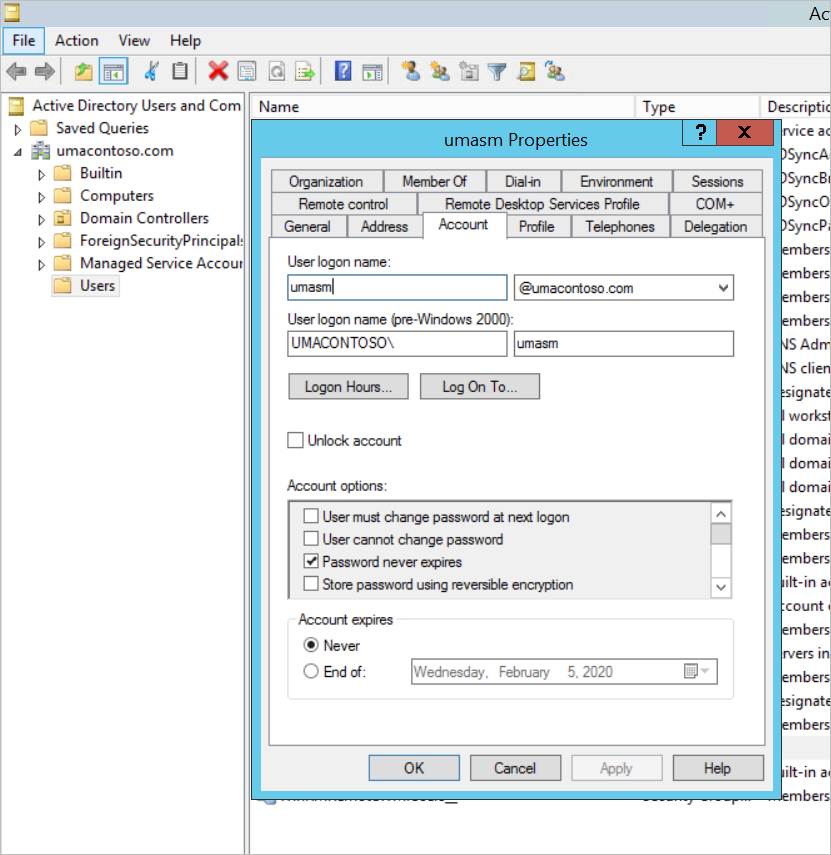
Once the AD sync is successful, you see the on-premises AD account coming up in the Azure portal under the Users and Groups section of the application. The source for the account is Windows Server AD.
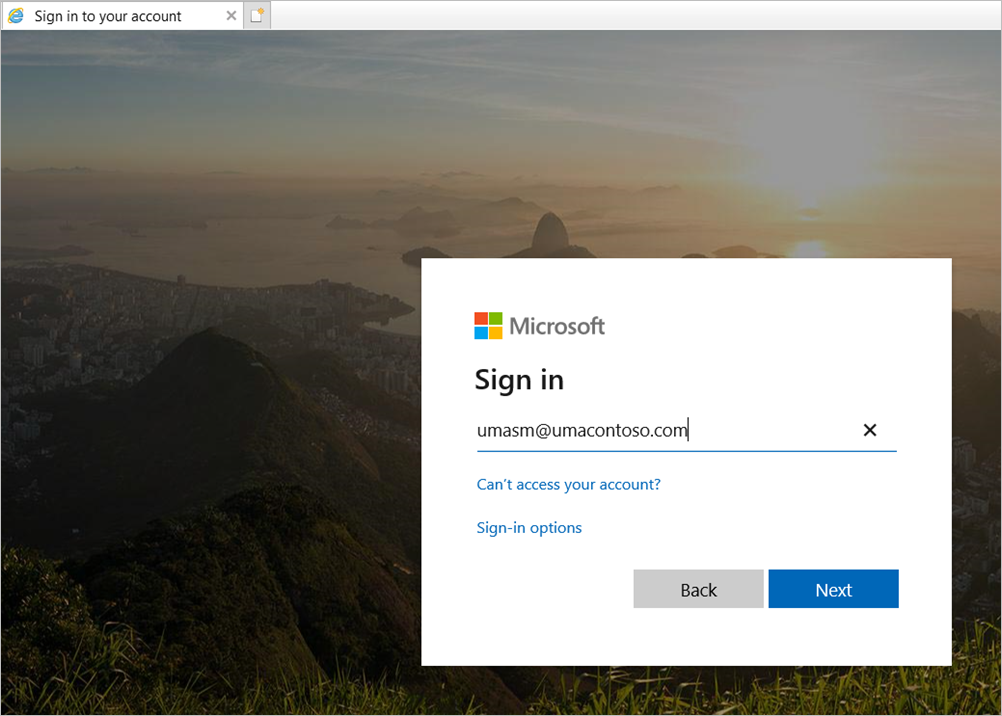
Signing in with
umasm@umacontoso.comis equivalent to using the Windows credentialsUmacontoso\umasm.These previous steps are applicable if you have on-premises AD configured and are planning to sync it with Microsoft Entra ID.
Successful sign-in after implementing the above steps:
Followed by the display of web portal:
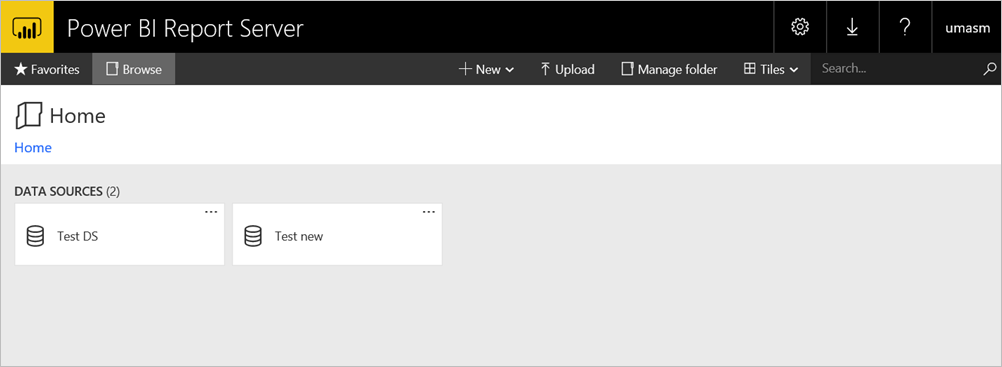
With a successful test connection to data source using Kerberos as the authentication:

Access from Power BI mobile apps
Configure the application registration
Before the Power BI mobile app can connect and access Power BI Report Server, you must configure the application registration that was automatically created for you in Publish through Microsoft Entra application proxy earlier in this article.
Note
If you use conditional access policies that require the Power BI mobile app to be an approved client app, you can’t use Microsoft Entra application proxy to connect the Power BI mobile app to Power BI Report Server.
On the Microsoft Entra ID Overview page, select App registrations.
On the All applications tab, search for the application you created for Power BI Report Server.
Select the application, then select Authentication.
Add the following Redirect URIs based on which platform you're using.
When configuring the app for Power BI Mobile iOS, add the following Redirect URIs of type Public Client (Mobile and Desktop):
msauth://code/mspbi-adal%3a%2f%2fcom.microsoft.powerbimobilemsauth://code/mspbi-adalms%3a%2f%2fcom.microsoft.powerbimobilemsmspbi-adal://com.microsoft.powerbimobilemspbi-adalms://com.microsoft.powerbimobilems
When configuring the app for Power BI Mobile Android, add the following Redirect URIs of type Public Client (Mobile and Desktop):
urn:ietf:wg:oauth:2.0:oobmspbi-adal://com.microsoft.powerbimobilemsauth://com.microsoft.powerbim/g79ekQEgXBL5foHfTlO2TPawrbI%3Dmsauth://com.microsoft.powerbim/izba1HXNWrSmQ7ZvMXgqeZPtNEU%3D
When configuring the app for both Power BI Mobile iOS and Android, add the following Redirect URI of type Public Client (Mobile and Desktop) to the list of Redirect URIs configured for iOS:
urn:ietf:wg:oauth:2.0:oob
Important
The Redirect URIs must be added for the application to work correctly.
Connect from the Power BI mobile apps
- In the Power BI mobile app, connect to your report server instance. To connect, enter the External URL for the application you published through Application Proxy.
- Select Connect. You're directed to the Microsoft Entra sign-in page.
- Enter valid credentials for your user and select Sign in. You see the elements from your report server.
Related content
- Connect to Report Server and SSRS from Power BI mobile applications
- Enable remote access to Power BI Mobile with Microsoft Entra application proxy
More questions? Try asking the Power BI Community