Note
Access to this page requires authorization. You can try signing in or changing directories.
Access to this page requires authorization. You can try changing directories.
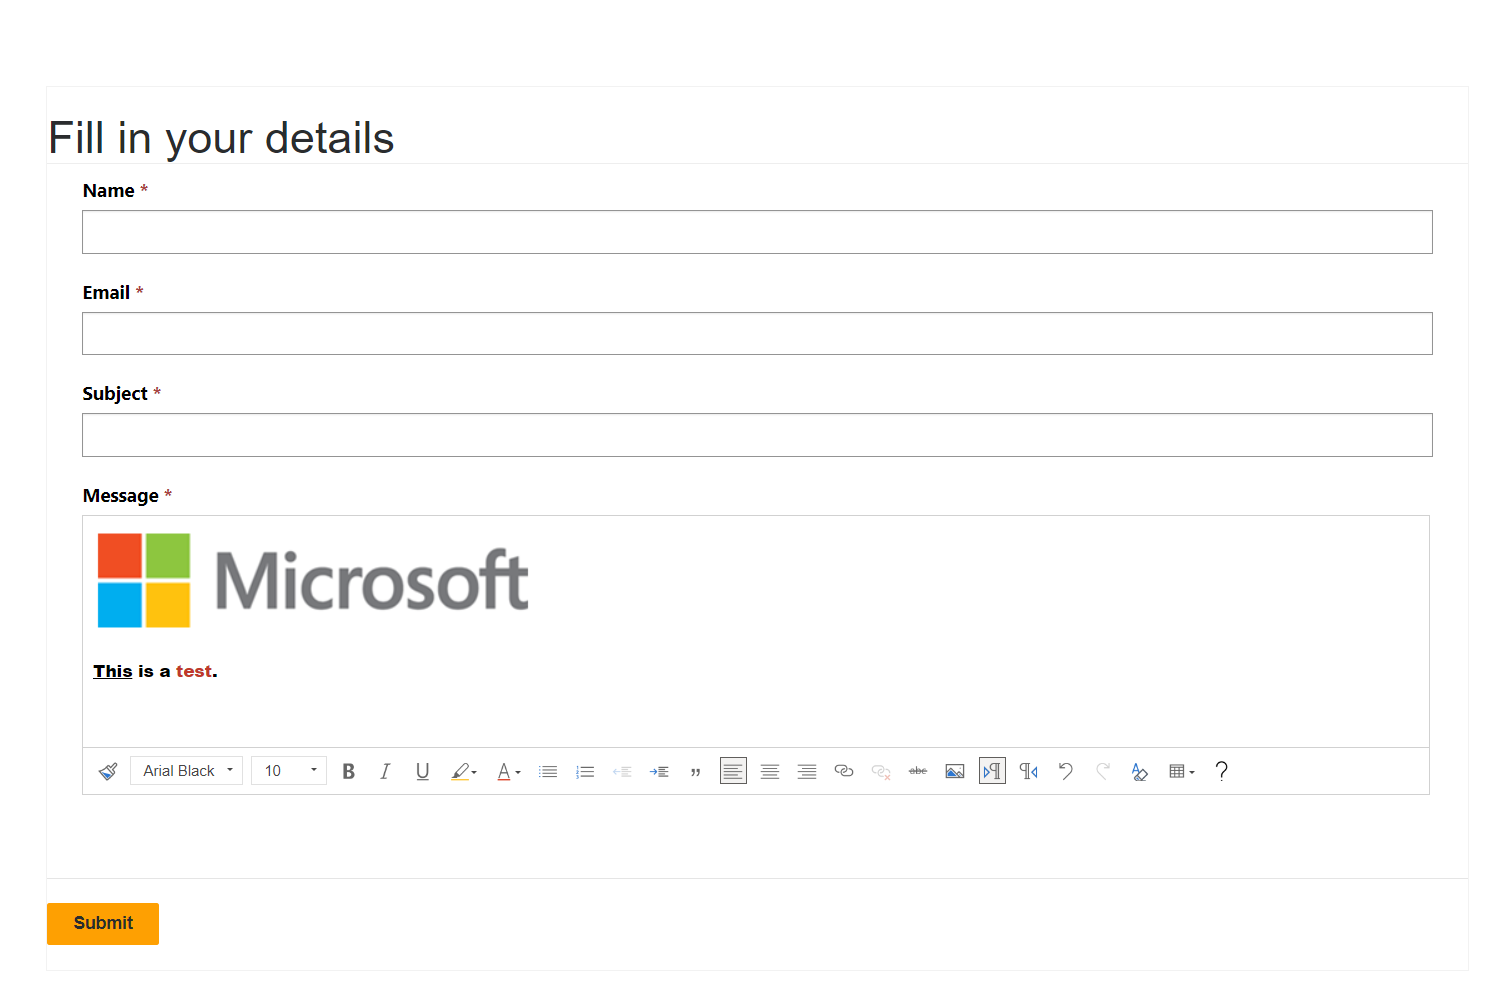
In the tutorial, you'll configure the rich text editor component on a Microsoft Dataverse form, and enable the rich text editor to be visible on a webpage.
This tutorial will use the Feedback table and the Contact us webpage that is available in the Starter layout templates.
Prerequisites
Step 1. Add the code component to a field in a form
In the design studio, select the Data workspace.
Select the Feedback table.
Select Forms and then choose to edit the simple contact us form.
Select the Message field.
Choose + Component and select the Number input component.

Select Done.
Select Save and Publish form.
Step 2. Configure the rich text editor component on webpage
In the following steps we will configure the existing feedback page, you can also create your own page and add your own form component.
In the Pages workspace, select the Contact us page.
The Message field should appear on the form with the message Enable custom component to see this field in preview.
Select the field and choose Edit field.
Select the Enable custom component field.

Select OK.
Select Sync.
Note
To display the data as rich text, you might have to increase the character size of the text columns to accommodate the extra information.
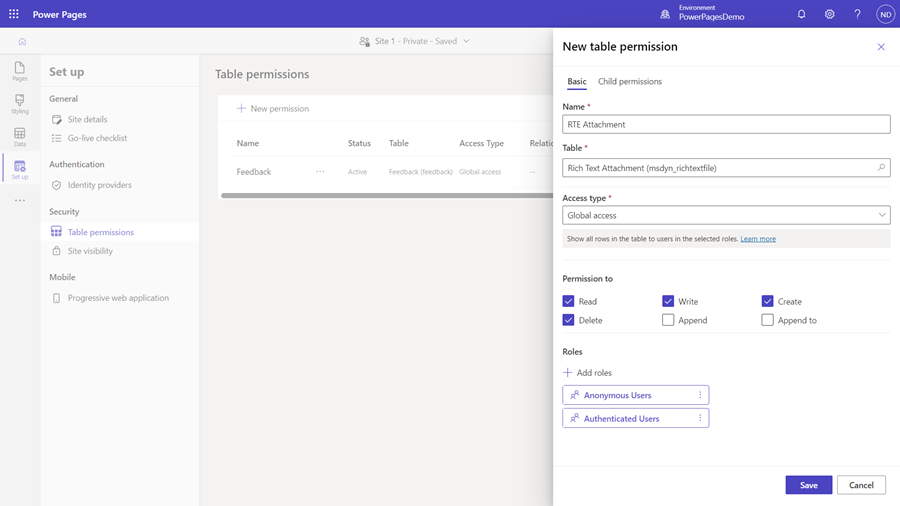
Step 3.1 Add table permissions for the rich text attachment table
For using and storing images in the rich text editor on the portal, you'll need to add table permissions to the rich text attachment table (msdyn_richtextfile).
Open the design studio and select Set up workspace.
Select Table permissions.
Select + New permission to create a new table permission for the rich text attachment table. The name can be anything you choose; in this example, we use RTE Attachment.
For Access type, select Global access.
Note
The Global access type is chosen because no relationship exists between the table configured to use the rich text editor control and the rich text attachment table.
Under Permission to, select the Read, Write, Create, and Delete checkboxes.
Assign an appropriate web role to the table permission.
Important
If you want to store images as base 64 strings directly in the column that you've configured to use the rich text editor control, you need to configure the control by using a JSON configuration file. Set disableImages and disableDefaultImageProcessing to true to allow images to be rendered consistently across all clients. Using this method doesn't require the global table permission on the rich text attachment (msdyn_richtextfile) table.
Step 3.2. Add web API site setting
In order to save images in the rich text editor control, you will need to add a couple of site settings.
Open the Portals Management app.
Go to Site Settings.
Create the following site settings: enter the name, your website, and the value of true, and then select Save & Close.
Site setting name Value Webapi/msdyn_richtextfile/enabled true Webapi/msdyn_richtextfile/fields *
Step 4. Preview the site.
In the design studio, select Sync.
Select Preview and then select Desktop, go to the Contact us page, you should see the custom component enabled.
Rich text editor on a read-only form
On a read-only form, the rich text editor displays the content with formatting and images. The content can be read, but not edited or updated.
Note
Only .PNG, .JPG., or .GIF file formats are supported for drag and drop.
Rendering rich text editor content field using liquid or Pages Web API
The rich text editor content field can be rendered using Liquid or the Pages Web API. If the field contains any image files, they will have a Dataverse Web API reference path. To display these images on a Pages web page, you need to replace the current path with the corresponding Pages API path.
Example :
The image element within the rich text editor content field will be displayed as follows, containing a reference to the Dataverse Web API path:
<img loading="lazy" src="/api/data/v9.0/msdyn_richtextfiles(d0a473a4-9e95-ee11-be37-000d3a5c393e)/msdyn_imageblob/$value?size=full" style="height:61px; width:376px">
To update the image element, replace /api/data/v9.0 with /_api as shown below:
<img loading="lazy" src="/_api/msdyn_richtextfiles(d0a473a4-9e95-ee11-be37-000d3a5c393e)/msdyn_imageblob/$value?size=full" style="height:61px; width:376px">