Create and modify Dataverse views by using the Data workspace
Views are a subset of table data. Create a view to select specific table columns and rows that you want to display in a site. The Views tab displays views used in the lists that are embedded in the site and all other views in the environment that are associated with the respective table. It only shows view types that are supported in portals. Selecting an existing view (or creating a new one) opens the Power Apps view designer, where you can define the view. Views are a foundation of portals lists.
You use the data workspace to create and modify Dataverse table views directly in the Power Pages design studio.
Note
You'll need to ensure that the changes you make to views are published before you used them to create list components on pages.
Tip
We've created a series of tutorials and videos for you to learn to use Power Pages and how create a view and add a list to a page. For more information, go to Tutorial: Add a list to a page.
Use the Data workspace
Go to Power Pages.
Select a site, and then select Edit.
On the left tool belt, select Data.
View designer
On the left pane of the Data workspace, the Tables in this site section lists the tables that are used in basic forms created in the site. The Other tables section lists all Dataverse tables in the environment.
Create or modify a view
From the Tables in this site or Other tables section, select the table that you want to either create or modify a view for.
In the table designer, select the Views tab.
Do one of the following steps:
To create a new view, select New View.
Enter a name and a description for your view.
Select Create.
To modify an existing view, select the view from Views in this site or Views available for this table.
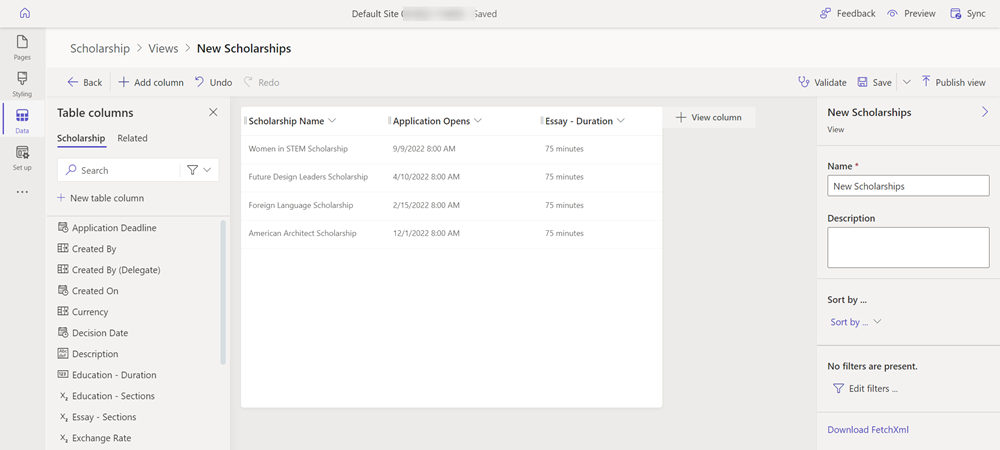
The view will appear in the view designer, where you can configure it by using the following features.
Action Description Back Return to the previous screen. Add column Display the list of table columns where you can search for, select, or create a new table column and add it to the view. Undo Undo your last update. Redo Redo your last undo change. Validate Run a checker to see whether there would be any performance impacts with the current view configuration. Save Save the view configuration. Save As Save the view configuration with a different name, which creates a copy of the current view. Publish view Publish the view so that it can be used when creating a list on a page. You'll also be able to select the column header and modify the following.
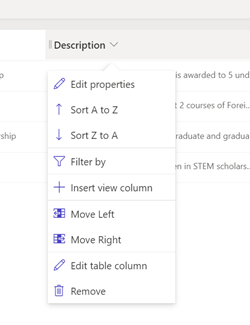
Action Description Edit properties Change the column width by entering the width in pixels. Sort options Depending on the data type, you can configure the sorting alphabetically (sort A to Z, sort Z to A), numerically (ascending or descending), or by date (older to newer, newer to older). Filter by Specify a value to filter the view. Insert view column Insert a table column to the view. Move Left/Move Right Move the column to the left or right in the view layout. Edit table column Edit the table column configuration. Remove Remove the column from the view (this doesn't delete the table column).
View properties
You can modify some of the view properties—such as the name and description—on the right panel.
Sort by
You can add a series of columns to be used to sort the view.
Filter views
You can also create filters for your view to display specific data. Select the Edit filters link to open the expression builder and specify columns and column groupings to filter your view data.
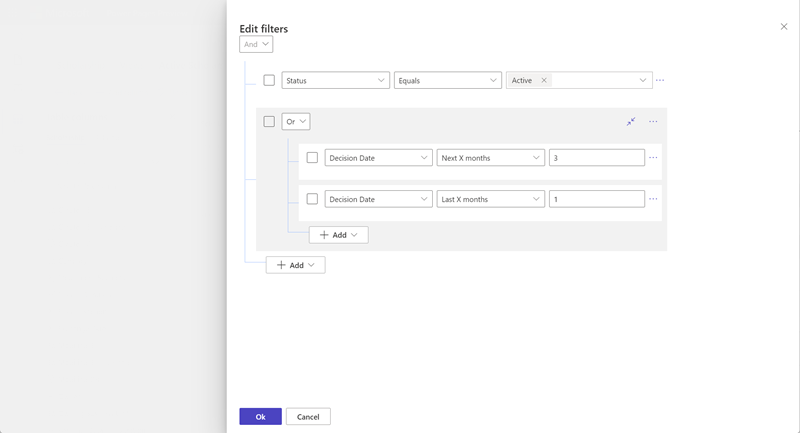
More information: Create or edit filters in model-driven app views
Download FetchXML
The Download FetchXML link will download your view definition as an FetchXML file that can be used by pro-developers when creating web templates for custom page layouts.
Next steps
Create and modify forms using the Data workspace
See also
Feedback
Coming soon: Throughout 2024 we will be phasing out GitHub Issues as the feedback mechanism for content and replacing it with a new feedback system. For more information see: https://aka.ms/ContentUserFeedback.
Submit and view feedback for