Note
Access to this page requires authorization. You can try signing in or changing directories.
Access to this page requires authorization. You can try changing directories.
You can generate answers from publicly available data by utilizing Bing search. Configuring Bing search enables the generation of answers from external sources beyond the Power Pages site built on the Dataverse instance.
To use Bing search:
Go to Power Pages.
Select the site, then select + Edit.
Go to the Set up workspace and select Add agent under Copilot.
Select View agent analytics.
Select Topics.
Select the System tab.
Select the Conversational boosting topic.
Update the Create generative answers node to include the public websites you want to index. For more details, go to Search public data or use a Bing Custom Search for generative answers.
Select Save and then select Publish.
Check if your public site is indexed by searching for its content using Bing search. If no results from your site appear, it might not be indexed. You can either wait for indexing or prompt Bing Webmaster to index your site immediately.
Important
If you configure agent for generative answers from public data using Bing search, the use of Bing search is governed by the Microsoft Services Agreement and Microsoft Privacy Statement.
Force Bing Webmaster Tools to index your site (optional)
When you add a site to Copilot, Bing might not index your site immediately. Indexing can take several hours to a day. To expedite indexing, use Bing Webmaster Tools to index your site's content immediately.
Add your site to your Bing Webmaster Tools account
Open Webmaster Tools.
Create a Bing Webmaster Tools account if you don't have one yet.
Add your site to your account.
- If your site is already verified on Google Search Console, you can import it to Bing Webmaster Tools.
- If your site isn't verified on Google Search Console, you can add your site manually.
Verify your ownership
Verify that you're the site owner using one of the following methods, also described in Bing Webmaster Tools help.
XML file authentication
With this method, you upload an XML file to your site's root folder. In Power Pages, it's as simple as adding the file to a note on the site's home page.
On the Add & verify site page in Webmaster Tools, select XML File.
Select BingSiteAuth.xml to download the file to your local drive.
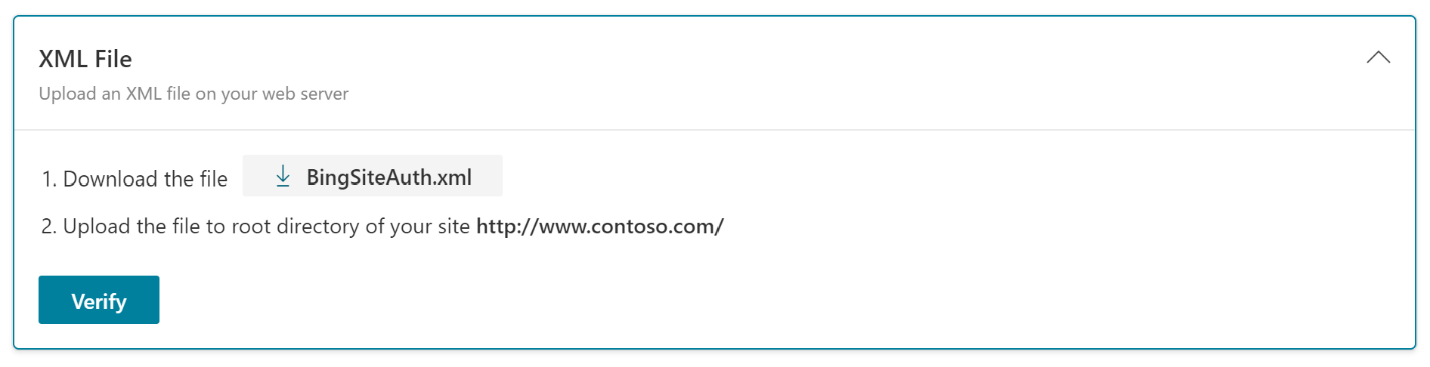
In the Power Pages design studio, select More items (⋮) > Portal Management.
In the sitemap under Content, select Web Files.
Select + New.
In Name, enter: BingSiteAuth.xml
In Website, search for and select your site.
In Parent Page, search for and select your site's home page.
In Partial Url, enter: BingSiteAuth.xml
In Publishing State, search for and select Published.
Select Save.
Select the Notes tab.
Upload the
BingSiteAuth.xmlfile.Select Save & Close.
Meta tag authentication
With this method, you add a metadata tag to your site's header HTML. In Power Pages, it's as simple as adding a content snippet.
On the Add & verify site page in Webmaster Tools, select HTML Meta Tag.
Select Copy.
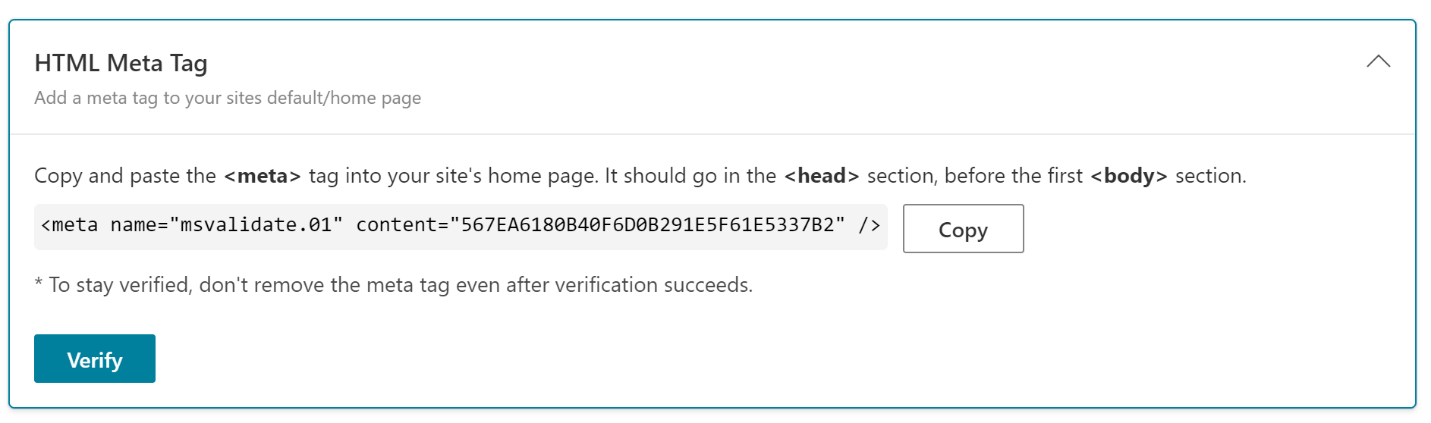
In the Power Pages design studio, select More items (⋮) > Portal Management.
In the sitemap under Content, select Content Snippets.
Select + New.
In Name, enter: Head/Bottom
In Website, search for and select your site.
In Display Name, enter: Head/Bottom
Leave Type set to Text.
In Content Snippet Language, search for and select English.
In the Value box, paste the metadata you copied in step 2.
Select Save & Close.
Add a Robots.txt file
Add a file to your site to tell Bing, Google, and other search engines (or robots) how much of its content to index. This Robots.txt file lets search engines index the entire site, but you can control which pages they index. Use Bing Webmaster Tools to easily edit and test your Robots.txt file.
On your local drive, create a text file and name it Robots.txt.
Enter the following content in the file:
User-agent: *
Disallow:
Save and close the file.
In the Power Pages design studio, select More items (⋮) > Portal Management.
In the sitemap under Content, select Web Files.
Select + New.
In Name, enter: Robots.txt
In Website, search for and select your site.
In Parent Page, search for and select your site's home page.
In Partial Url, enter: Robots.txt
In Publishing State, search for and select Published.
Select Save.
Select the Notes tab.
Upload the
Robots.txtfile.Select Save & Close.
Add a meta description to pages to index
A meta description tells search engines what text to display with the page title. It's an important part of making your site easy to find, so put thought into the description of each page you plan to index. To find guidance for creating effective meta descriptions, enter the key phrase "meta description" in your favorite search engine.
In the Power Pages design studio, select More items (⋮) > Portal Management.
In the sitemap under Content, select Web Pages.
Open a page that you want to force Bing to index.
Enter or update the Description on both the Information form and the Content Page form.
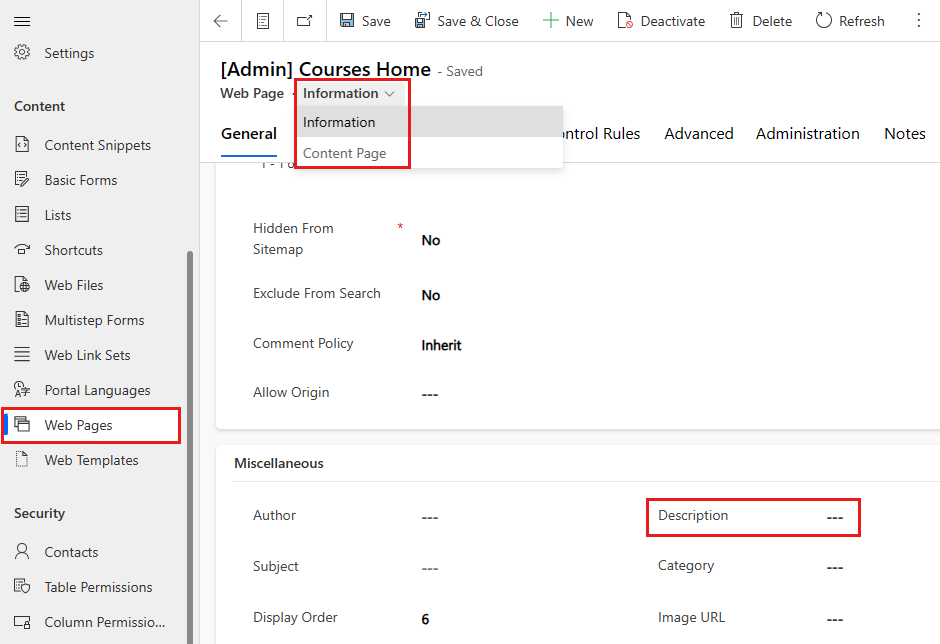
Select Save & Close.
Repeat for all pages to be indexed.
Run an SEO scan and fix issues
Scan for common search engine optimization (SEO) issues that make your site harder to find.
- Open Webmaster Tools Site Scan.
- Select Start new scan.
- Follow the instructions to analyze your site and view the report.
- Fix as many of the issues the scan discovered as you reasonably can.
Submit URLs
As the final step, index individual page URLs directly. It's a good idea to submit the URLs of any important new pages or pages with new content to get them indexed faster. You can submit up to 100 URLs per day.
- Open Webmaster Tools URL Submission.
- Select Submit URLs.
- Enter the URLs to index, one per line.
- Select Submit.
To verify the indexing status, select URL Inspection in the left side panel. Enter a URL, and then select Inspect.
Indexing usually completes within a few minutes, but it can take up to an hour to see results.