Note
Access to this page requires authorization. You can try signing in or changing directories.
Access to this page requires authorization. You can try changing directories.
Configure sensitivity labels for emails in model-driven apps, such as Dynamics Customer Service and Dynamics 365 Contact Center, to ensure email communications comply with your organization's policies and protect sensitive information across attachments, replies, and forwards.
Prerequisites
- Create and configure sensitivity labels in the Microsoft Purview portal. For more information, see Create and configure sensitivity labels.
- An email server profile with Server-to-Server Authentication (Same Tenant) is configured for Exchange Online. Learn more in Connect to Exchange Online.
- Server side synchronization is set up for email. Learn more in Set up server-side synchronization for email.
- The Microsoft Entra ID user associated with the mailbox has access to the required sensitivity labels in Microsoft Purview. Learn more in Permissions in the Microsoft Purview portal.
Enable email data sensitivity labels
Before you add sensitivity labels to the email form, enable email data sensitivity labels in the environment.
Perform the following steps:
- Sign in to Power Platform admin center.
- In the left navigation pane, select Manage.
- In the Manage panel, select Environments.
- On the Environments page, choose an environment.
- In the command bar, select Settings.
- Expand Email, and then select Email settings.
- In Set Email data sensitivity labels, turn on the toggle for Enable data sensitivity labels for emails.
Add the sensitivity label column to email form
To display sensitivity labels in emails, add the Sensitivity label column and control to the email form in Power Apps.
Perform the following steps:
Sign in to Power Apps and select your environment.
In the navigation pane, select Solutions.
Open the solution you want or create a new one.
Select Objects on the left navigation pane, and then select Add existing > Table > Email > Next.
Select Forms > Add existing form > Email (Main form) > Add.
Open the main form, and then in the form designer, select Columns.
Search for Sensitivity label.
Drag the Sensitivity label column onto the form canvas.
Select the Sensitivity label column on the form.
In the Properties pane, select Components > More components.
Search for and select Email sensitivity label control, and then select Add.
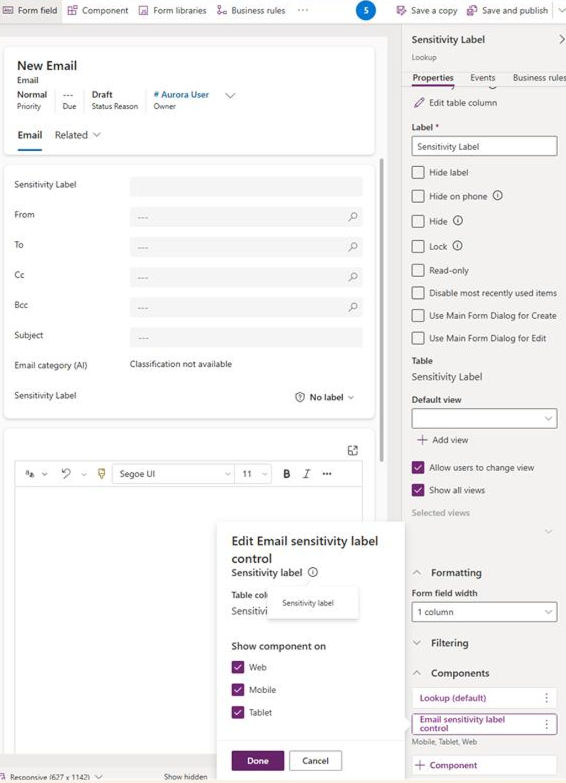
Configure the control properties as required.
Select Done.
Select Save and publish.