Note
Access to this page requires authorization. You can try signing in or changing directories.
Access to this page requires authorization. You can try changing directories.
You can reduce storage space used by removing or deleting data from Dynamics 365 apps, such as:
- Dynamics 365 Sales
- Dynamics 365 Customer Service
- Dynamics 365 Field Service
- Dynamics 365 Marketing
- Dynamics 365 Project Service Automation
- Dynamics 365 Finance and Operations
This article describes 15 methods to help you manage storage more effectively.
Use one or more of these methods to control total data storage usage. You can delete categories of data as needed or set up bulk deletion jobs that recur at scheduled intervals. For example, you can delete notes, attachments, import history, and other data.
Warning
You can't restore your data once you delete it. You might want to increase the amount of storage space in your Microsoft Dynamics 365 subscription instead of reducing your storage space used through deletion.
Prerequisites
You need an administrator security role. All methods except methods 3 and 5 require this role, such as System Administrator. An admin role gives you permission to delete records in bulk and delete system jobs.
Understand how storage works
- Storage consumption doesn't directly match the size reported in Microsoft Dataverse for apps. Consumption includes additional storage for metadata and encryption. For example, removing 10 MB of data doesn't necessarily reduce storage usage by 10 MB.
- Some platform operations require you to wait 24-36 hours to confirm data size changes. These operations include upgrades to newer versions and the creation of new workflows. During this time, report storage usage might temporarily increase.
Free up storage for Dataverse
Note
The system can take up to 72 hours to update storage information. We recommend that you wait up to 72 hours and monitor your storage.
Use the following methods to free up storage for each capacity type.
Reduce file storage
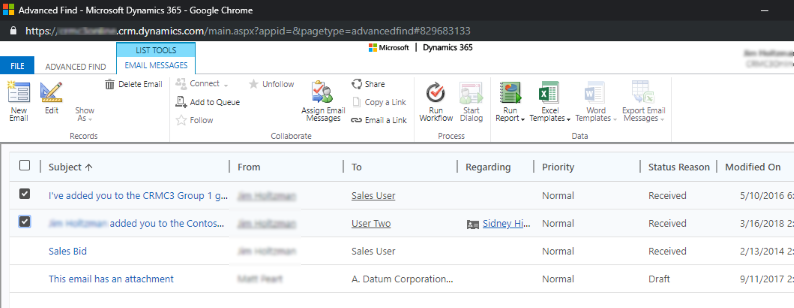
Method 1: Remove email attachments using Advanced Find
Warning
If you delete this data, attachments are no longer available in customer engagement apps. However, if you saved attachments in Office Outlook, they're still there.
Sign in to the Power Platform admin center.
In the navigation pane, select Manage.
In the Manage pane, select Environments.
Select an environment from the list, and then select Open.
In the upper-right corner, select Advanced Find (
 ).
).In the Look for list, select Email Messages.
In the search criteria area, add criteria. For example:
Attachments (Item)
File Size (Bytes) – Is Greater Than - In the text box, type a byte value, such as 1,048,576 (binary for 1 MB).

Select Results.
Review the list of email messages that contain attachments larger than the specified size and then delete the attachments as needed.


Method 2: Remove email messages with attachments using a bulk deletion job
Warning
If you delete this data, attachments are no longer available in customer engagement apps. However, if you saved attachments in Office Outlook, they're still there.
Sign in to the Power Platform admin center.
In the navigation pane, select Manage.
In the Manage pane, select Environments, and then select an environment.
Select Settings > Data management > Bulk deletion. In the menu bar, select New. The Bulk Deletion Wizard opens.

Select Next.
In the Look for list, select Email Messages.
In the search criteria area, add criteria. For example:
Status Reason – Equals – Sent or Received
Actual End – Older Than X Months – 1
Attachments (Item)
File Size (Bytes) – Is Greater Than – In the text box, type a byte value, such as 1,048,576 (binary for 1 MB).
Group the first two criteria rows:
Select the arrow next to each row, and then select Select Row.
With both rows selected, choose Group AND.
Select Next.
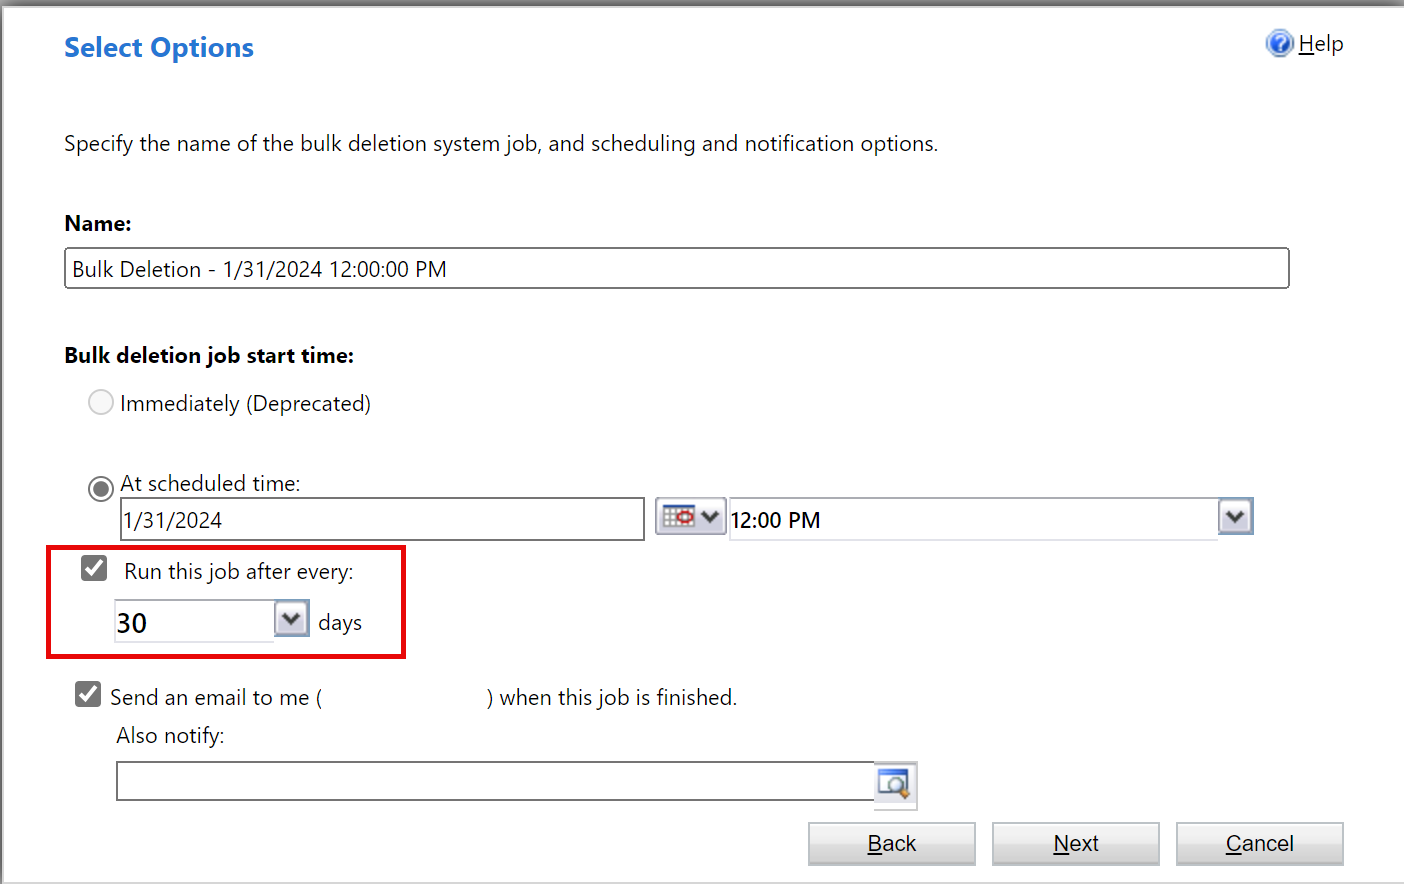
In the Name text box, enter a name for the bulk deletion job.
Select a start date and time; preferably when users aren't working in customer engagement apps.
Select Run this job after every, and then in the days list, select the frequency you want the job to run.


If you want to receive a notification, select Send an email to me (myemail@domain.com) when this job is finished.
Select Next, review the bulk deletion job, and then choose Submit to create the recurring job.
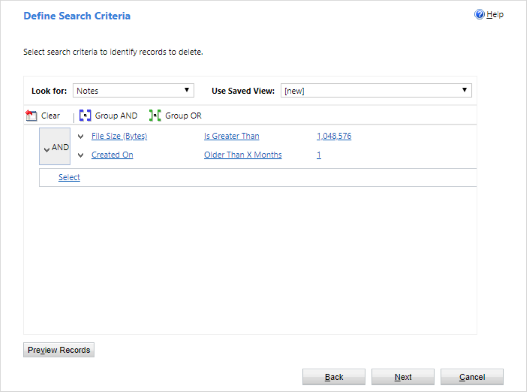
Method 3: Remove notes with attachments using Advanced Find
Warning
If you delete this data, notes and their associated attachments are no longer available in customer engagement apps.
Sign in to the Power Platform admin center.
In the navigation pane, select Manage.
In the Manage pane, select Environments.
Select an environment from the list, and then select Open.
In the upper-right corner, select Advanced Find (
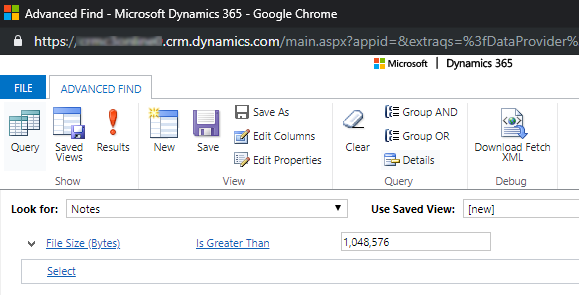
).In the Look for list, select Notes.
In the search criteria area, add criteria. For example:
- File Size (Bytes) – Is Greater Than – In the text box, type a byte value, such as 1048576.
Select Results.
Review the list of attachments that exceed the specified size.
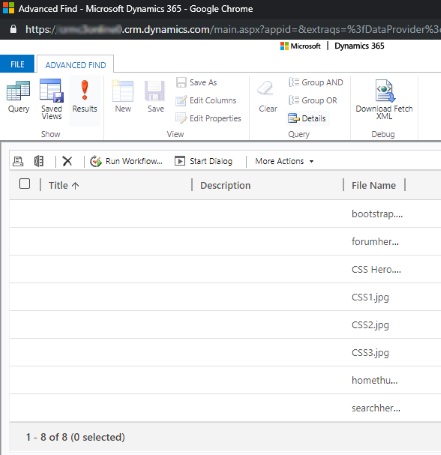
Select individual or multiple attachments, then select Delete (X).


Method 4: Remove notes with attachments using a bulk deletion job
Warning
If you delete this data, notes and their associated attachments are no longer available in customer engagement apps.
Sign in to the Power Platform admin center.
In the navigation pane, select Manage.
In the Manage pane, select Environments, and then select an environment.
Select Settings > Data management > Bulk deletion. In the menu bar, select New. The Bulk Deletion Wizard opens.
Choose Next.
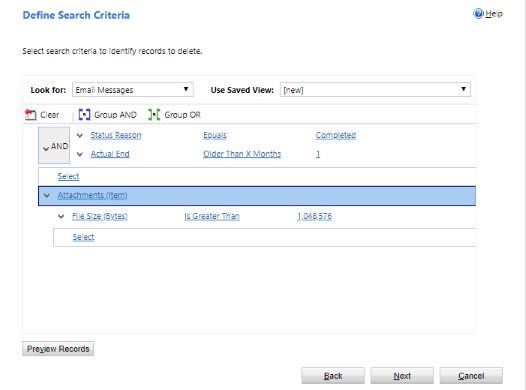
In the Look for list, select Notes.
In the search criteria area, add criteria. For example:
File Size (Bytes) – Is Greater Than – In the text box, type a byte value, such as 1048576.
Created On – Older Than X Months – 1
Group the two criteria rows:
Select the arrow next to each row, and then select Select Row.
With both rows selected, choose Group AND.
Select Next.
In the Name box, enter a name for the bulk deletion job.
Select a start date and time; preferably when users aren't working in customer engagement apps.
Select Run this job after every, and then in the days list, select the frequency you want the job to run.
If you want a receive a notification e-mail, select the Send an email to me (myemail@domain.com) when this job is finished check box.
Select Next, review the bulk deletion job, and then choose Submit to create the recurring job.

Method 5: Delete audit logs (legacy process)
When you enable auditing, customer engagement apps create audit logs to store the audit history of the records. You can delete audit logs to free space when they're no longer needed.
Warning
When you delete an audit log, you can no longer view the audit history for the period covered by that audit log.
Sign in to the Power Platform admin center.
In the navigation pane, select Manage.
In the Manage pane, select Environments.
Select an environment from the list, and then select Open.
In the upper-right corner of an app, select Settings (
 ) > Advanced Settings > Settings > Auditing.
In the Audit area, select Audit Log Management.
Select the oldest audit log, and then select Delete Logs.
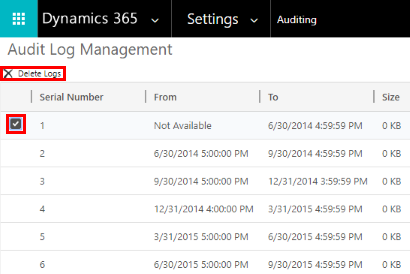
In the confirmation message, select OK.

Note
You can only delete the oldest audit log in the system. To delete more than one audit log repeat deleting the oldest available audit log until you have deleted enough logs.
Method 6: Delete audit logs (new process)
Note
The system can take up to 72 hours to update storage information for the deletion of audit logs. After choosing to delete audit logs, we recommend waiting up to 72 hours and monitoring your storage to see avialable log capacity.
Microsoft is migrating audit logs to a new storage location. Environments that complete the data migration can use the new audit log deletion experience.
When you enable auditing, customer engagement apps create audit logs to store the audit history of the records. You can delete the audit logs to free space when they're no longer needed.
Warning
After you delete an audit log, you can no longer view the audit history for the period covered by that audit log.
Sign in to the Power Platform admin center.
In the navigation pane, select Manage.
In the Manage pane, select Environments, and then select an environment.
Under Auditing, Free up capacity, select Delete audit logs.
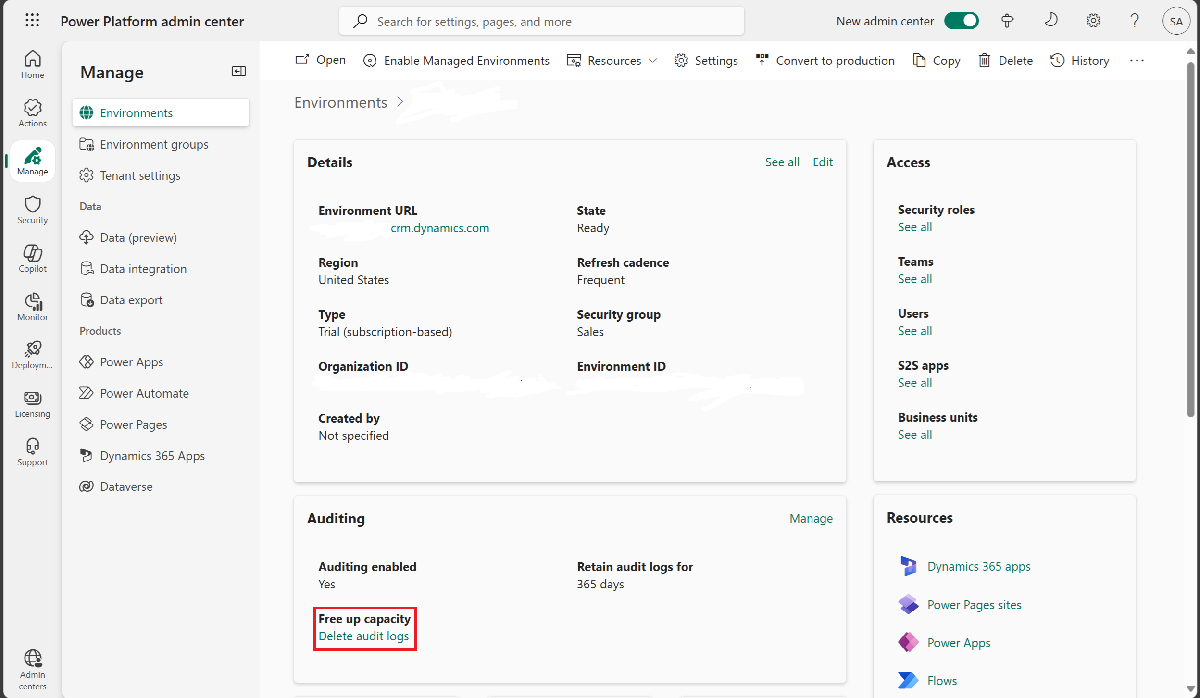
Choose how to delete logs either by table, access type, or date.
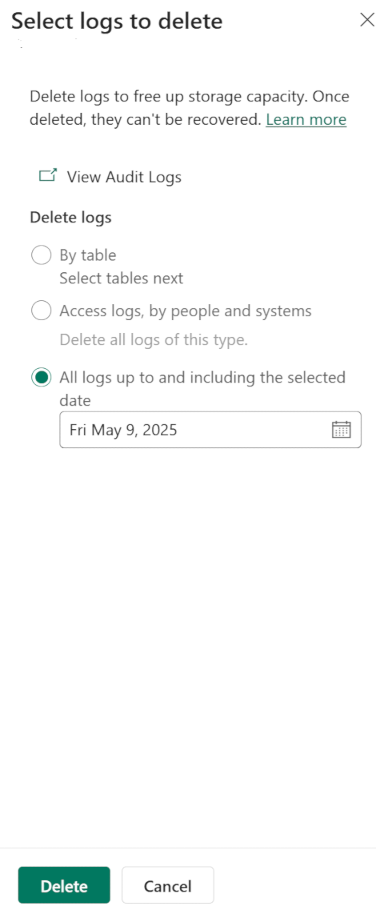
Setting Description System job name Delete logs by table Deletes audit logs for selected tables. By default all tables in the environment are shown, whether or not they contain audit data. Delete logs for [number of] tables. Delete access logs by people and systems Deletes all access logs for users and systems. Delete access logs. Delete all logs up to and including the selected date Deletes all logs up to the selected date. Delete all logs before and including [timestamp]. Select Delete, and then confirm the deletion.


All audit logs are deleted by an asynchronous system job that can take up to 72 hours to run.
To monitor the status of audit delete jobs, see the next section.
Monitor the status of audit delete jobs in the Power Platform admin center
Sign in to the Power Platform admin center.
In the navigation pane, select Manage.
In the Manage pane, select Environments, and then select an environment from the list.
Select Settings > Data management > Bulk deletion.

Review the system job and the Status Reason column.

Select the job to view details.


Reduce database storage
Method 1: Delete bulk email and workflow instances using a bulk deletion job
Warning
If you delete this data, you can no longer determine whether an email was sent through bulk email or whether a workflow rule ran against a record. The emails that were sent and the actions that ran as part of the workflow remain.
Sign in to the Power Platform admin center.
In the navigation pane, select Manage.
In the Manage pane, select Environments, and then select an environment from the list.
Select Settings > Data management > Bulk deletion. In the menu bar, select New. The Bulk Deletion Wizard opens.
Select Next.
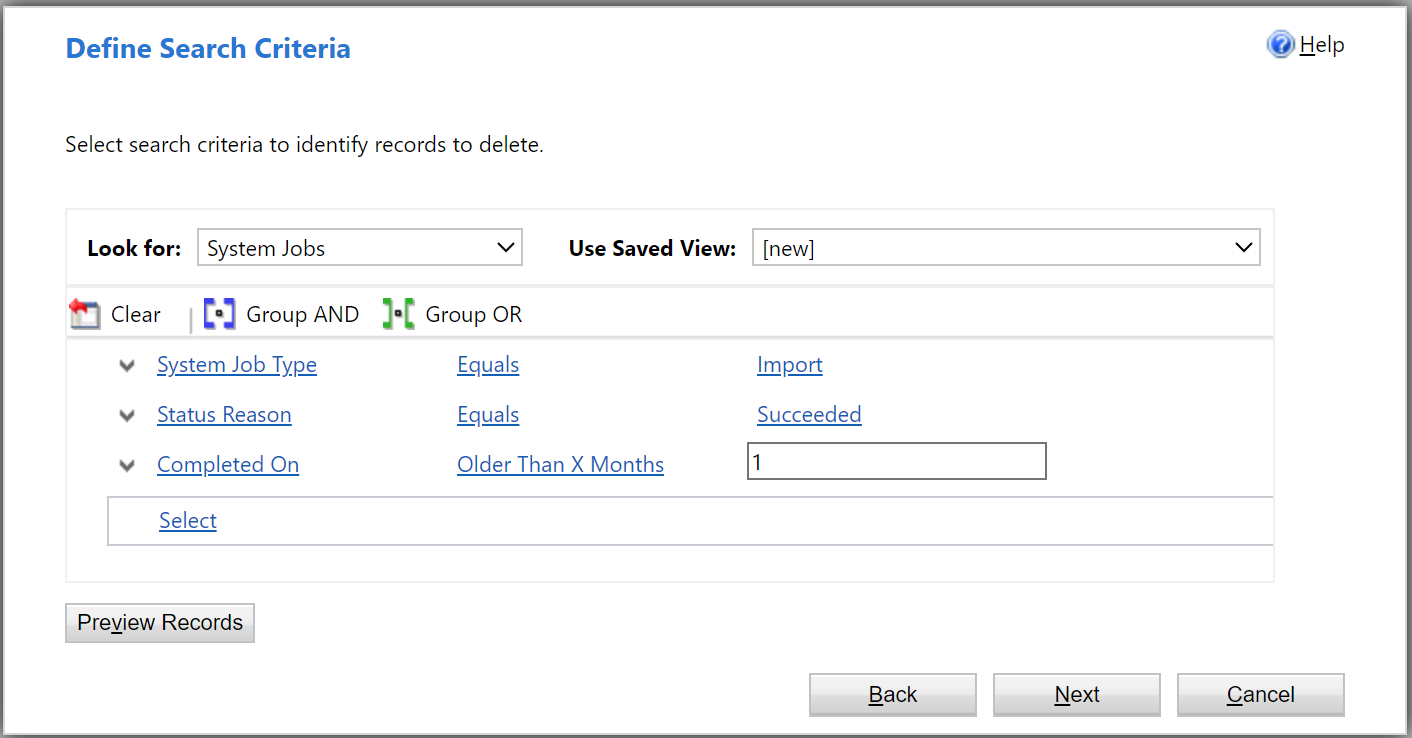
In the Look for list, select System Jobs.
In the search criteria area, add criteria similar to the following:
System Job Type – Equals – Bulk E-mail; Workflow;
Status Reason – Equals – Succeeded
Completed On – Older Than X Months – 1
Group the three criteria rows:
Select the arrow next to each criteria row, and then select Select Row.
When all three rows are selected, choose Group AND.

Select Next.
In the Name text box, enter a name for the bulk deletion job.
Select a start date and time for the job. Choose a time when users aren't working in customer engagement apps.
Select the Run this job after every checkbox, and then in the days list, select the frequency you want the job to run.
To receive a notification, select the Send an e-mail to me (myemail@domain.com) when this job is finished checkbox.
Select Next, review the bulk deletion job details, and then select Submit to create the recurring job.

Method 2: Evaluate and delete suspended workflows
Some workflows enter a suspended state because there's a condition that can't be met or some other reason that doesn't allow the workflow to continue.
Warning
Some workflows are suspended intentionally because a condition to be met or another issue prevents the workflow from continuing.
Sign in to the Power Platform admin center.
In the navigation pane, select Manage.
In the Manage pane, select Environments.
Select an environment from the list, and then select Open.
In the upper-right corner, select Advanced Find (
).In the Look for list, select System Jobs.
In the search criteria area, add criteria similar to the following:
System Job Type – Equals – Workflow
Status Reason – Equals – Waiting
Group the two criteria rows:
Select the arrow next to each criteria row, and then select Select Row.
When both rows are selected, choose Group AND.
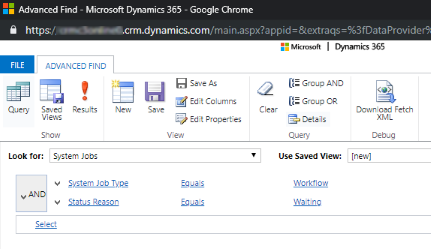
Select Results.
In the results list, open each item workflow to determine whether it can be safely deleted.

Method 3: Remove bulk duplicate detection jobs and associated copies of duplicate records
Each time a duplicate detection job runs, the system stores a copy of each detected duplicate record as part of that job.
For example, if 100 duplicate records, every a duplicate detection job identifies them, whether manual or reccurring, those 100 duplicate records are stored in the database under that instance of that duplicate job. These records remain until you merge or delete the duplicates or delete the duplicate detection job instance.
Sign in to the Power Platform admin center.
In the navigation pane, select Manage.
In the Manage pane, select Environments, and then select an environment.
Select Settings > Data management > Duplicate detection jobs.

Select the duplicate detection job instances that you want to delete and then select Delete (X).
To avoid unnecessary storage consumption, resolve duplicate records promptly so that they aren't reported in multiple duplicate detection jobs.


Method 4: Delete bulk import instances using a bulk deletion job
Each time you run a bulk import, the system creates a corresponding system job associated with that import. The system job details show which records were imported successfully and which records failed.
Warning
After you delete bulk import jobs, you can't view the imported data and you can't roll back the import.
Sign in to the Power Platform admin center.
In the navigation pane, select Manage.
In the Manage pane, select Environments, and then select an environment from the list.
Select Settings > Data management > Bulk deletion. On the menu bar, select New. The Bulk Deletion Wizard opens.

Select Next.
In the Look for list, select System Jobs.
In the search criteria area, add criteria similar to the following:
System Job Type – Equals – Import
Status Reason – Equals – Succeeded
Completed On – Older Than X Months – 1
Group the three criteria rows:
Select the arrow next to each criteria row, and then select Select Row.
With all three rows selected, select Group AND.
Select Next.
In the Name text box, enter a name for the bulk deletion job.
Select a start date and time for the job; preferably when users aren't working in customer engagement apps.
Select the Run this job after every checkbox, and then in the days list, select the frequency you want the job to run.
If you want a notification e-mail sent, select the Send an email to me (myemail@domain.com) when this job is finished check box.
Choose Next, review the job details, and then select Submit to create the recurring job.

Method 5: Delete bulk deletion job instances using a bulk deletion job
When you delete bulk data, the system creates a bulk deletion system job. You can delete these jobs when they're no longer required.
Warning
After you delete these jobs, you lose the history of previously run bulk deletion jobs.
Sign in to the [Power Platform admin center (https://admin.powerplatform.microsoft.com).
In the navigation pane, select Manage.
In the Manage pane, select Environments, and then select an environment from the list.
Select Settings > Data management > Bulk deletion. In the menu bar, select New. The Bulk Deletion Wizard opens.
Select Next.
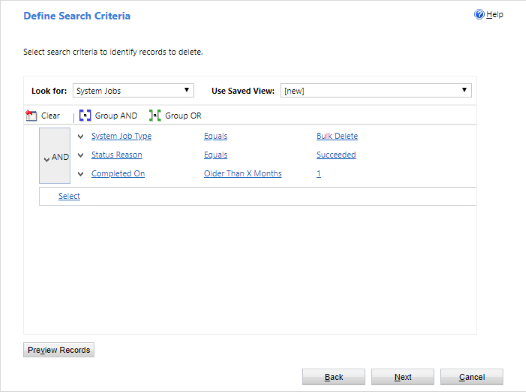
In the Look for list, select System Jobs.
In the search criteria area, add criteria similar to the following:
System Job Type – Equals – Bulk Delete
Status Reason – Equals – Succeeded
Completed On – Older Than X Months – 1
Note
You can also delete jobs that failed or were canceled.
Group the three criteria rows:
Select the arrow next to each criteria row, and then choose Select Row.
With all three rows selected, select Group AND.
Select Next.
In the Name text box, enter a name for the bulk deletion job.
Select a start date and time for the job; preferably when users aren't working in customer engagement apps.
Select the Run this job after every check box, and then in the days list, select the frequency you want the job to run.

If you want a notification e-mail sent, select the Send an email to me (myemail@domain.com) when this job is finished check box.
Select Next, review the job details, and then select Submit to create the recurring job.
Method 6: Remove unrequired tables and columns from Dataverse search
Tables and table fields enabled for Dataverse search affect database storage capacity.
- To update the list of tables selected for Dataverse search results, refer to Select tables for Dataverse search's global search.
- To revise the list of fields selected for each table for Dataverse search results, refer to Select searchable fields and filters for each table for global search.
Method 7: Remove unrequired data from activity tables
Activity tables store records for activities such as emails, appointments, tasks, calls, etc. To learn more about what data these tables contain, refer to Activities data model and storage.
Method 8: Remove unrequired Activity Feeds records
These tables store post related records for Activity Feeds functionality. To free storage space, you can delete any Post records that are no longer required.
Method 9: Modify Item Level Monitoring Settings
The ExchangeSyncIdMappingBase table stores references between Dynamics 365 records and their corresponding records in Microsoft Exchange. Server-Side Synchronization feature uses this table to sync emails, appointments, contacts, and tasks between Dynamics 365 and Microsoft Exchange.
The system stores additional rows to help troubleshoot the synchronization of specific items. For more information, refer to Troubleshoot item level Server-Side Synchronization issues with Microsoft Dynamics 365. This article provides details regarding to reduce the default retention period (three days) for troubleshooting records or disable the feature entirely. Rows unrelated to this feature can't be deleted and are required for Appointment, Contact, and Task synchronization.
Method 10: Remove unrequired Alerts (trace logs)
The Server-Side Synchronization feature logs alerts when events occur, such as mailbox errors or warnings. The system also logs informational alerts when you enable a mailbox. You can view these alerts when you view a Mailbox or Email Server profile within the Email Configuration area of Advanced Settings. While these records appear in a tab called Alerts, they're actually Trace records.
To free storage space, delete trace records that are no longer required. You can delete these records from the Alerts tab of an Email Server Profile or Mailbox record, or by using Advanced Find or a Bulk Delete job.
You can also configure which levels the system logs. For more information, refer to System Settings Email tab.
Free up storage used by flow approvals
View Delete approval history from Power Automate.
Free up storage used by the SubscriptionTrackingDeletedObject table
View Subscription Tracking Deleted Object Table.