Note
Access to this page requires authorization. You can try signing in or changing directories.
Access to this page requires authorization. You can try changing directories.
Note
The CoE CLI is deprecated and will be removed in a future release. Use the Power Platform Project Setup Wizard to set up and manage your ALM Accelerator for Power Platform projects.
The first step is to ensure there's an environment to build and manage solutions. Normally each maker has a unique development environment created. Having successfully gained access to a development environment, the commands below allow either a Power Platform administrator or a maker to perform the following tasks:
Set up service principal - Provide access to the service principal used by the Azure DevOps Pipeline.
Maker create solution - Create a solution branch in the Azure DevOps repository.
Set up service principal
The ALM Accelerator for Power Platform uses the created Microsoft Entra service principal to connect to environments and import and export the solutions. The user add command enables the ALM Accelerator to access each environment. The user add command adds the service principal as a user and assigns the system administrator security role to the user.
Log out of any existing sessions if not the maker or a Power Platform tenant administrator.
az logoutAdd the service principal to the environment.
coe alm user add -e https://contoso-dev-user1.crm.dynamics.com
More information: CoE ALM user add
Maker create solution
Power Platform solutions managed by the ALM Accelerator require a branch to be created in an Azure DevOps repository. This branch, called a "solution branch", allows the maker to build and test changes. Once changes have been verified, they can be merged back into the main branch to deploy to production. The branch command creates a solution branch in Azure DevOps and configures the required Azure Pipelines for the created branch.
Switch to the developer environment.
Create new solution, for example, NewSolution1.
Add items to the solution. For example:
a. Select a solution.
b. Add a canvas application.
c. Add a button.
d. Save the application and close.
Create a solution branch using the following CLI command.
coe alm branch \
-o https://dev.azure.com/dev12345 \
-p alm-sandbox \
-d MySolution1
More information: CoE ALM branch command
NOTES:
-o is the name of your DevOps organization.
-p is the name of the Azure DevOps project.
-d is the name of the solution branch to create.
If the repository you want to create a branch for is empty, you'll need to commit an initial commit before a branch can be created.
Open ALM Accelerator for Power Platform application.
Create a new profile for the solution by selecting the organization, project, repo and target branch.
Note
Unless you plan to override the default pipelines the suggested value for target branch is '[Use Solution Branches]'.
Enter the target validation, test and production environment urls and save your profile.
Select COMMIT SOLUTION.
a. Create a new Branch, for example, MySolution1-WIP.
b. Select an existing solution branch, for example MySolution1.
c. Add a comment, for example Initial version.
Select Bypass Prepare
Select COMMIT SOLUTION.
Select the icon to the right of COMMIT SOLUTION when it changes to the waiting icon.
a. Permit permissions for pipeline to run (variable group, service connection, pipeline). b. Then re-run the pipeline job.
Post set up checks
After setting up an advanced maker, you might need to verify the following set-up is correctly configured:
If this branch is the first branch you've created, you'll need to check variables applied for the created pipeline.
The first time that each pipeline is run from the administration application you'll need to open the pipeline in Azure DevOps and approve the resources used by the pipeline.
Select the blue icon for the Azure DevOps build in the application.
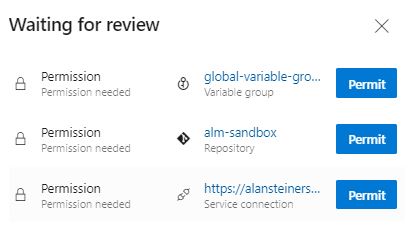
Check if there's a message similar to the screenshot below that requires approval of the pipeline to run.

If necessary, select View and permit the build pipeline to access the required resources, such as the variable group, repository, and service connection.
Optional. By default, the global variables, service connections and repositories are restricted and access for each pipeline must be configured. To grant access to all pipelines follow the instructions:
- Service Connections - Go to Project Settings -> Service Connections -> Edit Service Connection -> Grant access permissions to all pipelines. This has to be done for each Service Connection.
- Variable Group - Go to Pipelines -> Library -> Edit alm-accelerator-variable-group -> Pipeline Permissions -> Select ... -> Open Access
- Repository - Go to Project Settings -> Repositories -> select each pipeline -> Security -> Pipeline permissions -> Select ... -> Open Access
NOTES:
If you're using a free Azure subscription, you may receive the error message "No hosted parallelism has been purchased or granted". To resolve this issue, go to https://aka.ms/azpipelines-parallelism-request and request an Azure Pipeline build compute.
Read next
- Complete the Install Overview