Note
Access to this page requires authorization. You can try signing in or changing directories.
Access to this page requires authorization. You can try changing directories.
Note
The ALM Accelerator is deprecated and will be removed in a future release. Use Pipelines in Power Platform to bring ALM automation capabilities to Power Platform and Dynamics 365 services. Pipelines can be used with source code integration or extended to integrate with other providers.
You can configure the components of the ALM Accelerator for Power Platform either using the accompanying administration app or manually. This article guides you through configuring the app manually and is structured in seven sections:
- Prerequisites
- Foundational setup
- Development project setup
- Solution setup
- Import the solution and configure the app
- Set up makers to use the ALM Accelerator app
Prerequisites
Before you install the ALM Accelerator for Power Platform, make sure you've met the following prerequisites.
The ALM Accelerator must be installed in a Power Platform environment that has a Microsoft Dataverse database. All the environments you use the ALM Accelerator to deploy solutions to also require a Dataverse database.
Note
The ALM Accelerator isn't compatible with Dataverse for Teams. Both the ALM Accelerator app and the associated pipelines assume that you're using the full version of Dataverse in all environments.
We recommend you install the ALM Accelerator in the same environment as other CoE Starter Kit solutions. Learn more about how to determine the best strategy for your organization:
The ALM Accelerator uses Azure DevOps for source control and deployments. If you don't have an Azure DevOps organization, sign up for free for up to five users on the Azure DevOps site.
To complete the steps in this section, you need the following users and permissions in Azure, Azure DevOps, and Power Platform:
- A licensed Azure user with permissions to create and view Microsoft Entra groups, create app registrations, and grant admin consent to app registrations in Microsoft Entra ID
- A licensed Azure DevOps user with permissions to create and manage pipelines, service connections, repos, and extensions
- A licensed Power Platform user with permissions to create application users and grant them administrative permissions
The following connectors must be available to be used together in the environment into which the ALM Accelerator is imported:
- Dataverse (legacy)
- HTTP
- Power Apps for Makers
- HTTP with Microsoft Entra ID (with endpoint access to https://graph.microsoft.com)
- ALM Accelerator Custom DevOps (this connector is created as part of the accelerator solution import)
- Office 365 Users
- HTTP
Install the Creator Kit in the environment where you install the ALM Accelerator.
Foundational setup
The following steps are general to the functionality of the ALM Accelerator and aren't specific to any project or solution.
Create an app registration in your Microsoft Entra environment
Create an app registration for the ALM Accelerator to grant the app and associated pipelines permissions required to perform operations in Azure DevOps and Power Apps or Dataverse. You only need to do this once.
The following steps show how to create a single app registration with permissions for both Dataverse and Azure DevOps. However, you might want to create separate app registrations to divide responsibilities. You should consider how separate app registrations affect both maintenance and security before you decide on an app registration strategy.
Create the app registration
Sign in to the Azure portal.
Select Microsoft Entra ID > App registrations.
Select + New registration, and then give the registration a name, such as ALMAcceleratorServicePrincipal.
Leave all other options at their default values, and select Register.
Add permissions to the app registration
In the left side panel, select API permissions.
Select + Add a permission.
Select Dynamics CRM, and then select Delegated permissions and user_impersonation.
Select Add permissions to add the Dynamics CRM API user_impersonation permission to the app registration.
Select + Add a permission again.
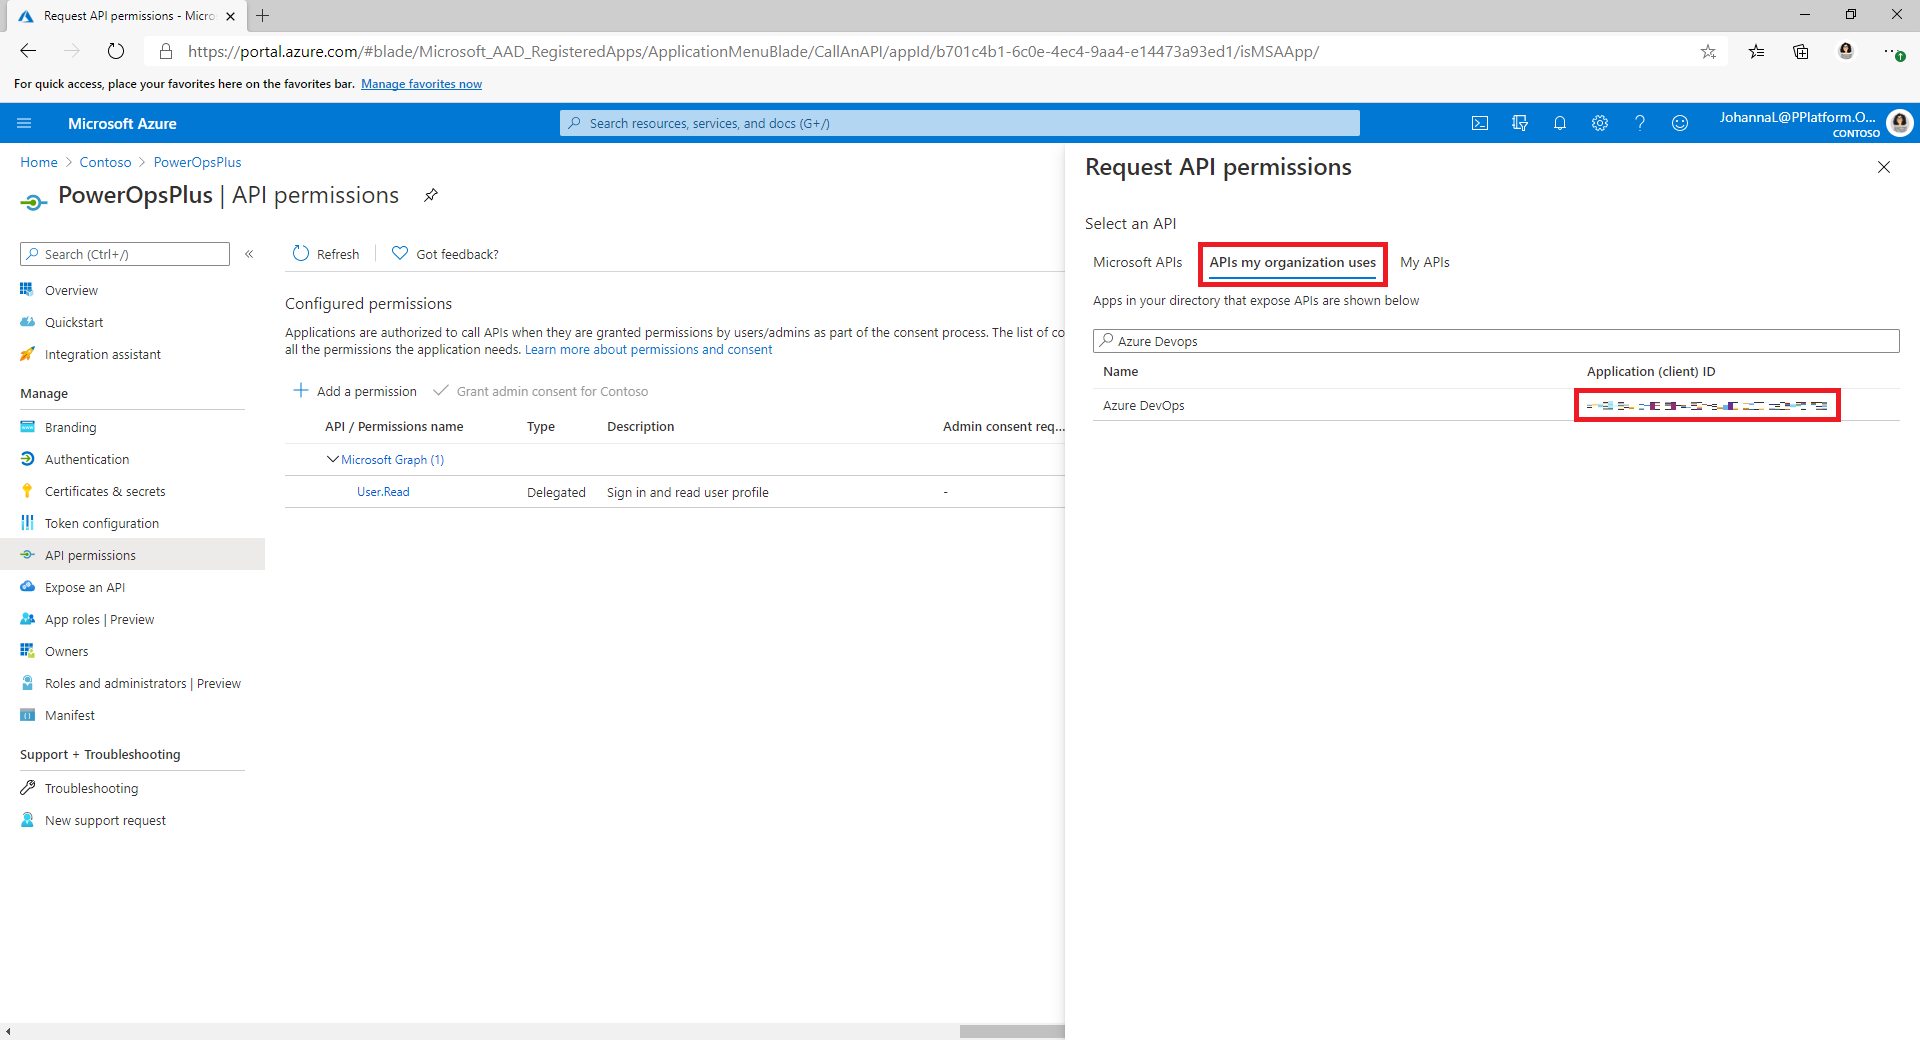
Select the APIs my organization uses tab. Search for and select PowerApps-Advisor, and then select Delegated permissions and Analysis.All (admin consent not required).
This permission is required to run static analysis through the app checker.
Select Add permissions to add the PowerApps-Advisor API Analysis.All permission to the app registration.
Select + Add a permission again.
On either the Microsoft APIs tab or the APIs my organization uses tab, select Azure DevOps, and then select Delegated permissions and user_impersonation.
This permission is required for connecting to Azure DevOps through the custom connector in the ALM Accelerator app.
If you added the Azure DevOps permission from the APIs my organization uses tab, copy the Application (client) ID for use later in this procedure.
You'll use it as the DevOps Application (client) ID, which is different from the Application (client) ID you'll copy later in this procedure.
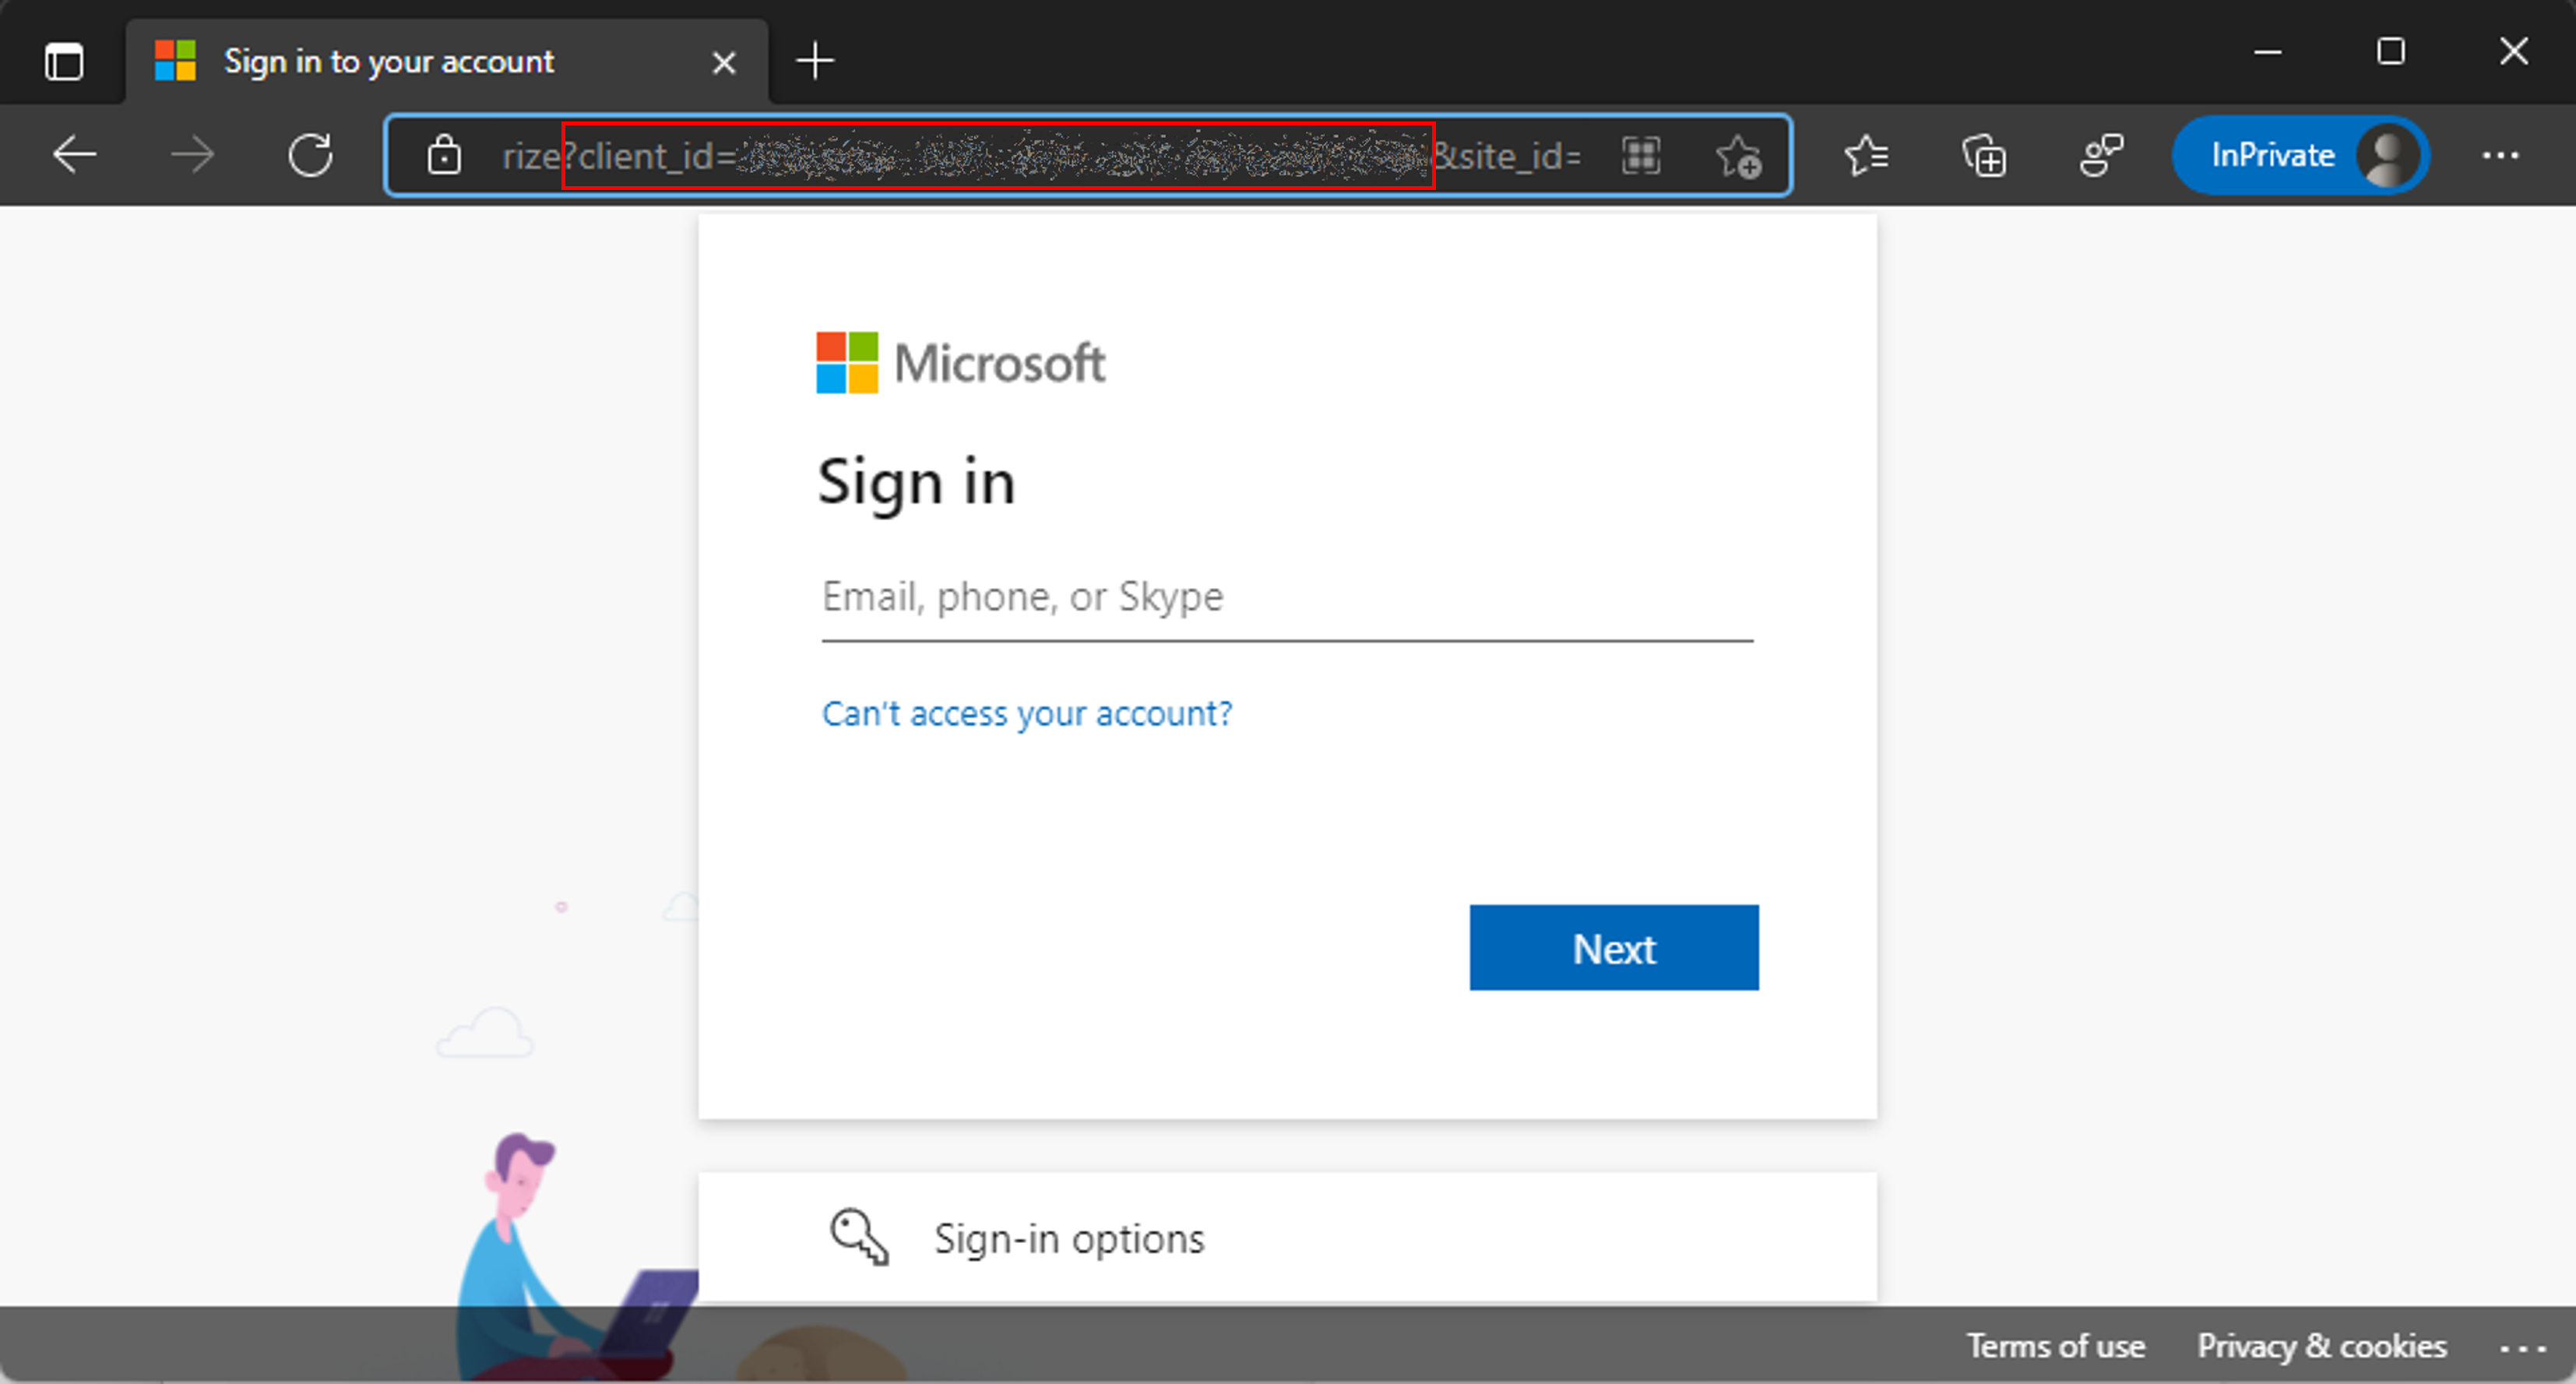
If you can't find the Azure DevOps permission on the APIs my organization uses tab, follow these steps to get the DevOps Application (client) ID:
- Open a private browser window and go to
https://dev.azure.com/<your devops organization>/_apis. - On the sign-in page, copy the value of the client_id parameter in the URL.
- Open a private browser window and go to
Select Add permissions to add the Azure DevOps API user_impersonation permission to the app registration.
Select Grant admin consent for <your tenant>.
Configure the client secret and redirect URI
In the left side panel, select Certificates & secrets.
Select + New client secret.
Select an expiration date, and then select Add.
Copy the client secret Value for use later. This is the only time you can copy the value. Be sure to do so before you leave the page.
In the left side panel, select Overview.
Copy the Application (client) ID and Directory (tenant) ID.
Select Configure.
Give Power App Management permission to your app registration
Grant Power App Management permissions to your app registration so that the pipelines can perform the actions they need to in your environments. To do that, run the following PowerShell cmdlet as an interactive user that has Power Apps administrative privileges. You only need to run this command once, after you create your app registration.
Important
The following PowerShell cmdlet gives the app registration elevated permissions like Power Platform Admin. Your organization's security policies may not allow these types of permissions. Make sure they're allowed before you continue. If they aren't allowed, certain capabilities don't work in the ALM Accelerator pipelines.
Install-Module -Name Microsoft.PowerApps.Administration.PowerShell
Install-Module -Name Microsoft.PowerApps.PowerShell -AllowClobber
New-PowerAppManagementApp -ApplicationId <the Application (client) ID you copied when you created the app registration>
Install Azure DevOps extensions
The ALM Accelerator uses several Azure DevOps extensions, including some third-party extensions that are available in the Azure DevOps marketplace. The website of each third-party extension and a link to their source code are provided in the following instructions. Learn how to evaluate a Marketplace extension publisher.
Sign in to Azure DevOps.
Select Organization settings.
Select General > Extensions.
Search for and install the following extensions:
Power Platform Build Tools (required): This extension contains the Microsoft build tasks for Power Platform. (https://marketplace.visualstudio.com/items?itemName=microsoft-IsvExpTools.PowerPlatform-BuildTools)
Replace Tokens (required): The pipelines use this extension to replace tokens in configuration files and store secure values in private variables configured for a pipeline. (https://marketplace.visualstudio.com/items?itemName=qetza.replacetokens | https://github.com/qetza/vsts-replacetokens-task)
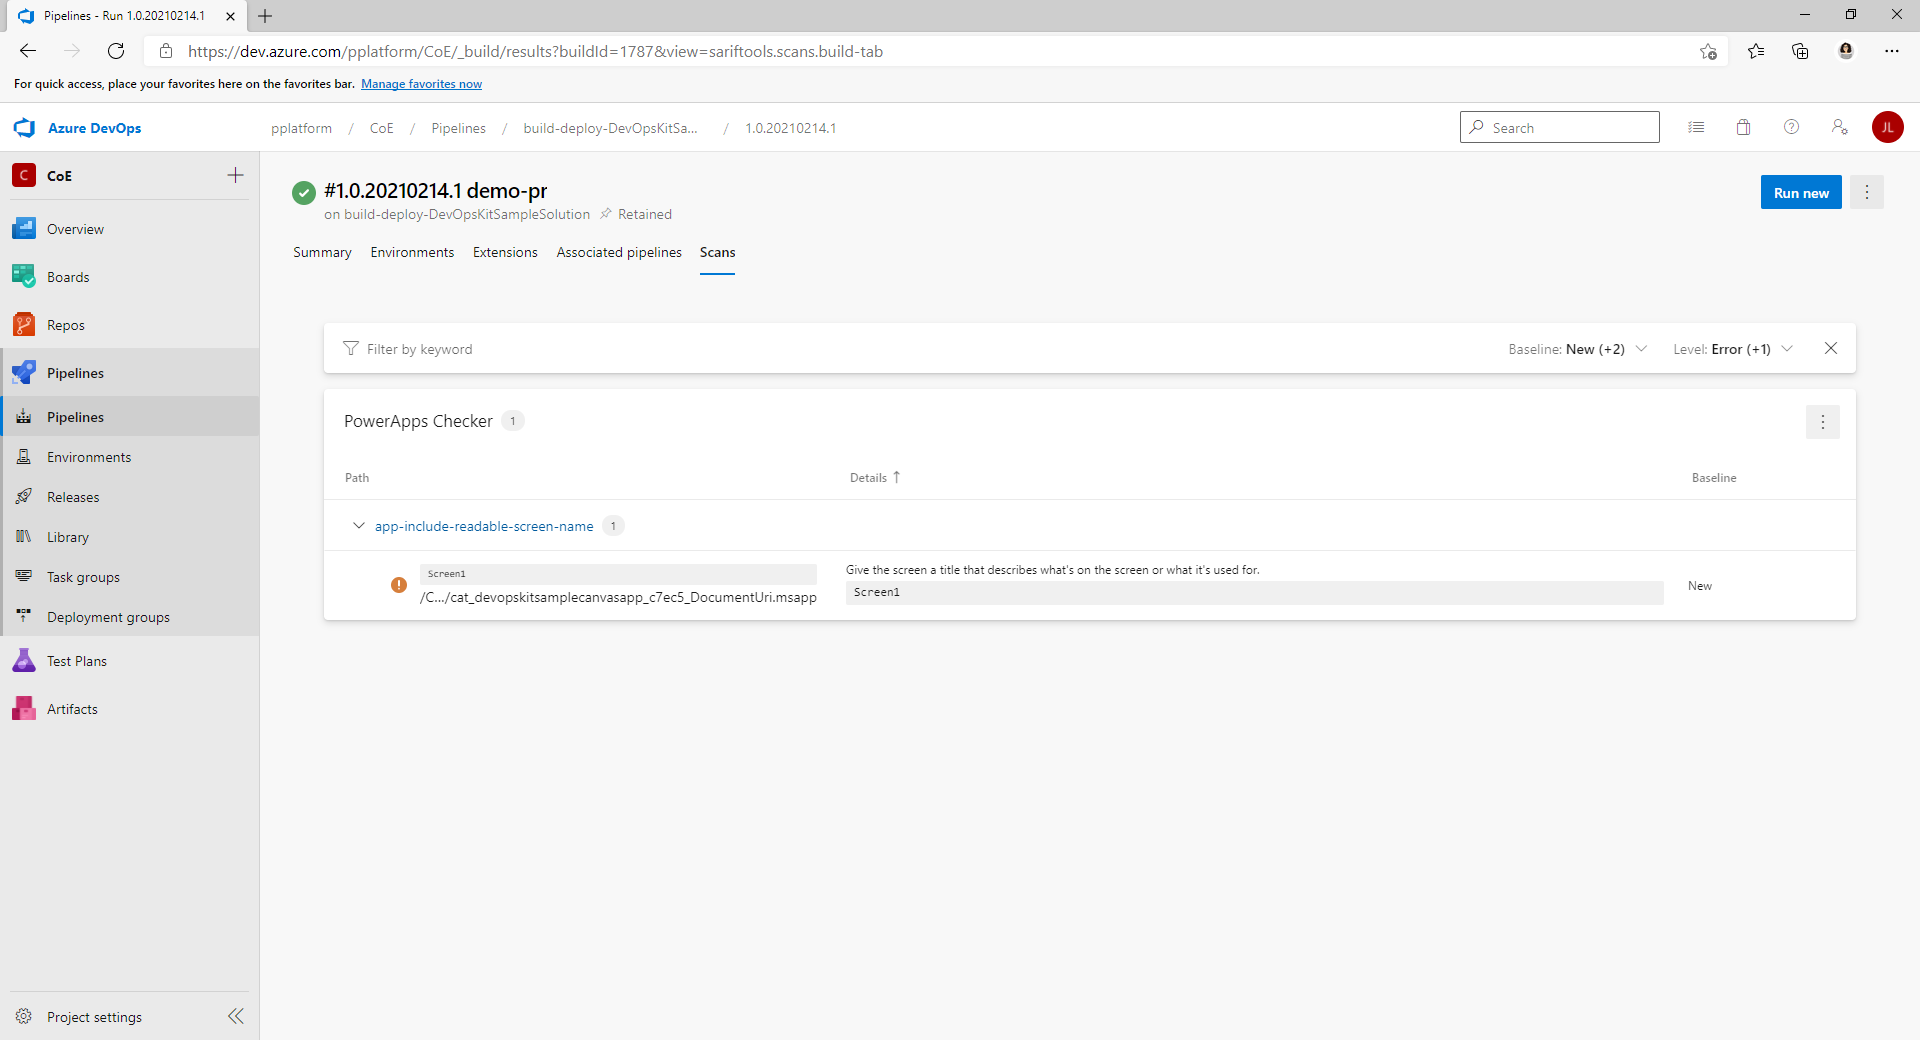
SARIF SAST Scans Tab (optional): Use this extension to visualize the SARIF files the solution checker generates during a build. (SARIF SAST Scans Tab - Visual Studio Marketplace)
Clone the YAML pipelines from GitHub to your Azure DevOps instance
Go to https://aka.ms/coe-alm-accelerator-templates-latest-release and copy the URL of the most recent release.
Sign in to Azure DevOps.
Create a project or select an existing project.
Select Repos, and then select Import repository in the repository list.
Paste the URL you copied in step 1 as the Clone URL, and then select Import.
Confirm the default branch for the repo is main. Select Repos and Branches and make sure the main branch is tagged as the default.
If it isn't, select the three vertical dots (⋮) corresponding to the main branch, and from the More options menu, select Set as default branch.
Note
This repo is where the solution pipeline templates and the export/import pipelines run. Later, when you create the pipelines for your solutions, you might need to refer to this specific project and repo if you choose to use a different repo for source control for your solutions.
Create pipelines for import, delete, and export of solutions
Create import, delete, and export pipelines based on the YAML in the Azure DevOps repo. These pipelines run when you use the app to commit a solution to Git, import a solution, or delete a solution.
Note
If you expect all your exports to perform the same actions regardless of the solution for which the pipeline is running, you can create a single export pipeline as described in this section. However, you might need different export actions based on the solution. In that case, you can append the solution name to the export-solution-to-git pipeline, like export-solution-to-git-SampleSolution, to have the app execute your specific solution pipelines when you perform the actions in the app.
The following table shows the correspondence between the YAML file in the repo and its accompanying pipeline.
| YAML file | Pipeline name |
|---|---|
| export-solution-to-git.yml | export-solution-to-git |
| import-unmanaged-to-dev-environment.yml | import-unmanaged-to-dev-environment |
| delete-unmanaged-solution-and-components.yml | delete-unmanaged-solution-and-components |
In Azure DevOps, go to Pipelines > Create a New Pipeline.
Select Azure Repos Git for your code repository, and then point to the Azure DevOps repo you created and seeded with the pipeline templates in the earlier steps.
On the Configure your pipeline page, select Existing Azure Pipelines YAML file and point to /Pipelines/export-solution-to-git.yml, /Pipelines/import-unmanaged-to-dev-environment.yml or /Pipelines/delete-unmanaged-solution-and-components.yml.
Select Continue, and then select Save.
Select the More menu (…) next to Run Pipeline, and then select Rename/Move.
Change the pipeline name to export-solution-to-git, import-unmanaged-to-dev-environment, or delete-unmanaged-solution-and-components, as appropriate.
Select Save.
Create export pipeline variables (optional)
You may set pipeline variables on the export-solution-to-git pipeline to control what information is persisted to source control. To apply these settings globally, set the variables on your export-solution-to-git pipeline. To apply the settings to specific solutions on export, create an export pipeline for your solution as described in the note in the previous section, and set the variables on that pipeline.
To make sure the current values of environment variables are never committed to source control during the export process, create the DoNotExportCurrentEnvironmentVariableValues variable on your export-solution-to-git pipeline and set its value to True.
Important
This pipeline variable is recommended so that you can use the deployment configuration functionality in the ALM Accelerator.
To make sure the values of specific default environment variables are set during the export of a solution, create the VerifyDefaultEnvironmentVariableValues variable on your export-solution-to-git pipeline and set its value to True. Set the values of default environment variables in the customDeploymentSettings.json as described in the deployment configuration guide.
In Azure DevOps, select Pipelines > Library > Create a new Variable Group.
Name the new variable group alm-accelerator-variable-group, exactly as given here.
The pipelines refer to this specific variable group, so it must be named exactly as shown. If you decide to use a different naming convention for your variable group, you need to modify parts of the pipelines to refer to the name you use instead.
Add the following variables to the variable group:
Name Description Value AADHost The Microsoft Entra authorization endpoint For public clouds, use login.microsoftonline.com. For government clouds, use the appropriate authorization URL. ProcessCanvasApps Whether canvas apps are unpacked during export or packed during builds If False, then the canvas apps aren't unpacked during export or packed during builds. The canvas app unpack and pack functionality is in preview and isn't recommended for use in production environments at this time. However, you can't view canvas source code in source control unless you set this variable to True. (Optional) If you use canvas studio test automation in your pipelines, add the following variables to the variable group:
Name Value TestAutomationLoginMethod CloudIdentity TestAutomationMakerPortalUrl The URL from the Power Apps maker portal, typically *https://make.powerapps.com*TestAutomationUsername The user account used to execute the automated tests TestAutomationPassword The password for the user account used to execute the automated tests (Optional) By default, the global variables are restricted and you need to configure access for each pipeline. You can simplify that and allow access for any pipeline. Under the Variable group (Pipelines > Library > alm-accelerator-variable-group), select Pipeline permissions in the top menu, select (…), and then select Open access.
Set permissions for the project build service
Important
Azure DevOps contains a number of "Build Service" accounts, and it might be confusing as you follow the steps in this section. Pay close attention to the names and format specified in steps 3 and 5. You might need to search for the specific account if it doesn't show up in the initial list.
In Azure DevOps, select Project settings.
Select Repositories > Security.
Under Users, search for and select Project Collection Build Service (Your Organization Name).
Note
You might not see Your Organization Name after the Project Collection Build Service user. It may be just a unique identifier. In this case, use the search function to find the user, and then select it.
Set the following permissions for the build service user:
Permission Value Contribute Allow Contribute to pull requests Allow Create branch Allow Edit policies Allow Under Users, search for and select Your Project Name Build Service (Your Organization Name).
Set the same values as in step 4.
Select Pipelines, select the three dots (…) in the upper-right corner, and then select Manage Security.
Set the following permissions for the Your Project Name Build Service (Your Organization Name) user:
Permission Value Edit build pipeline Allow Edit build quality Allow Manage build queue Allow Override check-in validation by build Allow Update build information Allow View builds pipeline Allow View builds Allow Select Project settings > Agent pools, select Security, and then select Add.
Search for and select Your Project Name Build Service (Your Organization Name).
Set the Role to Reader.
Select Add.
(Optional) By default, the pipeline permissions for each repository are restricted and you need to configure them individually. You can simplify that and allow access for any pipeline. Under Project Settings > Repositories, select each repository in turn. Select Security in the top menu. Find the Pipeline permissions block, select (…), and then select Open access.
Development project setup
The following section guides you through the steps required to set up each of the development projects you support. In this context, a development project comprises the infrastructure and configuration that supports healthy application lifecycle management (ALM), including the configuration of the Dataverse environment that supports the ALM process itself.
Create service connections for Azure DevOps to access Power Platform
Each Dataverse environment—development, validation, test, and production—must have a Power Platform service connection in Azure DevOps. Perform the following steps for each of your environments.
Note
ALM Accelerator app users see only environments in which they have either a user or administrator role on the service connection in Azure DevOps. If they work in personal development environments, makers must have a user or administrator role on the service connection for their personal development environment. Validation, test, and production environment service connections like the build service only need permissions granted to pipelines.
Sign in to Azure DevOps, and then select your project.
Select Project settings > Service connections, and then select Create service connection.
Search for and select the Power Platform service connection type.
Select Next.
For Server URL, enter your environment URL; for example,
https://myorg.crm.dynamics.com/.Important
You must include the trailing forward slash (/) in the URL; that is, after .com in this example.
For Service Connection Name, enter the same URL you entered in step 4, including the training forward slash (/).
Enter the Tenant ID, Application (client) ID, and Client Secret you copied from Microsoft Entra when you created the app registration.
Select Grant access permissions to all pipelines.
Select Save.
The service connections must provide user permissions to all users in all environments that users need to be able to access from the app (for example, maker environments).
In the Service Connections list, select the service connection to be shared with users.
Select More (…) in the upper-right corner, and then select Security.
In the Group or User list, select the user or group you want to provide user permissions to.
Select the User, select a Role, and then select Add.
Repeat the steps in this section for each of your development, validation, test, and production environments.
Set permissions for the project build service to use the service connections
In Azure DevOps, select Project settings > Service connections.
Select (…) in the upper-right corner, select Security, and then select Add.
Search for and select Your Project Name Build Service (Your Organization Name).
Set the Role to Administrator, and then select Add.
Create an app user in your Dataverse environments
Create an application user in your environments to allow the pipelines to connect to Dataverse. Do this in each environment you plan to use the ALM Accelerator to deploy to.
Sign in to the Power Platform admin center.
Select your development environment, and then select Settings.
Select Users + permissions > Application users.
Select + New app user.
Select + Add an app, select the app registration you created earlier, and then select Add.
Select the Business Unit.
Select the pencil icon to the right of Security roles, and then select security roles for the app user.
We recommend you give the app user system administrator security role privileges, so the user can perform the required functions in each environment.
Select Create.
Repeat these steps in your validation, test, and production environments.
Solution setup
When you create a solution in Dataverse, you need to create pipelines specifically for that solution. The following sample pipelines are included in the Pipelines directory in the coe-alm-templates repository:
- https://github.com/microsoft/coe-alm-accelerator-templates/blob/main/Pipelines/build-deploy-validation-SampleSolution.yml
- https://github.com/microsoft/coe-alm-accelerator-templates/blob/main/Pipelines/build-deploy-test-SampleSolution.yml
- https://github.com/microsoft/coe-alm-accelerator-templates/blob/main/Pipelines/build-deploy-prod-SampleSolution.yml
The sample pipelines provide flexibility for organizations to store their pipeline templates in a separate project or repo from the specific solution pipeline YAML. Follow the steps in this section to configure your solution pipeline. Repeat these steps for each solution for which you're using the ALM Accelerator for source control.
Important
The YAML for your solution pipeline is always stored in the same repo you use for source control for your solution. However, the pipeline templates—that is, the folder Pipeline\Templates—can exist either in the same repo as your solution pipeline YAML or in a separate repo or project.
Create the solution build and deployment pipelines
Solution pipelines are used to build and deploy your source-controlled solutions to environments in your tenant. The sample pipelines assume you're using only three environments: validation, test, and production. However, you can create as many solution pipelines as needed based on your organization's environment strategy.
The sample deployment pipelines are triggered by changes to a branch (that is, test and production) or as a part of a branch policy in Azure DevOps (that is, validation). Learn more about setting branch policies for pull request validation. You can also run pipelines manually, without a trigger.
Follow the steps in this section to create deployment pipelines from the sample pipeline YAML. The following table describes the pipeline configuration.
Important
The pipeline name must be exactly as shown in the following table, with the name of your solution in place of MyNewSolution.
| Pipeline YAML file name | Pipeline name | Branch policy enabled | Required |
|---|---|---|---|
| build-deploy-validation-MyNewSolution.yml | deploy-validation-MyNewSolution | Yes | Yes |
| build-deploy-test-MyNewSolution.yml | deploy-test-MyNewSolution | No | Yes |
| build-deploy-prod-MyNewSolution.yml | deploy-prod-MyNewSolution | No | No (Go to the next section) |
Note
The following steps create build and deploy pipelines for the validation, test, and production environments. However, you might want to build and deploy to validation and test and then deploy the artifacts from the test build to production. If that's the case, follow the steps in this section for only your validation and test environments. Then, skip to Create the solution deployment pipeline to configure your release pipeline.
Create the pipeline file
In Azure DevOps, go to the repo that contains the pipelines folder you committed, and select the Pipelines folder.
Open one of the three sample deployment pipelines and copy the YAML to use in your new pipeline.
Note the name of the repo for use in your pipeline.
Go to the repo that you want to use for source control for your solution.
Create a branch based on your default branch and name it for your solution; for example, MyNewSolution.
This branch becomes the next version (v-next) branch for your solution. All development work must be branched from this branch to a developer's personal working branch, and then merged into the v-next branch to push to validation and testing. Later, when a release is ready, the v-next branch can be merged into the main or default branch.
Select New from the top menu, and then select Folder.
Give the new folder the same name as your solution.
Give the new pipeline YAML file a name, such as build-deploy-validation-SampleSolution.yml, build-deploy-test-SampleSolution.yml, or build-deploy-prod-SampleSolution.yml.
Select Create.
Update and save the file
Paste the YAML you copied in step 2 in the previous section into the new pipeline file.
Change the following values in the new pipeline YAML:
Change Resources > Repositories > Name to the name of the repo that contains your pipeline templates.
In this example, the repo is named coe-alm-accelerator-templates and it exists in the same project as the MyNewSolution repo. If your template repository is in a different Azure DevOps project, use the format ProjectName/RepoName. You can also specify a branch for where your templates live using the
refparameter if necessary.Change any value that refers to SampleSolutionName to the unique name of your solution; for example, MyNewSolution.
Select Commit to save your changes.
In Azure DevOps, go to Pipelines, and then select Create a New Pipeline.
Select Azure Repos Git for your code repository.
Select the DevOps repo, which contains the deployment pipeline YAML.
On the Configure your pipeline page, select Existing Azure Pipelines YAML file, point to the YAML file in your repo that you created earlier, and then select Continue.
Select Save, select (…) next to Run Pipeline, and then select Rename/Move.
Change the pipeline name to deploy-validation-MyNewSolution, deploy-test-MyNewSolution, or deploy-prod-MyNewSolution, where MyNewSolution is the name of your solution.
Select Save.
If your new pipeline wasn't created in the repository's default branch: Select Edit on the pipeline. Select (…) in the upper-right corner, and then select Triggers. Select the YAML tab, and then select Get Sources. Change the Default branch for manual and scheduled builds to point to your solution branch. Learn more about how to configure pipeline triggers.
Repeat the preceding steps to create a deployment pipeline for each of your environments, referencing the sample deployment pipeline YAML from the coe-alm-accelerator-templates repo (deploy-validation-SampleSolution.yml, deploy-test-SampleSolution.yml, and deploy-prod-SampleSolution.yml).
Select Save and Queue, and then select Save.
Create the solution deployment pipeline (optional)
As mentioned earlier, the steps in the previous section create pipelines that build and deploy for validation, test, and production environments. However, you can create a separate solution deployment pipeline if you want to build and deploy only for validation and test and then deploy the artifacts from the test build to production.
Follow the steps in this section to create a solution deployment pipeline from the sample pipeline YAML. The following table describes the pipeline configuration.
Important
The pipeline name must be exactly as shown in the following table, with the name of your solution in place of MyNewSolution.
| Pipeline YAML file name | Pipeline name | Branch policy enabled |
|---|---|---|
| deploy-prod-MyNewSolution.yml | deploy-prod-MyNewSolution | No |
In Azure DevOps, go to the repo that contains the pipelines folder you committed and select the Pipelines folder.
Open the sample deployment pipeline deploy-prod-pipelineartifact-SampleSolution.yml, and copy the YAML to use in your new pipeline.
Note the name of the repo for use in your pipeline.
Go to the repo that you want to use for source control for your solution.
Select New from the top menu, and then select File.
Give the new pipeline YAML file a name; for example, deploy-prod-MyNewSolution.yml, where MyNewSolution is the name of your solution.
Select Create.
Paste the YAML you copied in step 2 into the new pipeline file.
Change the following values in the new pipeline YAML:
Change Trigger > Branches > Include to the branches in which changes should trigger a deployment to production.
Change Resources > Repositories > Name to the name of the repo that contains your pipeline templates.
In this example, the repo is named coe-alm-accelerator-templates and it exists in the same project as the MyNewSolution repo. If your template repository is in a different Azure DevOps project, use the format ProjectName/RepoName. You can also specify a branch for where your templates live using the
refparameter if necessary.Update Resources > Pipelines > Source to specify the build pipeline that contains the artifacts this pipeline should deploy. In this case, you're going to deploy the artifacts from the test pipeline you created earlier, which built and deployed your solution to the test environment.
Change any value that refers to SampleSolutionName to the unique name of your solution; for example, MyNewSolution.
Repeat steps 11 through 20 in the previous section for deploy-validation-ALMAcceleratorSampleSolution and deploy-test-ALMAcceleratorSampleSolution, to create a pipeline from the new production pipeline YAML named deploy-prod-ALMAcceleratorSampleSolution.
Set deployment pipeline variables
For each deployment pipeline you configured earlier, you must set the values of the variables EnvironmentName and ServiceConnection based on the environment to which the pipeline deploys. You can also set the EnableFlows variable to turn off Power Automate flows as part of a deployment.
Create environment and service connection variables (required)
Every deployment pipeline requires the environment variable EnvironmentName and the service connection variable ServiceConnection.
EnvironmentNamespecifies the Azure DevOps environment that's being deployed to enable tracking deployment history and set permissions and approvals for deployment to specific environments. Set this value to Validate, Test, or Production, as appropriate.ServiceConnectionspecifies how the deployment pipeline connects to Power Platform. Allowed values are the names of the service connections you created earlier.
Select Edit on each of the deployment pipelines.
Select Variables on the deployment pipeline definition to open the variables editor.
To add a variable, select (+). Enter the name of the variable and the appropriate value.
Repeat these steps to create the EnvironmentName and ServiceConnection variables.
Create the EnableFlows variable (optional)
You may set the value of a pipeline variable named EnableFlows to False to skip the steps that automatically enable Power Automate flows as part of a deployment. The default value of the EnableFlows variable is True.
Set branch policies for pull request validation
Create a branch policy to execute the pipeline you created earlier when a pull request is created.
In Azure DevOps, go to Repos, and then select the Branches folder.
Find the branch for which you want to create the pull request policy. Select (…) to the right of the branch, and then select Branch Policies.
On the Branch Policies page, go to Build Validation.
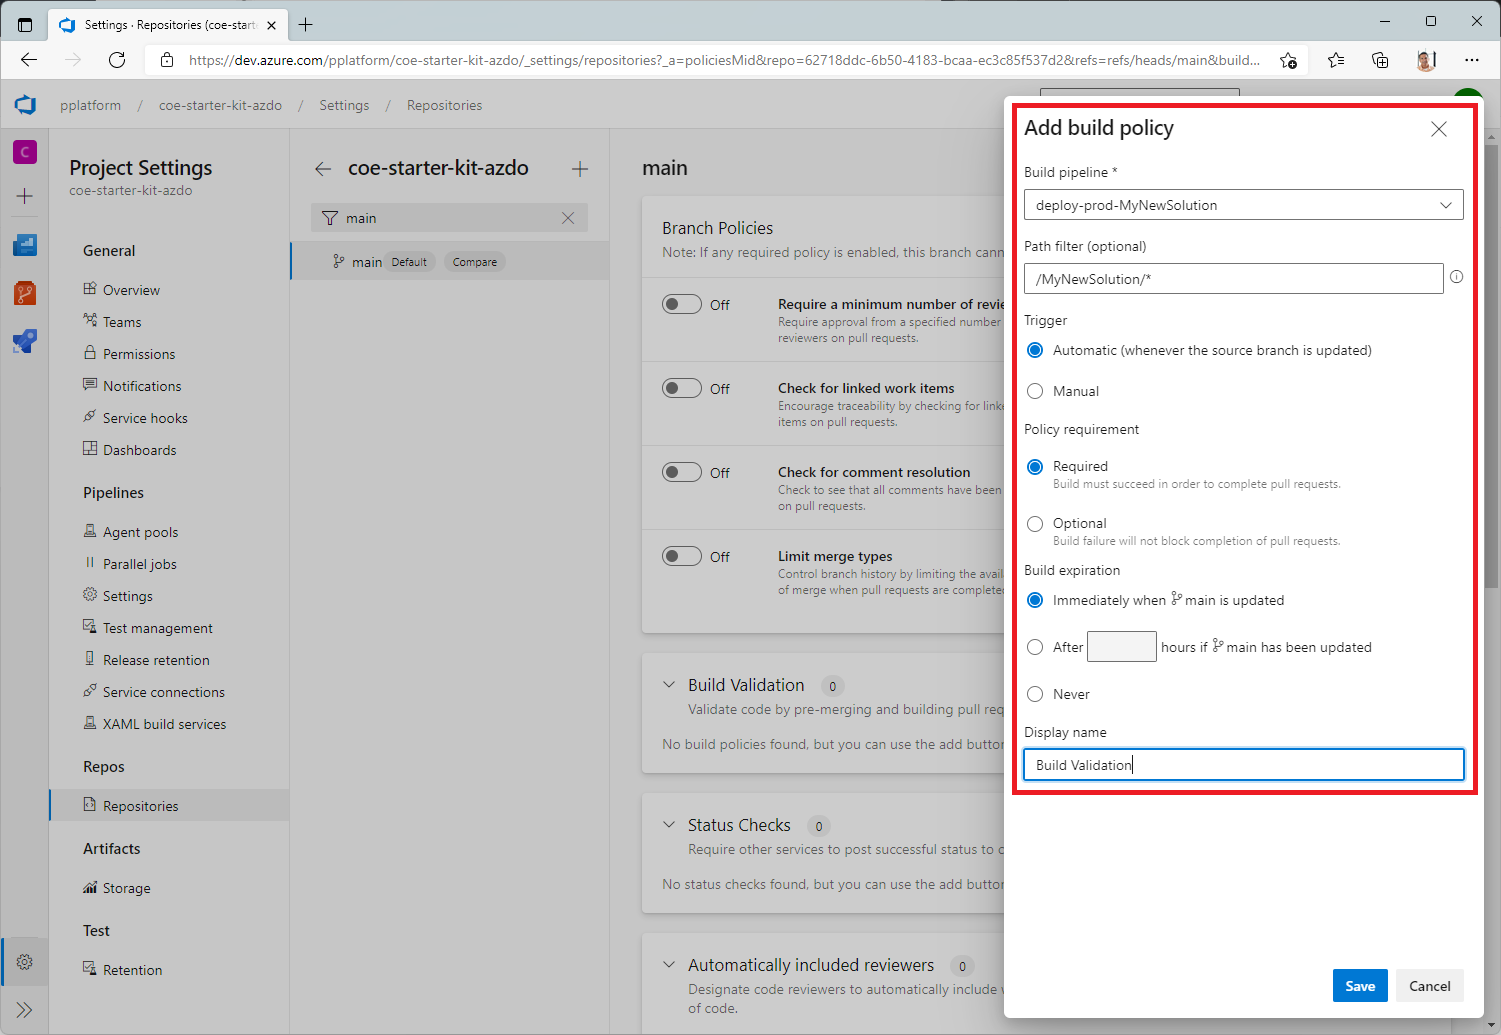
Select + to add a new branch policy.
In the Build pipeline list, select the pipeline you created earlier.
Specify a Path filter if applicable to make sure that only changes to the specified path trigger the pipeline for the pull request.
Set the Trigger to Automatic.
Set the Policy requirement to Required.
Set the Build expiration to Immediately.
Set a Display name for your branch policy; for example, PR Build Validation.
Select Save.
Set resource access permissions for pipelines
Pipelines need access to required resources, such as repositories, variable groups, and service connections, to run. To allow access, you have three options.
Grant access during the first run
You can allow access to a required resource during the pipeline's first run.
- Trigger the pipeline and open the pipeline run in Azure DevOps.
- Select View in the "permission required" banner.
- Select Permit for each required resource.
Give explicit permission
You can give explicit permission for a pipeline to access required repos.
- In Azure DevOps, open Project settings.
- Select Repositories, and then select a repository.
- Select the Security tab.
- Scroll down to Pipeline permissions and select +.
- Select the pipeline that you want to give access to the repository.
You can give explicit permission for a pipeline to access required variable groups.
- In Azure DevOps, select Pipelines > Library, and then select a variable group.
- Select Pipeline permissions.
- Select +, and then select the pipeline that you want to give access to the variable group.
You can give explicit permission for a pipeline to access required service connections.
- In Azure DevOps, open Project settings.
- Select Service Connections, and then select a service connection.
- Select More actions (…), and then select Security.
- Scroll down to Pipeline permissions and select +.
- Select the pipeline that you want to give access to the service connection.
Grant all pipelines access
You can allow all pipelines, both the ones you have now and any you create in the future, to access required repositories.
- In Azure DevOps, open Project settings.
- Select Repositories, and then select a repository.
- Select the Security tab.
- Scroll down to Pipeline permissions.
- Select More actions (…), select Open access, and then confirm when prompted.
You can allow all pipelines to access required variable groups.
- In Azure DevOps, select Pipelines > Library, and then select a variable group.
- Select Pipeline permissions.
- Select More actions (…), select Open access, and then confirm when prompted.
You can allow all pipelines to access required service connections.
- In Azure DevOps, open Project settings.
- Select Service Connections, and then select a service connection.
- Select More actions (…), and then select Security.
- Select a service connection, select the More actions (…), and then select Security.
- Scroll down to Pipeline permissions.
- Select More actions (…), select Open access, and then confirm when prompted.
Set Job authorization scope
Job authorization scope can be set for the entire Azure DevOps organization or for a specific project. Disable the Limit job authorization scope to current project for release pipelines setting, if you choose a different Azure DevOps project to install the templates.
To set job authorization scope at the organization level for all projects
- In Azure DevOps,choose Organization settings > Pipelines > Settings.
- Disable the Limit job authorization scope to current project for release pipelines setting.
Create a deployment configuration (optional)
You need to create several configurations in a target environment after a solution is deployed. These configurations are specific to the environment and include connection references, environment variables, and permissions for Microsoft Entra groups and Dataverse teams, in addition to sharing canvas apps and updating the ownership of solution components such as Power Automate flows. Along with these configurations, a target environment often needs sample or configuration data that's associated with Dataverse tables in the solution to provide a full end-to-end ALM experience.
If your solution requires these other configurations or data, follow the deployment configuration guide to configure your pipelines based on the environments to which you're deploying.
Import the solution and configure the app
Import the ALM Accelerator canvas app into your Power Platform environment, and then configure the included custom connector for Azure DevOps.
Install the ALM Accelerator in Dataverse
The ALM Accelerator solution depends on the Creator Kit. Install the Creator Kit now.
Download the latest managed solution file from GitHub. Scroll down to Assets and select CenterofExcellenceALMAccelerator_<latest version>_managed.zip.
Sign in to Power Apps, and then select the environment you want to host the ALM Accelerator app.
In the left side panel, select Solutions.
Select Import solution > Browse, and then browse to the location of the managed solution you downloaded and select the file.
Select Next, and then select Next again.
On the Connections page, select or create a connection to connect the CDS DevOps connection to Dataverse.
When you create a connection for HTTP with Microsoft Entra, use Microsoft Graph for both parameters.
Select Import.
Configure the DevOps custom connector
Select Data > Custom Connectors > CustomAzureDevOps.
Select Edit. On the Security page, select Edit, and then set the following fields:
Name Value Authentication Type OAuth 2.0 Identity provider Azure Active Directory Client ID The Application (client) ID you copied when you created the app registration Client secret The Application (client) secret value you copied when you created the app registration Tenant ID Leave the default value, common Resource URL The DevOps Application (client) ID you copied when you added permissions to your app registration Redirect URL Autogenerates. If you notice the 'Update to unique redirect URL' checkbox below the 'Redirect URL,' please check the checkbox. Select Update connector.
Add the 'Redirect URL' as 'Redirect URI'
The autogenerated 'Redirect URL' from the above section needs to be added as the 'Redirect URI' to the app registration.
In the left side panel, select Overview.
Select Add a Redirect URI.
Select + Add a Platform, and then select Web.
Under the Redirect URIs textbox, paste the autogenerated 'Redirect URL' copied from the above section.
Select Configure.
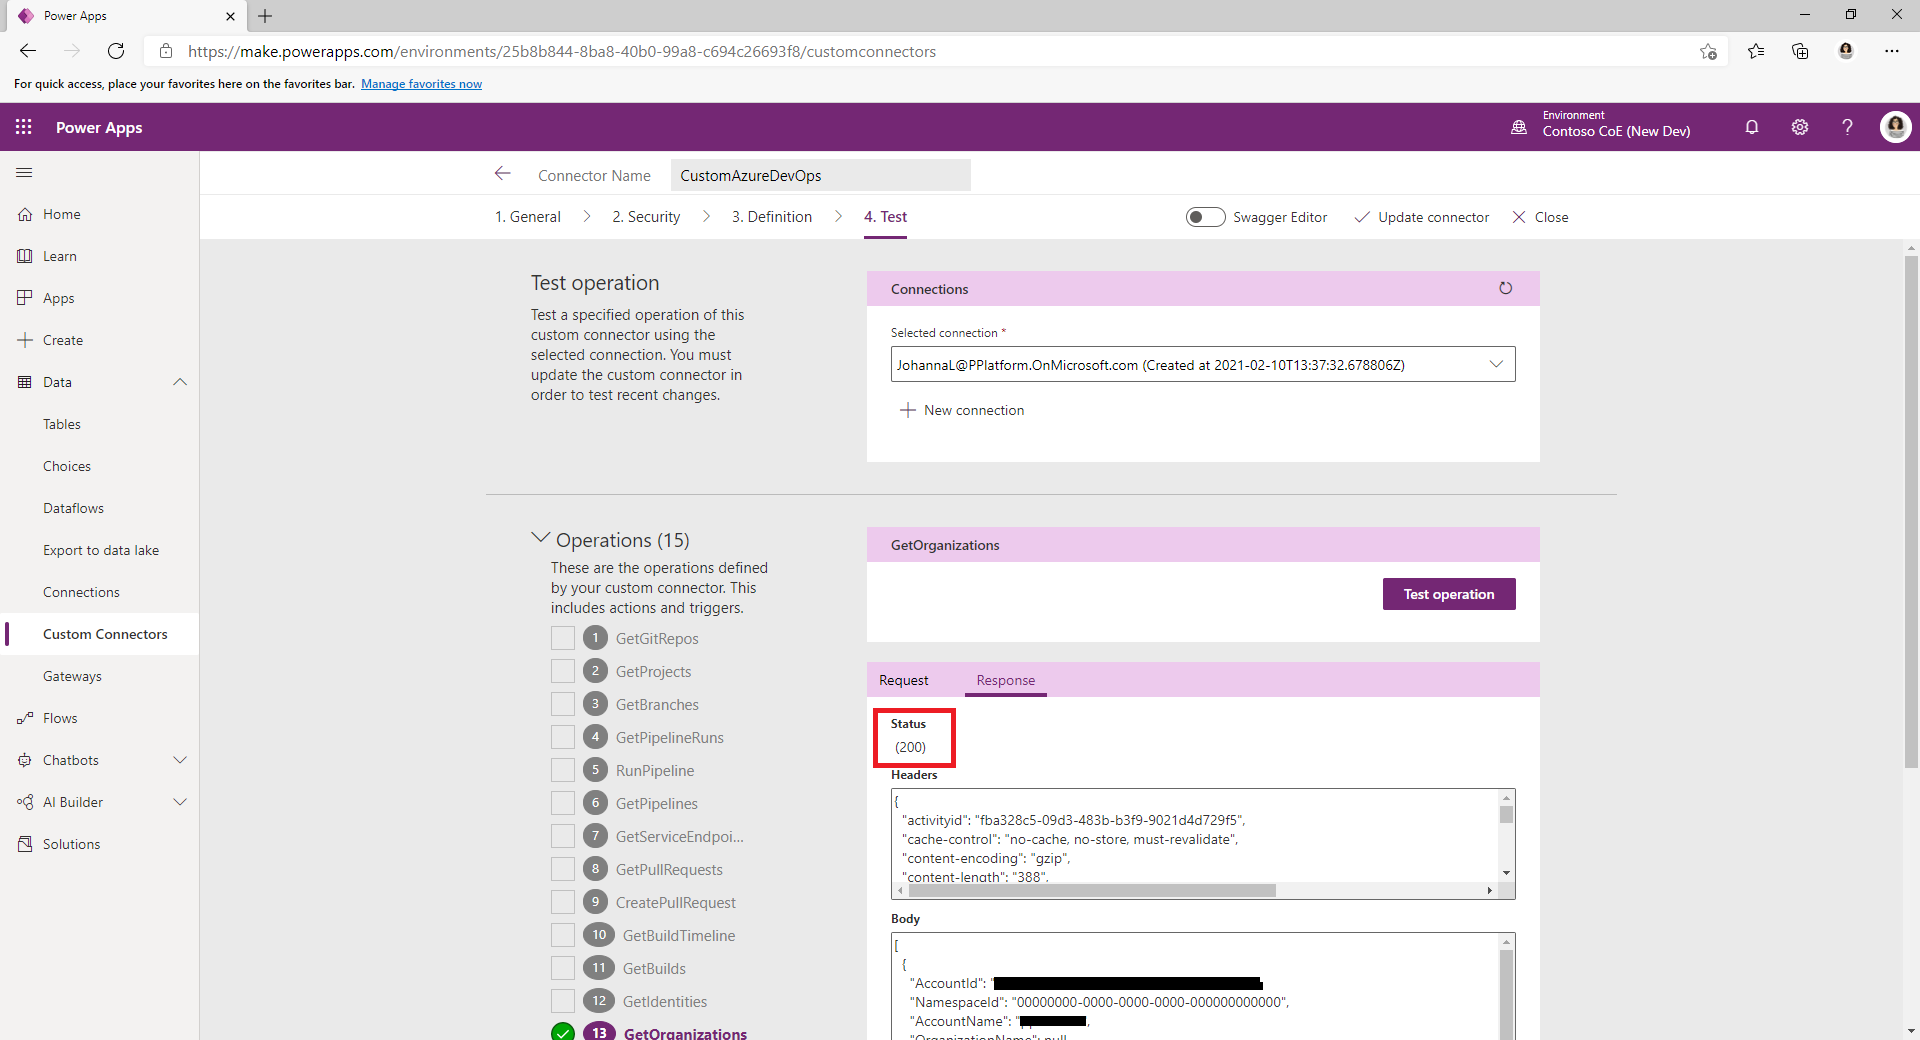
Test the custom connector
Open the Test menu.
Select New Connection, and then follow the prompts to create a connection.
In Power Apps, select your environment, and then select Dataverse > Custom Connectors > CustomAzureDevOps.
Select Edit, go to the Test page, and then find the GetOrganizations operation.
Select Test operation.
Confirm the Response Status returned is 200 and that the Response Body is a JSON representation of your Azure DevOps organization.
Set up makers to use the ALM Accelerator app
Configure user permissions for a maker's account in Dataverse and Azure DevOps.
Configure deployment user settings to set up the app's user experience and grant access to solutions and deployment profiles.