Note
Access to this page requires authorization. You can try signing in or changing directories.
Access to this page requires authorization. You can try changing directories.
Follow the steps in this article to deploy a Microsoft HPC Pack 2019 cluster in Azure virtual machines. HPC Pack is Microsoft's free HPC solution built on Microsoft Azure and Windows Server technologies and supports a wide range of HPC workloads.
Use one of the Azure Resource Manager templates to deploy the HPC Pack 2019 cluster. You have several choices of cluster topology with different numbers and types of cluster head nodes and compute nodes.
Important
All HPC Pack 2016 and 2019 Update 2 and earlier clusters, including Windows-only clusters, must refer to Manage Linux authentication key for HPC Pack to set a Linux authentication key to address the critical vulnerability CVE-2025-21198, immediately after the cluster is deployed via ARM template.
HPC Pack 2019 Update 3 and later clusters can set the authenticationKey parameter of the ARM template in order to set the Linux authentication key during head node and Linux compute node deployment.
Prerequisites
An Azure Key Vault Certificate is required to deploy Microsoft HPC Pack 2019 cluster in Azure. It must be created in the same Azure location where the HPC Pack cluster will be deployed.
The Key Vault must grant access to both Azure Virtual Machines for deployment (corresponding to the enabledForDeployment property) and Azure Resource Manager for template deployment (corresponding to the enabledForTemplateDeployment property). To enable these properties, go to the Key Vault on Azure portal, select Settings -> Access configuration, select these two properties and click Apply.

The certificate will be installed on all the HPC nodes during the deployment, it is used to secure the communication between the HPC nodes. The certificate must meet the following requirements:
- It must have a private key capable of key exchange
- Key usage includes Digital Signature, Key Encipherment, Key Agreement and Certificate Signing
- Enhanced key usage includes Client Authentication and Server Authentication
If you don't have an existing Azure Key Vault certificate which meets the above requirements, you shall either import a PFX certificate file to Azure Key Vault or directly generate a new Azure Key Vault certificate.
Note
Azure Key Vaults has two permission models, Azure role-based access control and Vault access policy. HPC Pack supports both two permission models from HPC Pack 2019 Update 2. If you choose Azure role-based access control, you need Key Vault Administrator role for the Azure Key Vault created.
If you are using pervious version of HPC Pack, you should choose Vault access policy.
For more information about differences between the two models, please see Azure role-based access control (Azure RBAC) vs. access policies (legacy).
Create Azure Key Vault Certificate on Azure Portal
Select an existing Azure key vault or Create a new Azure Key Vault in the location where the HPC Pack cluster will be deployed, make sure to enable access to Azure Virtual Machines for deployment and Azure Resource Manager for template deployment in the Access policies setting. And record the Vault Name, Vault Resource Group.
Click the Azure key vault, choose Settings -> Certificates -> Generate/Import, and following the wizard to generate or import the certificate.
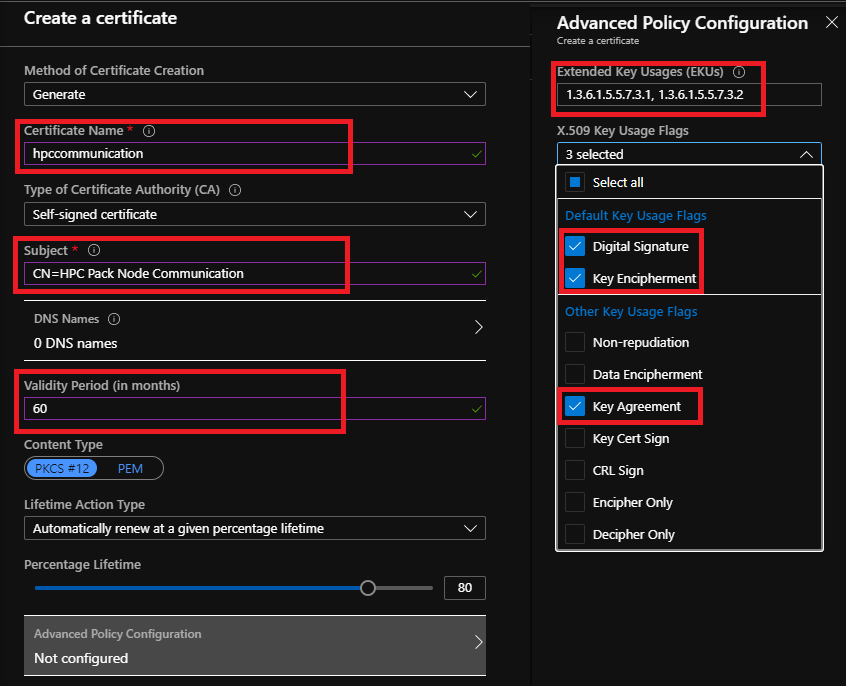
- After the certificate is created, click into the current certificate version, record X.509 SHA-1 Thumbprint as Cert Thumbprint, and Secret Identifier (but not Certificate Identifier) as Certificate URL.
Create Azure Key Vault Certificate with PowerShell
Install Azure PowerShell module on your computer, run the following PowerShell commands to either generate or import an Azure Key Vault Certificate. And record the output Vault Name, Vault Resource Group, Certificate URL, and Cert thumbprint values.
Generate a new self-signed Azure Key Vault certificate:
wget https://raw.githubusercontent.com/Azure/hpcpack-template/master/Scripts/CreateHpcKeyVaultCertificate.ps1
Set-ExecutionPolicy -ExecutionPolicy Bypass -Scope Process
Connect-AzAccount
.\CreateHpcKeyVaultCertificate.ps1 -VaultName <vaultName> -Name <certName> -ResourceGroup <resourceGroupName> -Location <azureLocation> -CommonName "HPCPackNodeCommunication"
Import an existing PFX certificate file to Azure Key Vault
wget https://raw.githubusercontent.com/Azure/hpcpack-template/master/Scripts/CreateHpcKeyVaultCertificate.ps1
Set-ExecutionPolicy -ExecutionPolicy Bypass -Scope Process
Connect-AzAccount
.\CreateHpcKeyVaultCertificate.ps1 -VaultName <vaultName> -Name <certName> -ResourceGroup <resourceGroupName> -Location <azureLocation> -PfxFilePath <filePath>
Supported topologies
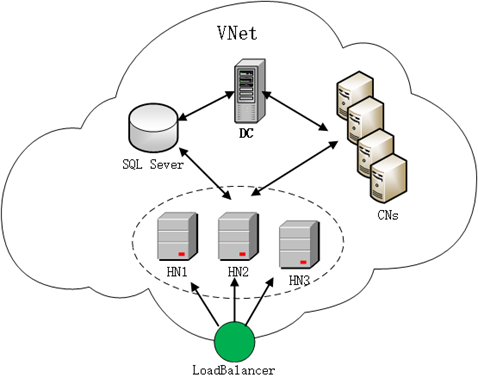
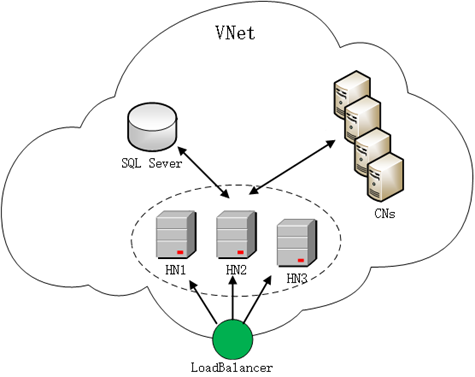
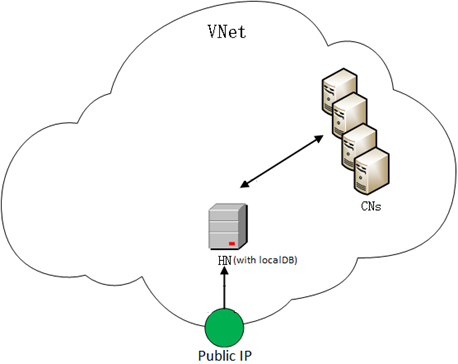
Choose one of the Azure Resource Manager templates to deploy the HPC Pack 2019 cluster. Following are high-level architectures of three example cluster topologies. High-availability topologies include multiple cluster head nodes.
High-availability cluster with Active Directory domain
High-availability cluster without Active Directory domain
Cluster with a single head node
Deploy a new cluster
To create the cluster, choose a template and click Deploy to Azure. In the Azure portal, specify parameters for the template as described in the following steps. Each template creates all Azure resources required for the HPC cluster infrastructure. Resources include an Azure virtual network, public IP address, load balancer (only for a high-availability cluster), network interfaces, availability sets, storage accounts, and virtual machines.
Step 1: Select the subscription, location, and resource group
The Subscription and the Location must be same that you specified when you uploaded your PFX certificate (see Prerequisites). We recommend that you create a different Resource group for the deployment.
Step 2: Specify the parameter settings
Enter or modify values for the template parameters. Click the icon next to each parameter for help information. Also see the guidance for available VM sizes.
Specify the values you recorded in the Prerequisites for the following parameters: Vault Name, Vault Resource Group, Certificate URL, and Certificate Thumbprint.
Step 3. Review terms and create
Review the terms and conditions associated with the template. If you agree, click Purchase to start the deployment.
Depending on the cluster topology, deployment can take 30 minutes or longer to complete.
Connect to the cluster
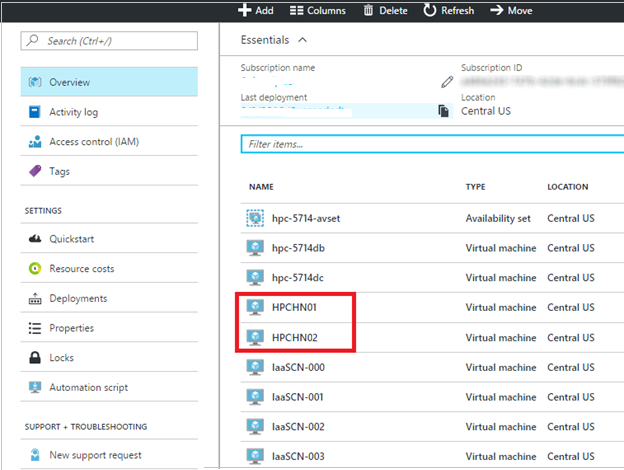
After the HPC Pack cluster is deployed, go to the Azure portal. Click Resource groups, and find the resource group in which the cluster was deployed. You can find the head node virtual machines.
Click one head node (in a high-availability cluster, click any of the head nodes). In Overview, you can find the public IP address or full DNS name of the cluster.
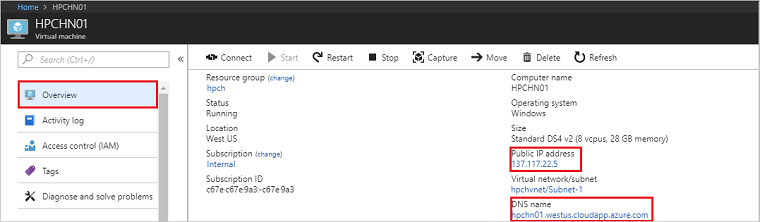
Click Connect to log on to any of the head nodes using Remote Desktop with your specified administrator user name. If the cluster you deployed is in an Active Directory Domain, the user name is of the form <privateDomainName>\<adminUsername> (for example, hpc.local\hpcadmin).
Note
If you want to manage(start/deallocate/restart) the Azure virtual machines for the HPC compute nodes with HPC Cluster Manager, you must configure an Azure Service Principal on the head node. See the prerequisites for Auto grow shrink for cloud resource for more details.
Add new compute nodes
After the HPC Pack cluster is deployed, if you want to add more compute nodes, you can click the link to add.
Next steps
- Submit jobs to your cluster. See Submit jobs to HPC an HPC Pack cluster in Azure and Manage an HPC Pack cluster in Azure using Azure Active Directory.