Note
Access to this page requires authorization. You can try signing in or changing directories.
Access to this page requires authorization. You can try changing directories.
WRF is a numerical calculation software for weather prediction. It has strong support for parallel computing. When built in DM (Distributed-Memory Parallelism) mode, it is essentially an MPI program. In practice, people run WRF in cluster.
This article will show you how to run WRF with HPC Pack, including creating a Linux cluster, building WPS (data preprocessing module of WRF), WRF and its dependent libraries, as well as executing WRF jobs. The node management and job management features of HPC Pack can help you simplify the process and increase efficiency.
Prerequisites
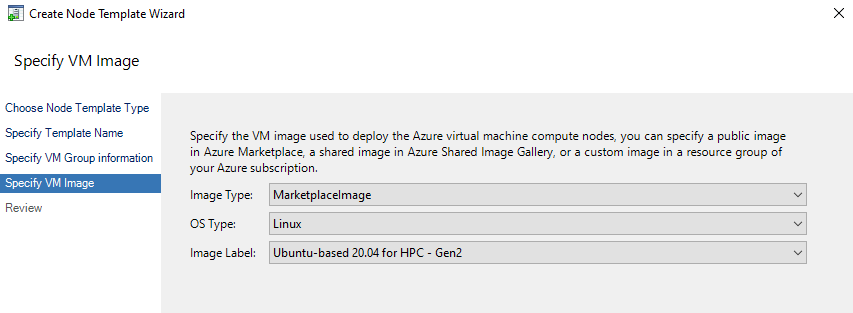
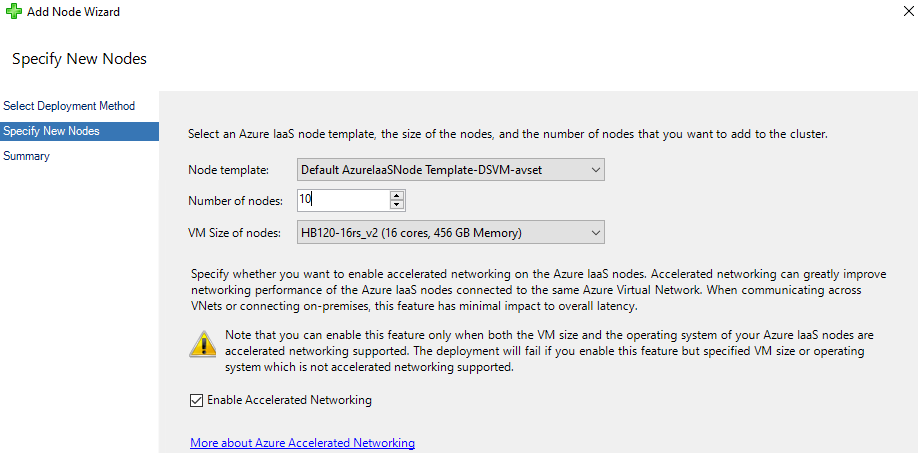
Prepare Linux compute nodes. You can deploy a new Linux cluster with the ARM template, or just add Linux nodes in Cluster Manager of an existing cluster. Notice that if your workloads require RDMA network, you should ensure the VMs are deployed in the same virtual machine scale set or availability set, and the
Compute Node Imageshould be ones with suffixHPCas well as theCompute Node VM Sizeshould be in H-series so that the VM could be RDMA-capable.Option 1: Use Single head node cluster for Linux workloads to deploy a new Linux cluster.
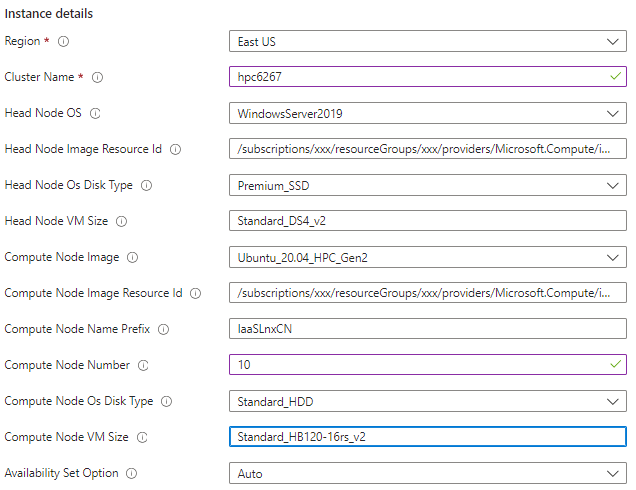
Option2: In the Cluster Manager of an existing cluster, add a new IaaS Node template and add a new node with the template. Note that the cluster can be either a cluster for Windows workloads or Linux workloads.
After deploying the nodes, it is necessary to create a specific group for them. This will be useful in the clusrun commands in the following sections to ensure the commands will not run on not WRF-related nodes. Here we create
WRFNodesfor the newly added nodes.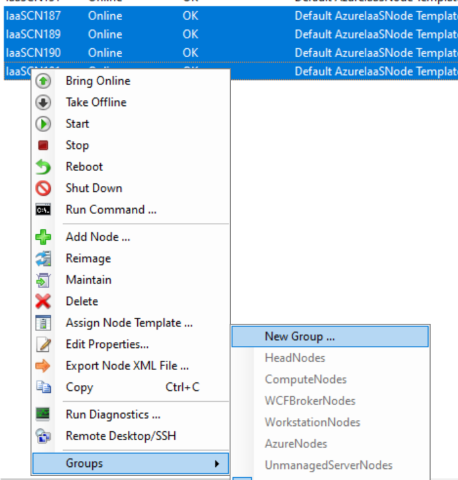
Prepare system environments.You should ensure the systems have a gfortran compiler, as well as gcc and cpp. The script languages csh, perl and sh are also required, since the WRF build system uses scripts written in these languages as the top level for the user interface. The official website of WRF provides tests to verity the compilers are compatible with each other and script languages are working properly on the system.
Make a new folder
WRFModel/Testsunder the home directory, download the test files and run the tests with clusrun.clusrun /nodegroup:WRFNodes "wget https://www2.mmm.ucar.edu/wrf/OnLineTutorial/compile_tutorial/tar_files/Fortran_C_tests.tar; mkdir -p ~/WRFModel/Tests; tar -xf Fortran_C_tests.tar -C ~/WRFModel/Tests;"&&clusrun /nodegroup:WRFNodes "cd ~/WRFModel/Tests;gfortran TEST_1_fortran_only_fixed.f;./a.out;gfortran TEST_2_fortran_only_free.f90;./a.out;gcc TEST_3_c_only.c;./a.out;gcc -c -m64 TEST_4_fortran+c_c.c;gfortran -c -m64 TEST_4_fortran+c_f.f90;gfortran -m64 TEST_4_fortran+c_f.o TEST_4_fortran+c_c.o;./a.out;./TEST_csh.csh;./TEST_perl.pl;./TEST_sh.sh;"
Download and build WRF
Set environment variables
Before compiling WRF or any libraries, it is necessary to set these makefile compiler options.
Name Value CC gcc CXX g++ FC gfortran FCFLAGS -m64 F77 gfortran FFLAGS -m64 Create a new folder
WRFModel/Build_WRF/Librariesunder home directory and use it as the parent directory that contains the locations in which different libraries will be installed. Set its value as an environment variableDIR.Use clusrun to achieve all above.
clusrun /nodegroup:WRFNodes "mkdir -p ~/WRFModel/Build_WRF/LIBRARIES;sed -i '$a export DIR=~/WRFModel/Build_WRF/LIBRARIES \nexport CC=gcc \nexport CXX=g++ \nexport FC=gfortran \nexport FCFLAGS=-m64 \nexport F77=gfortran \nexport FFLAGS=-m64' ~/.profile;source ~/.profile"
Download and compile MPICH
In principle, any implementation of the MPI-2 standard should work with WRF's distributed-memory parallelism mode. However, MPICH is which WRF's official website recommends. You need to download and build MPICH, then add the
binfolder of MPICH toPATH.Use clusrun to achieve all above.
clusrun /nodegroup:WRFNodes "cd ~/WRFModel/Build_WRF/LIBRARIES;wget https://www2.mmm.ucar.edu/wrf/OnLineTutorial/compile_tutorial/tar_files/mpich-3.0.4.tar.gz; tar xzvf mpich-3.0.4.tar.gz;cd mpich-3.0.4;./configure --prefix=`echo $(dirname $PWD)`/mpich;make;make install;sed -i '$a export PATH=$DIR/mpich/bin:$PATH' ~/.profile;source ~/.profile"
Download and compile libraries
Before compiling WRF, there are various dependent libraries that should be installed.
NetCDFis used as the fundamental of array computations.zlib,libpngandJasperare compression libraries necessary for compiling WPS with GRIB2 capability.Download and compile
NetCDF. Then add itsbinfolder toPATH, and add environment variablesNETCDF. Use clusrun to achieve these.clusrun /nodegroup:WRFNodes "cd ~/WRFModel/Build_WRF/LIBRARIES;wget https://www2.mmm.ucar.edu/wrf/OnLineTutorial/compile_tutorial/tar_files/netcdf-4.1.3.tar.gz; tar zxvf netcdf-4.1.3.tar.gz;cd netcdf-4.1.3;./configure --prefix=`echo $(dirname $PWD)`/netcdf --disable-dap --disable-netcdf-4 --disable-shared;make;make install;sed -i '$a export PATH=$DIR/netcdf/bin:$PATH \nexport NETCDF=$DIR/netcdf' ~/.profile;source ~/.profile"Download and compile
zlib. Then set makefile compiler optionsLDFLAGSandCPPFLAGS. Use clusrun to achieve these.clusrun /nodegroup:WRFNodes "cd ~/WRFModel/Build_WRF/LIBRARIES;wget https://www2.mmm.ucar.edu/wrf/OnLineTutorial/compile_tutorial/tar_files/zlib-1.2.11.tar.gz; tar xzvf zlib-1.2.11.tar.gz;cd zlib-1.2.11;./configure --prefix=`echo $(dirname $PWD)`/grib2;make;make install;sed -i '$a export LDFLAGS=-L$DIR/grib2/lib \nexport CPPFLAGS=-I$DIR/grib2/include \nexport LD_LIBRARY_PATH=$DIR/grib2/lib:$LD_LIBRARY_PATH ' ~/.profile;source ~/.profile"Download and compile
libpngwith clusrun.clusrun /nodegroup:WRFNodes "cd ~/WRFModel/Build_WRF/LIBRARIES;wget https://www2.mmm.ucar.edu/wrf/OnLineTutorial/compile_tutorial/tar_files/libpng-1.2.50.tar.gz; tar xzvf libpng-1.2.50.tar.gz;cd libpng-1.2.50;./configure --prefix=`echo $(dirname $PWD)`/grib2;make;make install;"Download and compile
Jasper. Then add environment variablesJASPERLIBandJASPERINC=correspondingly. Use clusrun to achieve these.clusrun /nodegroup:WRFNodes "cd ~/WRFModel/Build_WRF/LIBRARIES;wget https://www2.mmm.ucar.edu/wrf/OnLineTutorial/compile_tutorial/tar_files/jasper-1.900.1.tar.gz; tar xzvf jasper-1.900.1.tar.gz;cd jasper-1.900.1;./configure --prefix=`echo $(dirname $PWD)`/grib2;make;make install;sed -i '$a export JASPERLIB=$DIR/grib2/lib \nexport JASPERINC=$DIR/grib2/include' ~/.profile;source ~/.profile"Once the libraries are constructed, you need to verify that the libraries are able to work with the compilers that are to be used for the WPS and WRF builds. Use the tests provided by WRF's website.
clusrun /nodegroup:WRFNodes "wget https://www2.mmm.ucar.edu/wrf/OnLineTutorial/compile_tutorial/tar_files/Fortran_C_NETCDF_MPI_tests.tar; tar -xf Fortran_C_NETCDF_MPI_tests.tar -C ~/WRFModel/Tests;"&&clusrun /nodegroup:WRFNodes "source ~/.profile;cd ~/WRFModel/Tests;cp ~/WRFModel/Build_WRF/LIBRARIES/netcdf/include/netcdf.inc .;gfortran -c 01_fortran+c+netcdf_f.f;gcc -c 01_fortran+c+netcdf_c.c;gfortran 01_fortran+c+netcdf_f.o 01_fortran+c+netcdf_c.o -L ~/WRFModel/Build_WRF/LIBRARIES/netcdf/lib -lnetcdff -lnetcdf;./a.out;mpif90 -c 02_fortran+c+netcdf+mpi_f.f;mpicc -c 02_fortran+c+netcdf+mpi_c.c;mpif90 02_fortran+c+netcdf+mpi_f.o 02_fortran+c+netcdf+mpi_c.o -L ~/WRFModel/Build_WRF/LIBRARIES/netcdf/lib -lnetcdff -lnetcdf;mpirun ./a.out"
Download and compile WRF and WPS
Under
Build_WRF, clone the source code of WRF and WPS from Github.clusrun /nodegroup:WRFNodes "cd ~/WRFModel/Build_WRF;git clone https://github.com/wrf-model/WRF;git clone https://github.com/wrf-model/WPS"Compile WRF. Before compiling, you need to configure the compilers used and the way you wish to build WRF. Because we will build WRF in DM mode, please choose option 34 (gfortran compiler with gcc(dmpar)) and the nesting option should be "basic".
WRF adopts interactive mode in the configuration, so login to the node over SSH (Cluster Manager -> Resource Management -> Node Actions -> Remote Desktop/SSH) and manually run the configuration program and compile.
source ~/.profile;
cd ~/WRFModel/Build_WRF/WRF;
./configure #Here, you choose the compile option you want
./compile em_real >& log.compile #The compilation should take about 20-30 minutes
Check whether the compilation is successful by running
ls -ls main/*.exe, you should see:wrf.exe real.exe ndown.exe tc.exeCompile WPS. Again, you need to configure the compilers. Please choose option 1 (serial, recommended by WRF official website). WPS are less CPU-intensive and can be run as a single processor job.
Login to the node over SSH, run the configuration program and compile.
source ~/.profile;
cd ~/WRFModel/Build_WRF/WPS;
./configure #Here, you choose the compile option you want
./compile >& log.compile #The compilation should take a few minutes
If the compilation is successful, there should be 3 executables in the WPS top-level directory.
geogrid.exe -> geogrid/src/geogrid.exe
ngrib.exe -> ungrib/src/ungrib.exe
metgrid.exe -> metgrid/src/metgrid.exe
Run WRF workloads
Prepare sample data for WRF job
In this article, we use Hurricane Matthew's single domain case. For more information about the background, see this link.
Download the static geography data and Real time data. Although you can download the sample data on each node by
clusrun, to save network bandwidth, we recommend you to perform download on only one node, configure a NFS cluster and shared the data through NFS service.On server side:
Download data:
mkdir -p ~/WRFModel/Build_WRF/DATA;
cd ~/WRFModel/Build_WRF/DATA;
wget https://www2.mmm.ucar.edu/wrf/src/wps_files/geog_high_res_mandatory.tar.gz; #Static geography data
tar -xzvf geog_high_res_mandatory.tar.gz
wget https://www2.mmm.ucar.edu/wrf/TUTORIAL_DATA/matthew_1deg.tar.gz #Real time data
tar -xf matthew_1deg.tar.gz
Run
sudo apt install nfs-kernel-serverto install nfs server. Then check the status of the service bysudo systemctl status nfs-server. If the service is active, modify/etc/exportsto config which clients are allowed to access the shared folderDATA./home/hpcadmin/WRFModel/Build_WRF/DATA [client hostname1](rw,sync,no_subtree_check) ... /home/hpcadmin/WRFModel/Build_WRF/DATA [client hostnamen](rw,sync,no_subtree_check)Run
sudo exportfs -arvto make the changes effective andshowmount -eto check the exporting list.On client side:
Install nfs client, mount the shared folder and add a line to
/etc/fstabto automatically mount the shared folder when your Linux system starts up. Create a node groupWRF-NFSClientsfor the nodes and use clusrun to achieve all.clusrun /nodegroup:WRF-NFSClients "sudo apt install nfs-common -y;mkdir -p ~/WRFModel/Build_WRF/DATA;cd ~/WRFModel/Build_WRF;sudo mount [server hostname]:/home/hpcadmin/WRFModel/Build_WRF/DATA DATA;sudo sed -i '$a [server hostname]:/home/hpcadmin/WRFModel/Build_WRF/DATA /home/hpcadmin/WRFModel/Build_WRF/DATA nfs defaults,_netdev 0 0' /etc/fstab"
Note
- Please avoid using SMB share directory in WRF workload since the static geography data contains subfolders named "CON", which is one of Windows reserved file names.
- In this demo, we download the data to
DATAdirectory of one node, which is at the same level as yourWPSandWRFdirectories. For your work, please choose an appropriate NFS server node and directory based on your needs, and ensure there is enough left space under the directory. The size of static geography data is 29G. The OS disk of HBv2 series is 64G, and the sizes of temporary data disks are 480 + 960G. If you need to download the data to OS disk, you can expand virtual hard disks attached to a Windows virtual machine.
Use clusrun to set environment variable
WRFDATADIRfor your data directory.clusrun /nodegroup:WRFNodes "sed -i '$a export WRFDATADIR=~/WRFModel/Build_WRF/DATA' ~/.profile;source ~/.profile"
Edit setting files
WPS and WRF make use of various variables to define the data format, the time and space scope of the computation, etc. For detailed explanations of all the variables, see these links: WPS, WRF.
The following table lists how to Modify WPS's setting file namelist.wps to make it fit our case study. Note that for the variables having multiple values, you are able to only modify the first one since in single domain case we only care about the first domain.
| Variable name | Default value | New value |
|---|---|---|
| max_dom | 2 | 1 |
| start_date | '2019-09-04_12:00:00','2019-09-04_12:00:00' | '2016-10-06_00:00:00' |
| end_date | '2019-09-06_12:00:00','2019-09-04_12:00:00' | '2016-10-08_00:00:00' |
| interval_seconds | 10800 | 21600 |
| e_we | 150,220 | 91 |
| e_sn | 130,214 | 100 |
| dx | 15000 | 27000 |
| dy | 15000 | 27000 |
| map_proj | 'lambert' | 'mercator' |
| ref_lat | 33.00 | 28.00 |
| ref_lon | -79.00 | -75.00 |
| stand_lon | -79.00 | -75.00 |
| geog_data_path | '/glade/work/wrfhelp/WPS_GEOG/' | '$WRFDATADIR/WPS_GEOG' |
Use clusrun to do the modification. You can also upload your own settings files, download it to the node and replace the default setting file.
clusrun /nodegroup:WRFNodes "source ~/.profile;sed -i -e 's/max_dom = 2/max_dom = 1/g' -e 's/2019-09-04_12:00:00/2016-10-06_00:00:00/g' -e 's/2019-09-06_00:00:00/2016-10-08_00:00:00/g' -e 's/interval_seconds = 10800/interval_seconds = 21600/g' -e 's/e_we = 150, 220/e_we = 91/g' -e 's/e_sn = 130, 214/e_sn = 100/g' -e 's/dx = 15000/dx = 27000/g' -e 's/dy = 15000/dy = 27000/g' -e """s/map_proj = 'lambert'/map_proj = 'mercator'/g""" -e 's/ref_lat = 33.00/ref_lat = 28.00/g' -e 's/ref_lon = -79.00/ref_lon = -75.00/g' -e 's/stand_lon = -79.0/stand_lon = -75.0/g' -e """s#/glade/work/wrfhelp/WPS_GEOG/#$WRFDATADIR/WPS_GEOG#g""" ~/WRFModel/Build_WRF/WPS/namelist.wps;"
The following table lists how to Modify WRF's setting file namelist.input to make it fit our case study. Note that for the variables having multiple values, you are able to only modify the first one since in single domain case we only care about the first domain.
| Variable name | Default value | New value |
|---|---|---|
| run_hours | 36 | 48 |
| start_year | 2019,2019 | 2016 |
| start_month | 09,09 | 10 |
| start_day | 04,04 | 06 |
| start_hour | 12,12 | 00 |
| end_year | 2019,2019 | 2016 |
| end_month | 09,09 | 10 |
| end_day | 06,06 | 08 |
| interval_seconds | 10800 | 21600 |
| history_interval | 60,60 | 180 |
| restart_interval | 7200 | 1440 |
| time_step | 90 | 150 |
| max_dom | 2 | 1 |
| e_we | 150,220 | 91 |
| e_sn | 130,214 | 100 |
| num_metgrid_levels | 34 | 32 |
| dx | 15000 | 27000 |
| dy | 15000 | 27000 |
Use clusrun to do the modification. You can also upload your own settings files, download it to the node and replace the default setting file.
clusrun /nodegroup:WRFNodes "sed -i -e 's/max_dom = 2/max_dom = 1/g' -e 's/run_hours = 36/run_hours = 48/g' -e 's/start_year = 2019, 2019/start_year = 2016/g' -e 's/start_month = 09, 09/start_month = 10/g' -e 's/start_day = 04, 04/start_day = 06/g' -e 's/start_hour = 12, 12/start_hour = 00/g' -e 's/end_year = 2019, 2019/end_year = 2016/g' -e 's/end_month = 09, 09/end_month = 10/g' -e 's/end_day = 06, 06/end_day = 08/g' -e 's/interval_seconds = 10800/interval_seconds = 21600/g' -e 's/history_interval = 60, 60/history_interval = 180/g' -e 's/restart_interval = 7200/restart_interval = 1440/g' -e 's/time_step = 90/time_step = 150/g' -e 's/max_dom = 2/max_dom = 1/g' -e 's/e_we = 150, 220/e_we = 91/g' -e 's/e_sn = 130, 214/e_sn = 100/g' -e 's/num_metgrid_levels = 34/num_metgrid_levels = 32/g' -e 's/dx = 15000/dx = 27000/g' -e 's/dy = 15000/dy = 27000/g' ~/WRFModel/Build_WRF/WRF/test/em_real/namelist.input"
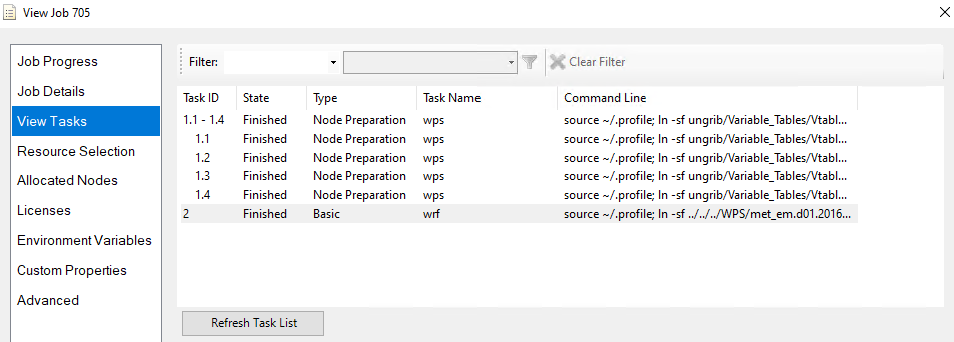
Create jobs to do the simulation
Create a job and add 2 tasks with dependence.
| Task ID | Task name | Type | Nodes | Cores | Workdir | Command |
|---|---|---|---|---|---|---|
| 1 | wps | NodePrep | N/A | N/A | source ~/.profile; ln -sf ungrib/Variable_Tables/Vtable.GFS Vtable; ./link_grib.csh $WRFDATADIR/matthew/fnl; ./ungrib.exe; ./geogrid.exe; ./metgrid.exe |
~/WRFModel/Build_WRF/WPS /name:wps |
| 2 | wrf | Basic | 4 | 64 | source ~/.profile; ln -sf ../../../WPS/met_em.d01.2016-10* .; mpirun -iface ib0 -np %CORE_NUMBER% -f $CCP_MPI_HOSTFILE ./real.exe; mpirun -iface ib0 -np %CORE_NUMBER% -f $CCP_MPI_HOSTFILE ./wrf.exe; mkdir -p $WRFDATADIR/results/matthew; cp wrfout_d01_2016-10-0* $WRFDATADIR/results/matthew; cp wrfrst_d01_2016-10-0* $WRFDATADIR/results/matthew; |
~/WRFModel/Build_WRF/WRF/test/em_real |
In task1, we handle the data preprocessing task by running WPS's three submodules: ungrib, geogrid and metgrid. Since the preprocessing result is the input of WRF simulation, it should exist at each node participating WRF job. So we add the tasks as node preparation task to make it execulated on each node.

In task2, we run the MPI programs real.exe and wrf.exe to perform the parallel computations and copy the output files to the
results/matthewfolder underDATAshared folder. In thempiruncommand-ifacespecifies the network interface to be used for communication between the processes.-npspecifies how mamy processes the MPI program run among. In this demo, we use 64 processes, that is, every core of the required nodes.-fspecifies the file name which contains node list. See this for information of$CCP_MPI_HOSTFILE.
Achieve all above with commands:
set NODE_NUMBER=4
set CORE_NUMBER=64
job new /numnodes:%NODE_NUMBER%
job add !! /workdir:~/WRFModel/Build_WRF/WPS /name:wps /type:NodePrep "source ~/.profile; ln -sf ungrib/Variable_Tables/Vtable.GFS Vtable; ./link_grib.csh ../DATA/matthew/fnl; ./ungrib.exe; ./geogrid.exe; ./metgrid.exe"
job add !! /workdir:~/WRFModel/Build_WRF/WRF/test/em_real /name:wrf /numnodes:%NODE_NUMBER% /requirednodes:[nodelist] "source ~/.profile; ln -sf ../../../WPS/met_em.d01.2016-10* .; mpirun -iface ib0 -np %CORE_NUMBER% -f $CCP_MPI_HOSTFILE ./real.exe; mpirun -iface ib0 -np %CORE_NUMBER% -f $CCP_MPI_HOSTFILE ./wrf.exe; mkdir -p $WRFDATADIR/results/matthew; cp wrfout_d01_2016-10-0* $WRFDATADIR/results/matthew"
job submit /id:!! /jobname:WRF
Get result
Check job result in HPC Pack 2019 Cluster Manager
The simulation results are generated as "wrfout" files under
/home/hpcadmin/WRFModel/Build_WRF/DATA/results/matthew, which can be visualized with NCL or python. Under the same folder there are "wrfrst" files which can be used for restart the simulation, more information about simulation restart please see this.